• stem+node ceramics
  • HOME
  • Food Recipes
  • About
  • Contact
Menu

The Lovely Crazy

Street Address
City, State, Zip
Phone Number

Your Custom Text Here

The Lovely Crazy

  • stem+node ceramics
  • HOME
  • Food Recipes
  • About
  • Contact

Spaghetti Squash with Roasted Beet Sauce

February 13, 2016 Colleen Stem
IMG_9270.jpg
IMG_9264.jpg

Are you ready for this weekend? You know what's coming right? Yup, another arctic blast. -30 degree temperatures, windchill warnings and local news forecasters warning of dangerously cold conditions. "Don't go outside , your face will freeze off"

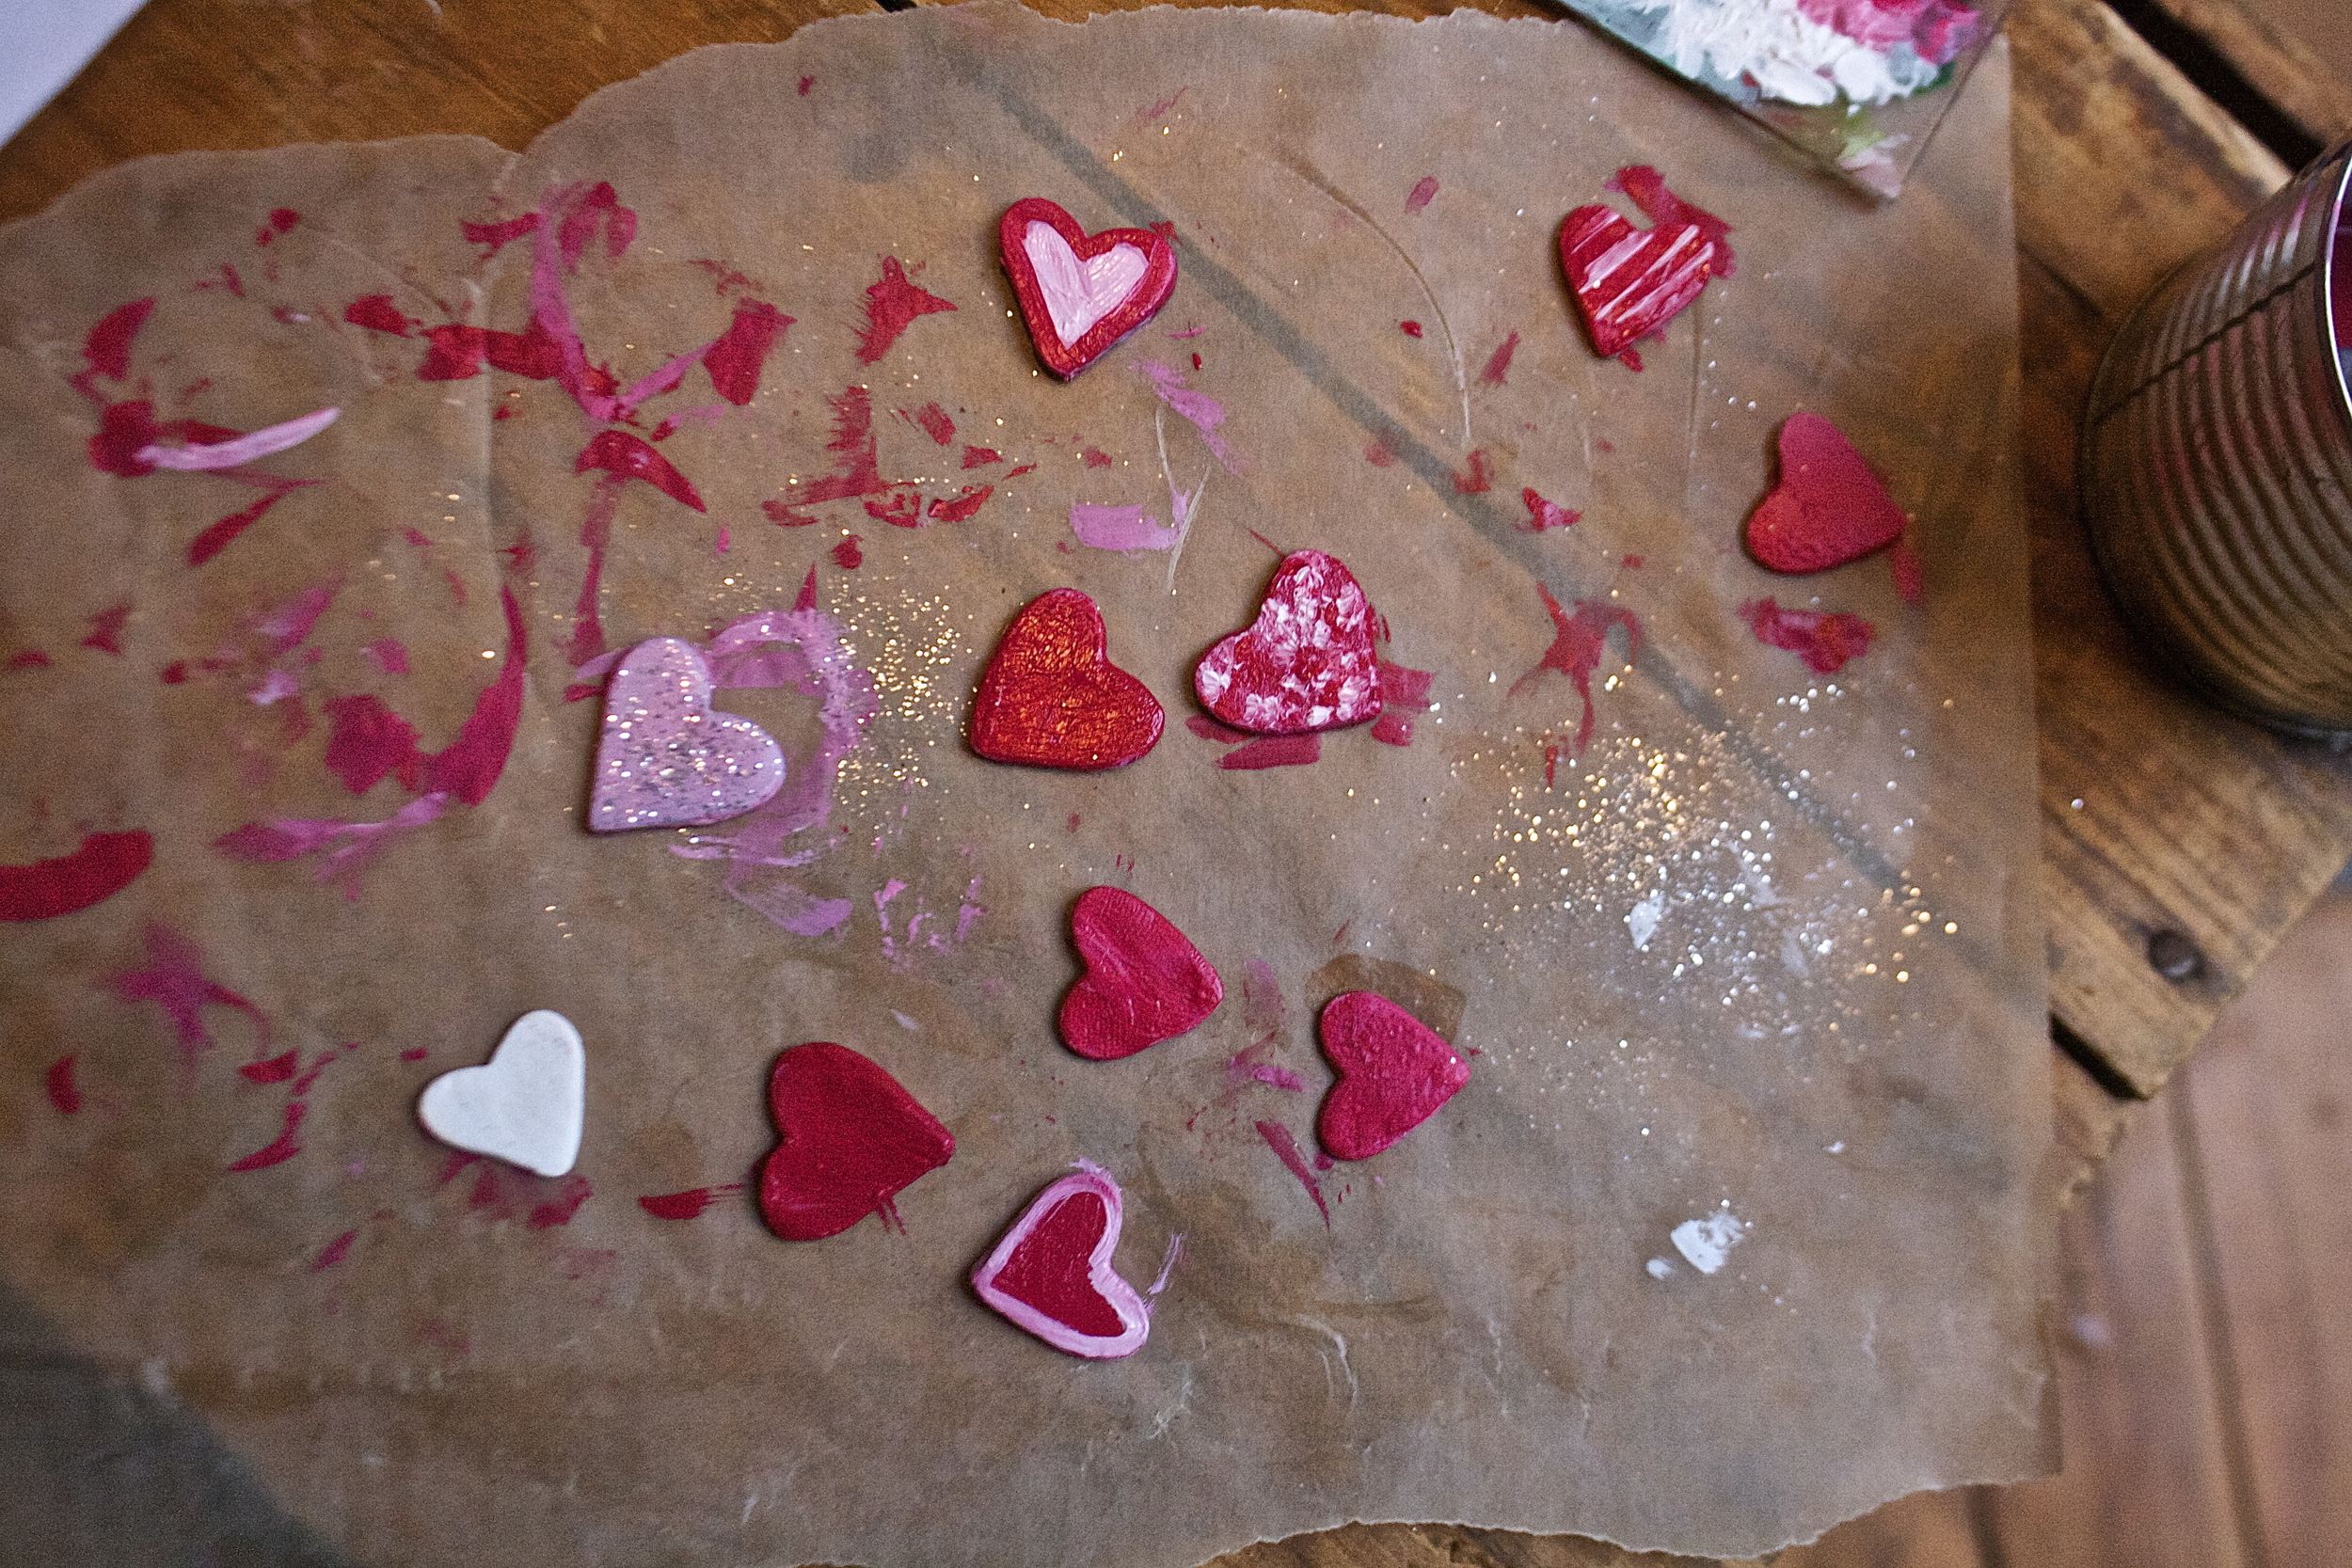
Oh yeah, and Valentine Day.

What are your thoughts on the V day? The mr and I, well we could kind of care less, but at the same time, we like the excuse to spend the day together, traditionally going for a hike with the pup (not this year... we would die) and just spending the day together being sweet (pretty much the same way we spend any days off together) We don't get fancy with dinner dates or overly large stuffed animals. No boxes of chocolate, bottles of champagne or fancy undies.  We keep it caj, maybe a sweet hand made card covered in glitter (never a store bought.) a stop for a good cup of coffee and an afternoon trip to the plant store to by a new pretty house plant (1. I really hate red roses and 2. I would much rather get a house plant then flowers that will die) But honesty, we just use V day as an excuse to not work and spend the day together, being left alone, eating whatever we want and doing whatever fun stuff we want.

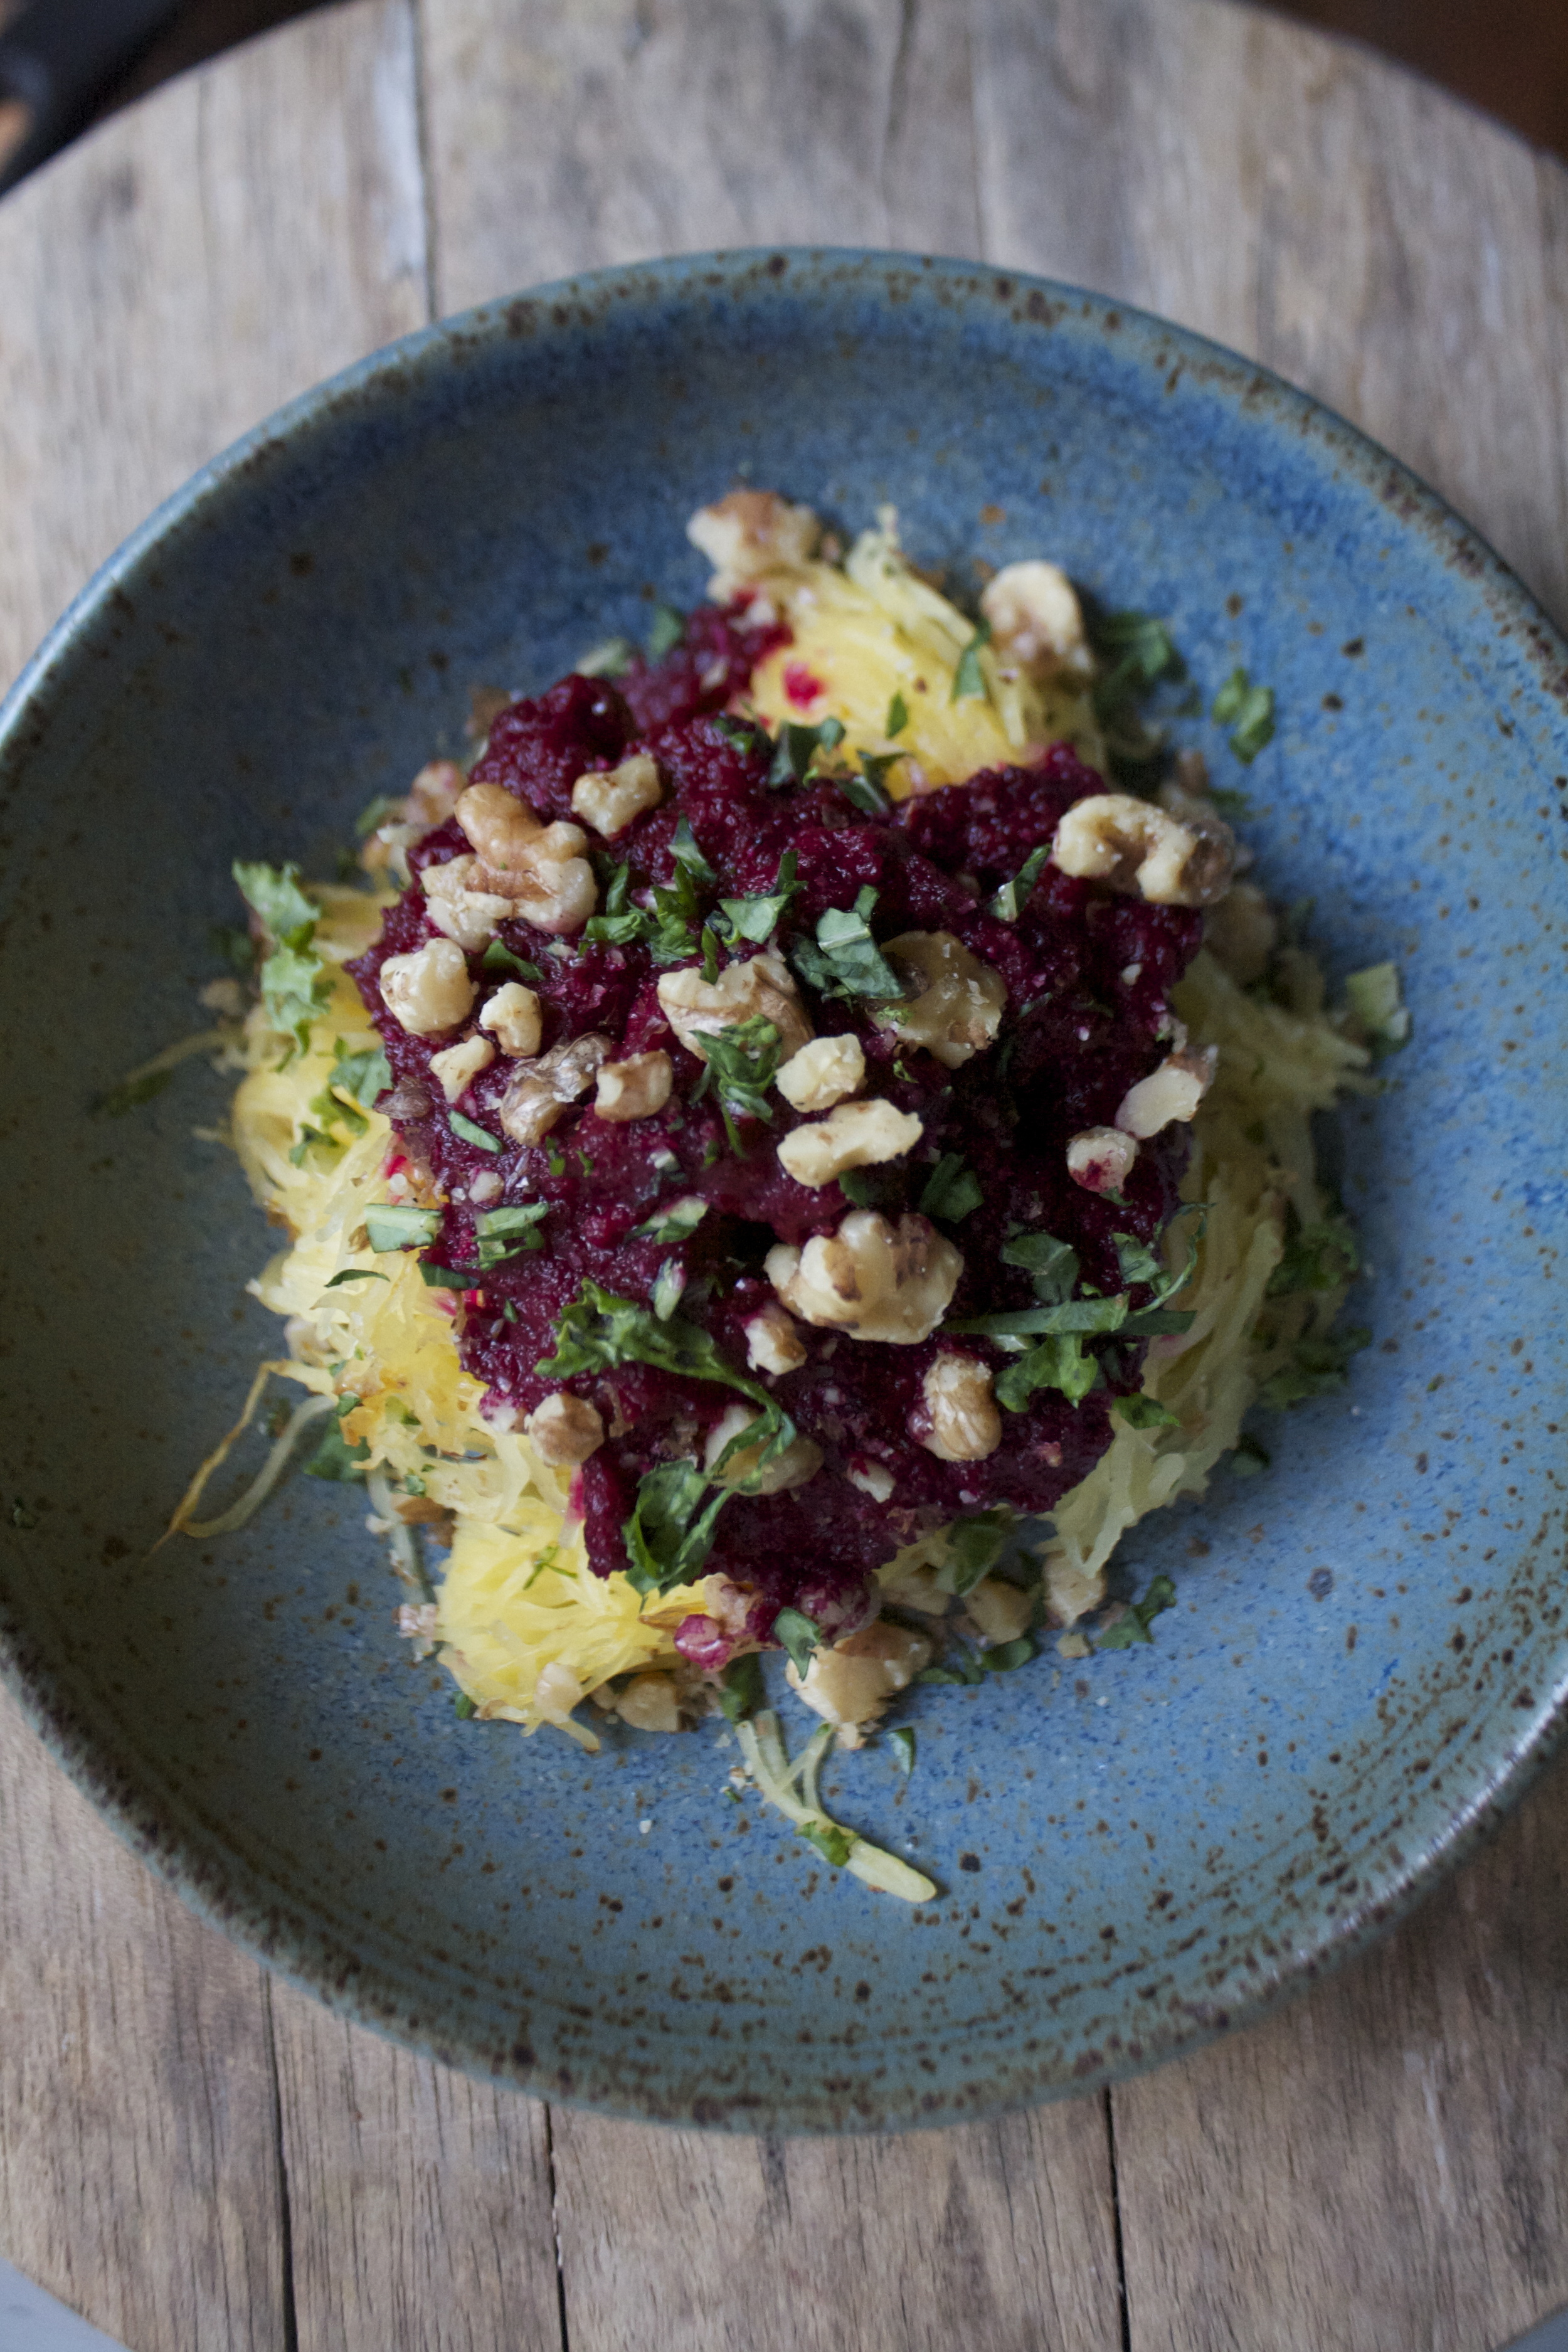
This dish was kinda inspired by being so pretty bright pink, but also it was just what I wanted to eat for dinner. Spaghetti squash doesn't get as much play as it should. Sure it's not the most sweet and nutty of the squashes, but it has a really nice subtle flavor that makes it a fantastic base for pretty much anything. And the beet sauce. Again, it's such a pretty color, but beside that, I can't get enough of them. I love me some roasted beets (way better then any chocolate or sweet treat)

I could lie to you and say that this is the dish that I will be making for me and the mr on Valentines day, but no,this dish already happened this week and the mr got into it, but would rather eat his favorite meal (pizza) for dinner.  And I will be eating the left over beet sauce with carrot sticks (this beet sauce id for real.. topped with a little yellow mustard... I could eat it for life)  then make a hugmongo batch of popcorn covered in peanut butter. We wiil sit on he couch and watch a lot of Netflix (still working my way through the fresh prince) and maybe a cute Wes Anderson movie. I will be in bed by 9.

But don't mind us old folks here. Go for it. Do up the Valentines Day. Make a pretty dish of food for your sweetheart, or if alone, make it for yourself, especiallyif you are hanging by your lonesome. Valentinesday is about being happy and this dish will make you happy, whether or not you plan on sharing it.

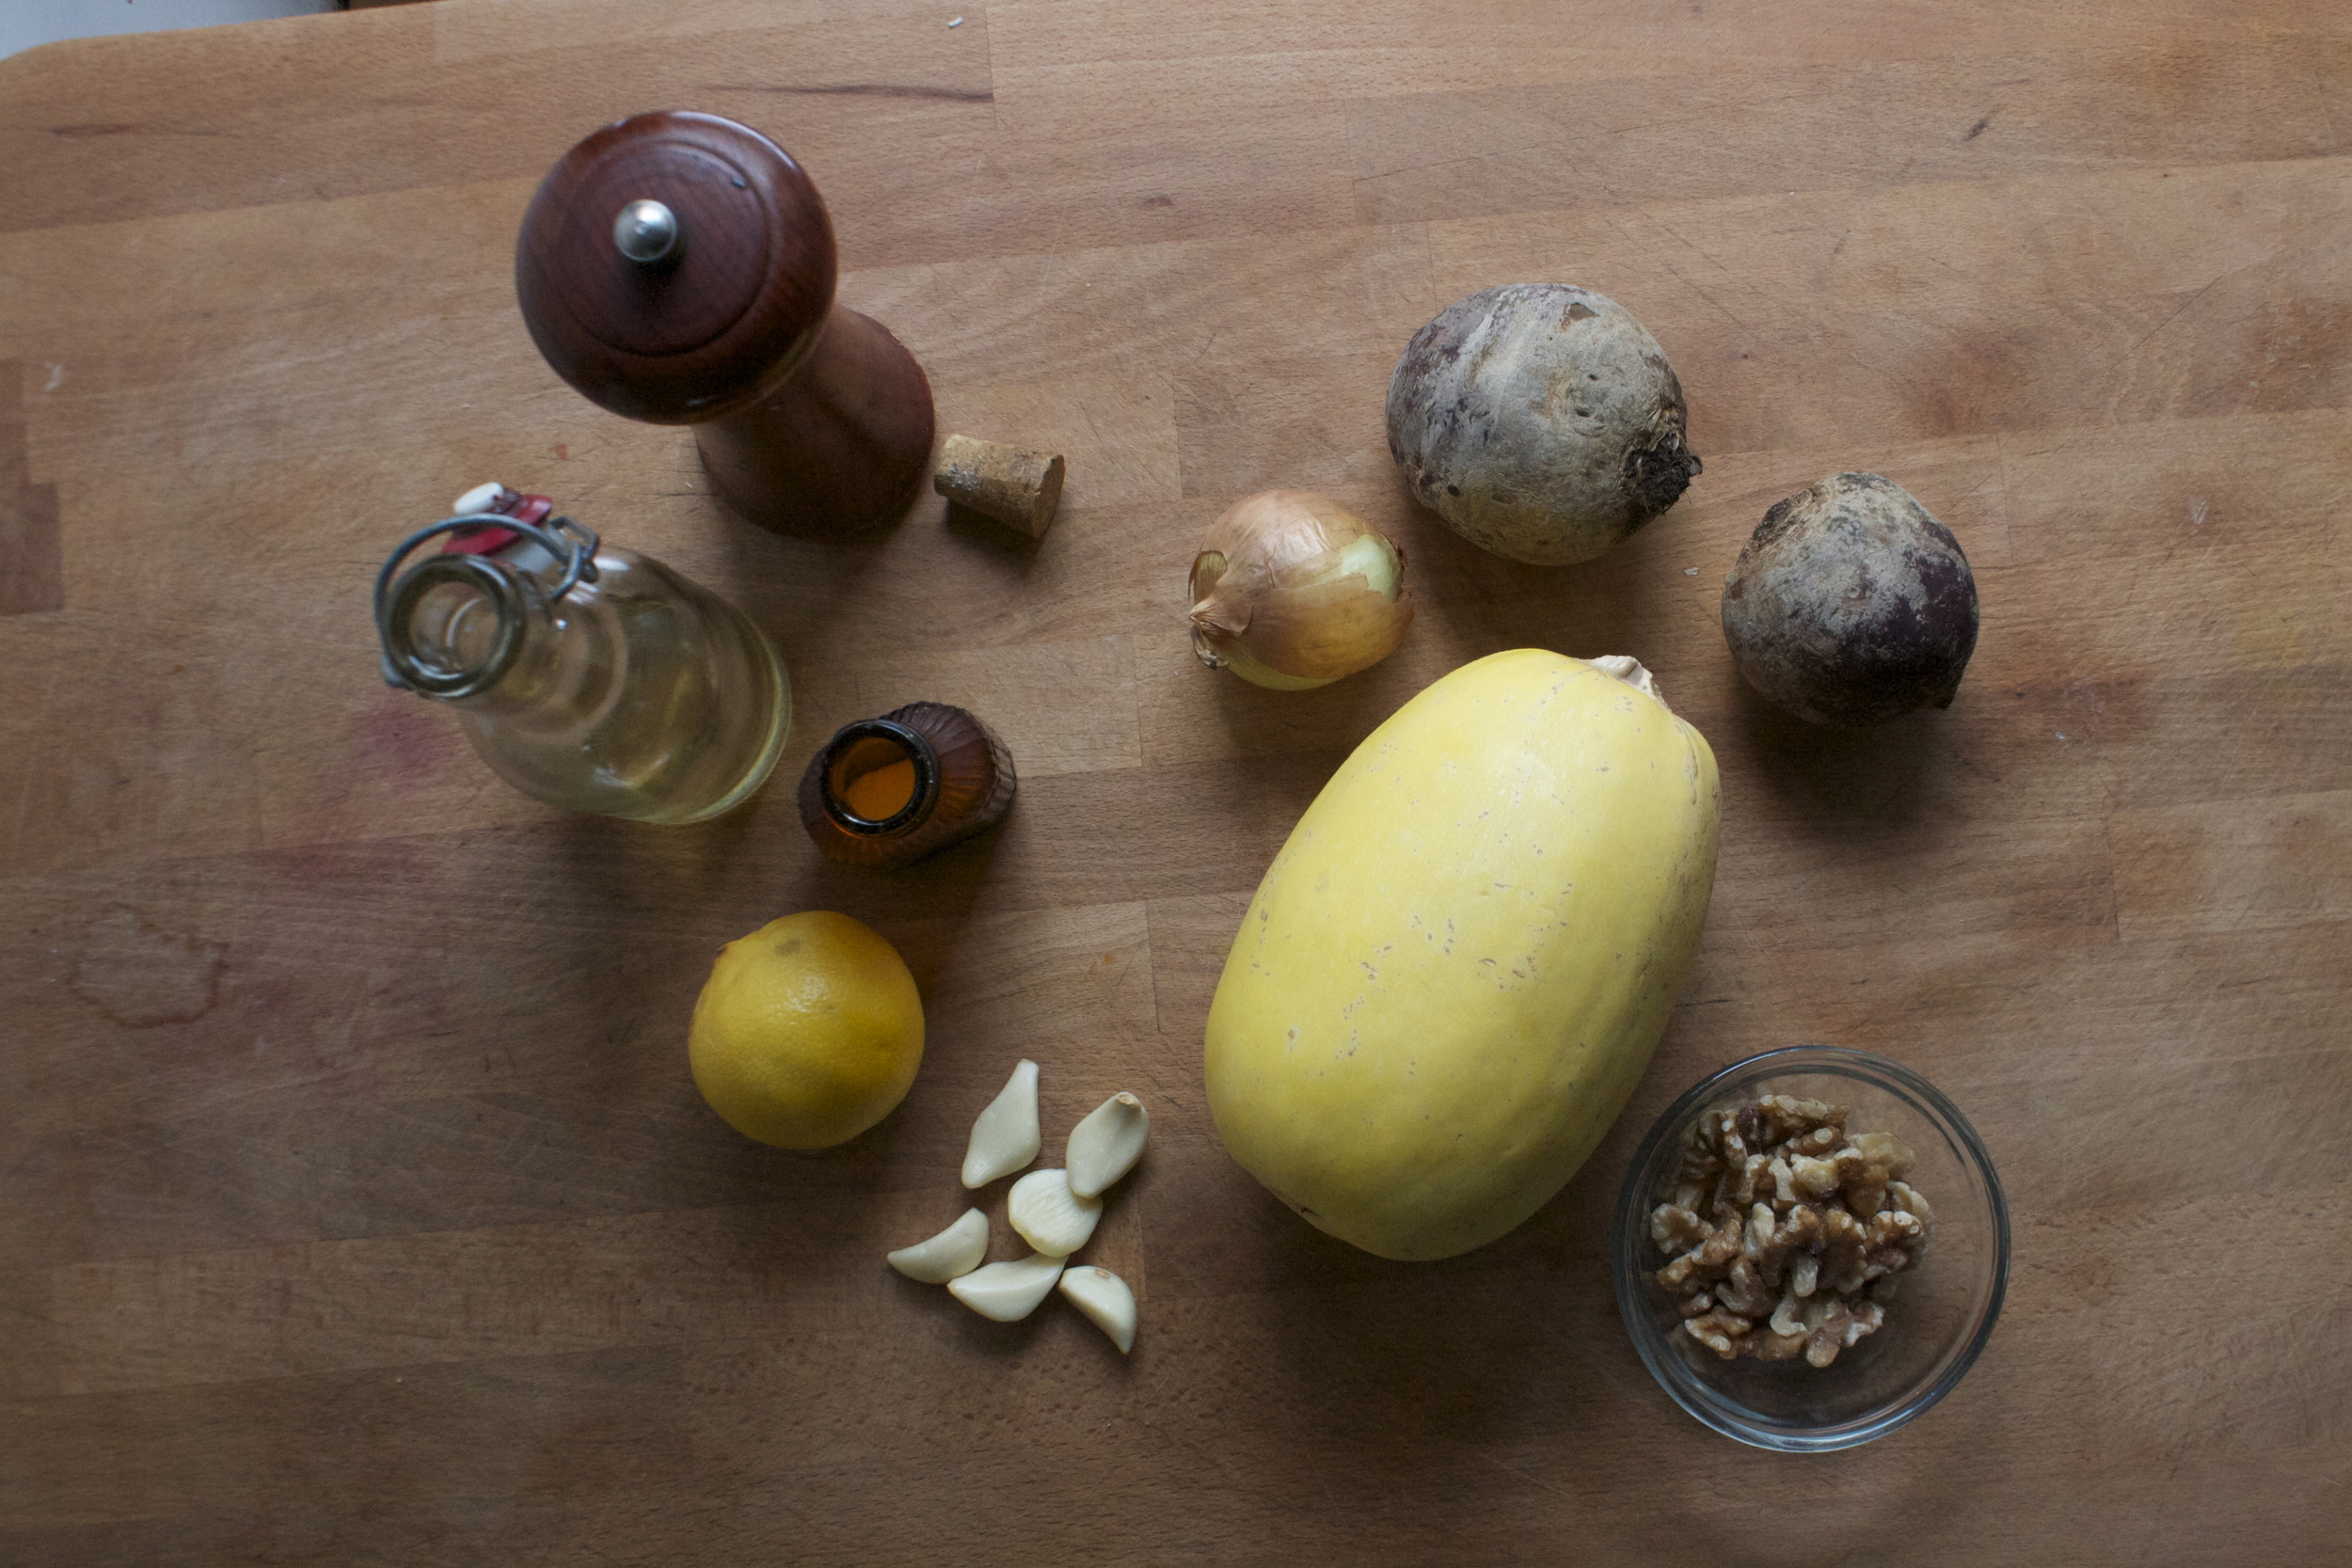
The stuff. One spaghetti squash big enough for at least 2 people (I love left overs so maybe big enough for 4), 2 largish beets, a a small onion. Also grab a clove of garlic of 4, a lemon, the salt and pepper, and some olive oil. Optional, but a very nice addition is a handful of tasted walnuts.

Quick and crank up the oven (make sure you take out the cast iron you left in there from last night), then stick the squash, beets and onion into the hot oven to roast. I stuck them all on a baking sheet and left them completely whole, but if you want, you could chop the beet and onion into chunks and drizzle with oil or you could wrap the beets in foil and bake them that way but really, why go through all that when you can just not? And don't bother peeling them.(unless you think you must.. but you really really don't need too)

And same for the squash. You could cut in half and roast it that way, but again, why when you don't need to.

So anyway, roast the beets and onion until fork tender. And the squash as well (check by stabbing with a fork) All my stuff roasted up pretty much perfectly at the exact same time, but it really depends on the size of your stuff. So check after 40ish minutes.

And once you pull that roasted stuff from the oven, let it cool just enough where you can handle it. Chop the onion into a couple chunks, the beets into smaller chunks and slice the squash in half length wise and set aside.

IMG_9221.jpg
IMG_9237.jpg

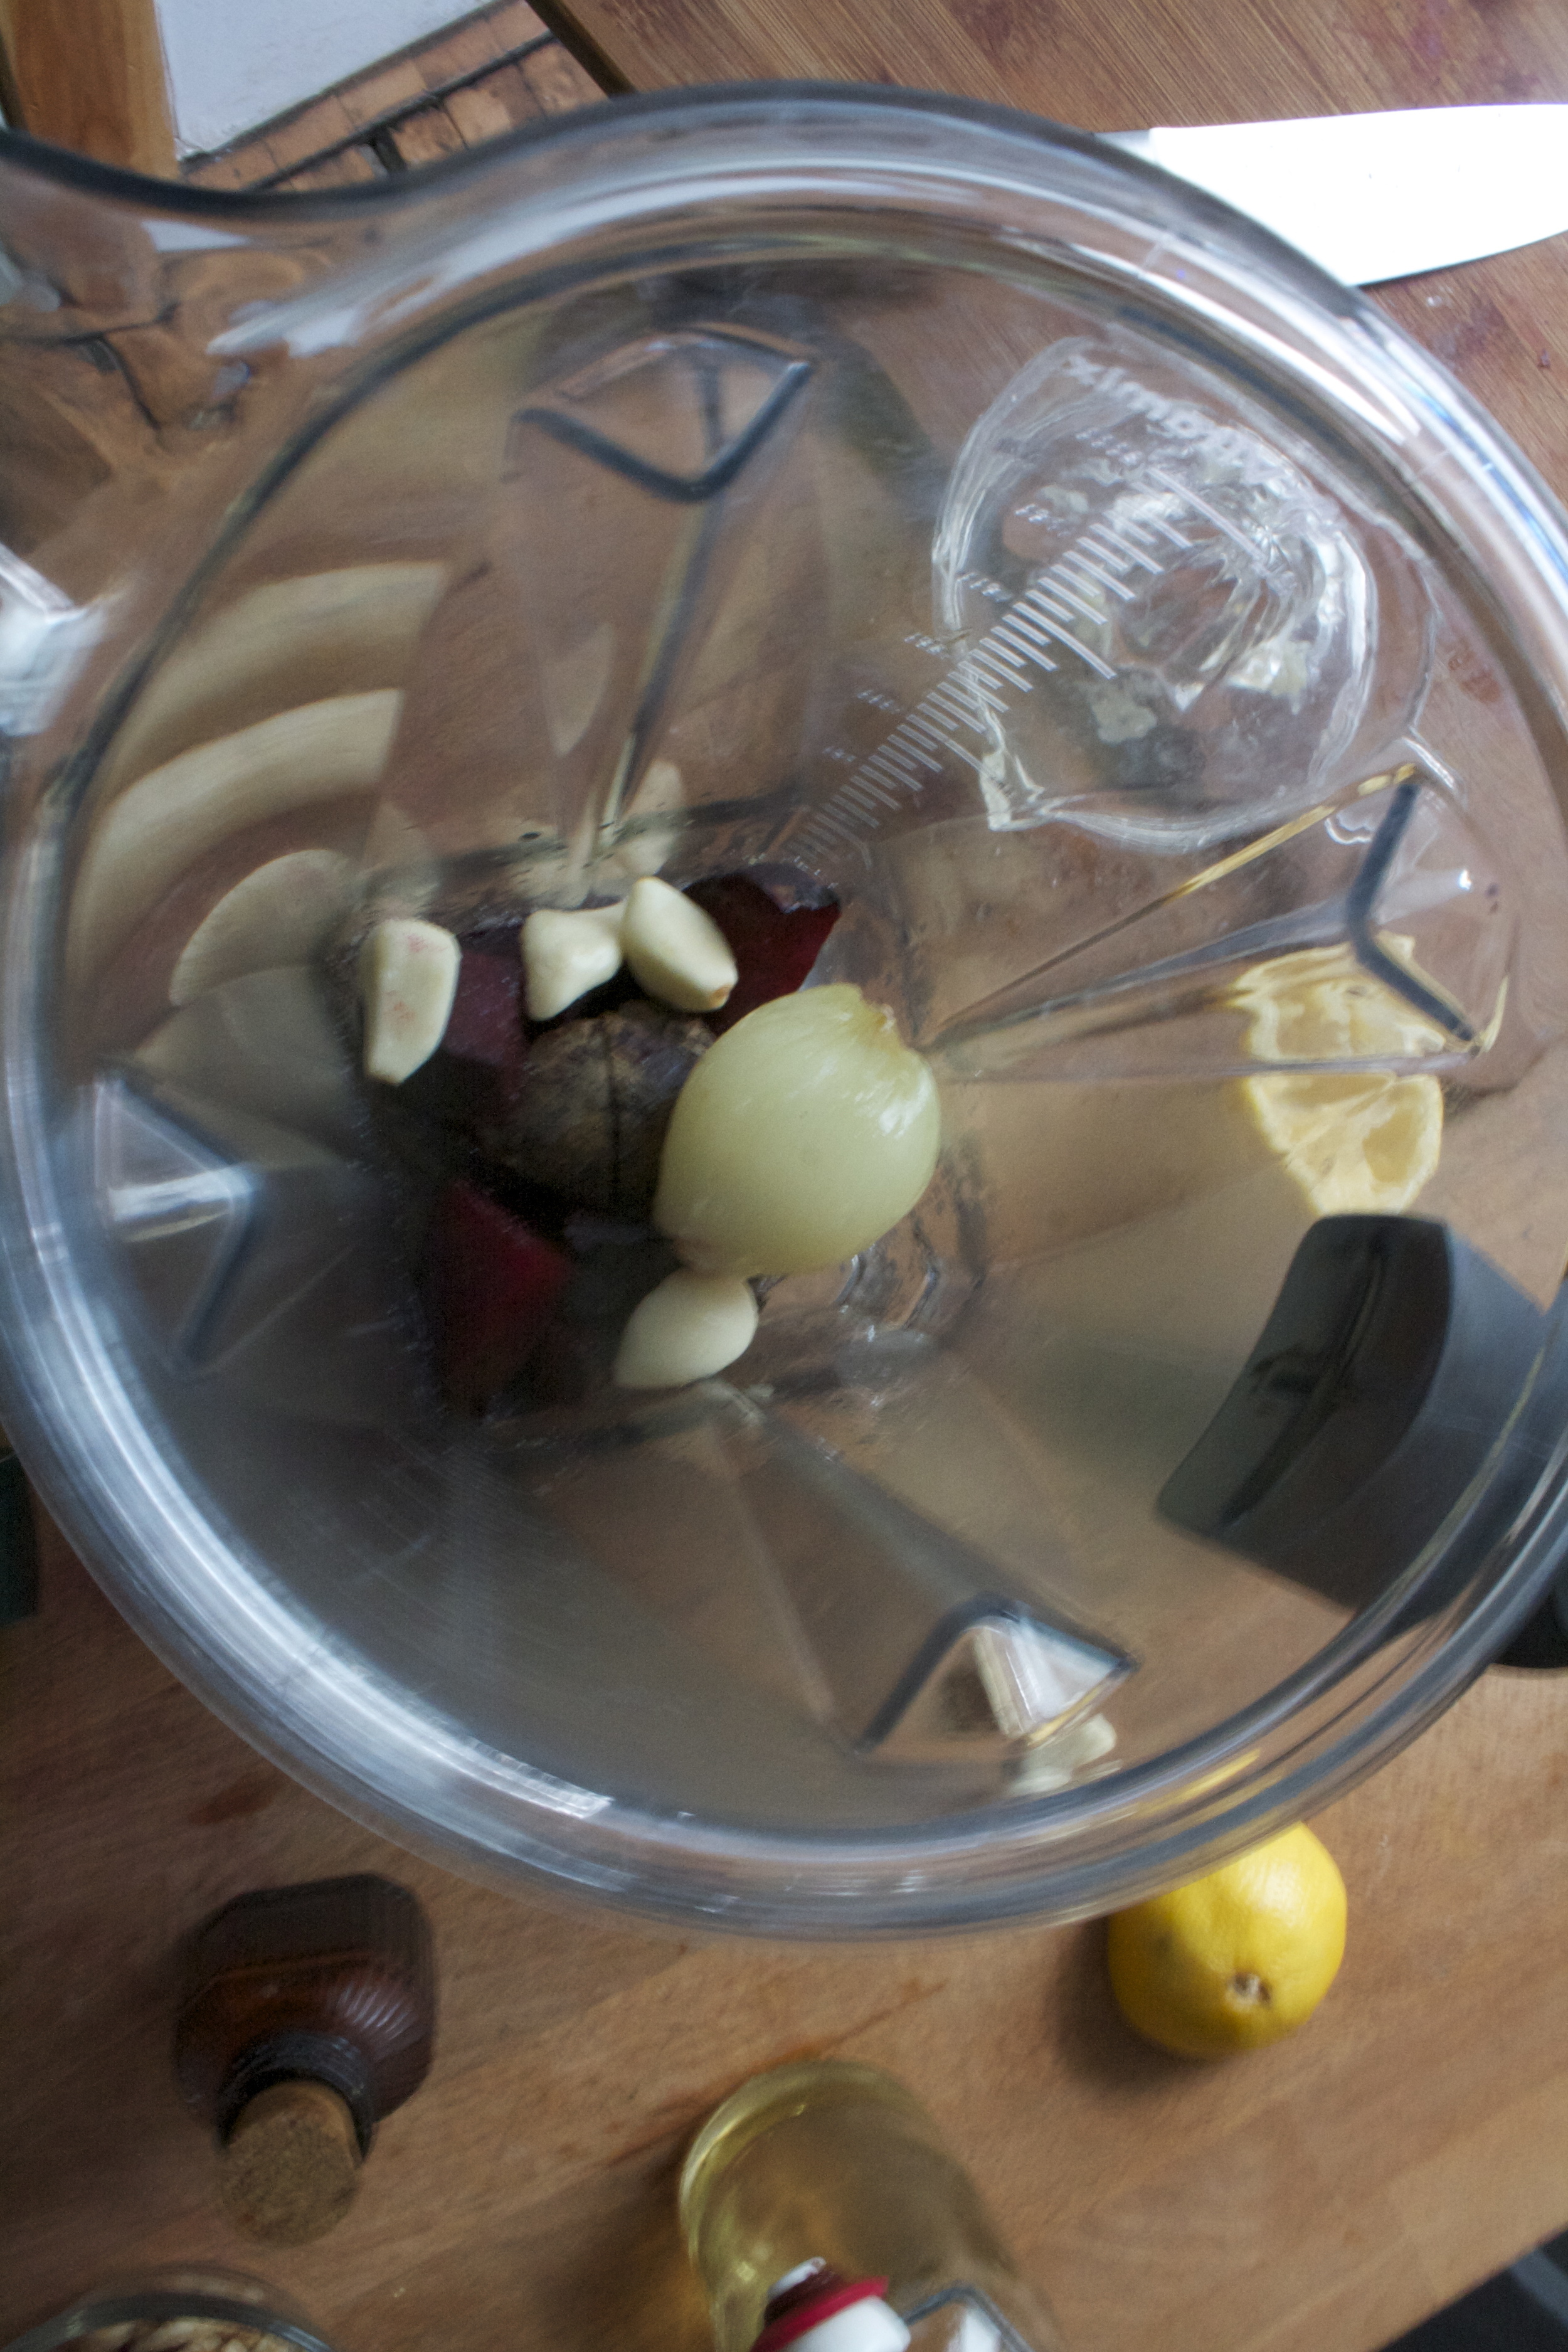
Grab a blender and toss in the onion, beets the juice of the lemon (start with half) apinch of salt, a few pinches of pepper, and a clove or 2 of garlic (ok, I love raw garlic and used a lot. If you do not like the taste of raw garlic, just toss it with a little oil and stick into the oven with the beets for about 10 minutes. Or you could omit the garlic entirely)

Once all the stuff is in the blender, turn it on. Drizzle in about a tablespoon or two of olive oil and blend until a nice smooth sauce has formed. Taste, season with more salt and pepper if needed. Add the other half of lemon if you think it needs it. You can also add a bit of water to thin it out more.. if you want

So now the squash should be cool enough to handle. Scoop out the seeds and with a fork, scrape up into spaghetti!

IMG_9250.jpg
IMG_9269.jpg

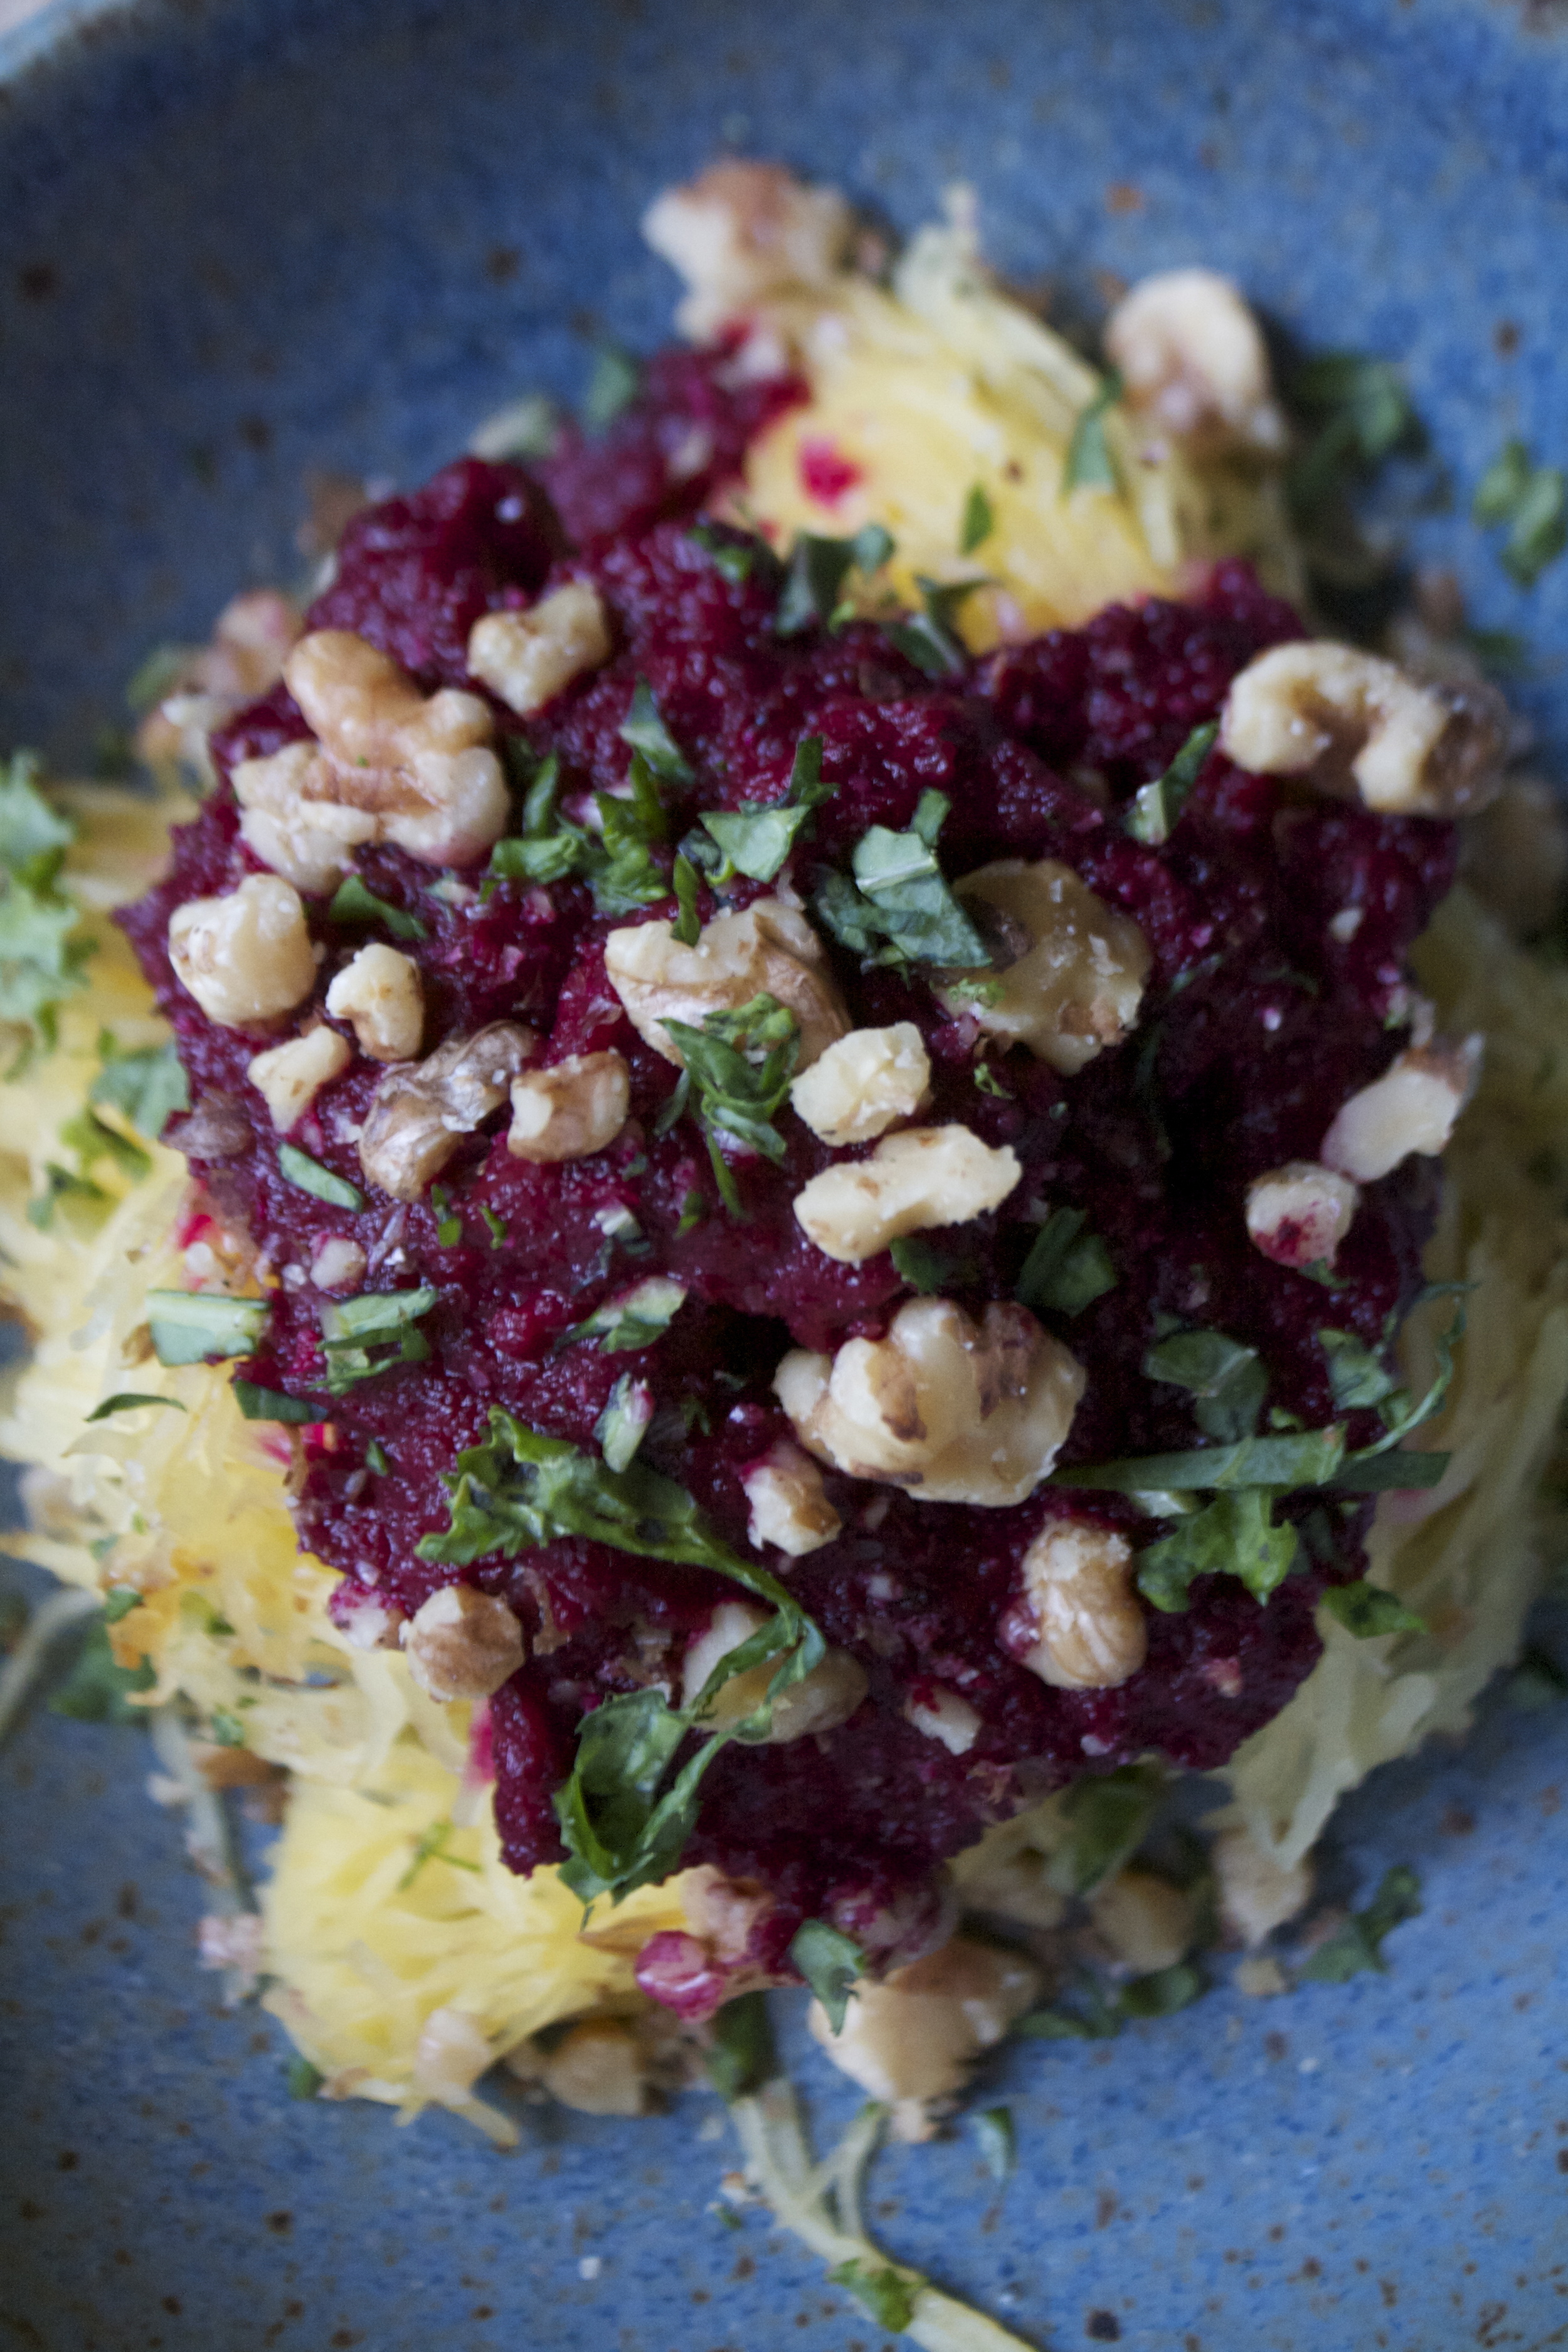
Heaps of squash go into bowls then topped with a generous mound of beet sauce. Topped with some roughly chopped toasted walnuts, a sprinkle of pepper and some bits of green stuff (I just diced up some kale)

Look at that. So pretty, so pink and all ready to go. Dinner for 2 with a good bit of left overs for later!

Happy weekend! And Happy Valentines Day if you do it, or if you don't!

-C


Spaghetti Squash with Roasted Beet Sauce

makes 3-4 servings


  • 1 medium sized spaghetti squash
  • 2 large beets
  • 1 small onion
  • 1 lemon
  • 2-4 cloves garlic
  • handful of toasted walnuts (optional)
  • olive oil
  • salt and pepper to taste

Note. You might want to thin out sauce out a bit without the use of a ton of oil. Go ahead and add a little water. Also, I used raw garlic in mine, but some people might not like it raw. Just toss a few cloves of garlic in a bit of oil and stick into the oven for 10-15 minutes with the other stuff to give it a little roast. OR just omit.

Preheat oven to 425.

Stick the onion, beets and squash onto a baking sheet, drzzle the beet and onion with a tiny bit of oil and stick the sheet into the oven. Roast everything until fork tender which should take around 45-50 minutes. (depending on the size of your produce, some thing might take longer or shorter, so just check after 40ish minutes)

Once everything is roasted, let the beets and onion cool just enough to handle and cut into chunks and toss into a blender. Add in the garlic, the juice of the lemon, a few drizzles of olive oil and a pinch of salt and pepper. Now turn blender on and blend until smooth.

And the squash. Cut the thing in half and remove the seeds.  Then with a fork, scrap the squash from the skin into spaghetti like strands.

Place squash into bowls, sprinkle with salt and pepper, add a drizzle of oil if you want and top with a good hearty heap of beet sauce. Top with more cracked pepper and a few chopped walnuts and maybe add a little something green, you know, to make it pretty.

Serve warm with love and a fork.. your lips might turn pink with beet love.


In Vegetables, Vegan, Savory, sauce, recipes, Paleo, holiday, grain free, Gluten Free, Dairy Free, dinner, entree Tags Spaghetti squash, Spaghetti Squash with Roasted Beet sauce, roasted beet sauce, vegan, gluten free, paleo, clean eating, plant based, healthy, dinner, entree, Valentines Day, veggies, simple dinner, grain free
7 Comments

Super Cute DIY Heart Pins

February 11, 2016 Colleen Stem
IMG_9084.jpg
IMG_9198.jpg

This past Christmas, my (kinda)mother- in-law gave me and the mr these really cool honey bee pins in our stockings. Nothing fancy, just a little pin, but I think it was one of the best gifts that I had gotten all year. The pin lives on my winter jacket.

And now I am into pins.

So a couple of the little's came over yesterday after school for crafts and dinner and I figured a bit of pin making would be a perfect little project for us to do. And being that it's the big V day coming up,  making these pins heart shaped was more then overly appropriate. (What's Valentines day without cute little hearts?) Well pin making we did, or I did, not so much for them. They made a few, but in the end, they were more excited to beat the crap out of the mr and to eat carrot shavings with peanut butter and nutella.. Totally ok with me because really, I was the one that wanted a little craft time and the mr did need to get his butt kicked.

Sure I made these pins pretty much for myself, but imagine the possibilities. Make a bunch to give out to your friends, family, neighbors, or even the mail man!? Or if you have yourself a little, how great would these pins be make and to give to all their little classmates. I know that if received one of these pins in my homemade shoe box mail box meant to collect all of my candy studded, drugstore bought valentines. I would have been elated and rocked that pin all year long on my super cool backpack.(grade schooler, they have all the fun) Right after I finished painting and gluing all my pins, Miley then decided that they were freaking awesome and wanted to make a bunch more.... Well little little, to late, time to go home. But I did give her a bunch to bring back with her. She will just have to bug her mom to make some more.

And sure, I mention valentines day when talking about these pins, but really, hearts are for everyday, and are still really great long after V day is over.

Handmade heart pins = love!

Stuff you need for some awesome pins.

  • Polymer clay (I used white but any color will do)
  • red and white paint (preferably enamel or a high gloss paint) and a paint brush
  • bar pin backs (I bought these at Michael 's craft store. 64 for like 3 bucks!)
  • industrial strength glue (E600 is great and is used and recommended by many a crafters)
  • rolling pin or wooden dowel
  • small heart shaped cutter
  • sharpie pen to write on pins (optional)
  • Glitter( also optional)

A couple notes. You could use red clay but I have found that when I buy the red dyed clay, its always harder to work with and plus, it stainsyour hands. Also, I like to seal the clay and enamel paint does the trick. If you don't want to paint it, just pain on a coat of clear sealer.

Start buy kneading a chunk of clay a little bit to get it to a workable state, then roll into a ball and roll out flat. I rolled mine out about 1/3 of an inch, but I also knew I wanted to squish it out a little flatter once I cut the shapes out.

Cut out your hearts, or if you want, free form them.  What I did was used my tiny heart cookie cutter to cut the initial shape, but then used my thumb and squished them all out a bit bigger.

Note here.. Hears are awesome and amazing, but other shapes....Go for it. You probably have a shit tone of those pin backs.

And just before you bake them, make sure that the pins you are using will fit behind the hearts. (if you notice any visible pin, just smoosh the heart out a little more).

Into the oven,, out of the oven. Read the package to make sure, but the stuff I used only needed to be baked for 15 minutes at 275

Once out of the oven, let completely cool and harden.

Once the hearts are cooled, go ahead and paint them. Use straight up one color, or mix and make a few different shades. (red, white and pink are nice together)

You can add some glitter to the wet paint to add a little bling....

Or add designs or what have you. Do whatever feels right.

Now stick a pin thingy on the back of each heart with a blob of glue. (If you use the E600, make sure to use it near a window or somewhere ventilated.. it really stinks for a few minutes)

Let the glue dry (this glue was completely dry within an hour, but follow glue package instructions)

And if you want, grab the sharpie, make sure the paint is really dry (at least an hour) and write a little something on the hearts.

And now the hard part.. which one goes to who and which one (or 4) do you keep for yourself. (you can always make more!)

Have fun!

-C

IMG_9192.jpg
In arts, crafts, decorations, DIY, holiday Tags DIY, Heart Pins, Super Cute, Home, homemade valentines, valentines day, simple, gift, pin, arts, crafts, polymar clay
Comment

Tahini Chocolate Chip Granola Bars

February 9, 2016 Colleen Stem
IMG_8923.jpg
IMG_8917.jpg
IMG_8917.jpg

I wanted to be in the kitchen so I asked the mr what he wanted me to make him. Anything he wanted, like a cake, or cookies, or donuts.

He asked for granola bars. (so cute)

I think the reason that he requested granola bars was that he knew I wanted to test out the golden syrup that I brought back from Ireland and I had mentioned that I was going to make myself some granola.  (not him, me) but I went with it. And really, I was excited to bust out the golden syrup.

Now what kind of granola bars was the question, but I didn't even ask him I just went with tahini chocolate chip. Tahini cause its amazing, chocolate chips because, just because. And the golden syrup. The bit of research that I have done on golden syrup had told me that this stuff is like glue (it really is) and that it can be used in lu of other binders that I would normally add to granola bars (like dates) It is pure can sugar that has been turned into a thick, golden syrup (hence the name) and has a more nutty, earthy flavor then just sugar, which went together quite nicely with the oats ans tahini in these bars. (next thing to try it with.. rice crispy treats!)

 So I got some kitchen time, the bars where made, the syrup was used, the mr was happy.

Win win win. WIN!

The stuff. Oats, tahini, golden syrup, cinnamon, sesame seeds, chocolate chips, and sea salt. Not a whole lot of stuff and nothing else is needed. But if you are feeling it, add some more. (cranberries, chopped dates, coconut, some nuts)

In a big bowl, combine the oats, cinnamon, sesame seed and chocolate chips.

In a separate (microwave safe) bowl or jar mix together the golden syrup and the tahini. Stick it in the microwave for 15 seconds, take it out, stir it, then another stick it in for another 15 seconds. You just want the mixture to be runny. Another way you could do this is on the stove top or, Like me, place jar in the oven and stir until loose. (I don't have a microwave and I didn't want to dirty a pot)

Pour the warm mixture into the oat mixture and stir until all the oats and stuff are all coated.

IMG_8874.jpg
IMG_8881.jpg

Dump the mixture into a parchment lined pan and press it down as hard as you can with your hands or a bottom of a glass

And optional, but really good, sprinkle the top with sea salt. (do not use table salt)

Now here is the deal. You can do one of two things. If you want a chewer granola bar, place these bars in the fridge for at least an hour until they set up and call them done. For a cruncher bar,  stick the granola into the oven for a little bit to give them a slightly crunchier texture

I tossed my into the oven, just for like 12 minutes, just to give them a little color and a bit of crunch. (the longer you leave them in there, the harder and crunchier they become)

Pulled from the oven, chillin out and waiting to be cut.

And piled high. a stack of bars, awaiting a mouth to eat them.

What a bar. The mr is a lucky guy.

Happy day to you!

-C


Tahini Chocolate Chip Granola Bars

makes 8 Bars

  • 3 cups oats (gluten free if needed)
  • 1/3 heaping cup golden syrup (can be bought at some grocery stores but can be found online as well)
  • 1/3 heaping cup tahini
  • teaspoon of cinnamon
  • 1/2-1 cup of chocolate chips
  • a few pinches of sea salt(optional)

Note. Feel free to add more mix ins if you want (nuts, coconut, dried fruit) just don't add more then another 1/2 cup of stuff.

In a large bowl toss together the oats, cinnamon, sesame seeds and chocolate chips. In a separate microwave safe bowl (or a pot), combine the golden syrup and the tahini. Place in microwave for 15 second increments,  stirring in between until the mixture is loose and pourable. (or heat on stove on low heat until pourable)

Add tahini mixture into oat mixture and mix until all the oats are evenly coated.  Dump into a parchment lined, 9x9 inch baking pan and evenly press the granola down as hard as you can with either your hands or a bottom of a glass (or whatever) Sprinkle the top with sea salt.

And now you have two decide if you want a more chewy granola bar or or a slightly crunchier bar. For a chewier one,  stick the pan into the fridge for at least an hour until they firm up. For a but more crunch,. place bars in the oven for 10-15 minutes at 350, just until they get a slight golden brown and a little bit of crunch on top.  Remove from oven and let cool.

Once bars are ready, remove from pan, grab a knife, cut into bars (or whatever shape you want) and eat them. Store extra in an airtight container (raw ones in the fridge, baked ones are ok on the counter)


In 5 ingerdients or less, breakfast, brunch, Dairy Free, desserts, Gluten Free, Raw, recipes, snack, Sweets, Vegan Tags Tahini Chocolate chip granola bars, granola bars, raw, vegan, gluten free, chocolate chips, plant based, oats, sesame, breakfast, snack, protein
Comment

Sunday Happy

February 7, 2016 Colleen Stem

I love me a good home. And lucky for me, my home is really good.

This week has been nothing but a little weird. We pretty much went from travel mode to real life mode within a day and we still have not completely shaken the post travel, kinda weird heady feelings. (I am still waking up at weird times in the night for a second wondering where I am.) I think part of it is that I have been feeling kind of sick ever since we got back and also all the crap we have to deal with is making real life feel a little stressful. (TAXES AAAAHHHHH!!!) But at the same time, everything about being home is fantastic. Lots of family time, lots of puppy and kitty time, and lots of just being home with a somewhat normal routine. I love to travel and see new places, but one of the best part of leaving is the coming back.

And my kitchen. Oh how I have missed it.

So today is a planed chill out and catch up on not catching up day. We must try not to achieve to much other then watching some tv, (I should finish the watching the first season of the fresh prince) reading, drinking more then to much coffee and just taken the day easy. And I might even bake something! We have all next week to be crazy busy.

And I hope the same goes for you too because you know you need it.

Here are some of the things that the internet has shown me this week.

-I NEED to go to this park. Maybe my next trip?

-Vegan Ben and Jerry's has arrived!

-Love this loft and all of the plants.

-Someday I will have one of these rugs and life will be awesome

-Very much into a white washed workspace

-This House Costs Just $20,000—But It’s Nicer Than Yours

-Watch the rainbow bagels be made. So pretty

-Finally, I have been waiting for this. Two Scientists Have Attempted to Study Resting Bitchface

-Love me some plants

-Is ‘Vegetable-Forward’ Dining Really the Way We Want to Eat?

and pictures this week were few, so I will leave you with this one (a pre-trip angry kitty on the move)

Have a great rest of the weekend!

-C

In travel, sunday happy, photography, holiday Tags travel, home, vermont, airplane, internet, photography, links
2 Comments

Ireland

February 6, 2016 Colleen Stem

What can I say, Ireland was everything and more that I thought it was. The landscape is amazing, the people are so kind and friendly, stone walls a plenty, a pub or 5 on every corner, and the driving.. Oh man, that shit was cra cra!

It all started from Boston, after a four hour drive in the snow, we made it to the airport to sit around for a few hours before boarding my first plane ride ever. The excitement and fear were real, sending me into a walking fit where I went from bathroom to bathroom to pee (I pee when I am nervous... TMI?) But then we boarded and squeezed into out sets and the plane took off. And let me tell you, after taking 6 flights over the course of 2 weeks, that very first flight was a nightmare. The entire flight was constant turbulence and I had gotten a touch of vertigo. I though I was going to barf and was pretty sure the plane was going to crash. But I didn't and it didn't and that was that.

So three plane rides and one 8 hour layover later, we landed safely at the Dublin airport. It was late, to late to get our car, so we ended up sleeping (but not really) in the food court where the seats we plush and there was free wifi. At the very first second we could we rushed to the car rental place and got out sweet little ride, with the steering wheel all wrong. It was fantastic. The mr was the driver, for reasons of many, mostly I am a chicken shit and was to scared so I never did any of the wrong side driving, which was great cause the mr, he was a pro, like he had been driving on that side all his life.

And off we went, over the hills, into the countryside, around and around all the roundabouts. Hoping around every few days from bnbs (we did airbnb all the way and it was awesome) and just kept on going, going and going. We saw so much. Little towns, ocean for miles, the cliffs, the beaches, the green. Huge stone ruins all over the place. Castles, churches, sheep and cows. Everything was so lovely, so green even in the winter, and just so dang pretty.  The weather was fine, never to cold, always a little drizzly (which I kind of liked) but the wind.. The wind was ferocious and nearly blew me away on many occasions. And again, the people.. We talked to so many folks and every one of them were so kind and helpful, it really made the place feel homey. Oh, and the produce. I ate my weight in fresh cabbage ans carrots, all grown in the country! But the one not so great thing that I must mention is the coffee. We had a heard time finding a decent cup anywhere. It was all about the tea. Tea and scones everywhere. I was coffee depleted by the end of the first day.

I could keep telling you every little detail, but I won't,  Ill just leave you with lots of pictures (I have so so so many pictures) and let you imagine yourself there.


IMG_7947.jpg
IMG_8139.jpg
IMG_8031.jpg
IMG_7935.jpg
IMG_8276.jpg
IMG_7890.jpg
IMG_8259.jpg
IMG_7882.jpg
IMG_8195.jpg
IMG_7858.jpg
IMG_7976.jpg
IMG_8247.jpg
IMG_8312.jpg

And now I can't wait to go back, but next time we want to bring our camping stuff and maybe rent some bikes Travel around like cool kids. (I would be ok with not driving over there anymore)

Have a great day and maybe go plan a trip to Ireland.

Bye

-C

In travel and adventure, travel, photography, holiday Tags Ireland, europe, travel, adventure, photography, pictures, cliffs, city, nature
Comment
← Newer Posts Older Posts →
 

https://thelovelycrazy.squarespace.com/config#/|/about/

Me. Food Maker.Food eater. Woo HOO!

STEM+NODE  SMALL BATCH AND ONE OF A KIND POTTERY

stem+node ceramics


____________________

Subscribe

GET NEW POSTS IN YO EMAIL

You are AWESOME!!!


@thelovelycrazy 2014-2021