• stem+node ceramics
  • HOME
  • Food Recipes
  • About
  • Contact
Menu

The Lovely Crazy

Street Address
City, State, Zip
Phone Number

Your Custom Text Here

The Lovely Crazy

  • stem+node ceramics
  • HOME
  • Food Recipes
  • About
  • Contact

Burnt Broccoli

October 3, 2020 Colleen Stem
IMG_0716.jpg

Sometimes it is the simplest of simple things that really get me excited about food. Take for instance burnt broccoli. What exactly is there to say about it other then it is broccoli roasted until it is burnt.

Well I tell ya, it’s amazing and delicious.

I have always been in love with broccoli but lately I have taken to eating more and more of it then usual. Partly because I have been getting a lot of it at the farm, but mostly because I have been craving it in the weirdest way, like every time I get hungry, all I want is to eat is burnt broccoli. What I do is I roast the broccoli unit it is basically burnt. And then I eat it, just like that, nice and burnt and crispy and I just can’t get enough.

Is that a little weird? Maybe sure, but whatever, it is fantastic and I really don’t care if it is weird. I’m doing me and eating a plate of burnt ass broccoli every day makes me happy.

You should try it. It will portably make you happy too.

To the broccoli!

The stuff. All you need is broccoli. You could toss int n a a tiny bit of oil if you want, but I forgo the oil. And salt and pepper if you want too, but again, I don’t want it.

IMG_0707.jpg

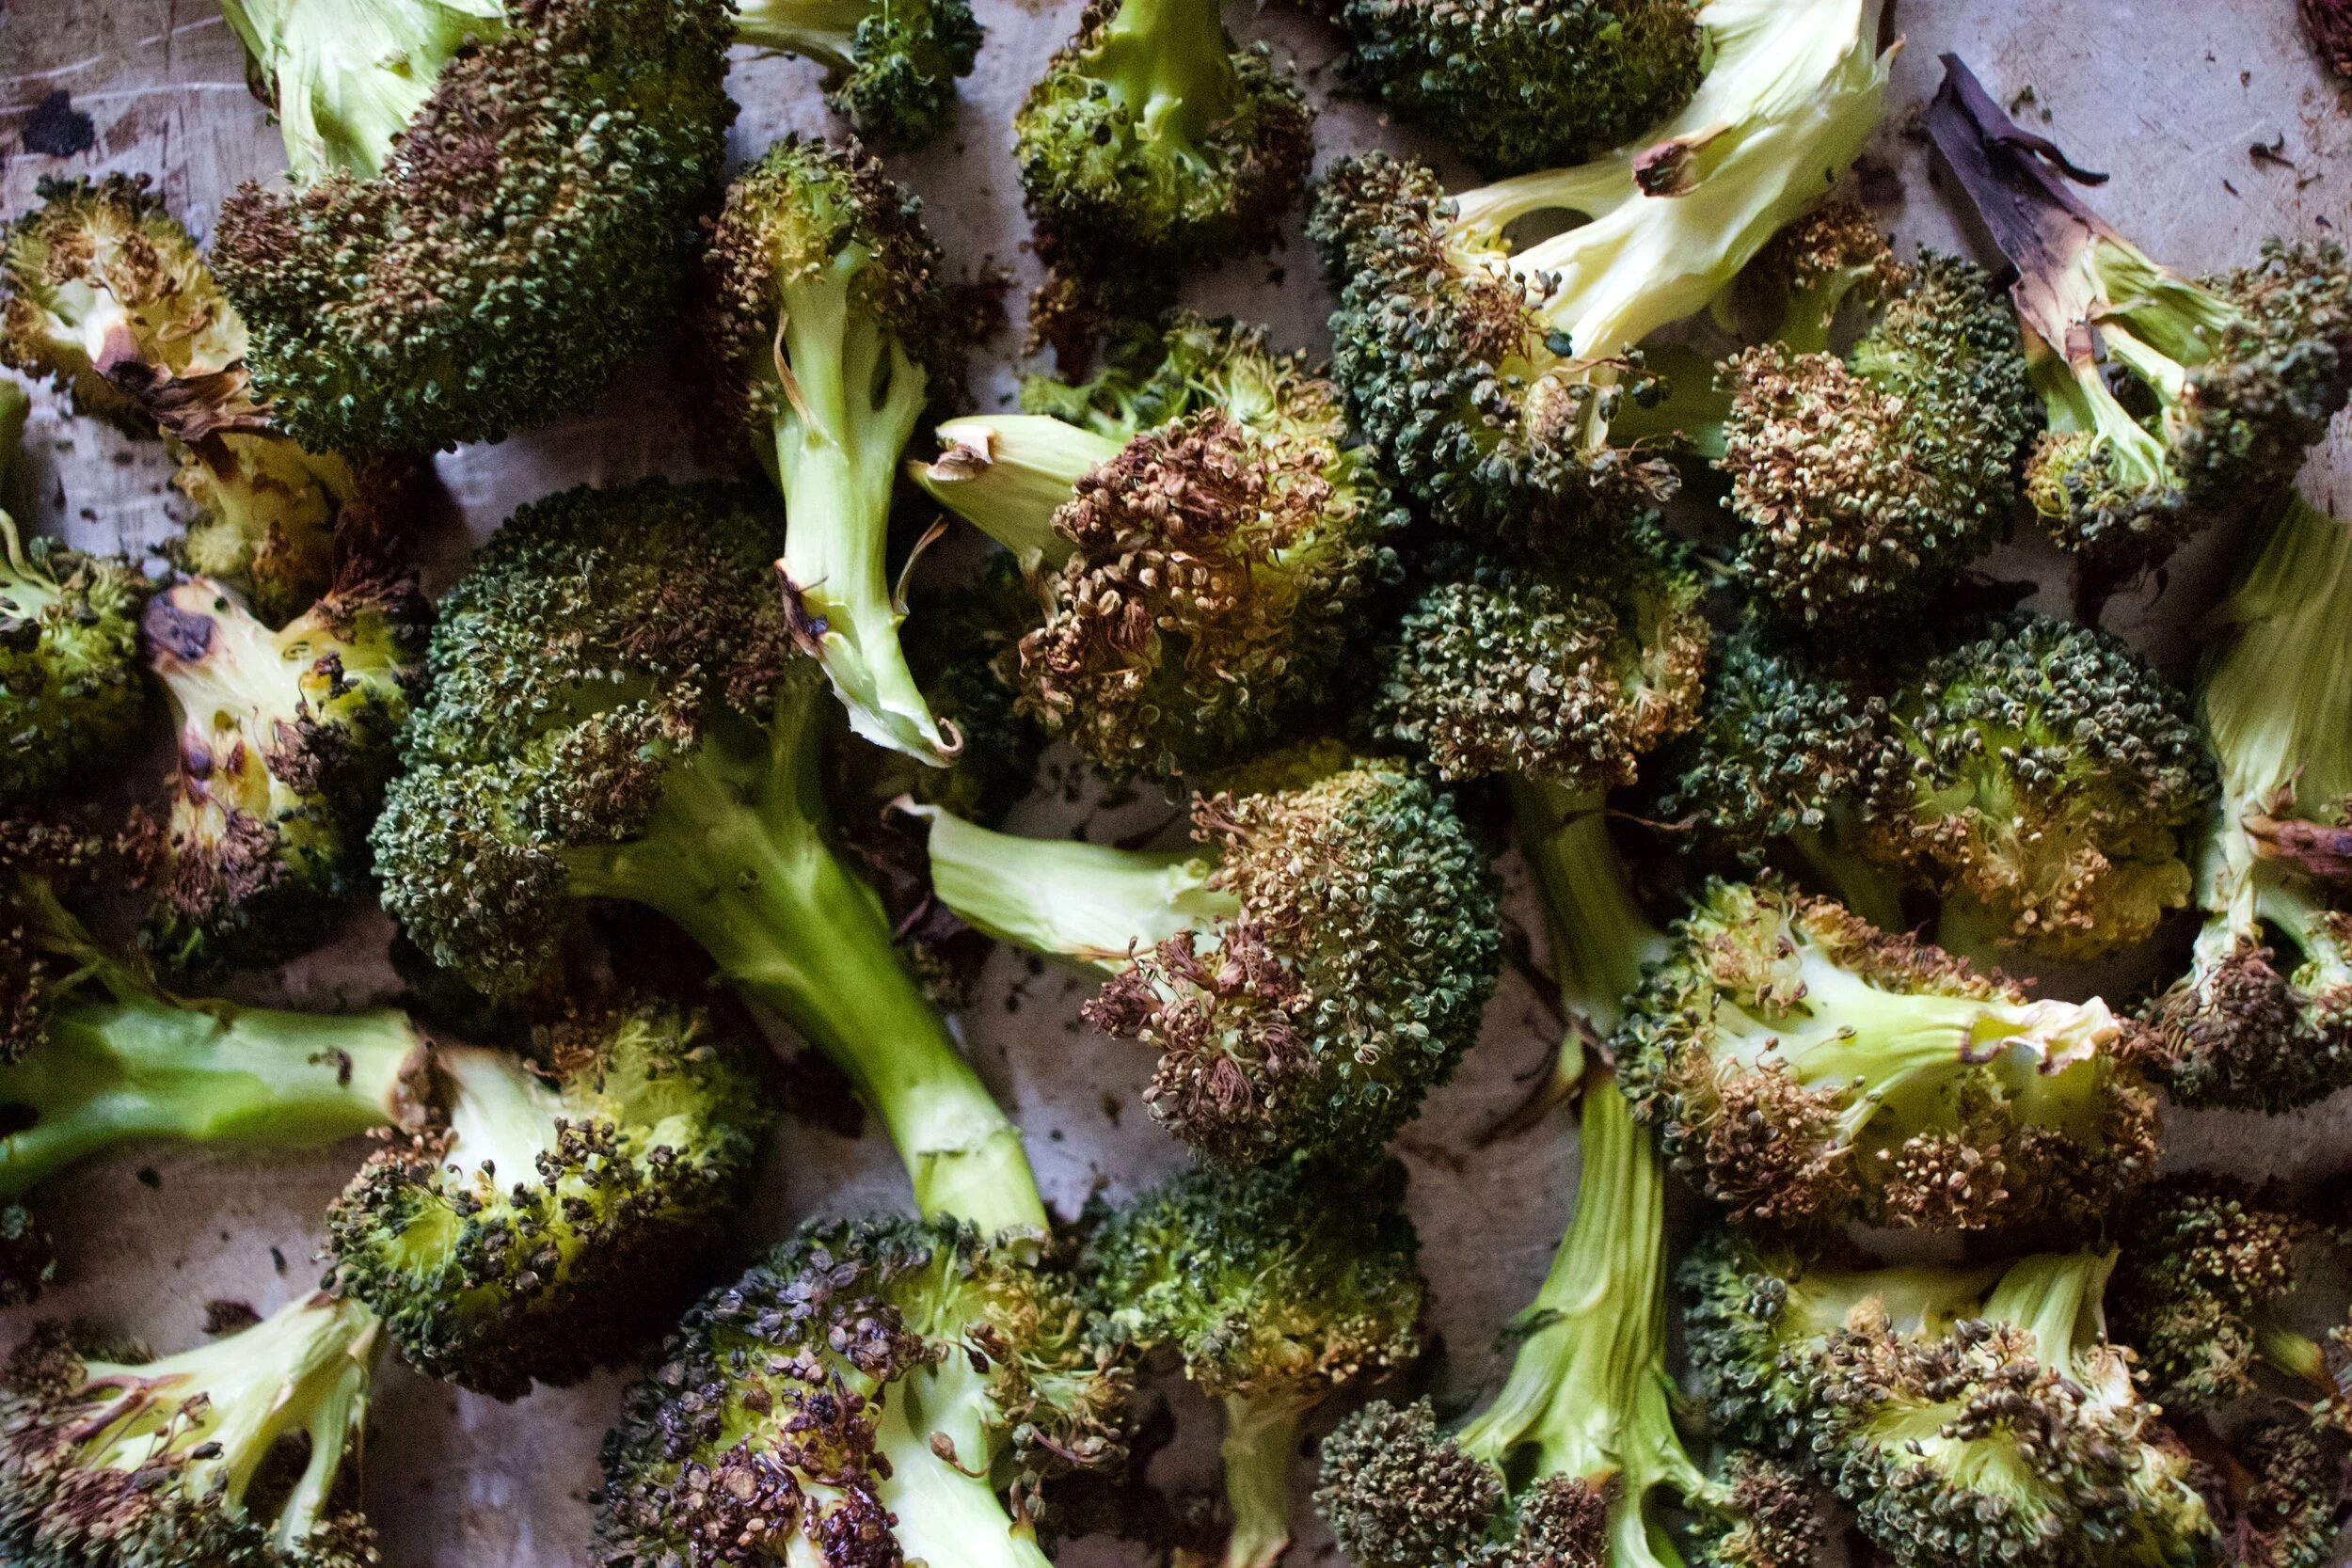
So basically all you do is brake apart broccoli crowns and stick them on a baking sheet and pop it into a really hot oven for 45 minutes to an hour, depending on how burnt you want your broccoli.

Good and crispy. I might leave it in a tad bit longer but at this point I just wanted to eat it so I just called it.

Then once it is burnt, you eat it. Plain and unadulterated or splashed with lemon juice or even dipped in hummus. Any way is a good way because burnt broccoli is alway going to be good.

-C


Burnt Broccoli

  • Broccoli crowns (at least 1, if not a whole lot. Make as much as you want)

  • olive oil (optional)

  • salt and pepper (optional)

Preheat oven to 450

Break of cut apart broccoli crowns into florets and place on a baking sheet. If you want, lightly oil the baking sheet and or toss broccoli in a teaspoon or so oil.

Place in oven and cook for 45 minutes to an hour or until broccoli is burnt to your liking.

Remove broccoli from oven when done and eat, as a side, in a sandwich, or on it’s own as a great snack.

Tags broccoli, burnt broccoli, vegan, grain free, gluten free, plant based, one ingredient, fresh, fall, food
2 Comments

Wedge Salad

August 29, 2020 Colleen Stem

I feel like people are constantly throwing shade at iceberg lettuce. When talked about, it is always subpar with other greens in the world, that it has no nutritional value, that it is always soggy, that it is just not classy enough.

Well what I say is that iceberg is a hell of a lot more nutritional than a lot of things (like a bag of chips), that if it is soggy, well you bought it when it was no good, and that I love me some iceberg lettuce and I am classy as fuck.

The wedge, It is exactly what is sounds like, a big wedge of lettuce. Traditionally I think it is covered in a mass amount of blue cheese and bacon, but yeah, I don’t get down with that. Hummus and tomatoes ad mustard, that is how I roll. This “salad” is probably one of my all time favorite salads. Crisp and light lettuce, summer fresh tomatoes, creamy hummus, and the slight tang of mustard. I have been eating this for years and it still never stops being a favorite snack (because It really is what I snack on. And I will eat the whole head of lettuce with a few tomatoes. Nothing better on a hot afternoon). Out of all honesty though, I usually don’t eat it like a wedge, I usually just tear off a hunk of lettuce, slice a a slab of tomato, then dunk it straight into the hummus. That goes straight into my mouth and then I squirt a little mustard in there. That is class.

Now to the wedge!

The stuff. A head of iceberg lettuce (cut into wedges), hummus (store bought or home made), a couple of fresh tomatoes, scallions, yellow mustard, and pepper.

IMG_0092.jpg

Thinly slice the tomatoes and chop up the scallions

Grab a wedge of the lettuce and stick it on a plate. Grab hummus and mix around until loose. Add a tablespoon or two or water to help loosen it if it is too thick, then slather wedge in hummus.

IMG_0109.jpg

Layer on sliced tomatoes, add more hummus, and drizzle the top with mustard. Oh, and cracked pepper.

And then eat it. One wedge or the whole damn head. No shade from me.

-C


Wedge Salad

Makes 4 wedges

  • a head of iceberg lettuce

  • 3/4 cup homemade or store bought hummus

  • 1/4 cup water(if needed)

  • 2 large fresh tomatoes

  • 2-3 scallions (the green parts)

  • Yellow mustard

  • cracker pepper

Take the head of iceberg and slam it core side down onto a hard surface. This should dislodge the core (a good trick to know) Then cut the head into 4 equal wedges and place each wedge on a plate.

Slice up tomatoes thinly and chop up the green parts of the scallions.

Grab hummus and mix around until loose. If it is really thick add water until it is the consistency of lets say, a creamy thick dressing. Take the hummus and lather each wedge. Layer on sliced tomato, then top with more hummus.

Grab mustard and drizzle (squeeze) all over each wedge. And last but not least, season with pepper.

Now eat it.


In Vegetables, Vegan, salad Tags wedge salad, vegan wedge, iceberg lettuce, plant based, no shade, easy, tomato, hummus, grain free, gluten free, dairy free, snack, healthy, food, summer
Comment

Roasted Sweet Potato, Broccoli, and Kale Bowl

August 22, 2020 Colleen Stem
IMG_0054.jpg

The other morning I woke up chilly, lke legit had to grab a sweater. It made me smile so hard. And when I left for my morning run through the woods, I spent the entire time in a long sleeve shirt, not stupid hot, thinking about all the food that I was suddenly craving. An hour of soups, casseroles, and basically everything hot and comforting running through my mind. Honestly, it’s what I think about during most of my runs. Anyway I was going through my food inventory I had at home and decided what I was going to make myself lunch on this fine cool day was this. Roasted sweet potato with broccoli, onion, and kale. Tahini too. And za’atar. I was drooling while running, again not out of the norm. Good times.

So I came home, did stuff, and made myself lunch. Exactly as I wanted, all for me, and it was everything that I thought it would be. Simple, fresh, hot but not heavy, and just the right amount of comfort to feel all the feels of soon to be fall. I grabbed my food, a book, and sat out on the porch, still in a long sleeved shirt, and ate my lunch. A fine lunch that was. A fine fine lunch.

You should have yourself a fine lunch (or any meal) too.

Now to the food!

The stuff. A sweet potato, a head of broccoli, 1/2 a large onion (or 1 small one), tahini, a lemon, a clove or garlic, za’atar, and salt and pepper.

Start by chopping up the sweet potato into mouth sized pieces, break apart the broccoli into smaller mouth sized pieces, and slice up the onion.

Toss it all onto a sheet pan and cover with the za’atar seasoning. You can toss around in a little oil if you want, but I actually just spray it wit ha little water and call it. I am over roasting with oil, it is to oily.

Put the seasoned goodness into hot hot oven.

Oh and place clove or garlic on pan too, just for a few minutes to get a little roasted and remove. It’s for the tahini dressing.

Chop up kale up.

IMG_9966.jpg
IMG_9968.jpg

Make the tahini dressing. Tahini, roasted garlic minced up, lemon juice, and a little hot water. Mix tighter until creamy smooth. Season with salt and pepper.

Roasted and delicious.

Grab kale and toss it around with everything while it is still hot so the kale kind of wilts. You can also pop it into the oven for a few more minutes to really get that wilt on.

Dump it all into a big bowl.

IMG_0046.jpg

Drizzle that tahini all over, grab a fork (or not),and make you teeth dance with all this goodness in the mouth.

-C


Roasted Sweet Potato, Broccoli, and Kale Bowl

Serves 1 as a meal

  • 1 sweet potato

  • 1 head of broccoli

  • a small onion (or half a big one)

  • a few kale leaves

  • 1 tablespoon za’atar seasoning

  • 1 heaping tablespoon tahini

  • a lemon

  • a clove of garlic

  • a few tablespoon hot water

  • salt and pepper

Preheat oven to 450 degrees

Grab the sweet potato and cut into mouth sized chunks. Break apart the head of broccoli into florets And cut up stem into chunks, and slice onion into thick pieces. Place on a baking sheet, sprinkle on the za’atar, and toss around. Sprinkle or spray(with a spray bottle) with a little water. Also throw the garlic clove onto the pan too and place it into the oven.

After about 10 minutes, grab the garlic from the pan and keep everything else roasting.

In the meantime, make tahini dressing. Mince the roasted garlic and add to the tahini with the juice of half the lemon and a splash of hit water. Mix together until completely incorporated, adding in a little more hot water as needed to make the dressing into a thick, but drizz-able consistency. Season with salt and pepper.

And chop kale into smaller pieces.

After 20ish minutes, remove pan from oven and toss the veggies around and place back into oven and roasted for another 10ish minutes or until the sweet potato is soft and tender and the broccoli is looking all roasted. Remove and right away toss the kale with the hot veggies to get the kale to wilt a bit. Also can stick the pan back into oven for a minute to wilt it even more.

And then dump the contents of the pan into a big bowl, drizzle the tahini all over, and eat that shit.

In Vegetables, Vegan, salad, sheet pan Tags Roasted Sweet Potato, Broccoli, and Kale Bowl, Sweet potato, kale, onion, broccoli, grain free, gluten free, vegan, dairy free, plant based, vegetarian, food, plnat based, tahini, healthy, dinner, fall, warm food, roasted, sheet pan meal
Comment

Eggplant Rolls

August 1, 2020 Colleen Stem
IMG_9511.jpg
IMG_9535 2.jpg

Eggplant and I are having real moment right now. I honestly think I have been eating one, in some way or another, just about every day for the last week or so. And no, I am not sick of them at all. But yes, I have been lazy about doing much other roasting or braising the old plant and just eating it straight into my mouth hole. But I guess sometimes my lazy ass wants more substance and also, it is nice to feed the mr something good too. I figured I should maybe do something a little more classy, more meal like, and might actually require a fork to eat it with. (I have a real tendency to eat with my hands, even the things that most people would probably say could not be eaten with hands. You should see me eat soup! Ha!) And so I prepared for us a feat of greatness (not really a feat, but great for sure). Eggplant roll ups.

These rolls are way more tasty and delicious then the effort it takes to make them. Really, they are super simple to make. Just a thick herby bean filling rolled up in eggplant and roasted in tomatoes. Sounds so good right? Well then taste even better. And then you can top that whole shebang with some fresh basil and everyone is all good to go.

So ok, I feed some to the mr for dinner because the goal was to fee us both with one dish, but I sure did eat more then half (like 3/4 of it) to myself. Without a fork.

There is no shame in my game.

Now to the eggplant rolls!

The stuff. An eggplant, an onion, some white beans, crushed tomatoes, a lemon, some thyme, oregano,and garlic powder, salt and pepper, oil, and basil. (I just pureed all my fresh basil into a paste so yeah).

First up, slice the eggplant lengthwise into 1/2 inch thick pieces.

Place the pieces on a baking sheet and sprinkle with a pinch of salt. It is ok if they overlap a little, we are just trying to soften them a bit. Stick into a hot oven.

Now chop up the onion.

IMG_9410.jpg
IMG_9412.jpg

Into a skillet it goes to cook up until soft and fragrant.

Eggplant, comes out of the oven all nice a pliable.

IMG_9430.jpg
IMG_9431.jpg

Now make the bean filling. Beans, onions, spices, juice of lemon, and a good crank of pepper and a pinch of salt go into food processor. Blend until smooth.

Gently grab an eggplant cut and cover one side with the bean mixture. Don’t skimp our but don’t add ore then you can roll up. And then roll it up.

Add a cup or so of sauce to a skillet or casserole dish, then place the rolls on in. Once all the rolls are in, cover with the remaining crushed tomato or marinara sauce.

Pop into hot oven to bake.

And then when the eggplant is tender and the sauce is all bubbly, pop it out.

Add some fresh basil (or basil puree) and grab that fork.

Nothing left for you to do beside eat it.

-C


Eggplant Rolls

serves 3-5

  • a medium to large eggplant

  • 1 yellow onion

  • 2 1/2 cups white beans (or one can)

  • a lemon

  • teaspoon each of thyme, garlic powder and oregano

  • 3 cups crushed tomato or a simple marinara sauce

  • salt and pepper

  • splash of oil

  • fresh basil (optional)

Preheat oven to 400 degrees

Grab the eggplant and cut the very top off then cut slices lengthwise about 1/2 inch thick. You should get about 10-12 slices. Place the slices onto a baking sheet, overlapping a little if necessary, sprinkle with a pinch of salt, and place into oven. Cook for about 10 minutes or until the eggplant is just barely starting to soften and becomes pliable. Remove from oven and let cool a bit.

Meanwhile chop up the onion and place into a lightly oiled skillet. Cook for 5-8 minutes or until the onion starts to become translucent and fragrant. Once cooked, place into a food processor along with the beans (drained but keep the liquid),the spices, and the juice of the lemon. Pulse until smooth and if needed, add a few tablespoons of the bean liquid to loosen it up enough to blend. Taste and season with salt and pepper.

Now to make the rolls. Grab cooled off piece of eggplant, lay it flat, and cover with the bean mixture. Not too much or too little, probably a bit less then 1/4 cup. Then roll the eggplant up. Either grab a skillet or baking dish and add about 1 cup of the crushed tomato or marinara sauce to the bottom. Place rolls as they are being made into the dish. Once you have filled the dish with the rolls, cover with the remaining sauce.

Place the rolls into the oven and bake for 30ish minutes or until eggplant is nice and fork tender.

Once baked, remove from oven, left cool for a few minute and then serve. Top with fresh basil (or basil puree) if you want.

Eat with a fork.

In Vegetables, Vegan, summer, entree, beans Tags Eggplant Rolls, eggplant, lasagna, vegan, grain free, gluten free, dairy free, food, plant based, dinner, delicious, dinner ideas, healthy, beans, pulses, easy, summer, rolls
Comment

Raspberry Danishes

July 18, 2020 Colleen Stem
IMG_9203.jpg
IMG_9174.jpg

When your neighbor tells you to pick as many raspberries as you can, well you go pick as many raspberries as you can. Just a few houses down the street, she has a yard full of the heaviest fruited raspberry bushes that have seen. So I grabbed my biggest mixing bowl and went at it. So many raspberries, they were basically falling off into the bowl (and into my mouth). Fresh raspberries, there is not much better.

And she wants me to come back for anther round. We have good neighbors.

I had quite the raspberry loot. The mr and I ate some (maybe too many), froze some, and then I made danishes for no other reason then I wanted to. And that was a just decision because everyone loves a good danish.

And these were good, or sooo good, according to the mr. He ate half while the other half were demolished when I brought them to my moms for dessert which was the plan so it worked out. People and their danishes. It’s a thing you know.(No, not really)

Now to the danishes!

The stuff. Fresh raspberries (You can use frozen or if you really want, raspberry jam) flour, sugar, salt, plant milk, oil, yeast, a lemon, powdered sugar, vanilla. and that is it.

IMG_9048.jpg
IMG_9052.jpg

Start with mixing the yeast with the oil, milk, and sugar in a large bowl. Add in the flour and slat ads mix mix mix until you can’t mix no more.

IMG_9055.jpg

Dough.

IMG_9060.jpg
IMG_9062.jpg

Dump onto a floured surface aaaaaanf. Knead. 5-8 minutes until the dough is all soft and smooth and uniformly dough.

Place the dough into cleaned bowl and cover. Set somewhere warm to rise.

IMG_9078.jpg
IMG_9088.jpg

In the mean time, make raspberry jam. Place raspberries and sugar into a pot and cook down until mixture is thick and jam like. Once the mixture sticks to a spoon like warm jam, turn heat off and let cool.

IMG_9092.jpg

Dough doubled and ready.

Dump dough out and cut into 12 equal pieces. Roll each piece into ball then roll out into a dish about a 1/2 inch thick.

Place dough disks onto splat or parchment lined baking sheet then indent each dough disk with a spoon or your fingers. Dollop a good plop of raspberry jammy into said intents. Once they are all jammed, pop them into the oven to bake. 15-18 minute should do it.

Look at those. Get them out of the oven and on to a wire rack for cooling time.

IMG_9138.jpg
IMG_9139.jpg

Make glaze. Sugar, lemon zest, vanilla, and lemon juice Mix until combined and yeah, that it glaze.

Drizzle the glaze all over those lovelies.

IMG_9209.jpg

And then you eat becucae that is why you made them.

Share with your people. Or just eat them all to yourself, you made them and they are yours.

-C


Raspberry Danishes 

makes 12

  • 4 cups of all purpose flour

  • 1 teaspoon salt

  • 2 teaspoons yeast

  • 1 cup room temperature plant based milk

  • 1/2 cup neutral oil

  • 1/3 cup white sugar

    For raspberry jam

  • 1/4 cup white sugar

  • 2 cups fresh raspberry

    For glaze

  • 1 lemon

  • 1 1/2 cups powdered sugar

  • splash of vanilla

In a large bowl combine the yeast, sugar, oil and milk. Really mix well and let sit for a minute to just get yeast activated. Dump in flour and salt and mix with a wooden spoon or whisk until it becomes to hard to stir. Dump mixture onto a lightly floured surface and knead dough for about 5-8 minutes or until the dough is soft and smooth. Place dough in a clean bowl and cover and let rise for about an hour or so or until the dough doubles in size.

While dough is rising, make raspberry jam. Mix raspberries and sugar together into a pot and place on medium heat on stove. Let cook for a couple minutes and once the raspebrries start to break down, stir. Let mixture cook down for about 10 minutes, stirring often, until the mixture becomes thick and sticks to a spoon like warm jam should. Take off heat and let cool.

Preheat oven to 350

Once dough has doubled in size, dump onto it onto a floured surface and with a knife or dough scraper, cut into 12 equal sized pieces. Roll each piece into a ball then flatten out into a disk about 1/2 inch thick. Place dough disks on a parchment or splat mat lined baking sheets (you will need 2). With a spoon, lightly push a intent into the center of each disk then place a good plop or the cooled raspberry jam into the intent. Once all the dough has its berries, place the baking sheets into the oven to bake, for about 15-18 minutes, or until the danishes are a nice golden brown.

When they are done baking, remove from oven and place on wire rack to cool.

While cooling, make the glaze. Zest lemon and place in a bowl with the powdered sugar and vanilla. Add in half the juice of the lemon and stir until completely combined. If the mixture is too thick, add more juice, to thin, add a little more powdered sugar.

And once the danishes are cooled, drizzle on the glaze. And then thats it. You can eat them now.

Any left over why are there left overs?) should be stored in a airtight container for a few days at room temp or in the fridge . They also freeze well.

In Vegan, sweet breads and muffins, summer, fruit, desserts, breakfast Tags Raspberry Danishes, danish, raspberry, vegan, plant based, jam, fresh, dairy free, easy, dough, king Arthur flour, berries, summer, food, desserts, breakfast, fun
Comment
← Newer Posts Older Posts →
 

https://thelovelycrazy.squarespace.com/config#/|/about/

Me. Food Maker.Food eater. Woo HOO!

STEM+NODE  SMALL BATCH AND ONE OF A KIND POTTERY

stem+node ceramics


____________________

Subscribe

GET NEW POSTS IN YO EMAIL

You are AWESOME!!!


@thelovelycrazy 2014-2021