• stem+node ceramics
  • HOME
  • Food Recipes
  • About
  • Contact
Menu

The Lovely Crazy

Street Address
City, State, Zip
Phone Number

Your Custom Text Here

The Lovely Crazy

  • stem+node ceramics
  • HOME
  • Food Recipes
  • About
  • Contact

Watermelon Iced Green Tea

July 6, 2016 Colleen Stem
IMG_6062.jpg
IMG_6088.jpg

I love watermelon, I mean, who doesn't, but i don't often buy them for myself for one main reason. They are so freaking big and once you cut open a melon, the rest of what is not eaten needs to be refrigerated which would be fine but I have a very tiny fridge and sticking a watermelon in there takes up about half the space. And sure, I could maybe eat a whole melon all to may face in one sitting, but then I would explode. And yes, I know you can buy smaller wedges of melon at the store, but I refuse. Those wedges just seem gross and expensive and wrong to me.  When I buy watermelon I take my chances and buy the whole thing and just eat the crap out of it until I make room for other food in the fridge.

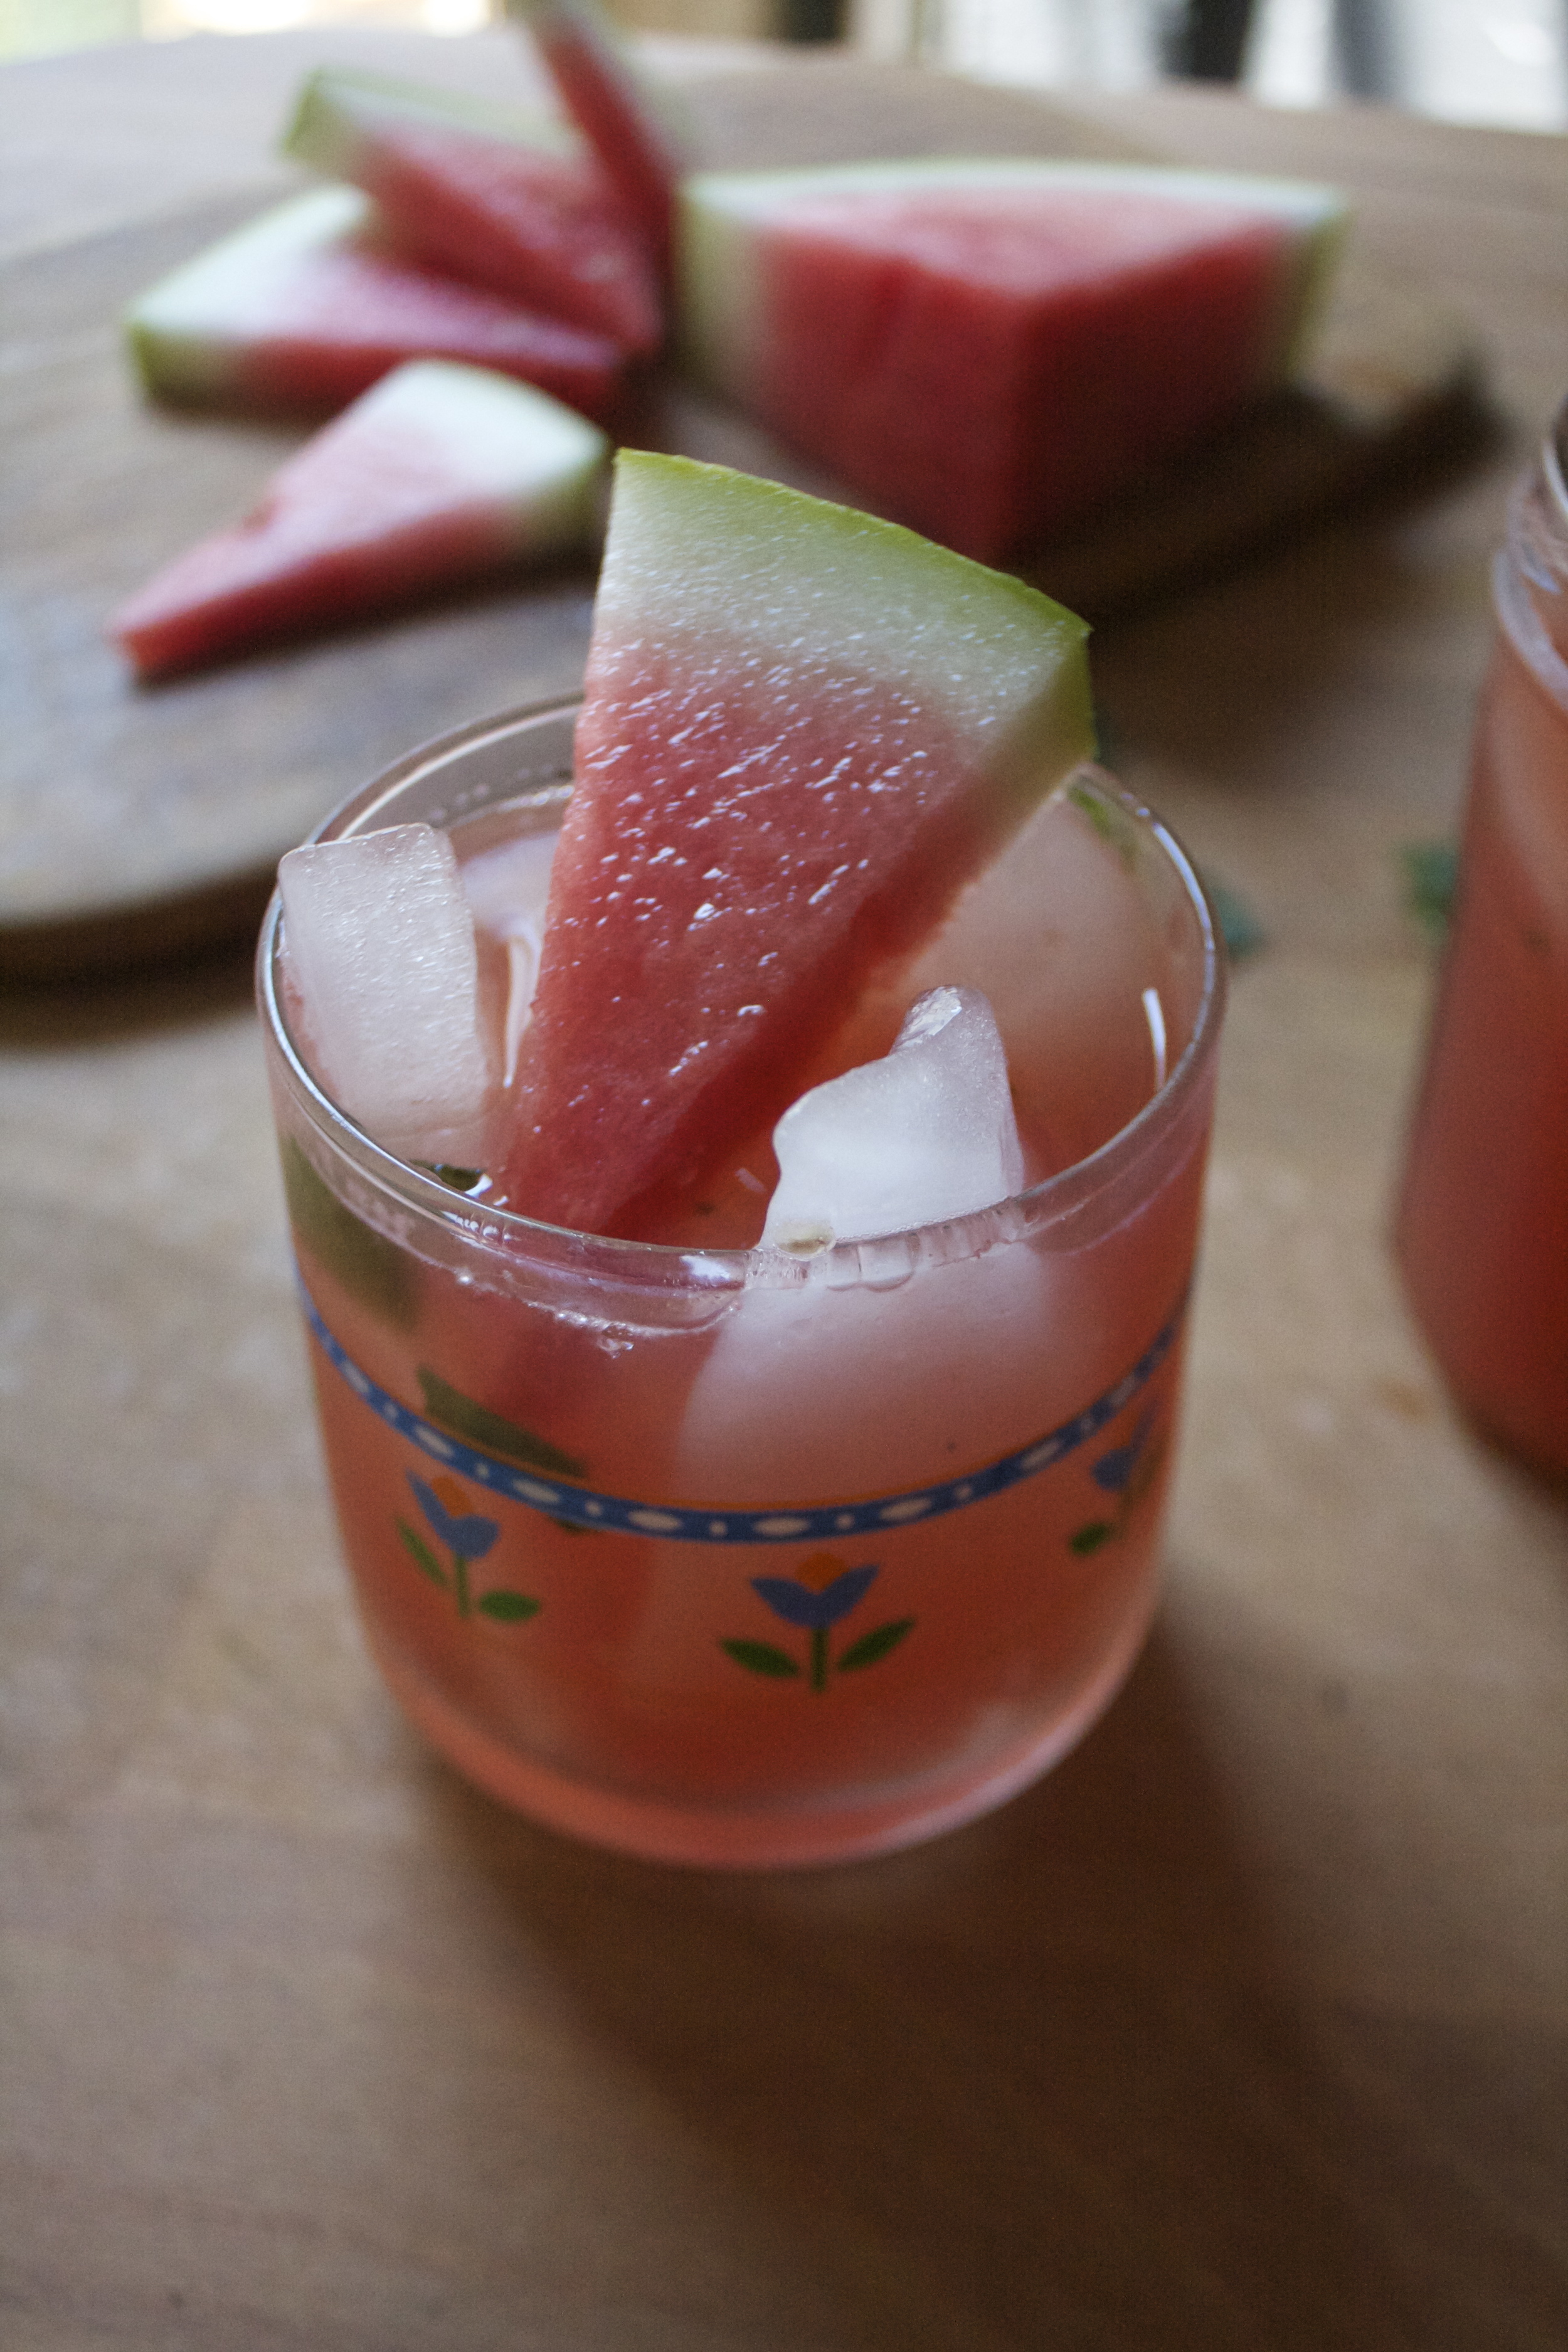
It has been so hot out (too hot) and I really just needed a watermelon, so I bought a watermelon (the biggest one I could find because of course). I waited for a day until the fridge was near empty and cut the beast up. Half went into the fridge right away (I had just eaten the last of the greens to make room) and the other half, well only a 1/4 was eaten. I could have kept going and eaten the rest or I figured I would just make a nice tea drink with the rest. And that what I did and that's this drink I show you here. Smooth, bright, and earthy iced green tea with fresh sweet watermelon, it's all summertime up in you mouth. And pureeing up watermelon into a liquid definitely takes up way less space in the fridge. I am a genius.

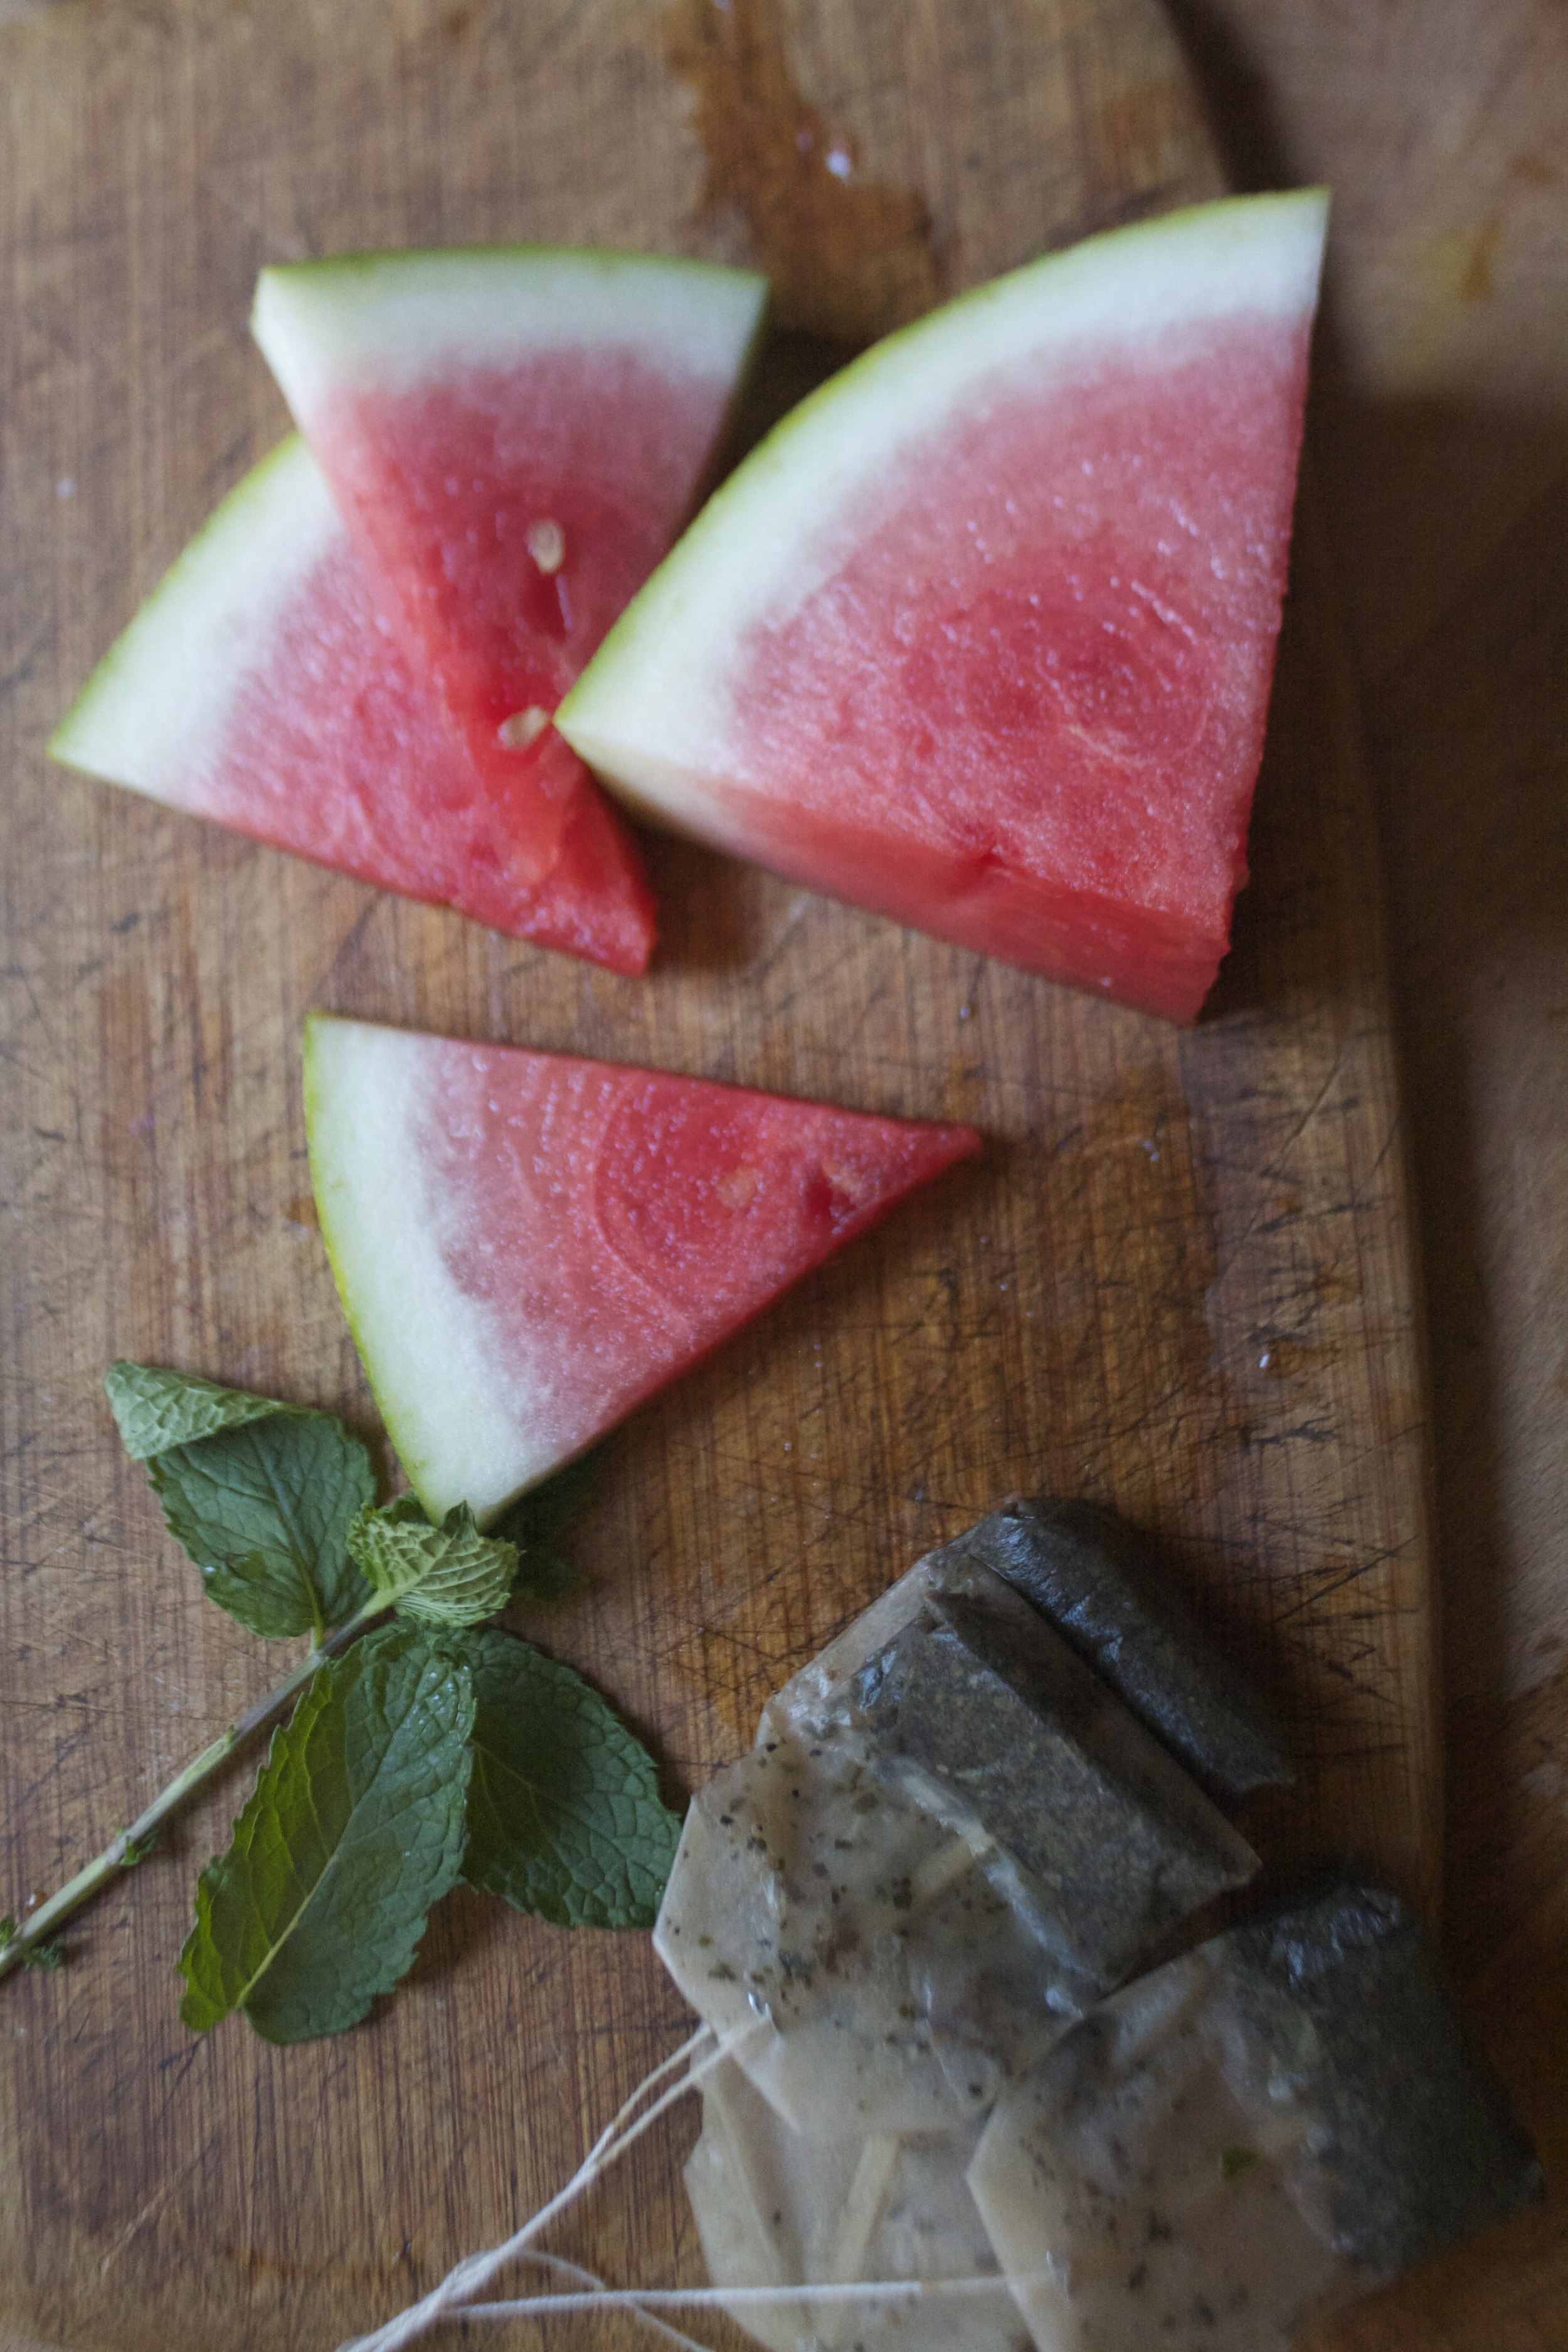
The stuff. Some watermelon, a few green tea bags, a lime( or a lemon), a spring or two of mint, and some water.

Start off with making the tea. Hot water to tea bags, steep for 5 or so minutes then remove bags. Stick tea in fridge to cool.

Now for the watermelon. Remove the rind from the fruit , and cut it up into chunks. Toss in a few mint leaves and.....

Pureeit.

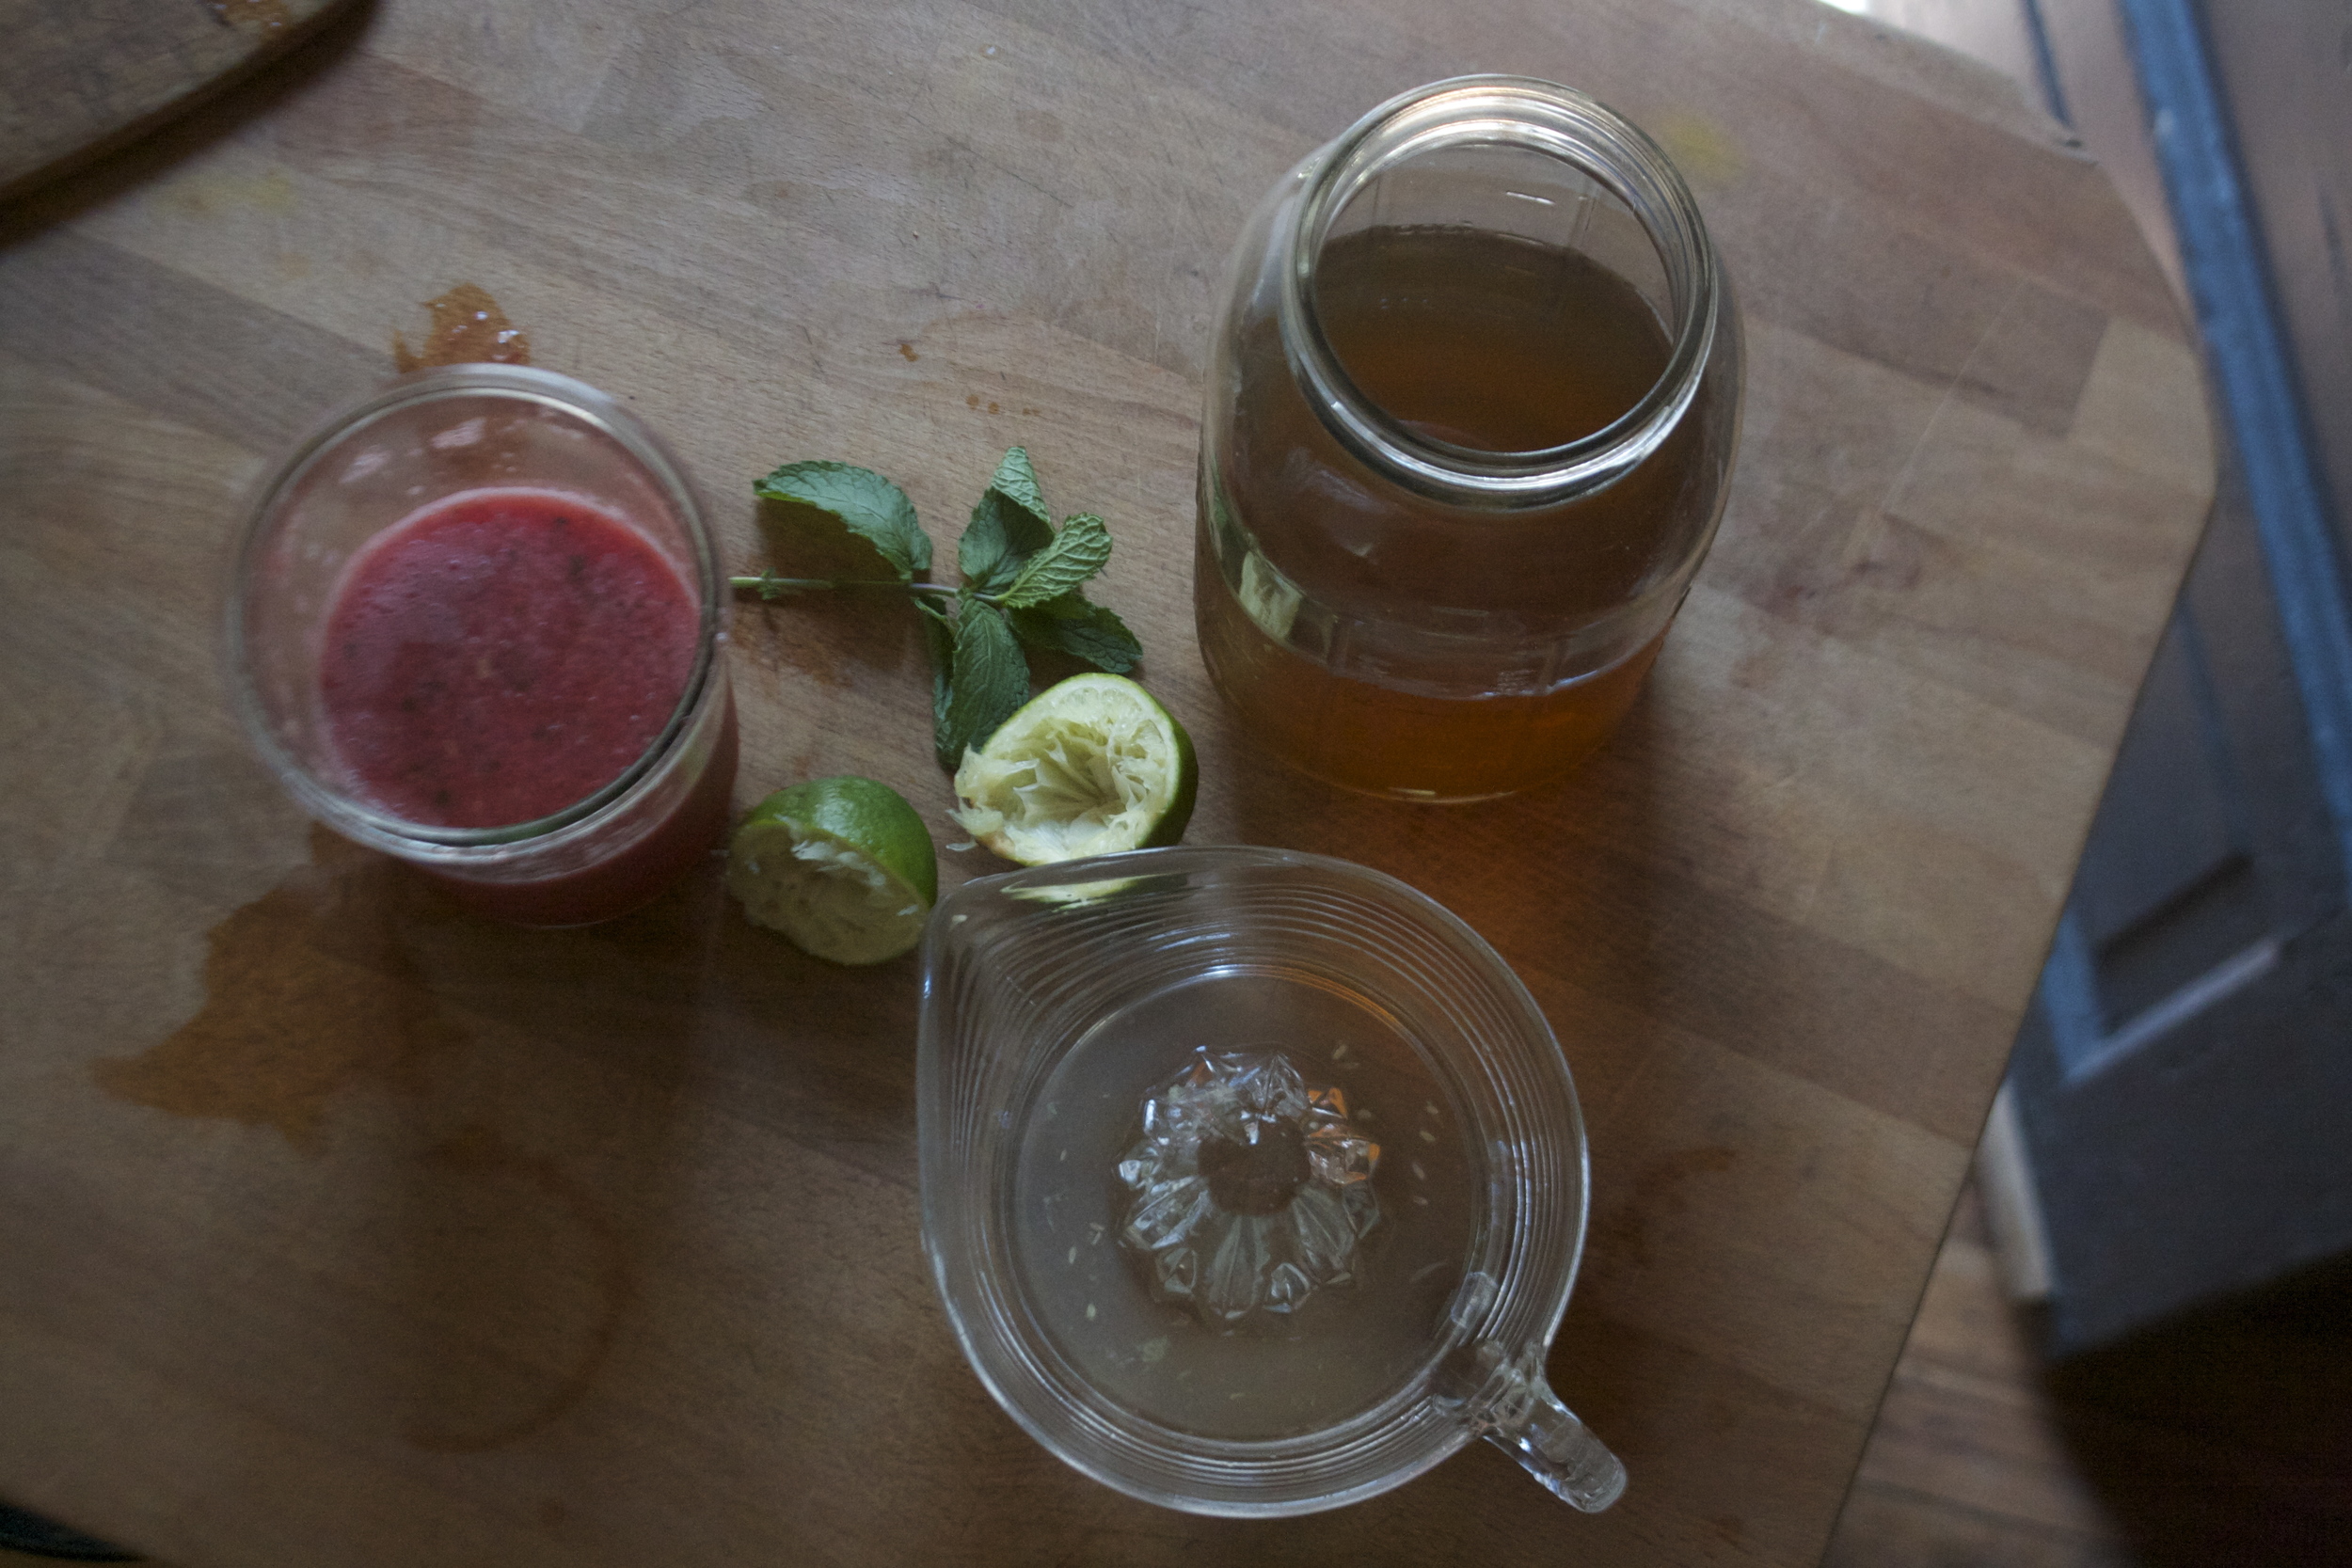
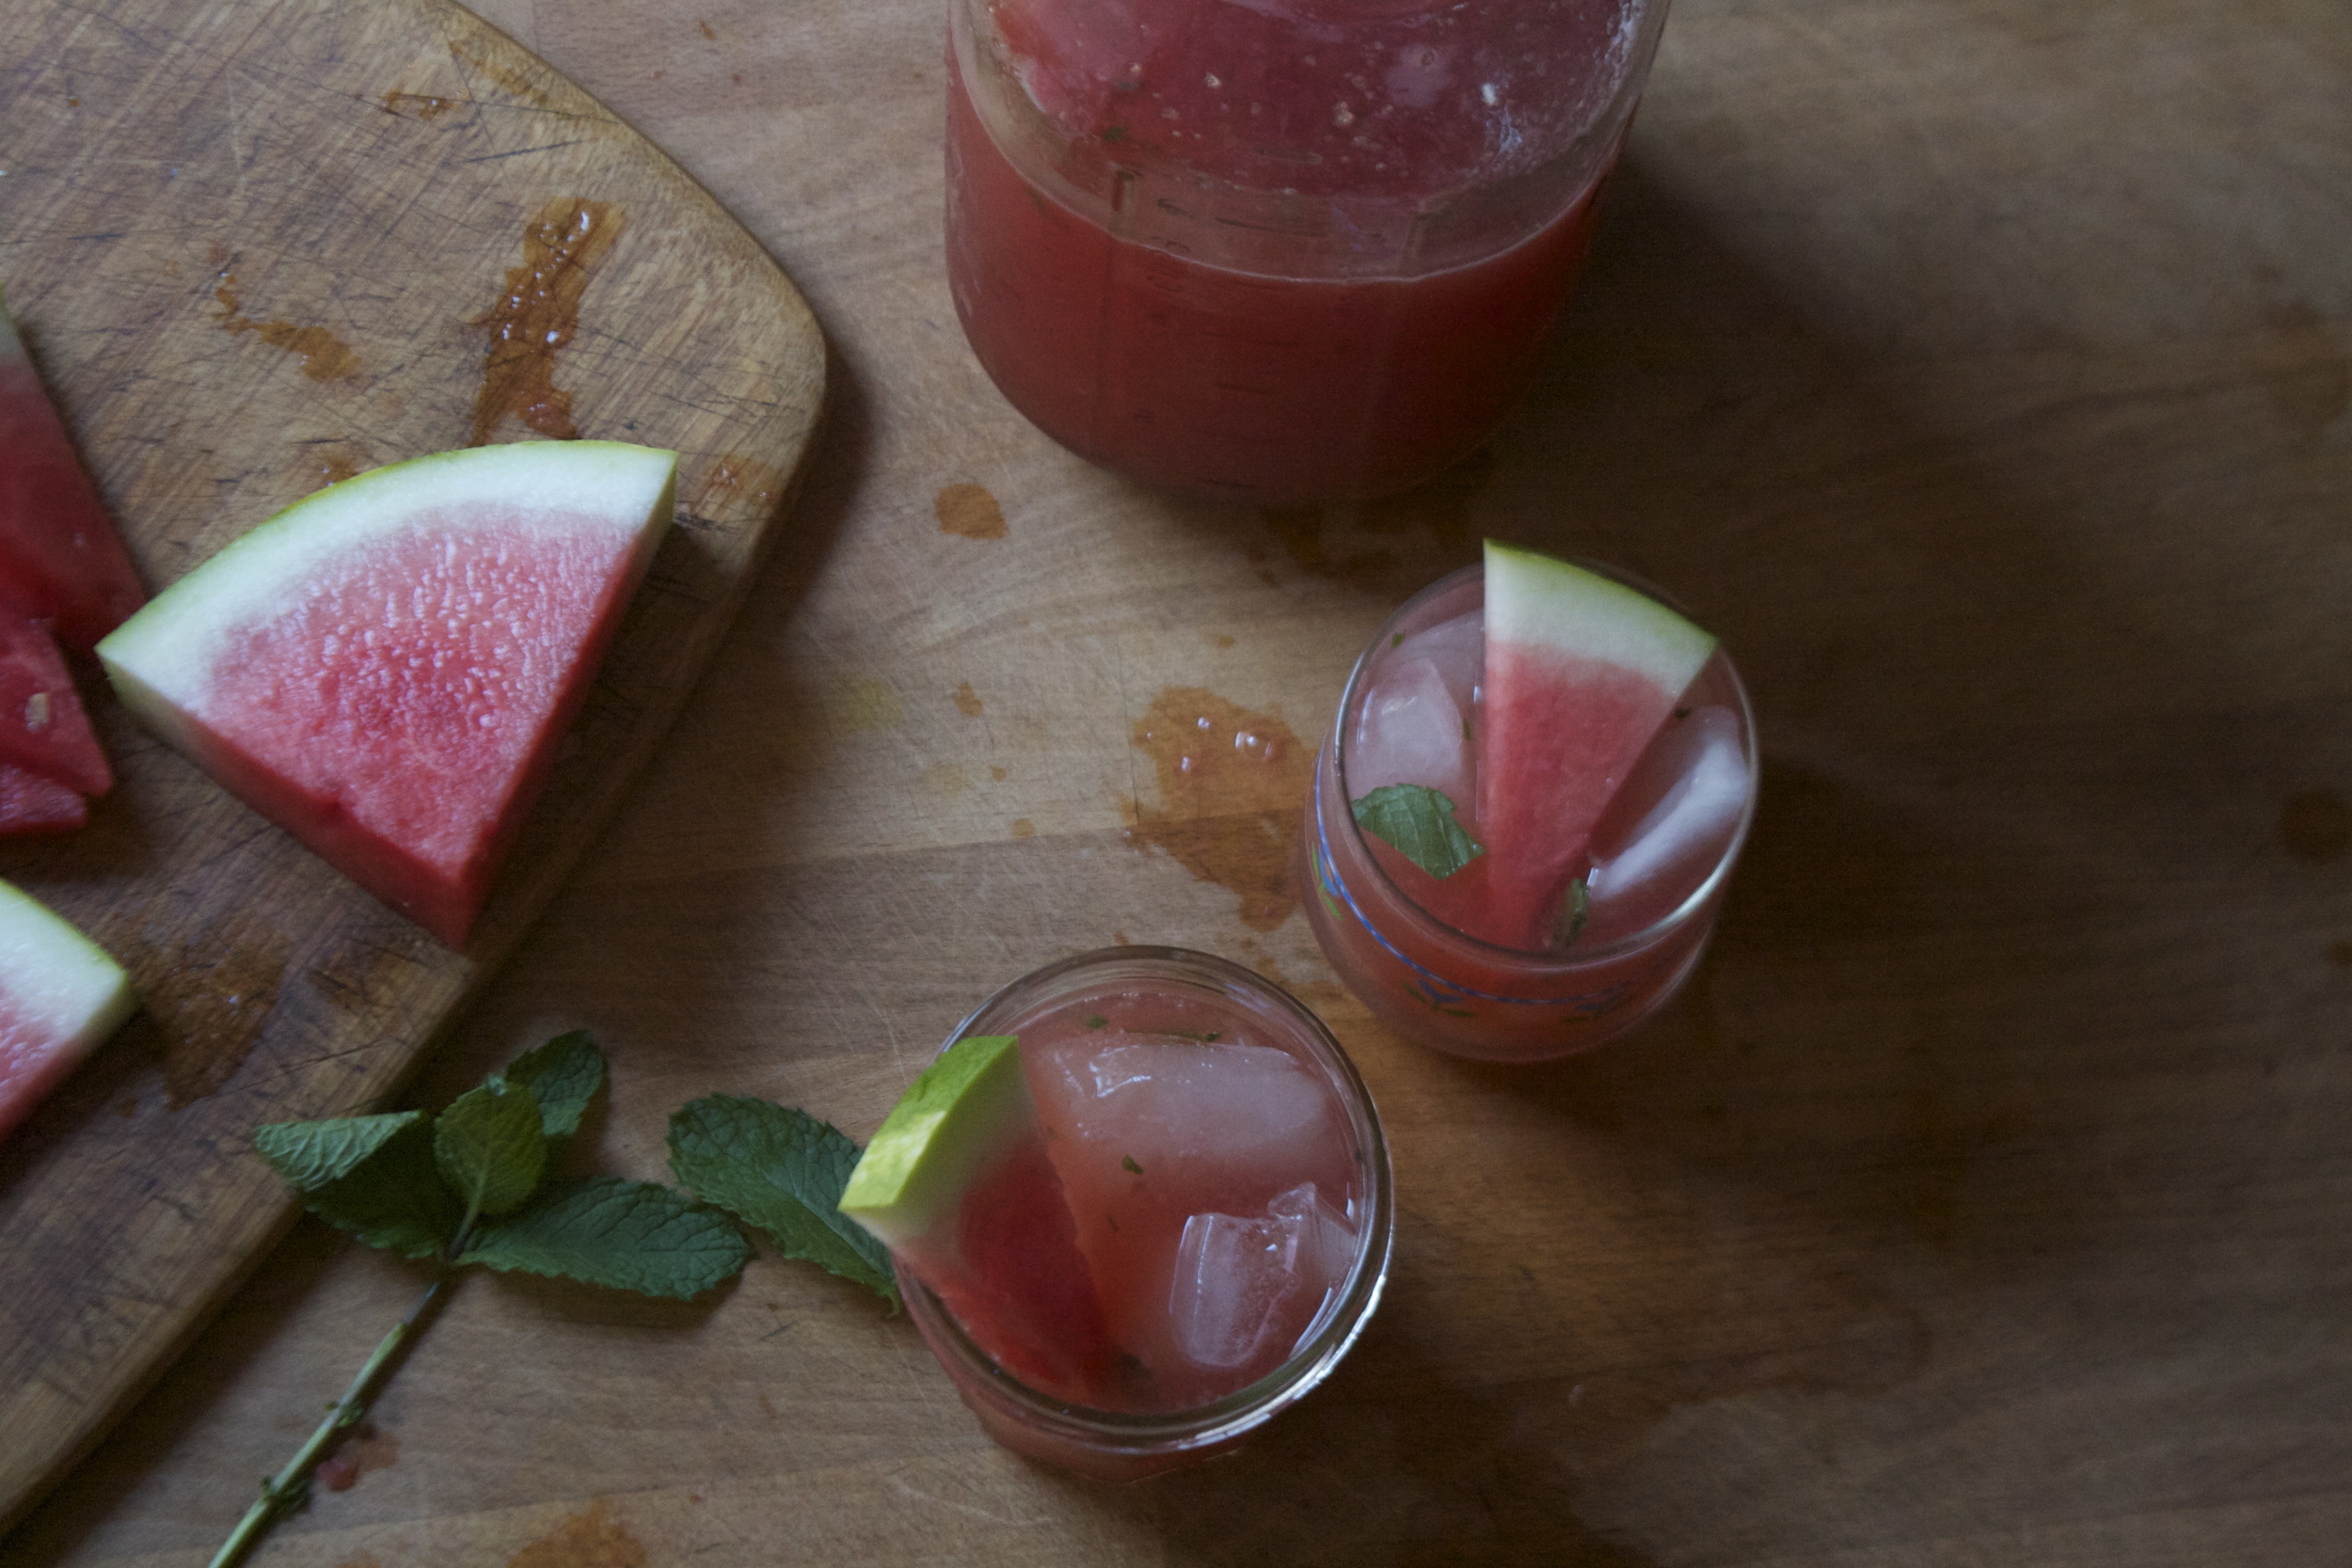
So you have cooled tea, pureed watermelon and the juice of a lime.

Pour it all together and mix it all up.

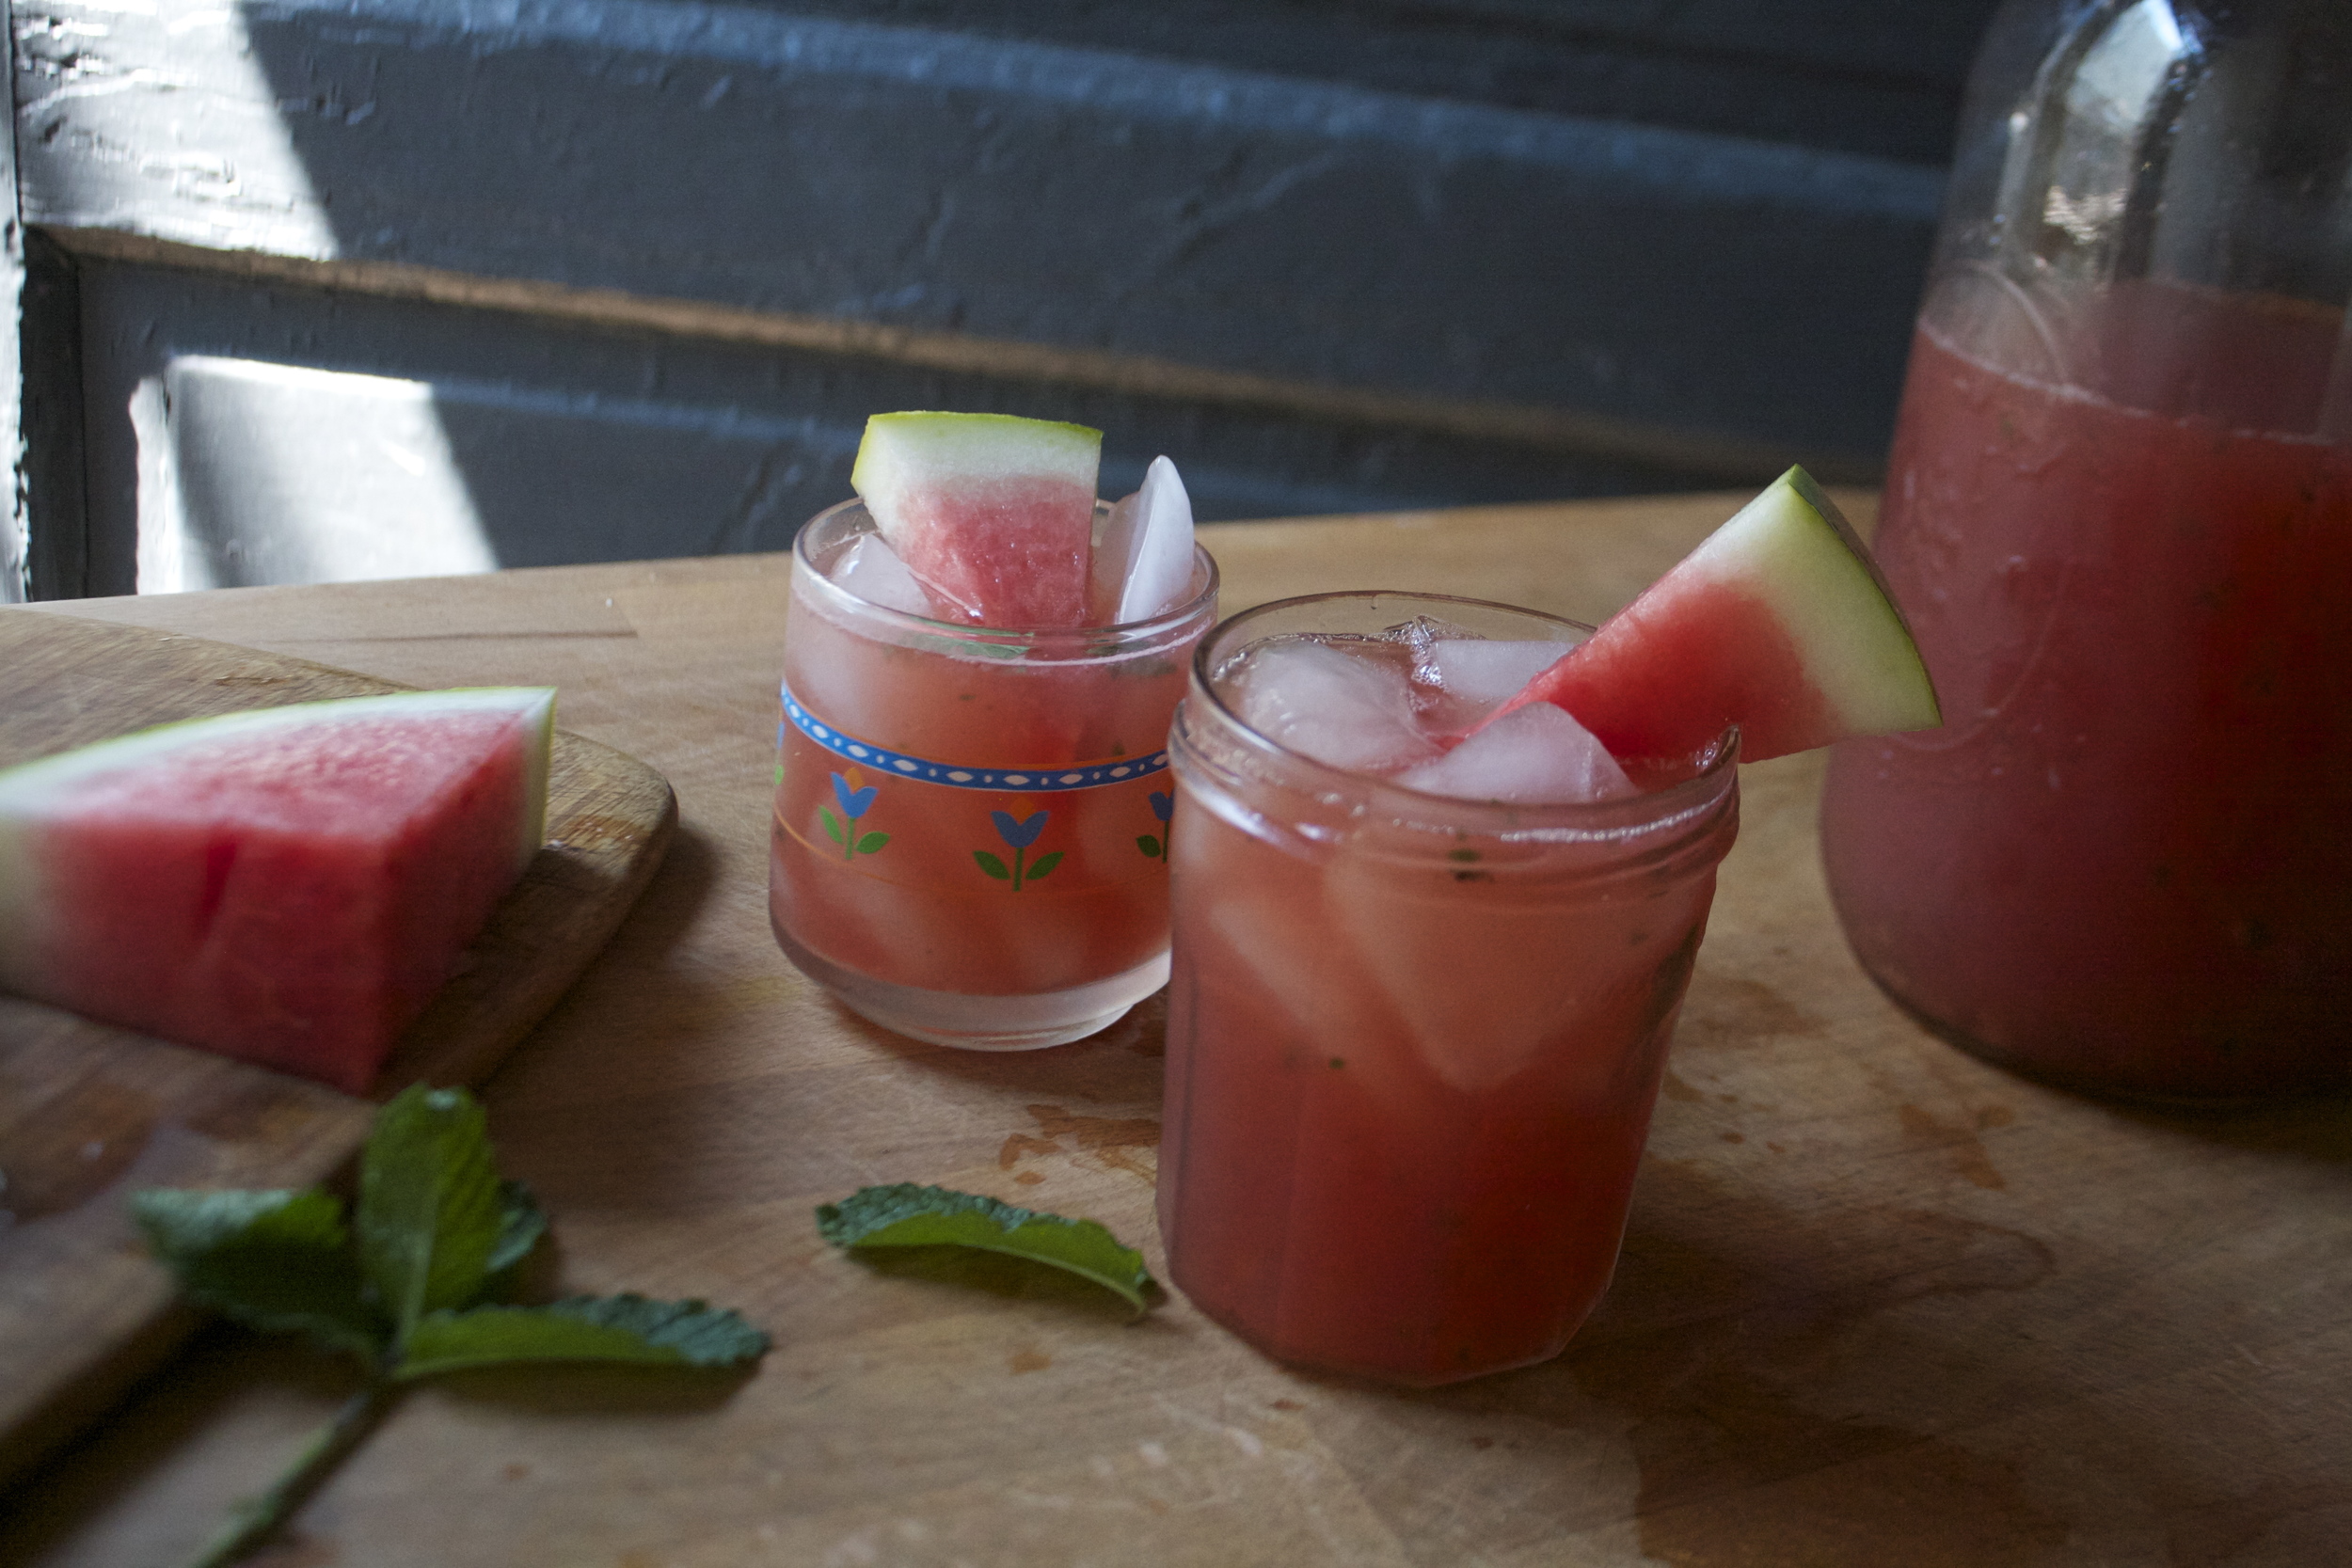
And there you have it. Fresh watermelon green ice tea, ready for your drinking.

All you need now are glasses full of ice and little wedges of melon.

All the summertime, all the watermelon.

Hope you are all staying cool.

-C


Watermelon Iced Green Tea

make 6 1/2 cups


  • 4 green tea bags
  • 4 cups water
  • 1/4 of a watermelon (about 2 1/2 cups liquid watermelon)
  • 1 lime (lemon works too)
  • a few sprigs of mint (optional)

Bring water to an almost boil (I let my tea pot whistle, turn it off and sit for a minute or two) and pour hot water over tea bags. Let steep for about 5 minutes, then remove bags and refrigerate tea until cold.

When the tea has cooled, take you melon, remove the rind, and puree the fruit along with the mint, with a blending device of you choice. Squeeze in the juice of the lime and give it all a good stir.

Pour tea over ice, garnish with a sprig of mint and a slice of watermelon if you want some fancy.

In 5 ingerdients or less, BBQ, breakfast, brunch, Dairy Free, drinks, summer, Sweets Tags Watermelon Iced Green Tea, iced tea, green tea, summer, watermelon, drink, fresh, easy, sugar free, vegan, gluten free, cold drink
Comment
Share

Coconut Oatmeal Ice Cream

June 22, 2016 Colleen Stem
IMG_5328.jpg
IMG_5338.jpg

Whats summer without some ice cream?  That is no summer, that just sounds like Hell. And this past weekend I was pretty sure I was in hell because it was so mother f*ing hot and for a while, I had no ice cream (and no air conditioner)

We used to have an air conditioner. My mom gave us one a few years back because she was worried about washer (so nice she was worried about the dog and not me, but that's cool) And we used it, not often, but when the temps got above 90, we would bust that mother out, hang blankets from the ceiling and create a little frozen ice box. Washers bed, the couch, and the tv were the only things in the box and it was fantastic.We would spend all day hanging out in the dark little ice box, cuddled on the couch watching tv. Washer would just lay there and I am pretty sure that he loved it just as much. But a couple years ago that air conditioner broke so now we don't have one. So now when it's mother f*ing hot, we are just really fucking hot. As for Washer, I send him over to my moms house. She has like 10 air conditioners. And the mr and I.. we bitch and complain and sweat and eat ice cream.

So I made this is my ice cream, a Colleen approved, oh so good I want to eat it for ever meal, type of ice cream. Nice and creamy with nice coconut oatiness. Its really pretty great.

And if there was ever a time when you woke up so hot that all you for wanted for breakfast was ice cream, well that's completely cool, especially with this kind cause it's kinda really healthy and made with oats and so it it definitely ok.

Here's to ice cream all day, every day.

The stuff. We got a can of coconut milk, some old fashion oats, a few dates and salt. ( we need just a pinch) Also need a little water.

IMG_5170.jpg
IMG_5179.jpg

Pretty simple here, just dump the coconut milk, oats,the dates(make sure they are pitted) and a pinch of salt to a blender and blend the crap out of it. And keep blending until its all creamy smooth and oh so nice then stick the blender in the fridge.

After about an hour or so the mixture becomes super thick. Stick it back on the blender stand and give it one last swirl to make sure it's all mixed up.

Pour/scrap mixture into a freezer safe container and stick it into the freezer... lick blender clean, watch you tongue and fingers.

After a hour or so, remove the kinda frozen ice cream and give it a good whip with a stick blender or if you don't have, scrap the ice cream back into the blender, and give it a swirl, stick back into freezer container hen back into the freezer until frozen.

And when you are ready to eat, remove from freezer, let sit out for 5-10 minutes to soften enough to scoop and do what needs to be done.

Look at that. So good.

And not only dessert, but this could be your breakfast tomorrow....and every day from now on.

-C


Coconut Oatmeal Ice Cream

  • 1 can coconut milk
  • 1/2 cup water
  • 1 1/2 cups oats (gluten free if needed)
  • 3-5 dates*
  • pinch of salt

*Note. I used 3 dates and found it sweet enough but I don't like things too sweet. If you know you like things sweet, do 5. Also, if the dates are not super soft, soak them water for a little bit.

Grab your blender and place all the ingredients in it. Start blending and blend and blend and blend until all smooth and creamy. (It might take a few minutes.) And once it's all blended up, stick the blender into the fridge .

After about an hour or so the mixture should have gotten nice and thick .Remove and blend the whole thing up once again and transfer the mixture to a freezer safe container. Place said container into the freezer. Let the mixture set up and get pretty close to frozen and remove from fridge and give it another good blend (I use my hand blender, but you can always scoop back into the regular blender to do it) Place back into freezer until frozen.

When you are ready for ice cream, remove for freezer and let sit out for 5-10 minutes until soft enough to scoop.  It might be super hard at first but don't worry, it soften up quick enough. I find scooping it easier with a ice cream scooper dipped in hot water....

Scoop it, add any toppings you want (toasted coconut and toasted oats are great) and then eat it.

Store left overs in freezer (duh) but place a piece of wax paper over the top to keep from freezer burn.

In 5 ingerdients or less, breakfast, brunch, Dairy Free, desserts, frozen, Raw, snack, Sweets, Vegan, ice cream Tags Coconut Oatmeal Ice Cream, Ice Cream, Vegan, Healthy, No refined sugars, breakfast ice cream, healthy ice cream, dessert, home made ice cream, clean eating, plant based
4 Comments
Share

Upside-down Rhubarb Maple Cornbread Cake

June 7, 2016 Colleen Stem
IMG_4732.jpg
IMG_4591.jpg

My rhubarb patch has turned into a rhubarb jungle and I couldn't be happier. At the beginning of the spring I moved like 10 of the plants to the new patch location and was wondering if I would even get a small crop this year. Guess my soil is premo cause those plants be ginormous.

And now I am harvesting the stalks from that jungle and I have rhubarb coming out of my ears. (I will be eating rhubarb all summer long) It's not really a problem per say, but there is so much, so it's time to get a little crafty with the tangy sour veggie stalk.(rhubarb sword fight anyone?)  One of the first things I made with some of it was a salad that consisted of roasted and slightly charred zucchini, onions, corn and rhubarb. I made it for the mr thinking that he was going to love it because he loves rhubarb so much. Well he didn't love it because of all the corn. (Such a weird egg that boy) But me,I loved it, like ate it all and then some. Corn and rhubarb are such a good combination and if the mr wasn't being such a weirdo, he should have liked that salad too. But it gave me the inspiration for the cake . A cornbread cake ( he loves cornbread) sweetened just the right amount with maple. Not exactly a rhubarb corn salad, but you get the idea. And this cake is totally multi purpose. Made as dessert and would go extremely well with a scoop of your favorite vanilla ice cream but would work equally as well served with a bowl of baked beans. I mean, can cake for dinner get any better?

The stuff. A bowl with cornmeal, flour, baking soda, baking powder, along with a little salt. Also need some maple syrup, soy milk, earth balance and apple cider vinegar.And of course we have a few rhubarb stocks,

Start with melting the earth balance and maple syrup together on the stove and letting it thicken up a bit. While it's thickening, think about the shape of you skillet and haw you want to layer you rhubarb, like the design of it.

Then when the maple is thickened and you know how you want to layer it, chop up your rhubarb and start placing in into the bottom of the skillet. Any way you do it, just make sure that the bottom is pretty much covered in rhubarb and that its only on stalk deep.

Rhubarb so pretty

Now for the batter. Easy easy. Just whisk together the dry and combine all of the wet into a bowl.

Wet and dried mixed together.

Pour the batter gently onto the rhubarb and smooth the batter out.

And into the oven it goes.

IMG_4693.jpg
IMG_4702.jpg

Pulled from the oven when the cornbread is golden brown and a tester stuck into it comes out clean. Let it cool just as it is for about 10 minutes... (give the maple time to cool and set up so it doesn't just get sucked into the cake) then flip in. I flipped mine onto a piece of parchment and a cutting board . You could try to go directly onto a cake stand or plate, but It might get a little messy. I like to play it safe when flipping things and just use a big cutting board. Now get ready to cross your fingers.....

Ta da!. Ain't it a beaut? And don't worry if a little piece or two get stuck in the pan. Either scrape it out and place it back on the cake or consider it a little snack.

There you have it. A cake good to go for all your meal eating needs.

Go rhubarb GO!

-C


Upside-down Rhubarb Maple Cornbread Cake

  • 1 1/4 cup flour
  • 1 1/4 cup cornmeal
  • 1 teaspoon baking soda
  • 1 tablespoon baking powder
  • 1 teaspoon salt
  • 1/3 cup melted earth balance + 2 tablespoons
  • 1/3 cup maple syrup + 2-3 tablespoons
  • 1 1/2 cups soy milk (or any plant based milk)
  • 1 tablespoon apple cider vinegar
  • 2-3 stalks rhubarb (enough to cover bottom of skillet)

Note. I baked this in a 10 inch cast iron skillet. If you don't have one, a 9 inch circle or square pan will do the trick, you are just going to have to simmer the maple in a pot ans pour in into the pan you are using...and maker sure to grease it!

Preheat oven to 350.

Place the 2 tablespoons of earth balance and the 1/3 cup of maple into a 10 inch skillet and place on medium heat. Stir around until earth balance is melted and the maple starts to thicken. Remove from heat. Now grab rhubarb cut into pieces and layer it any way you see fit, making sure to cover the bottom of the skillet but not layering it in to thick.

In a large bowl mix together the flour corn meal, salt, baking soda and powder. Then In a separate bowl, mix together the apple cider vinegar, soy, melted and cooled earth balance and the remaining maple. Pour wet into dry ans mix until even;y incorporated.

Pour batter gently on top of rhubarb, leveling out if need be, then slide it on into the oven to bake for 25-30 minutes or until the cake is golden brown and a tester stuck into the middle come out clean.

Remove cake ans let cool for for about 10 minutes. This is really important,because flipping to soon and all the rhubarb maple will just absorb and soggy up the cake and if you wait to long, all that goodness willl harden up and get stuck. SO 10 minutes.

Now when your ready yo flip, think about size. I used a big cutting board that , but a plate would work to, just make sure it;s slightly bigger then the skillet. Then just do it flip and lift the skillet away. Any pieces that might have gotten stuck can be scraped off and placed back where they belong.

Now your cake is ready and waiting for you to eat. Sweet enough for dessert, not to sweet that you couldn't serve it with dinner. Multi purpose cake.. the best kind!


In bread, breakfast, brunch, cake, Dairy Free, desserts, dinner, recipes, Sweets, Vegan, Vegetables Tags Upside-down Rhubarb Maple Cornbread Cake, corn bread, vegan, cake, maple, rhubarb, plant based, clean eating, sno sugar added, upside down cake, local
Comment
Share

Pineapple Jalapeno Hummus

May 18, 2016 Colleen Stem
IMG_3866.jpg
IMG_3814.jpg

I eat a lot of hummus. Like a lot. Every day, all day long. (seriously, I am always snacking on veggies dipped in hummus) So I am sorry to all around me that my breath always smells.. (I blame all the garlic in the hummus.)

Recently, during a particularly browsey grocery shop, I ended up in the hummus case (I always end up there) and found a new hummus flavor.  Pineapple jalapeno, WHAT.  I grabbed it right then and there, convinced that hummus gods were rewarding me for all of my hummus eating and have made me my very own flavor.

Got home, tossed all the groceries into the fridge and busted open the new hummus, a bag of carrots, and went at it. Oh man, it was good.(to often the store bought hummus flavors are not so great) The flavors were all there, sweet and spicy, and creamy.  It was fantastic, I ate almost all of it and I knew I had to make my own.

And I did and you know what, it was even freaking better! (Fresh it the best!)

So If you are a hummus person of any kind, this is a fantastic exciting flavor that will make you all sorts of happy.

The stuff for the hummus:  chickpeas, tahini, olive oil, garlic, and salt and pepper. And for flavor add ins,  fresh pineapple and a jalapeno pepper.

Chickpeas (rinsed and drained) go into the food processor with some tahini, the juice of the lemon and salt and pepper.. The garlic I actually pulsed in the processor first (to avoid big raw hunks) and some olive oil are also going in on this.

Blended until a smooth, creamy perfection.

Now for the fun stuff. Dice up the pineapple and remove seeds (or not) from the jalapeno and dice that up too

Toss it all (minus a few little pieces of garnish if you want) into that creamy dreamy hummus.

Pulse pulse pulse until the chunks of stuff are all incorporated . Make it super chunky or super smooth, up to you. I like mine kinda chunky, but not too chunky, if you know what I mean.

Into a big bowl, topped with a few little diced up pieces of jalapeno and pineapple, you know, for prettiness. And lots of cracked pepper.. Lots.

Now eat. With whatever ( I like veggies or just give me a spoon, Ican eat hummus all by itself)

Hummus for life!

-C


Pineapple Jalapeno Hummus

Makes about 2 1/2cups

  • 2 1/2 cups cooked chickpeas (one can)
  • 2-3 cloves garlic
  • 2 tablespoons tahini
  • 1 lemon
  • 2 tablespoons olive oil
  • 3/4 cup fresh pineapple
  • 1-2 jalapenos
  • salt and pepper

Rinsed and drain chickpeas. Add garlic and a little olive oil to the food processor and pulse until the garlic is a little minced. Add in the drained chickpeas,  tahini, a sprinkle of salt ans pepper, the juice of the lemon and another tablespoon of olive oil and blend until smooth.

Dice up pineapple into smaller chunks and remove seeds (if you want) from the jalapeno and chop that into smaller pieces . Add to the hummus and pulse until combined. You can leave it chunky or blend until smooth. Just stop blending when you reach you desired consistency . Garnish with more chopped pineapple and jalapeno and lots of freshly ground pepper.

Serve with whatever you eat your hummus with.

Store left over (there probably won't be any) in a container in the fridge.

In Vegan, snack, Savory, recipes, pulses, Gluten Free, grain free, dinner, Dairy Free, brunch, beans Tags Pineapple Jalapeno Hummus, hummus, beans, pulses, fruit dip, vegan, gluten free, plant based, healthy, clean eating, fun food, summer, dip, spread
5 Comments
Share

Maple Banana Walnut Oat Squares

May 10, 2016 Colleen Stem
IMG_3451.jpg
IMG_3417.jpg

Every year I play this game with myself.. Is it allergies or am I sick. The past few days I have been feeling kinda crappy, waking up with itchy, gunky eyes. My throat hurts, my head is like a balloon, and I am just feeling beat.. 

I think it's that I am sick (because I don't want to have allergies) but whatever it is, it sucks, but usually goes away after a week (like every year because its really allergies). Blah.

But enough about my balloon head, lets talk these maple banana walnut oat squares. These yummy gems of the oat square world are just what you need in your life. Healthy, protein packed, nutty, and a touch sweet. No junk, just good stuff all made with little to no effort. If you like banana bread, you will be all into them. I was inspired to make these by the extremely ripe bananas that need to be eaten asap and the mr's lack of eating a healthy breakfast (I want him to eat, and I want it be oatmeal). I know him well enough that if I make a snack like thing and leave it out to eat, that he will eat it. For breakfast.

So weather or not you are looking for a good way to get in some good stuff into your tummy or just want some good tasting stuff in your mouth, this is the breakfast/dessert for you.

The stuff. A couple of ripe bananas, a bunch of rolled oats, some yummy walnuts, real maple syrup, cinnamon, baking soda and a wee bit of water.

Start with the walnuts in a food processor. Turn it on and process until....

You got this walnut butter. Do not eat it, it's for the squares (it is so good).

IMG_3355.jpg
IMG_3358.jpg

Add in the oats, cinnamon and baking soda and turn the processor back on until you get a nice unified crumbly mixture.

Now in goes the bananas and the maple syrup. And you guessed it, blend some more. While you are blending, if the mixture seems to dry, add in a splash of water, to wet, just toss in another handful of oat. The mixture should be like a muffin batter consistency.

And that's it. If you want some nut chunks, add in a handful more of walnuts (do it) and pulse just to get them mixed into batter.

Then pourthe mixture into a well greased 9x9 baking pan and spread out evenly. Toss those suckers into the oven to bake.

Oh so good bananas give off the best smell when baking. After about a 1/2hour, these bars are nice and golden brown and a fork stuck in the center comes out clean, which means, they are done.

Cut into square , eat one or two, and save the rest. Eat for breakfast, as a snack, or for dessert. And a smear of peanut butter on top is aces too!

Later dudes.

-C


Maple Banana Walnut Oat Squares


  • 3 cups old fashion rolled oats (gluten free ones to keep in GF)
  • 1 cup plus a a small handful walnuts
  • 1/2 cup maple syrup
  • 2 rip bananas
  • 1 /2 teaspoon baking soda
  • 1 teaspoon cinnamon (optional)

Place 1 cup of walnuts into a food processor and blend until it turns into walnut butter.. about 3 minutes. Add in the oats and blend together until it becomes a crumbly mixture. Add in the maple, baking soda, cinnamon and the bananas (break into chunks) and blend until incorporated. If the mixture seems lie its too dry, add in a splash of water, and if to wet, add in another handful of oats. The batter should resemble a muffin batter.  Once blended, mix in the remaining walnuts and pulse just to mix them in.

Pour mixture into a well greased 9x9 baking pan and stick into the fridge for 10ish minutes and preheat oven 350

And after the time in the fridge, remove the pan and slide them into the oven. Bake until golden brown and a tester stuck into te middle comes out clean. (about 30 minutes)

Remove and let cool. Pop out of pan, cut into square, and eat to you face.

Squares will last 3-4 days in a airtight container or freeze them and they will last until you eat them.


In breakfast, bread, Vegan, Sweets, snack, recipes, Gluten Free, desserts, Dairy Free, brunch Tags Maple Banana Walnut Oat Squares, vegan, Gluten free, oatmeal, oat squares, breakfast bars, healthy, clean eating, plant based, bananas, maple, walnut, nuts, protein
Comment
Share
← Newer Posts Older Posts →
 

https://thelovelycrazy.squarespace.com/config#/|/about/

Me. Food Maker.Food eater. Woo HOO!

STEM+NODE  SMALL BATCH AND ONE OF A KIND POTTERY

stem+node ceramics


____________________

Subscribe

GET NEW POSTS IN YO EMAIL

You are AWESOME!!!


@thelovelycrazy 2014-2021

­
­
0 items
$0