• stem+node ceramics
  • HOME
  • Food Recipes
  • About
  • Contact
Menu

The Lovely Crazy

Street Address
City, State, Zip
Phone Number

Your Custom Text Here

The Lovely Crazy

  • stem+node ceramics
  • HOME
  • Food Recipes
  • About
  • Contact

Chocolate covered Peanut Butter and Jelly patties

February 12, 2022 Colleen Stem
IMG_0682.jpg
IMG_0667.jpg

The other day I was talking to So, my little 9 year old niece about Valentines day and what she loves about it. Of course the conversation quickly because about food and then about candy and what kind of candy is the best. So, being the eater that she is, had a tendency to steer towards anything chocolate and eats more peanut butter then me, (and I eat a lot) which meant that it was decided that the best candy is chocolate and peanut butter anything. We then decided that I should make peanut butter chocolates for Valentines day.. We wanted to do it together but she has like school and all sorts of after school ballet classes all week so yeah, she told me I should just go ahead a make a batch for her, And you know what, that is what I did. And because I wanted to make them a little more, I don’t know, fun, I added the jelly. Who wouldn’t want a chocolate covered peanut butter and jelly?

These patties are super easy to make. The only time consuming part is freezer time for setting the peanut butter. There are no crazy ingredients, just peanut butter, jelly, graham crackers (the peanut butter part is ground up with graham crackers to give it some heft and a little cookieness) and chocolate (plus a little oil to melt with the chocolate). And the results are as good, if not better then any chocolate you will find at any store. Plus if you are feeling fancy you can drizzle white chocolate and or add sprinkles because um, yeah. So cute!

Anyways, I made the patties and have hidden most of them away (from the mr) to bring over to So. I am a little worried she won’t like the jelly because she really has very specific food preferences and we didn't talk about the jelly part…. But again, super easy to make and if she doesn't like them I know a bunch of other littles (and the mr) that will love them. And now that I am thinking about it I am probably should make another batch to share with the other littles anyways so I’ll just make more and set aside a few without the jelly, just in case.

Man those littles, they got me whipped. HA!

Now to the peanut butter and jelly patties!

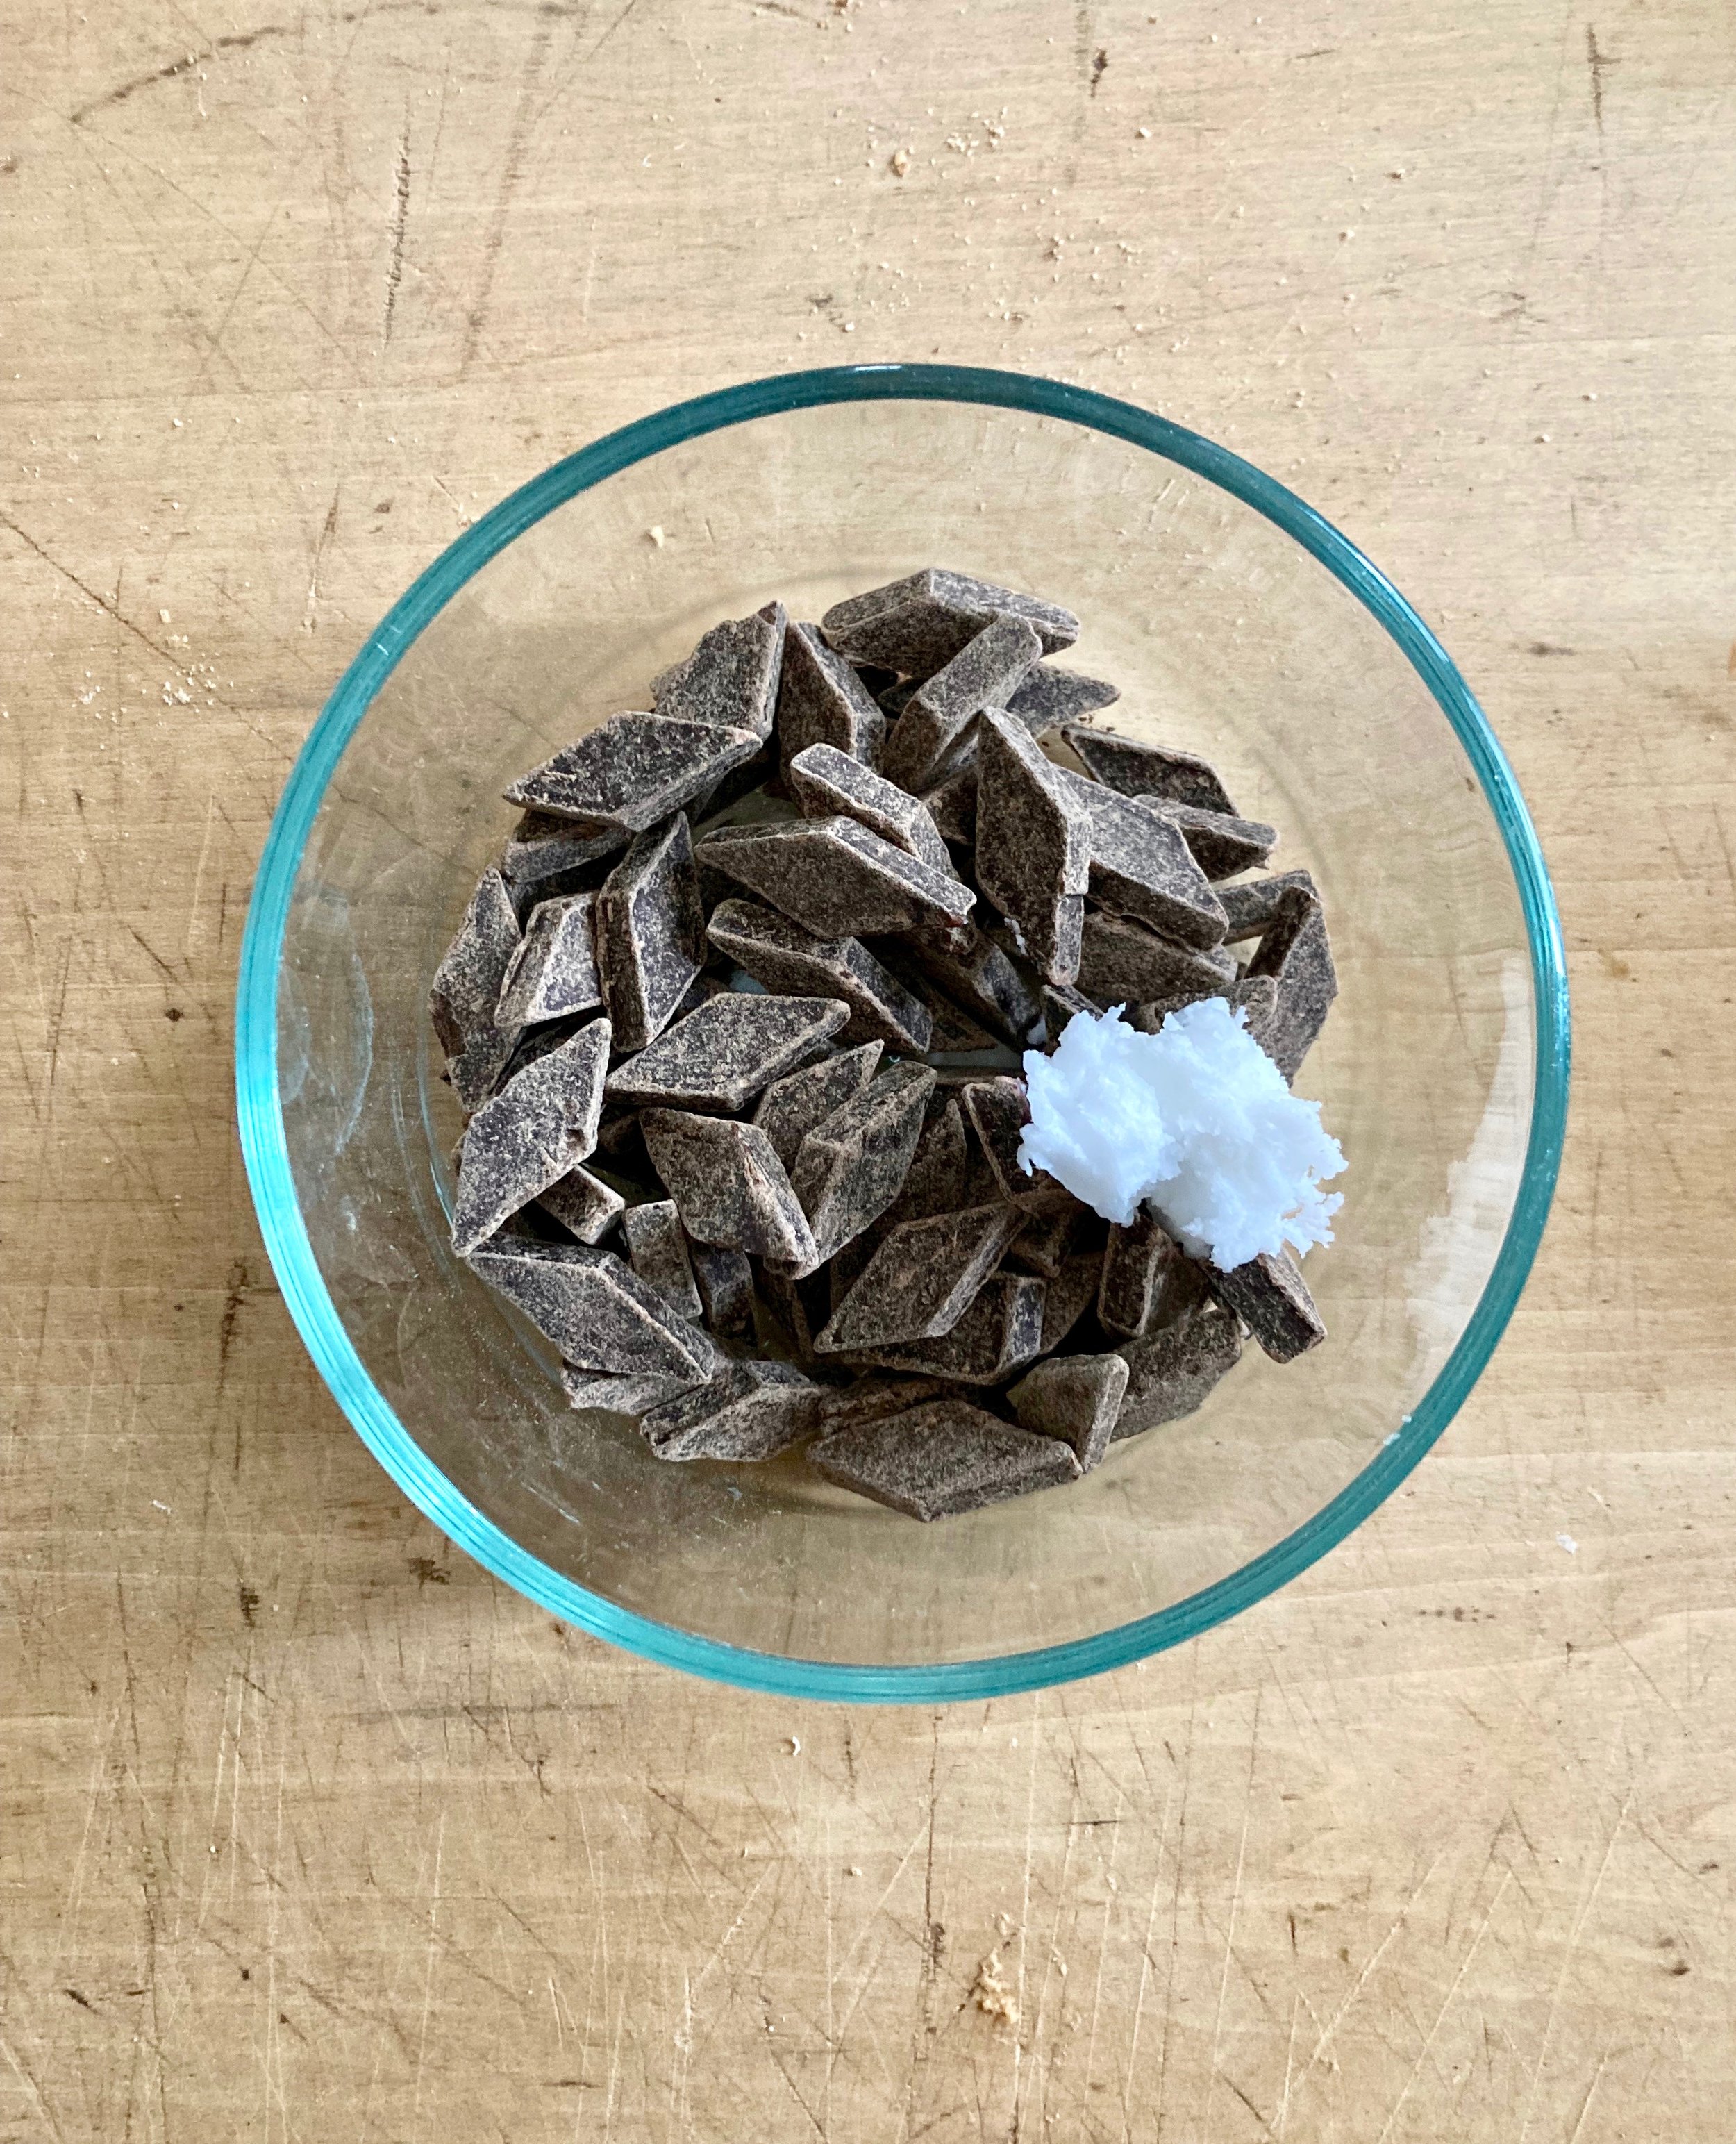
The stuff. Peanut Butter, jelly, graham crackers, chocolate chunks and coconut oil.

IMG_0622.jpg
IMG_0627.jpg
IMG_0641.jpg

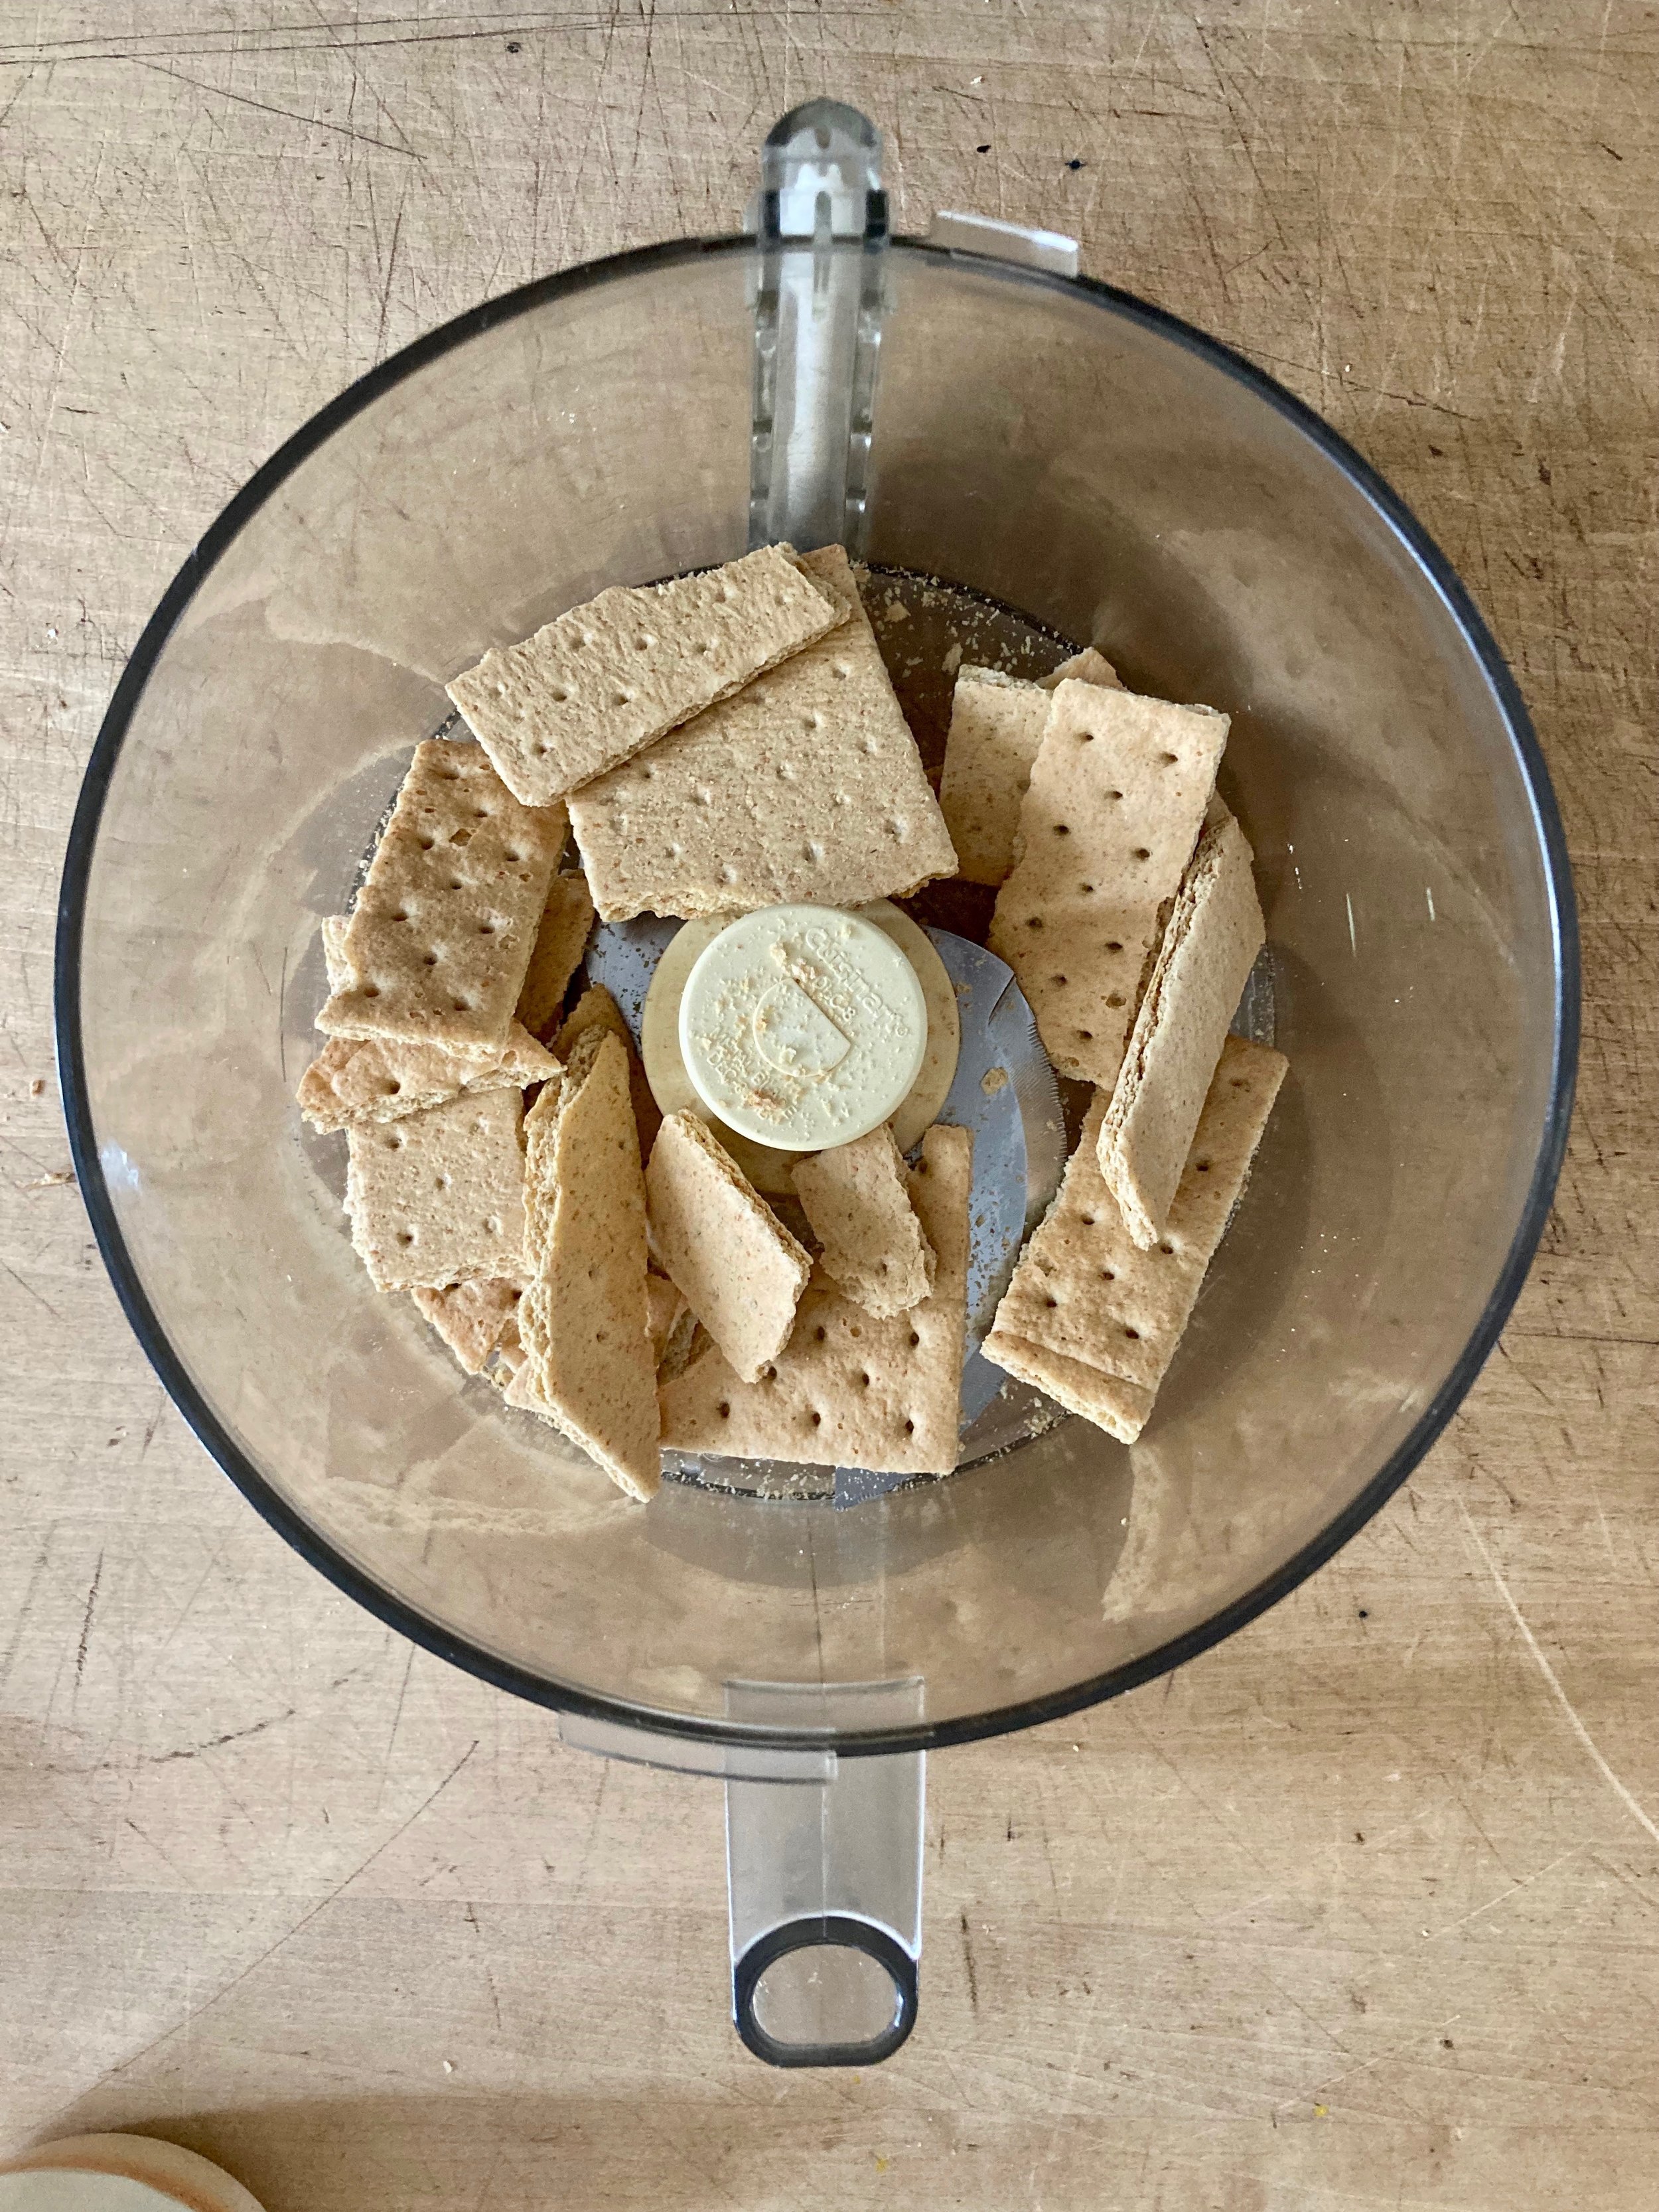
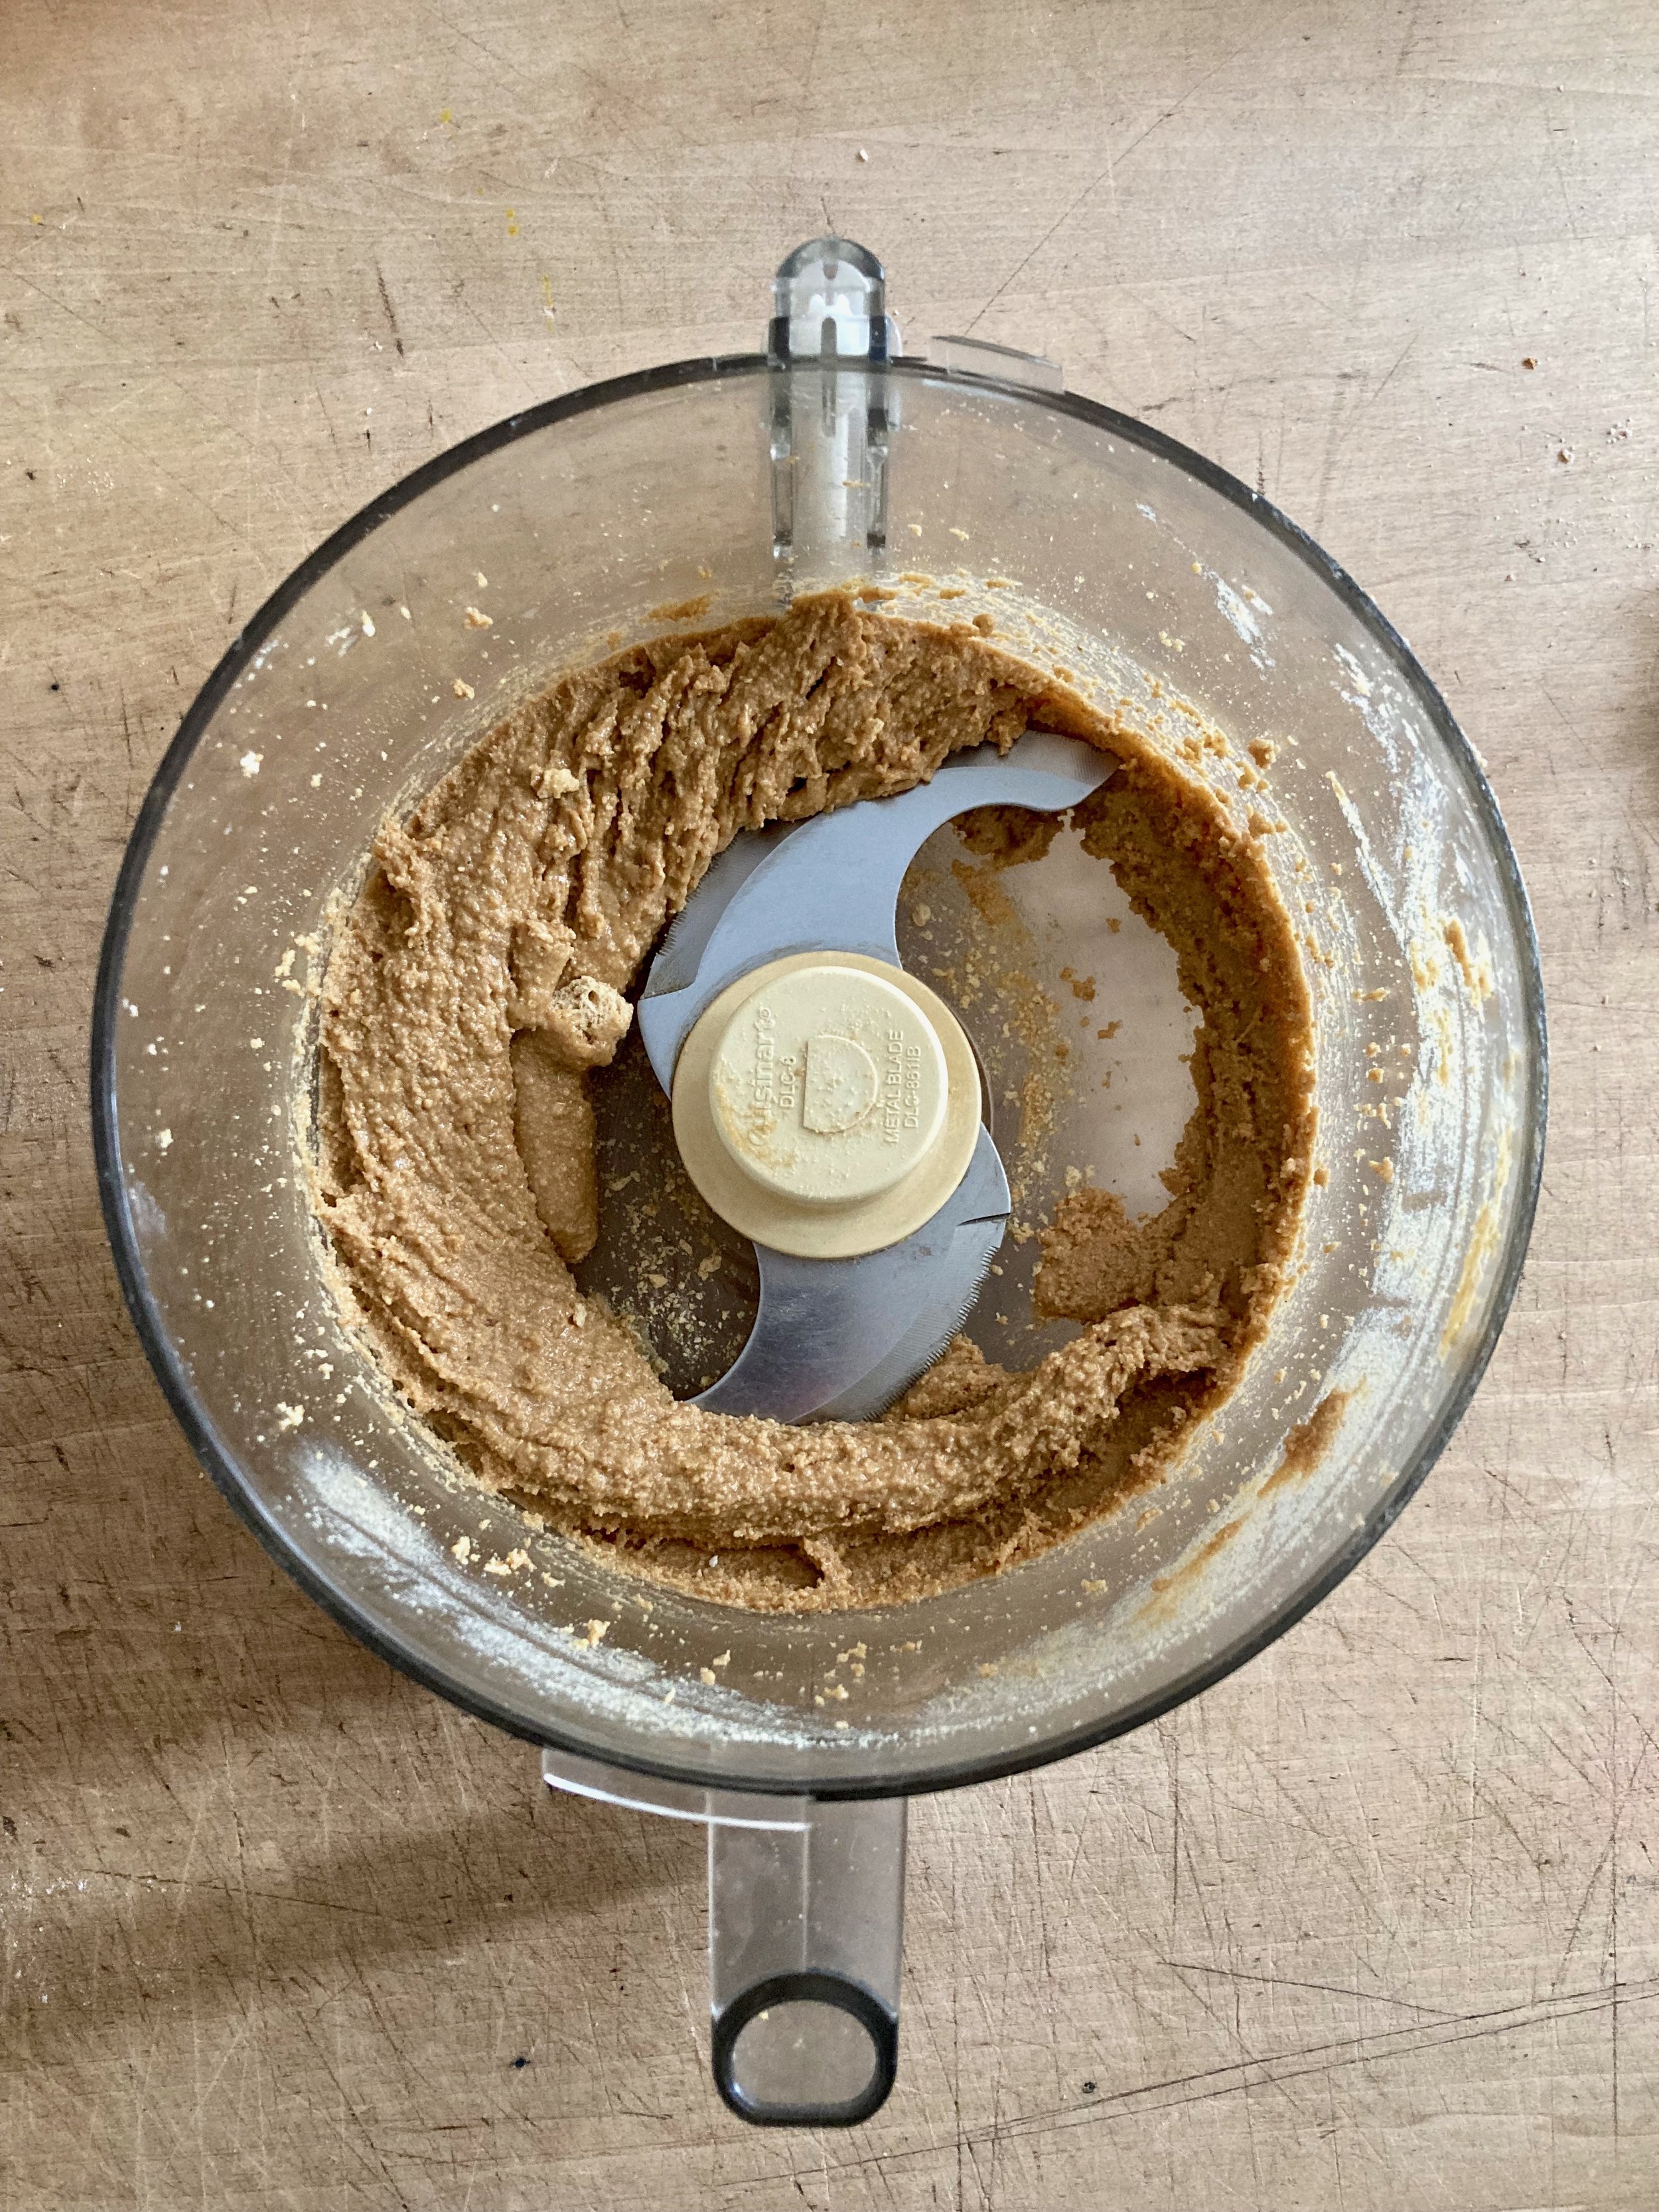
Super basic. Add graham crackers to food processor and blend until the crackers are super crumby. Add in the peanut butter and pulse (scrap sides if needed) until the graham crumble and peanut butter are completely incorporated.

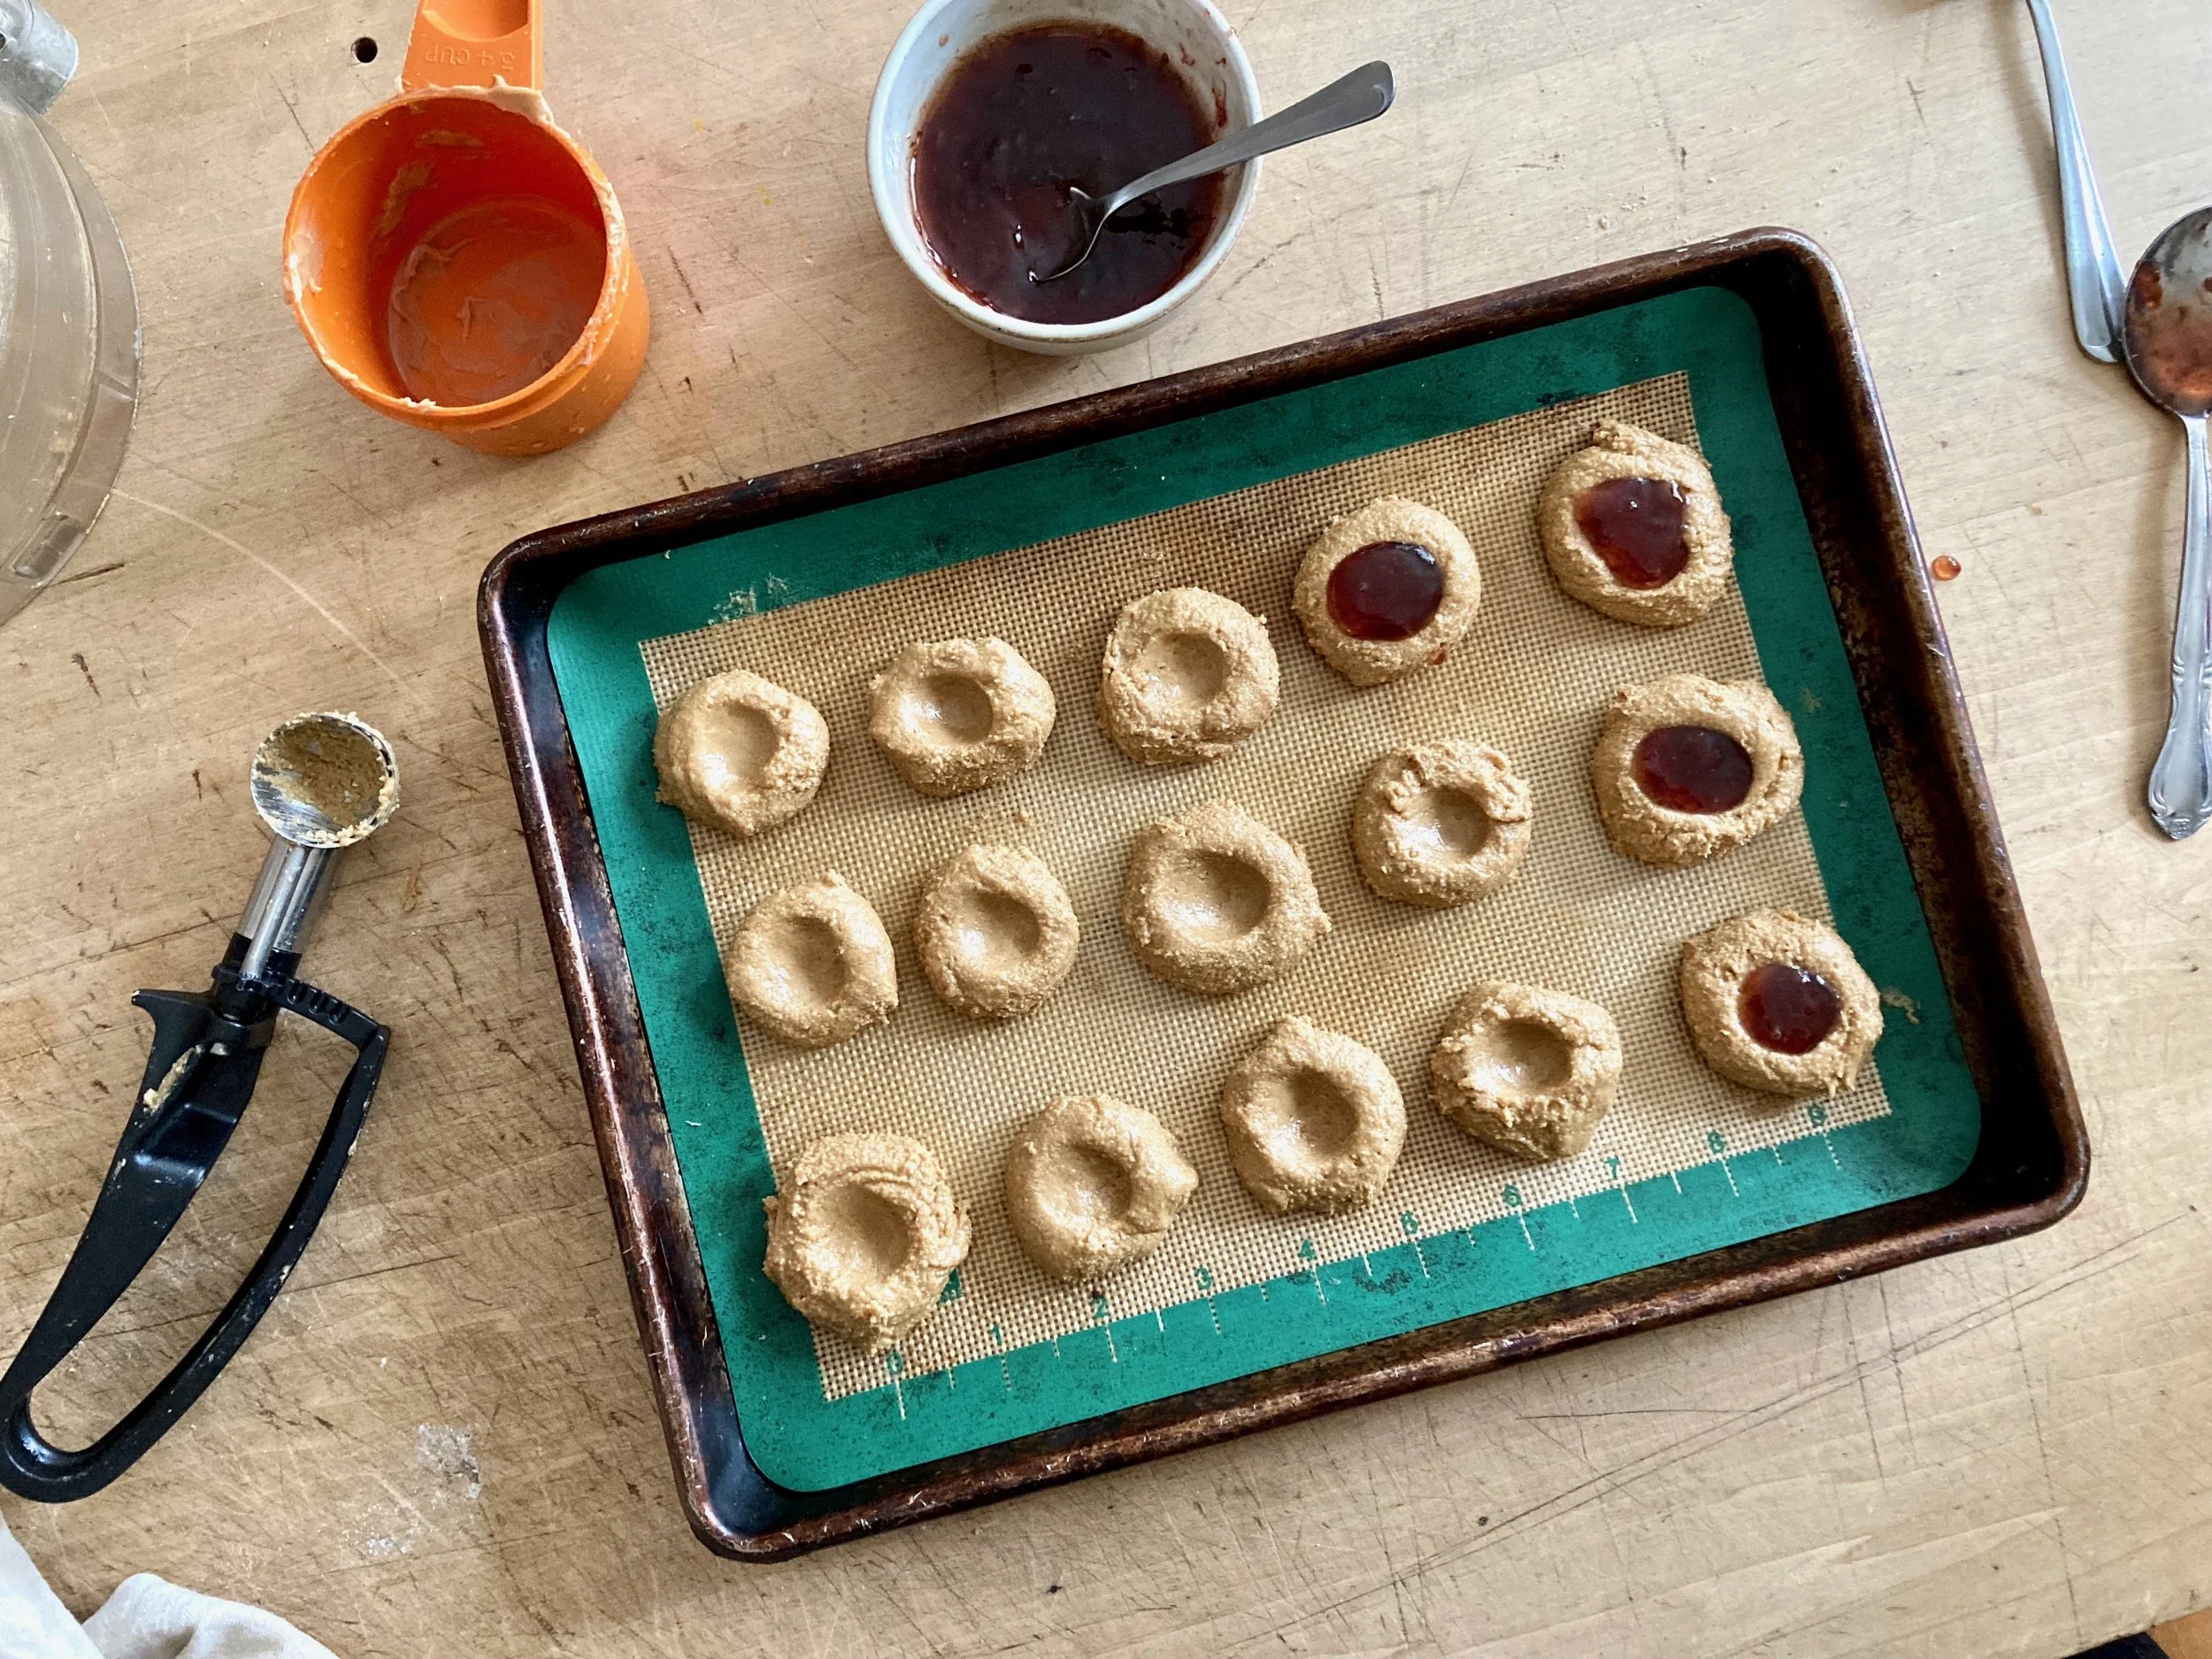
Scoop out balls of the peanut butter graham cracker mixture onto a wax or silicone lined baking sheet. Once all scooped, roll into a ball then with you finger (dipped in water to prevent sticking,) make a little well in each ball and flame it a bit. Fill the wells with jam then place the baking sheet into the freezer. Freezer for about an hour.

IMG_0653 2.jpg
IMG_0656.jpg

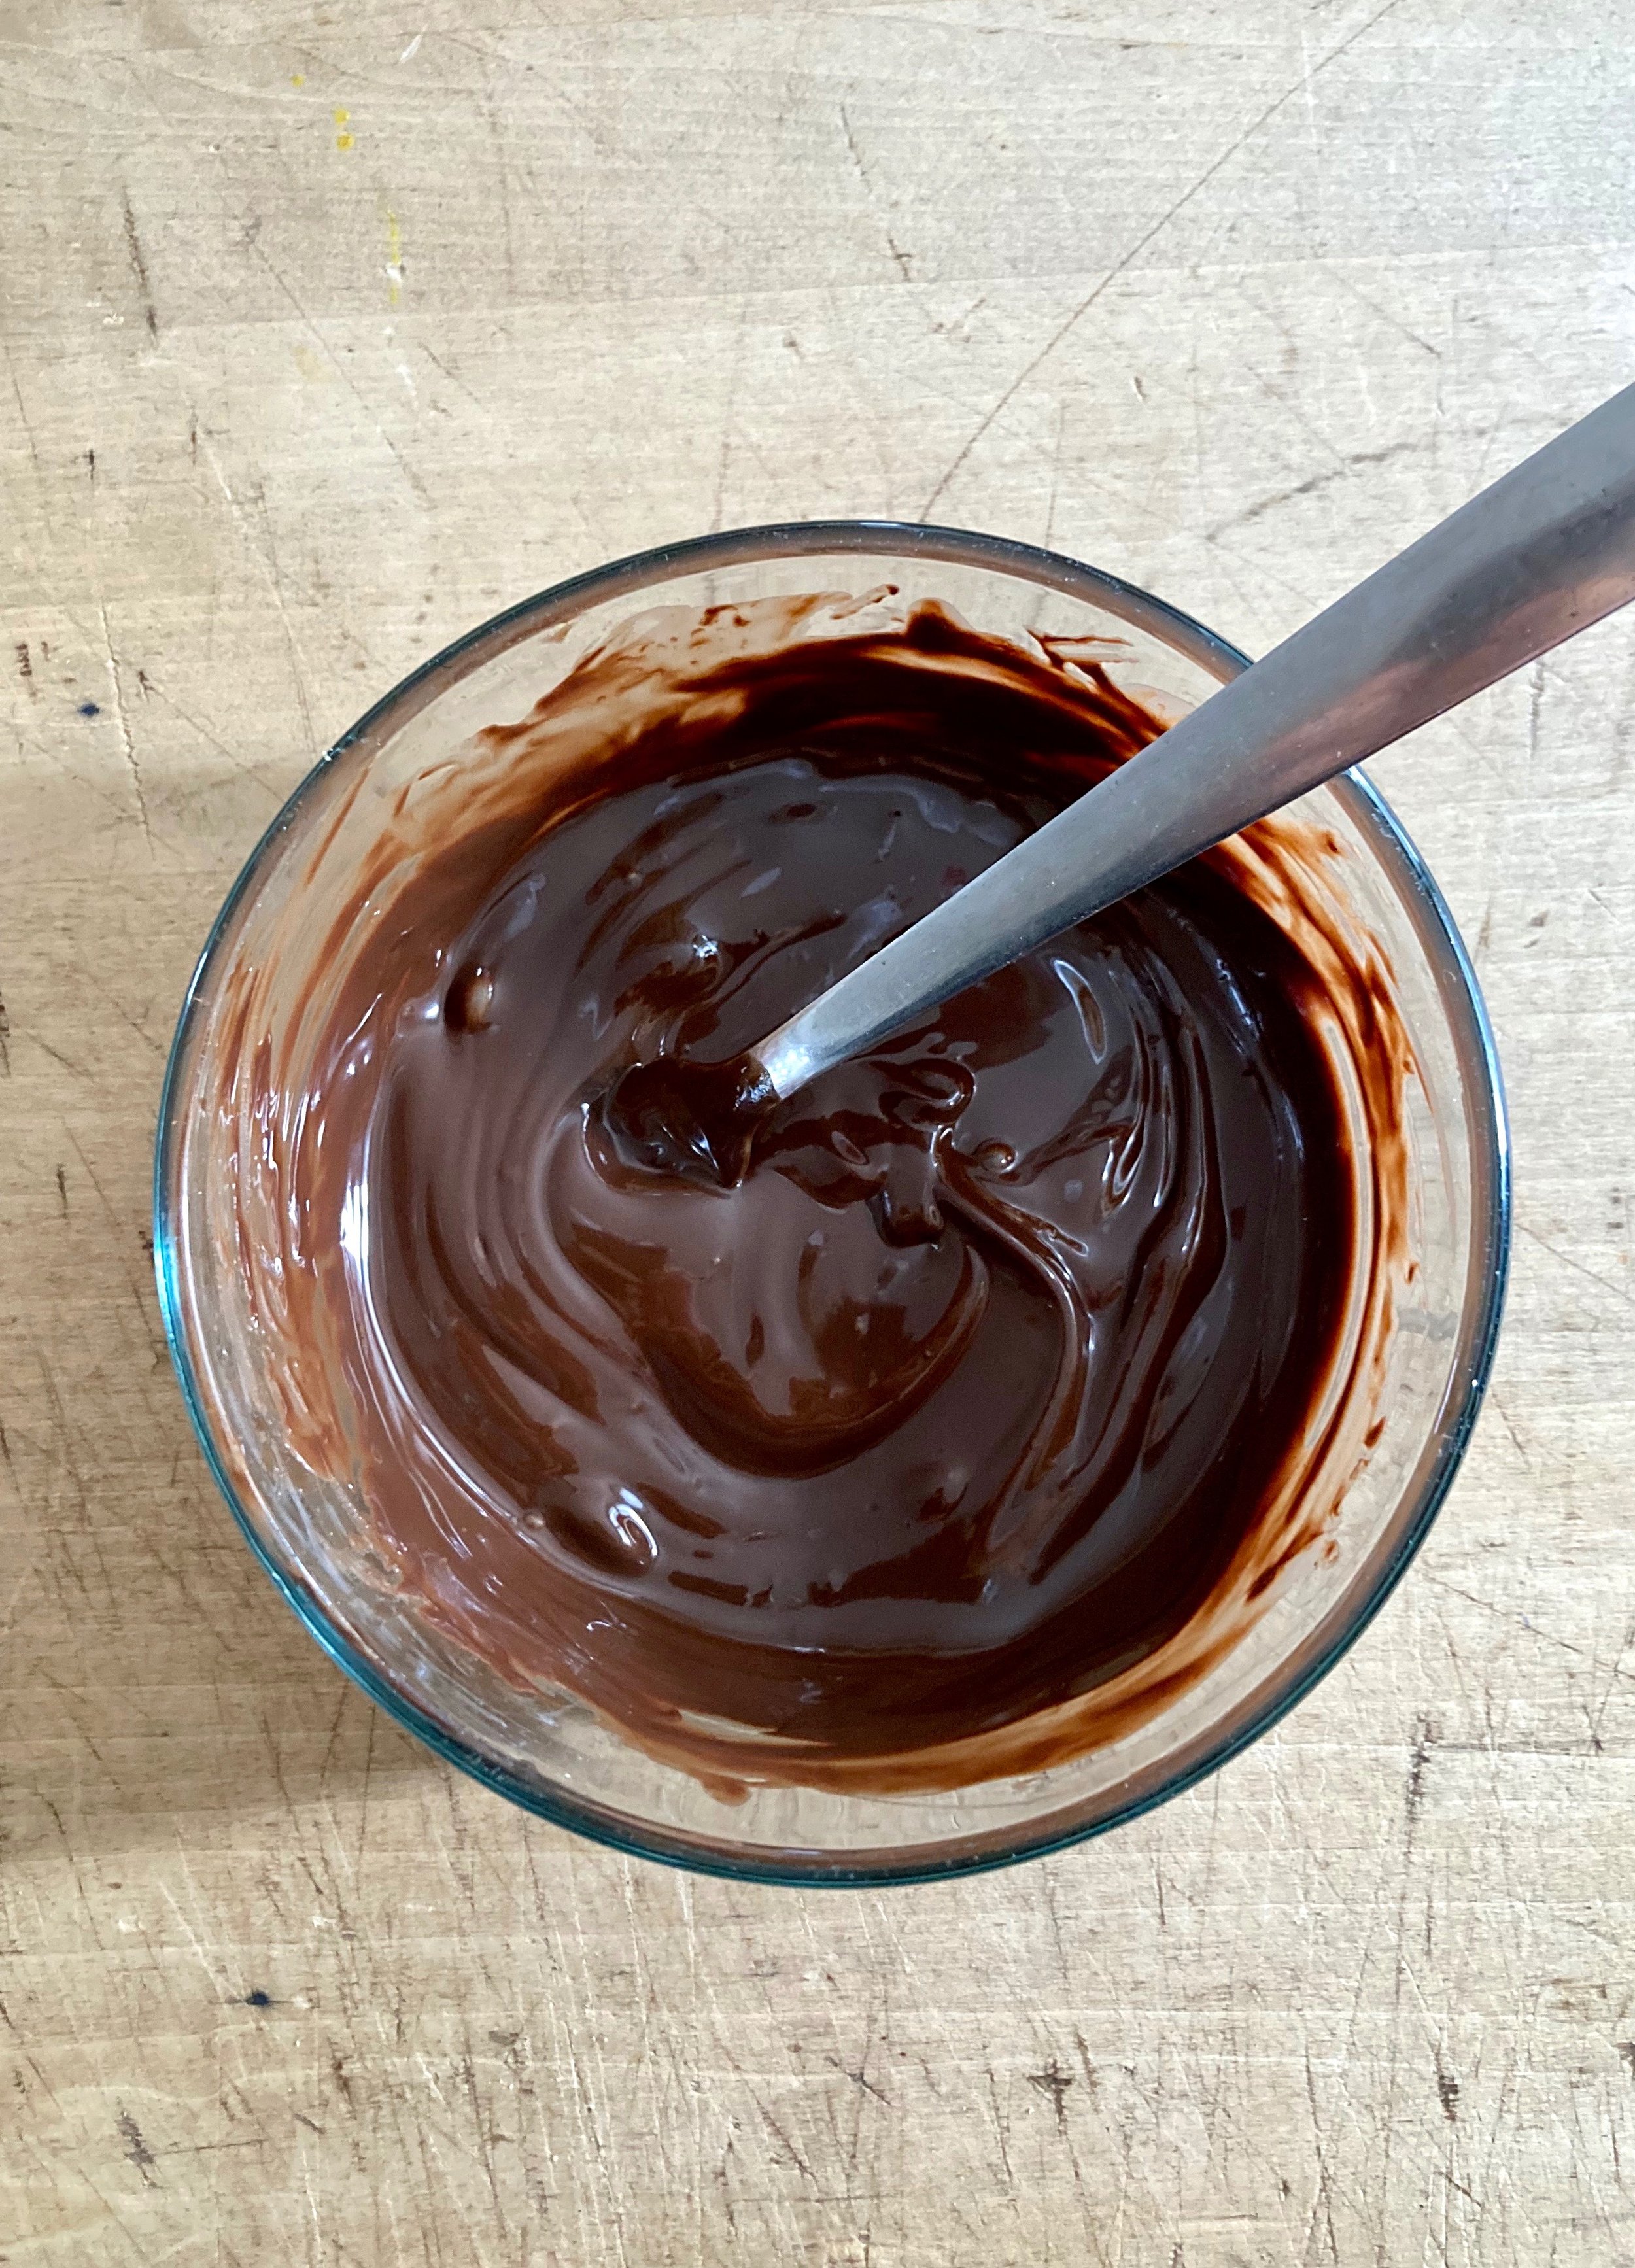
Right before you take the peanut butter jelly patties from the freezer, melt chocolate. Just add the oil to the chocolate and place in the microwave for about 30 seconds, Stir around until it starts to melt. Stick it back in the microwave for another 15 seconds if it didn't get ht enough to become smooth.

And once you have the chocolate smooth, grab the frozen patties and start dipping them in the chocolate. I don’t know what I was thinking at the time but I went ahead and spooned the chocolate on top then realized that I need to the do the bottoms so had to let them harden and them had to dip the bottom after whihj was annoying. So Mayne just dip the whole thing in the first time.

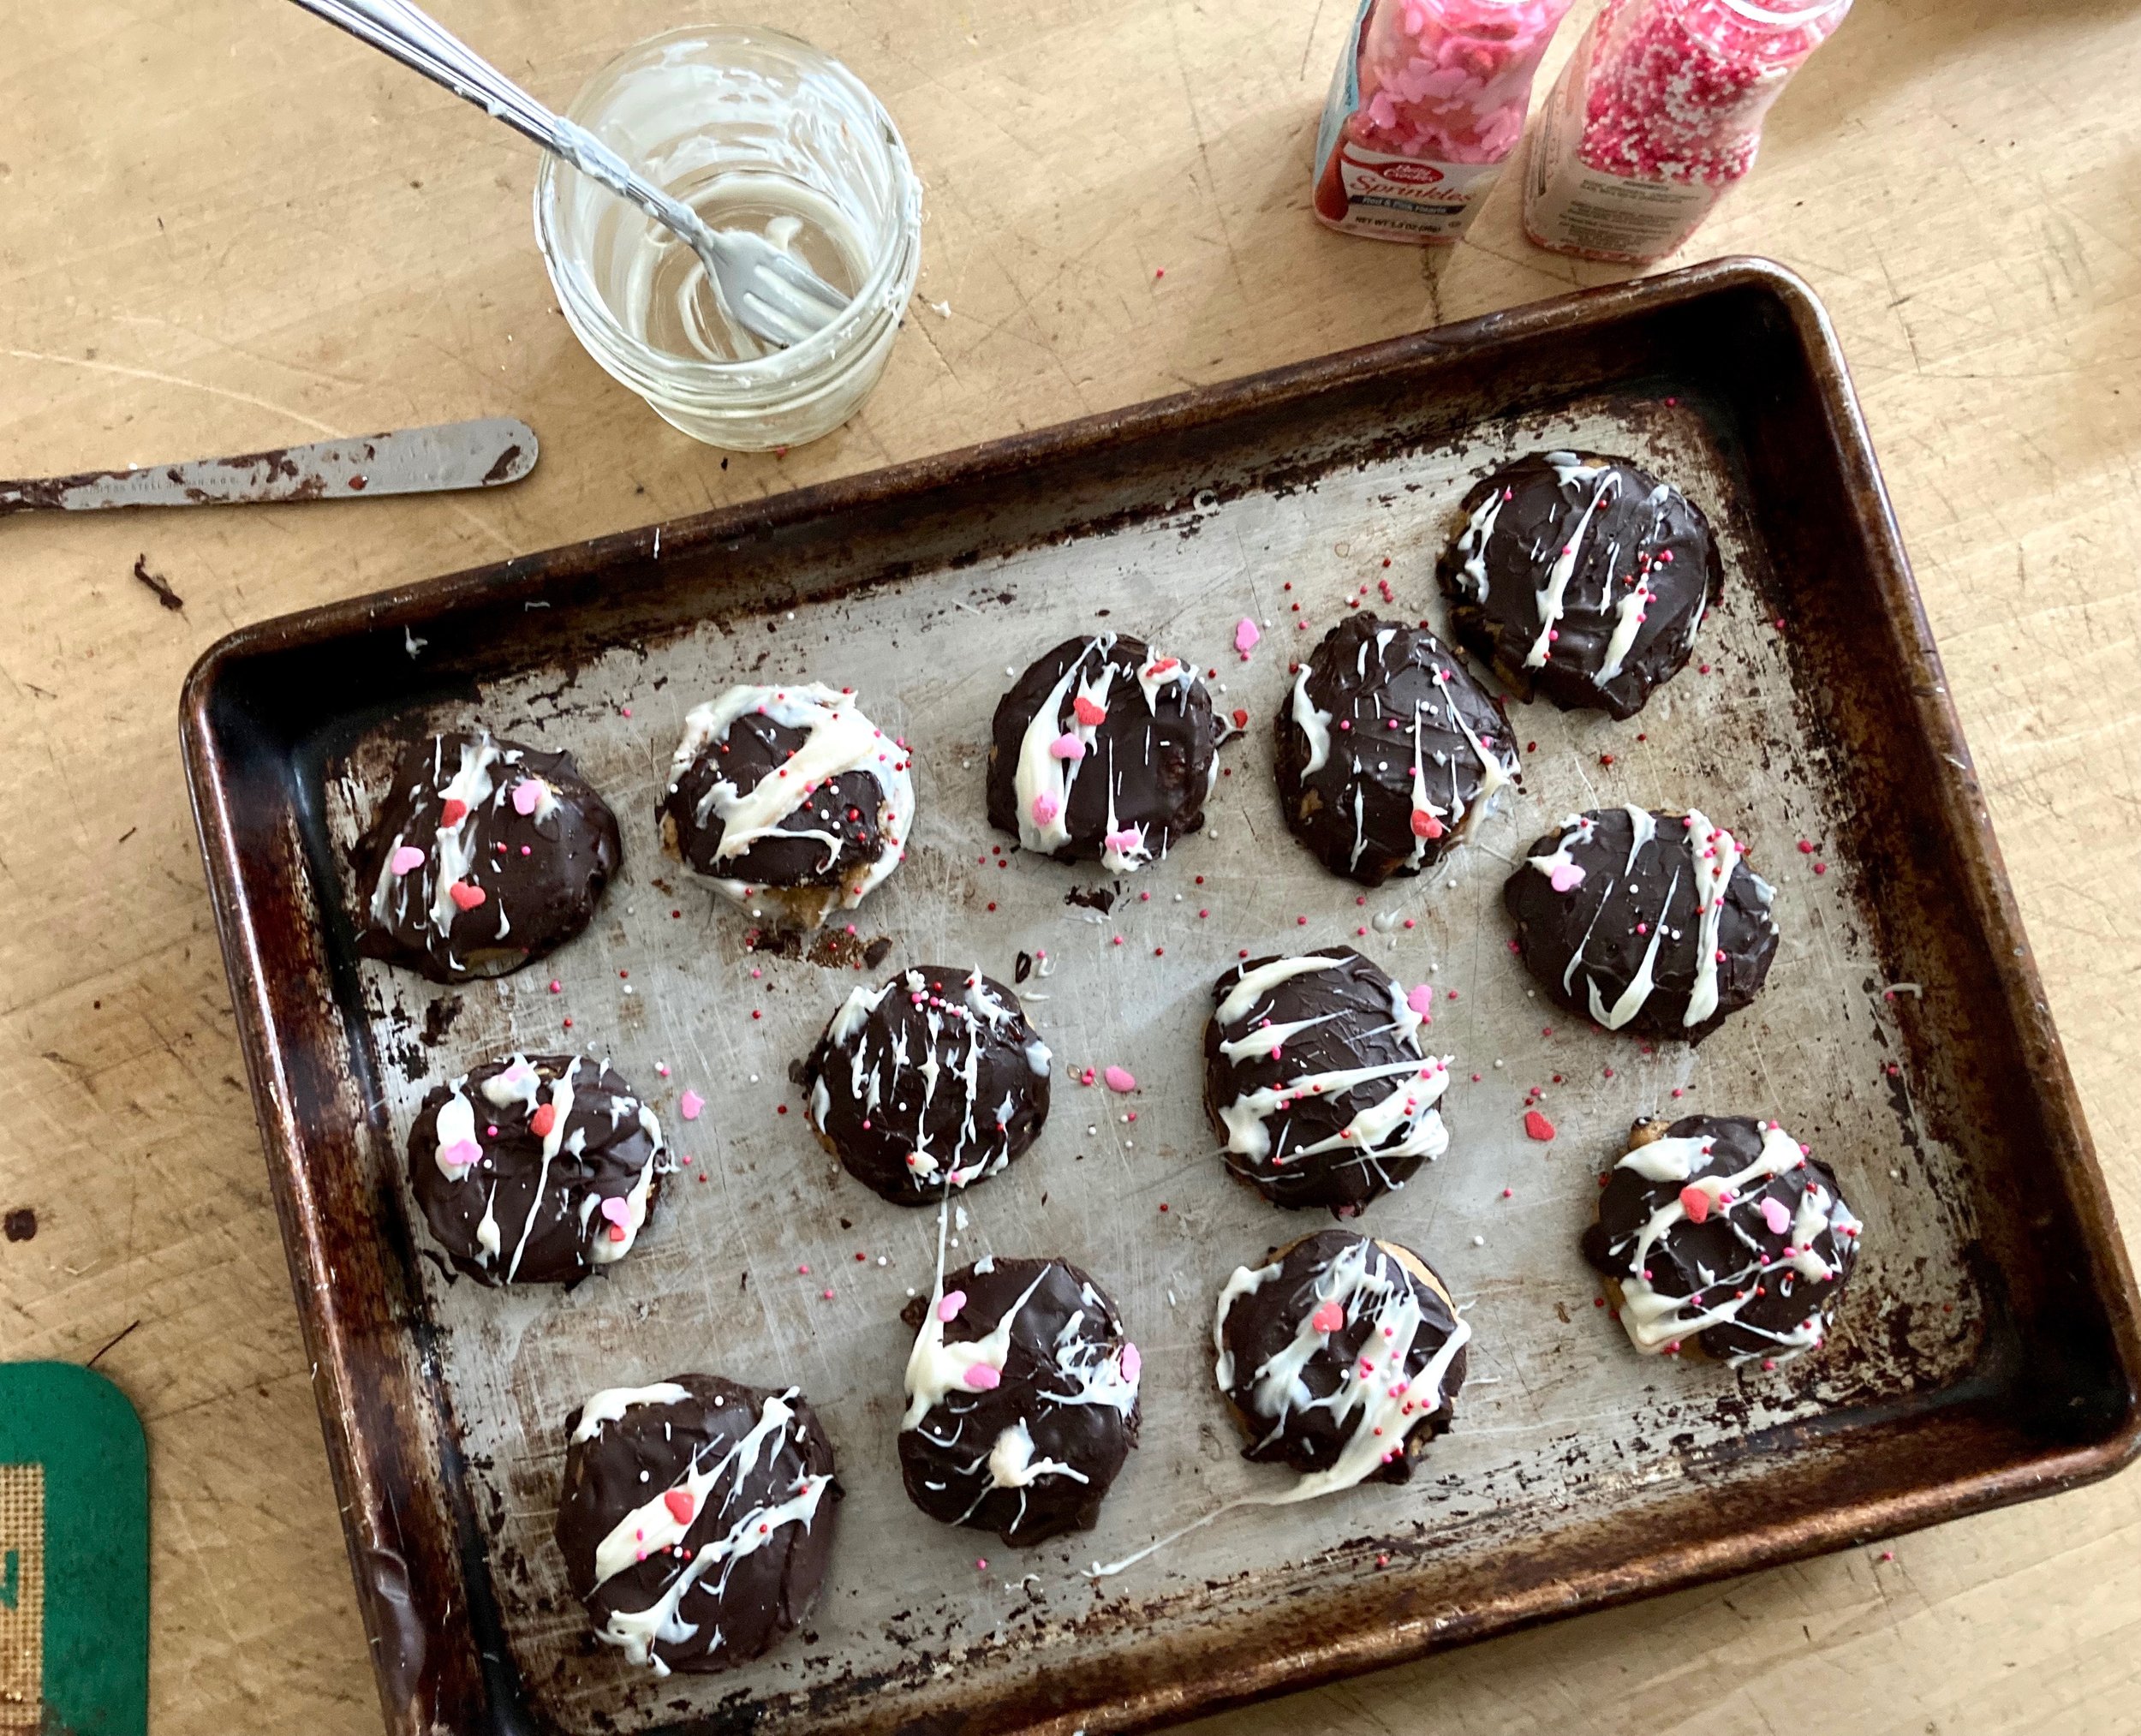
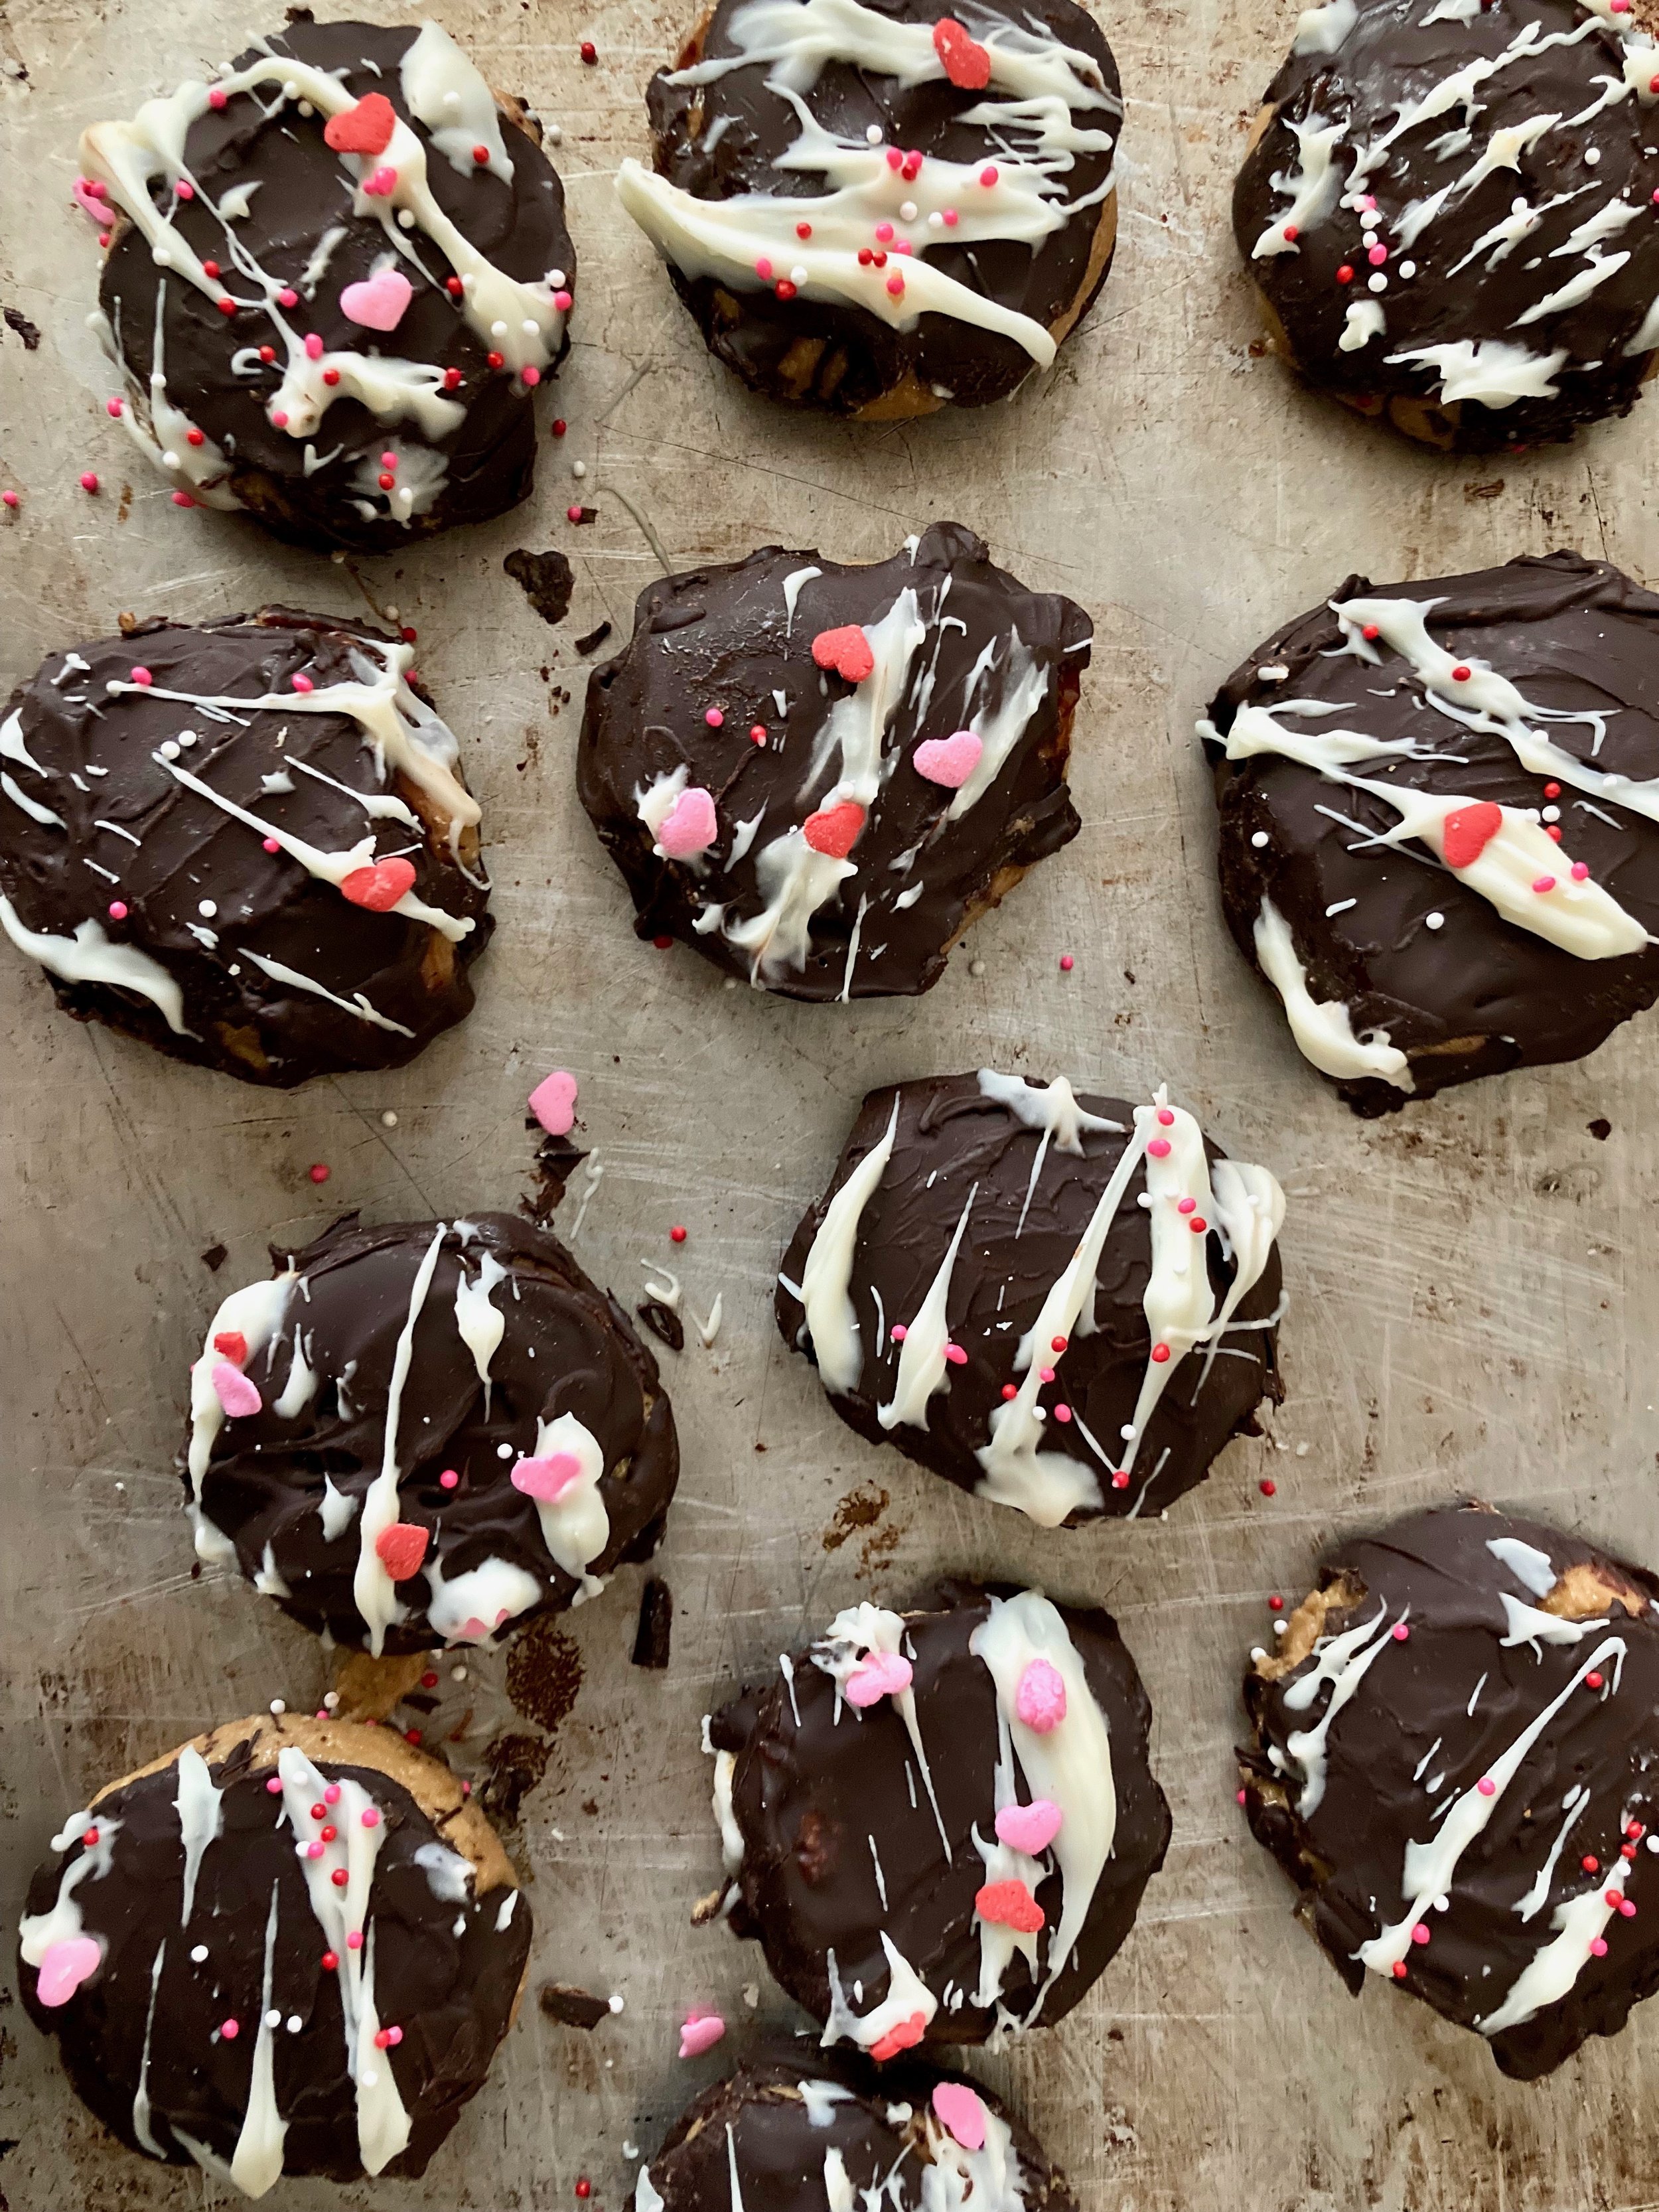
And if you are feeling fancy, decorate the patties. Sprinkles are alway welcomed around here so I melted a little white chocolate and dazzled it on and stuck the sprinkles to that because the chocolate what already hard (if adding sprinkles they need to be added before the chocolate gets hard) and plus the white chocolate looks pretty.

And that is it. Chocolate covered peanut butter and jelly patties. Perfect for all chocolate needs and maybe a sweet treat to make for your special Valentine… Or a 9 year old that basically told you too. 🤣


Chocolate covered Peanut Butter and Jelly patties

makes around 15 chocolate patties

  • 3/4 cup creamy peanut butter (the non natural kind like skippy)

  • 1/3 cup strawberry jam

  • 8 whole graham crackers

  • 1 1/4 cup dark or semi sweet chocolate chips or chunks

  • 2 teaspoons coconut oil

  • sprinkles and or 1/4 cup white chocolate chips (optional)

Start but placing graham crackers into a food processor and blend until they have became a medium fine crumb. Add in the peanut butter and pulse (scraping down sides if needed) until the peanut butter and graham cracker crumb have been completely incorporated so about a minute or 2.

Line a baking sheet with wax paper or silicone mat and scoop out about 2 tablespoons of the mixture and roll into a ball. Place on baking sheet and with a wet finger (so it doesn’t stick) slightly flatten the ball and make a little well into the patty. Fill the wells up with about 1/2 teaspoon or so of jam. Once they all have been jammed place the baking sheet into the freezer. Let the patties freeze for about an hour.

Right before taking the peanut butter patties from freezer, melt chocolate. If using a microwave just add oil to the chocolate and melt for 15 second increments unit the chocolate starts to melt. (30-45 seconds should be enough). Once the chocolate is starting to. melt, stir untll smooth. Or if doing it on the stove, stir chocolate in a double boiler until smooth.

Once chocolate is ready pull the peanut butter patties from the freezer. Dip each patties (jelly side up, into chocolate so it is completely covered and place back on baking sheet. If you want to add sprinkles, do it right away before chocolate sets. If you want to add white chocolate, let the dark chocolate set until hard and then melt white chocolate the way you did the dark chocolate and then drizzle it on.

And that is it. You then eat them. Store left over chocolates in airtight container. They are fine at room temperature but are best left in the freezer.

In candy, Vegan Tags Chocolate Covered Peanut Butter And Jelly Patties, peanut butter, jelly, candy, chocolates, Valentines day, dessert, vegan, easy, homemade
Comment

Tomatillo Pumpkin and White Bean Stew

October 16, 2021 Colleen Stem
IMG_7655.jpg
IMG_7651.jpg
IMG_7601.jpg

First off, I am not sure if this is technically a stew, or chili, or just a soup, but I think a stew so I am sticking to it.

Secondly, I don’t give a flying f%$# what it technically is because whatever it is is so freaking good!

Lets talk about this stew and whats in it. Me and tomatillos are having a thing right now and I can’t seem to get enough if them. They are bright and slightly sour, but also sweet with a bit of acidity, kind of like a unripe tomato but just better and taste fantastic. Then I got the pumpkin which is hardy and creamy and I will eat all day, everyday forever if I could. White beans which are also creamy and delicious, all in a pot with a good amount or cumin, some of this and that, cooked down to a delicious pot of stewed goodness.

And isn’t stew just he perfect food for a nice crisp fall day? 100% yes to that and yes to this stew. It will make you happy, smile, and full.

Now to the stew!

IMG_7566.jpg

The stuff. Fresh Tomatillos, a pie pumpkin, cooked white beans, an onion, a jalapeño, a couple cloves or garlic, cumin, chili powder, red wine vinegar, salt and pepper, and fresh cilantro.

IMG_7571.jpg
IMG_7575.jpg

Start with dicing up the onion, garlic, and jalapeño. Remove the seeds fro meh jalapeño to make is less hot.

IMG_7578.jpg

Toss that stuff into a pot along with the cumin and chili powder, a pinch of salt, ans about a 1/2 cup of water. Place on stove on medium heat and start to cooke.

IMG_7584.jpg

Husk, rinse, and halve tomatillos.

IMG_7590.jpg

Once the onion and jalapeño mixture is cooked a bit like this…

Add in the tomatillos and enough water to submerge the all. Place back on stove on high heat.

Now dice up pumpkin into inch sized cubed.

IMG_7604.jpg

Now add the pumpkin and the white beans into the pot. Bring the whole thing to a boil once more, then turn the heat down to low. Cook for about an hour to hour and a half, string once in a while, until its cooked down nice and thick.

IMG_7610.jpg

It is ready.

IMG_7650.jpg

Grab a bowl, fill it up, top with fresh cilantro, and get down on it.

P.S. This is now my new favorite food

-C


Tomatillo Pumpkin and White Bean Stew

2-3 good hardy servings

  • 20-22 tomatillos (about 3 1/2 cups after husked and halved)

  • 1 small pie pumpkin (3 1/2 cups cubed pumpkin)

  • 2 cups (or 1 can) cooked and drained while beans

  • 1 yellow onion

  • 2 cloves garlic

  • 2 tablespoons cumin

  • 1 teaspoon chili powder

  • 1 tablespoon red wine vinegar

  • 6-7 cups water

  • salt and pepper

  • fresh cilantro

Start by dicing up the onion into really small pieces. Mince the garlic and cut the jalapeño up into small pieces (remove seeds) while you are at it. Place the onions, garlic, jalapeño,cumin, chili powder, and a pinch of salt into a pot. Add in about 1/2 a cup of water and place on stove on medium heat and start to cook.

While that is cooking a bit, husk, rinse, and halve the tomatillos. When the onion and garlic mixture has cooked down a bit, add the tomatillos to the pot along with a couple of cups of water (enough to submerge the tomatillos). Place back on stove on high heat and bring to a boil.

In the meantime, dice up 3 1/2 cups of pumpkin (remove seeds and save for later and don’t peel pumpkin unless you really want to) into mouth sized cubes. Once diced up, add into the pot along with the with beans and vinegar. Add more water until everything is submerged (about 3-4 more cups) then bring pot back to a boil. Once boiling, reduce heat to low and let cook for about an hour to an hour and a half, stirring on occasion, until the tomatillos have cooked and thickened, the pumpkin is nice and tender, and the whole stew is nice and well, stew like.

And once it is cooked, taste for seasoning (add more salt and pepper if needed). Then ladle into a bowl, toss on some fresh cilantro then dig in.

Left overs store well in fridge for about a week. Its easy to heat up but really, cold stew is amazing!

In Vegan, Vegetables, soups/stews/chilis Tags Tomatillo Pumpkin and White Bean Stew, souo, chili, vegan, vegetarian, dairy free, hardy, tomatillos, pumpkin, fall, easy, cumin, homemade, dinner, where bean, beans, pulses
Comment

Roasted Corn Hummus

August 7, 2021 Colleen Stem

How much hummus is to much hummus to eat? Seriously, how much? Because I eat A LOT of hummus, like hummus everyday, sometimes (all the time) even multiple times a day. And not just a little bit. Give me a bowl of it, any sized bowl, and see what I can do.

And I like just about any hummus, but with that said they are not all created equally. Homemade is almost always the superior, (although there are some brands that I really really like), freshly made is best, heavy on the lemon is a bonus, and some kind of mix in is always appreciated.

Roasted corn hummus. Oh boy did I attack this one. A base of a traditional creamy hummus in all it’s glory, blended up with freshly picked and freshly roasted sweet corn. When whipped up together it creates a soft, almost fluffy, creamy mixtures of all the goodness. It is so freaking good and is probably going to be my repeat hummus for the foreseeable future (until the corn stops growing). It really is a stand out. The mr and the littles even loved it and that is something.

To the hummus!

IMG_6735.jpg

The stuff. Freshly roasted corn on the cob, cooked chickpeas, tahini, some garlic cloves ,a lemon, salt, pepper and red pepper flakes , ice cubes, and a little olive oil.

IMG_6745.jpg

Basically the only work to do. Cut corn from cob.

IMG_6748.jpg
IMG_6751.jpg
IMG_6760.jpg
IMG_6754.jpg

Add corn and garlic to food processor and pulse for a minute, scrapping down sides a few times. Add in the chickpeas, tahini, juice of the lemon, ice cubes, and red pepper flakes. Blend until nice and smooth. And that is it. Taste and add more salt and pepper if needed.

Scoop it all into a bowl and eat the hummus any way you see fit.

-C


Roasted Corn Hummus

makes about 3 cups

  • 2 roasted cobs of corn (2 cups cut from cob)*

  • 2 cups (or 1can) cooked and drained chickpeas

  • 1/3 cup tahini

  • 2 cloves garlic

  • a lemon

  • 3 ice cubes

  • salt and pepper

  • 1-2 teaspoons red pepper flakes

  • olive oil (optional to drizzle on at the end)

*There are many methods to cook corn so you can cook it any way you want. I just wet the corn still in the husk and pop it into a really hot oven or about 25 minutes.

Start by removing corn from the cob. Place corn and garlic into food processor and pulse for a minute, scraping down sides a couple times, until pretty blended up. Add in chickpeas, tahini, the juice from the lemon, ice cubes, and a good healthy pinch of salt and pepper and as much red pepper flakes as you want. Blend until smooth. Taste and add more salt and or pepper if needed.

Scoop into a bowl or container and drizzle with olive oil if desired.

Eat right away with cut up veggies, smeared in pita, with a spoon, or any other way you want to eat it.

Left overs can be stored in airtight container in fridge for a few days but really, who has left over hummus?

In Vegan, summer, pulses, hummus Tags Roasted Corn Hummus, corn, gluten free, vegan, fresh, summer, hummus, homemade, home Made, easy, spread, dip, dinner, plant based, protein
Comment

It’s Hot Out. Make some Popsicles.

July 10, 2021 Colleen Stem
image-asset-4.jpeg
image-asset-3.jpeg
image-asset-1.jpeg
image-asset.jpeg
image-asset-5.jpeg
image-asset-2.jpeg

It is hot out Dumb hot. What do you do to stay cool? Me? Well besides spending my time splayed out on the kitchen floor (it’s the coolest spot in the house), I like to eat frozen food, sometimes in the form of popsicles. And it has been freaking stupid hot way too much already this year and I haven’t made nearly enough popsicles. That ends now. Dealing with the heat sucks and I deserve a freaking popsicles and so do you.

Here are a few of my favorites.

  • Roasted Banana Strawberry Popsicles

  • Avocado Mango Popsicles

  • Carrot Ginger Orange Popsicles

  • Toasted Coconut And Corn Popsicles

  • Rhubarb Popsicles

  • Pineapple Cucumber Spinach Popsicles

Next week I’ll share one of my new favorite, a sweet potato fudgesicle. I was going to share it this week but I ended up eating the frozen sweet potatoes that I had intended to use. Oops.

Stay cool. Eat popsicles!.

-C

In frozen, Popsicles, Vegan Tags popsicles, summer, stay cool, heat wave, vegan, frozen, healthy, plant based, fruit, homemade, vegetable, roundup, recipes
Comment

Strawberry Oat Milk

June 26, 2021 Colleen Stem
IMG_6133.jpg
IMG_6141.jpg
IMG_6122.jpg

One of the most redeeming qualities of summer is the fresh, super sweet, strawberries that grow in the early part of the season. Bright red little gems that I go and hand pick from a strawberry field (early in the morning because who wants to be in a beating hot field in he middle or the day?), eating one berry for ever two I pick. Hands stained red. Belly full of berry happiness. It’s times like these that I am glad for summer.

And now that I have strawberries, I can make strawberry milk. Have you ever had it? This strawberry milk is nothing like the milk made from the nasty and crazy sweet fake pink syrup (strawberry syrup reminds me of my little brothers when they were little. They would drink cups and cup of the fake strawberry milk and I always thought that they were gross. But not just because of the milk…hehe). No this strawberry milk is oat milk with fresh strawberries and taste just like a berry explosion of goodness in your mouth. Its smooth and creamy and tastes like real strawberry, like it should.

A true summer treat. And it is so easy to make, almost as easy as squirting syrup into a cup.

Now to the strawberry oat milk!

IMG_6069.jpg

The struff. Strawberries, oats, and water.

IMG_6078.jpg

Only thing you really need to do is remove the greens from the berries.

IMG_6083.jpg
IMG_6094.jpg

Then pop them into a blender with water and oats and blend until smooth and creamy. That is it. Now you have strawberry oat milk.

IMG_6130.jpg

Pour into glasses, garnish with a few berries (or a bowl to snack from) and that is that.

Summer milk.

-C


Strawberry Oat Milk

  • 3/4 cup old fashion oats

  • 2 1/2 cups cold water

  • 1 cup fresh strawberries

  • 1 tablespoon sweetener or a couple dates (optional to add sweetness)

Note. For a thicker and creamer milk just add another 1/4 of oats.

Remove greens from strawberries and toss them into a blender with the oats and water and any sweetener (if using). Blend until smooth.

Optional. Pour through a strainer or nut milk bag to remove any grittiness. I do not do this.

Pour into glasses and enjoy.. I like to add an ice cube or a cut up frozen strawberry into the milk to make it really cold.

Milk can be stored in a jar in fridge for 2-3 days.

In drinks, fruit, Vegan Tags Strawberry Oat Milk, oat milk, homemade, fresh, summer, fruit, drink, vegan, gluten free, dairy free, easy, milk, oats, plant based, healthy
Comment
Older Posts →
 

https://thelovelycrazy.squarespace.com/config#/|/about/

Me. Food Maker.Food eater. Woo HOO!

STEM+NODE  SMALL BATCH AND ONE OF A KIND POTTERY

stem+node ceramics


____________________

Subscribe

GET NEW POSTS IN YO EMAIL

You are AWESOME!!!


@thelovelycrazy 2014-2021