• stem+node ceramics
  • HOME
  • Food Recipes
  • About
  • Contact
Menu

The Lovely Crazy

Street Address
City, State, Zip
Phone Number

Your Custom Text Here

The Lovely Crazy

  • stem+node ceramics
  • HOME
  • Food Recipes
  • About
  • Contact

Creamy Tomato White Bean Soup

September 1, 2018 Colleen Stem
IMG_2074.jpg
IMG_2096.jpg
IMG_2111.jpg

This summer has been weird. And when I say weird, I mean too stupid freaking hot and humid and it's screwing up my life. I think I have gone a month, maybe more, without making soup. That is just not right. For as long as I can remember I have made soup, or at least eaten soup, just about everyday, even all summer long. But the terrible heat and humidity this year, I just have had no desire. It has been straight up shredded zucchini and whole tomatoes for some time now. I just don't want to have any residual added heat to my life.  But the other day, oh how lovely. I woke up with a chill,  enough that I needed to grab a long sleeve before leaving the house, and had the very strong urge to return home and get my soup on. And soup on I did!

For my first trip back into soup (oh how I missed soup!), I went simple and used what I, and many, many people have ample supplies of right now. Tomatoes. And beans because I wanted my soup to be thick and creamy and I had the beans so why the heck not.

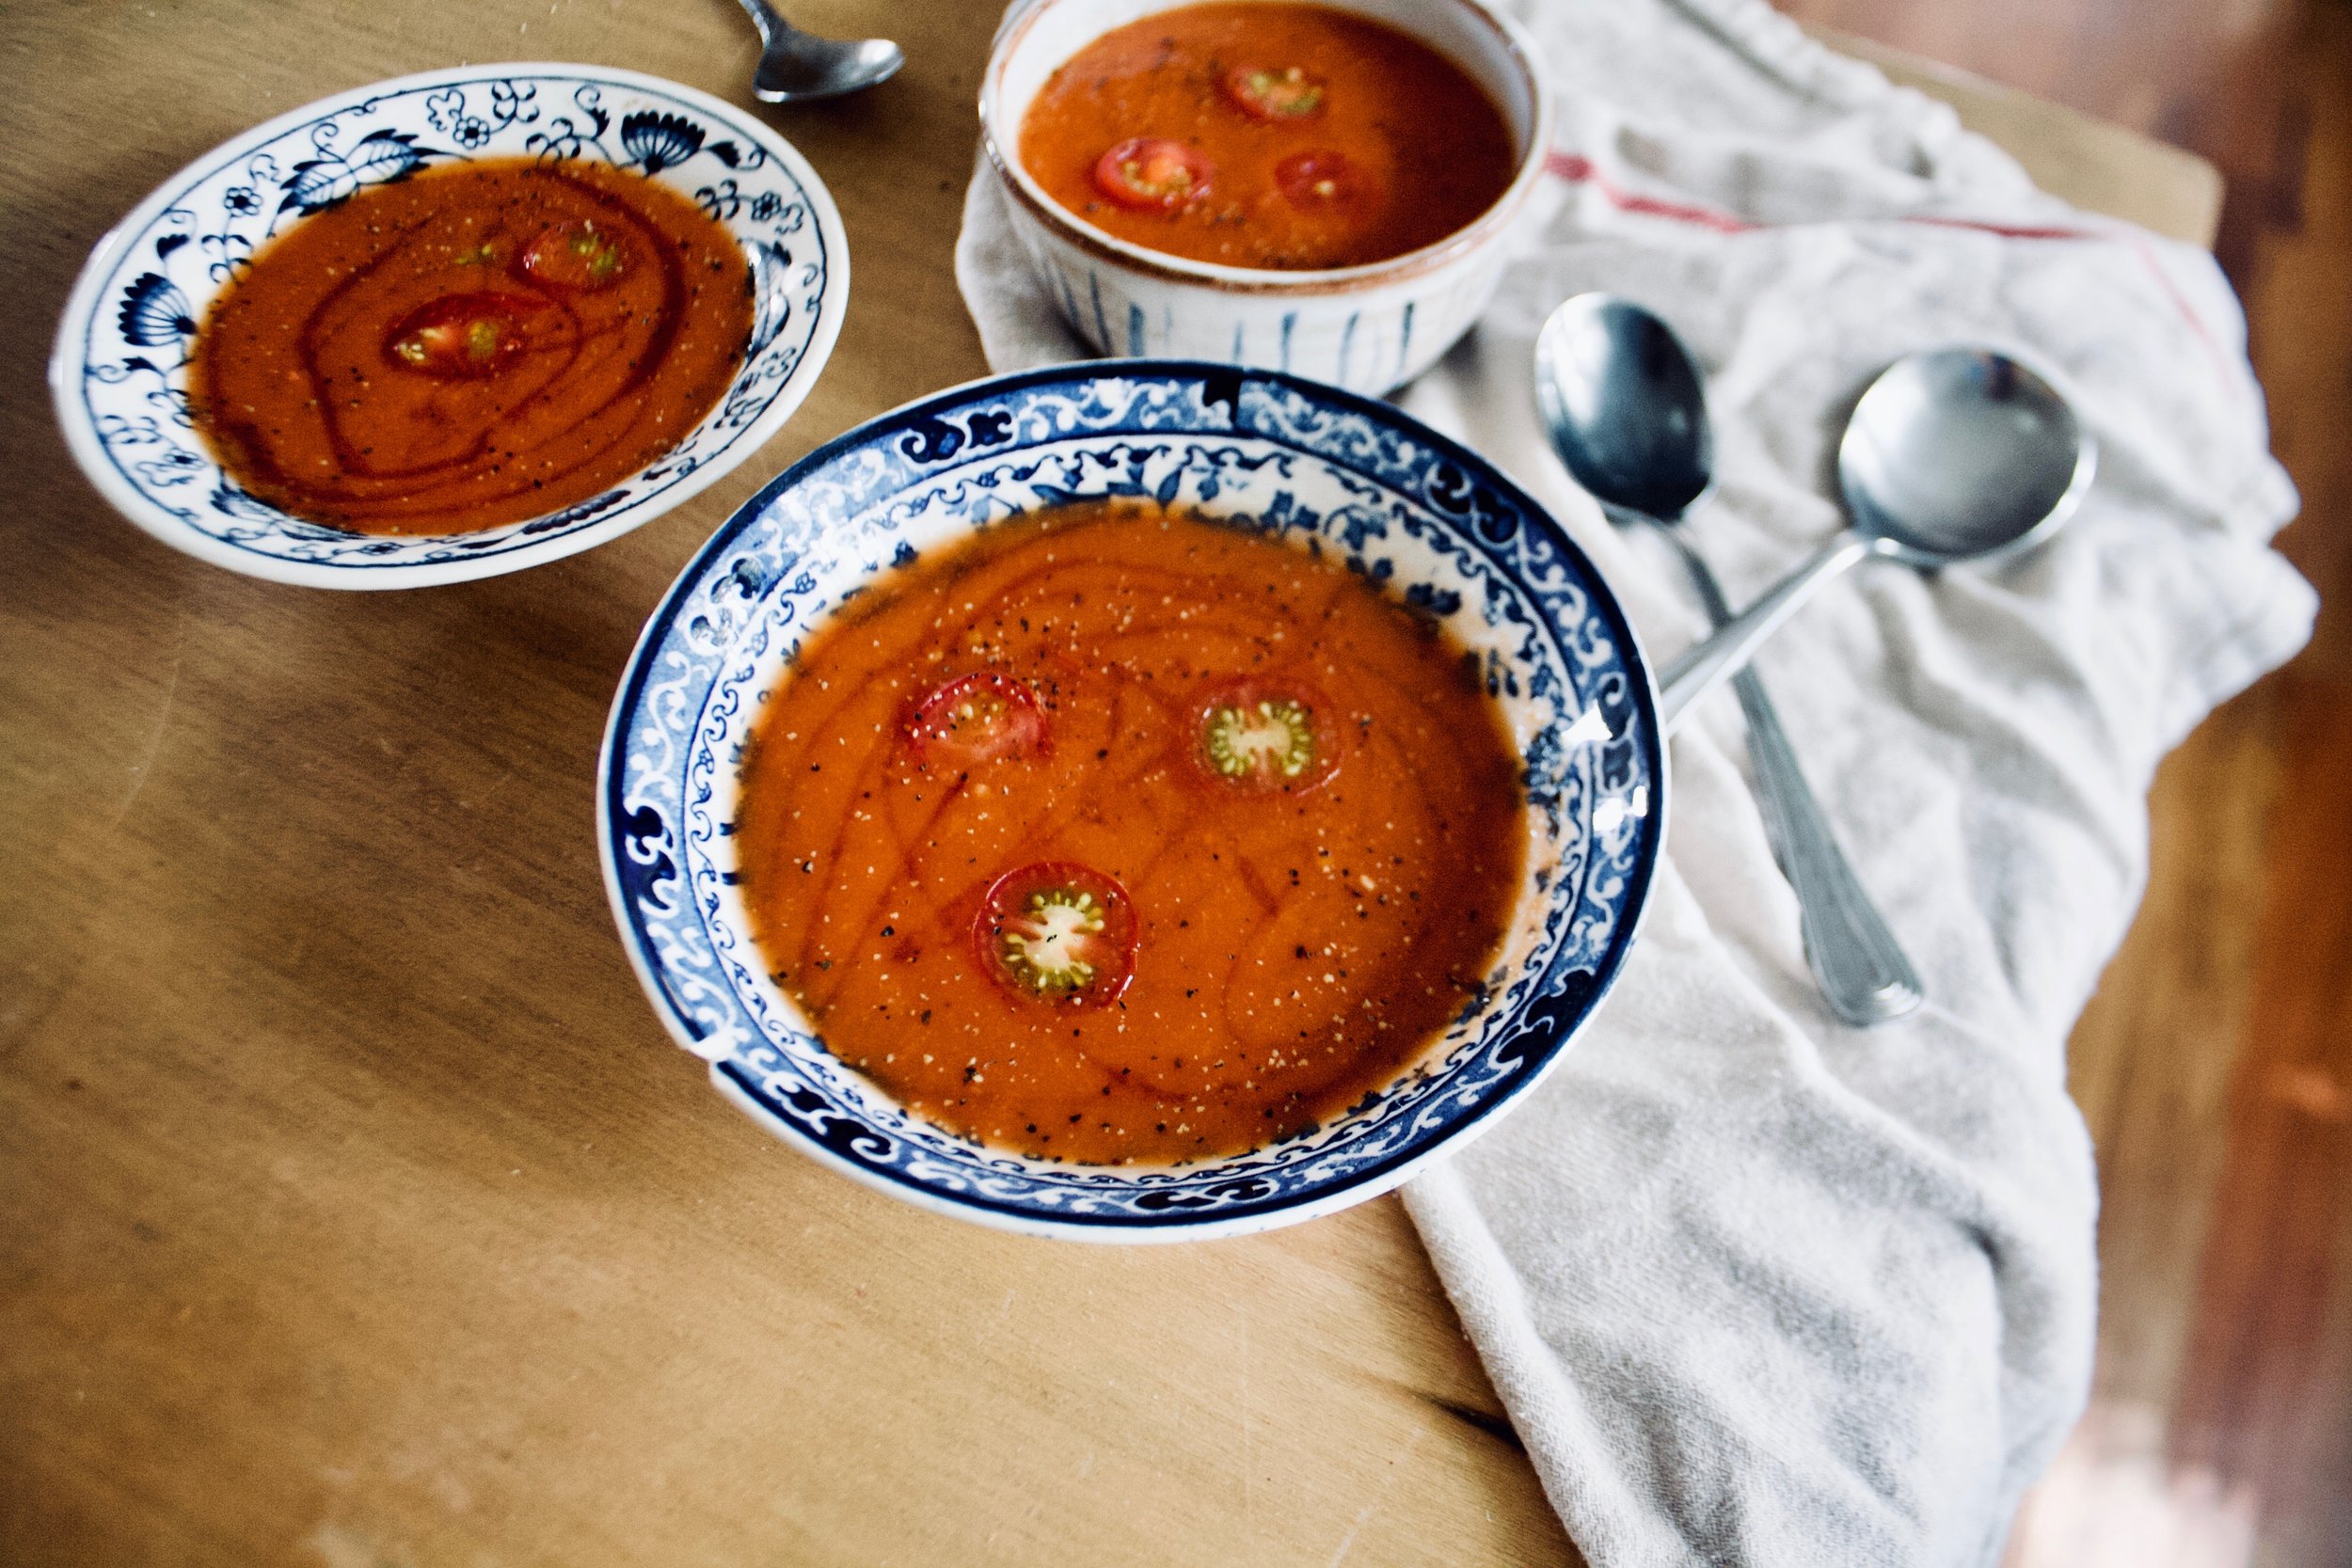
This soup really requires very little and you get the most thick, delicious, creamy, tomatoey soup. Perfect to eat alone, but is fanatic with some crackers, or a hunk of crusty bread. And it uses a lot of tomatoes which is nice because I am (as are many of you.. My neighbor is bringing me HER tomatoes now too) trying to make a dent in the ever growing pile or these beauties on the counter. This soup dented it, until I went out to the garden a few minutes later. My pile is bigger then ever, which is fine because I am back on my soup game. 

IMG_1897.jpg

The stuff. Lots of tomatoes, some white beans (I used navy, but any white bean would be good) a large onion, a carrot, salt and pepper, a lemon, some olive oil, and honey (optional).

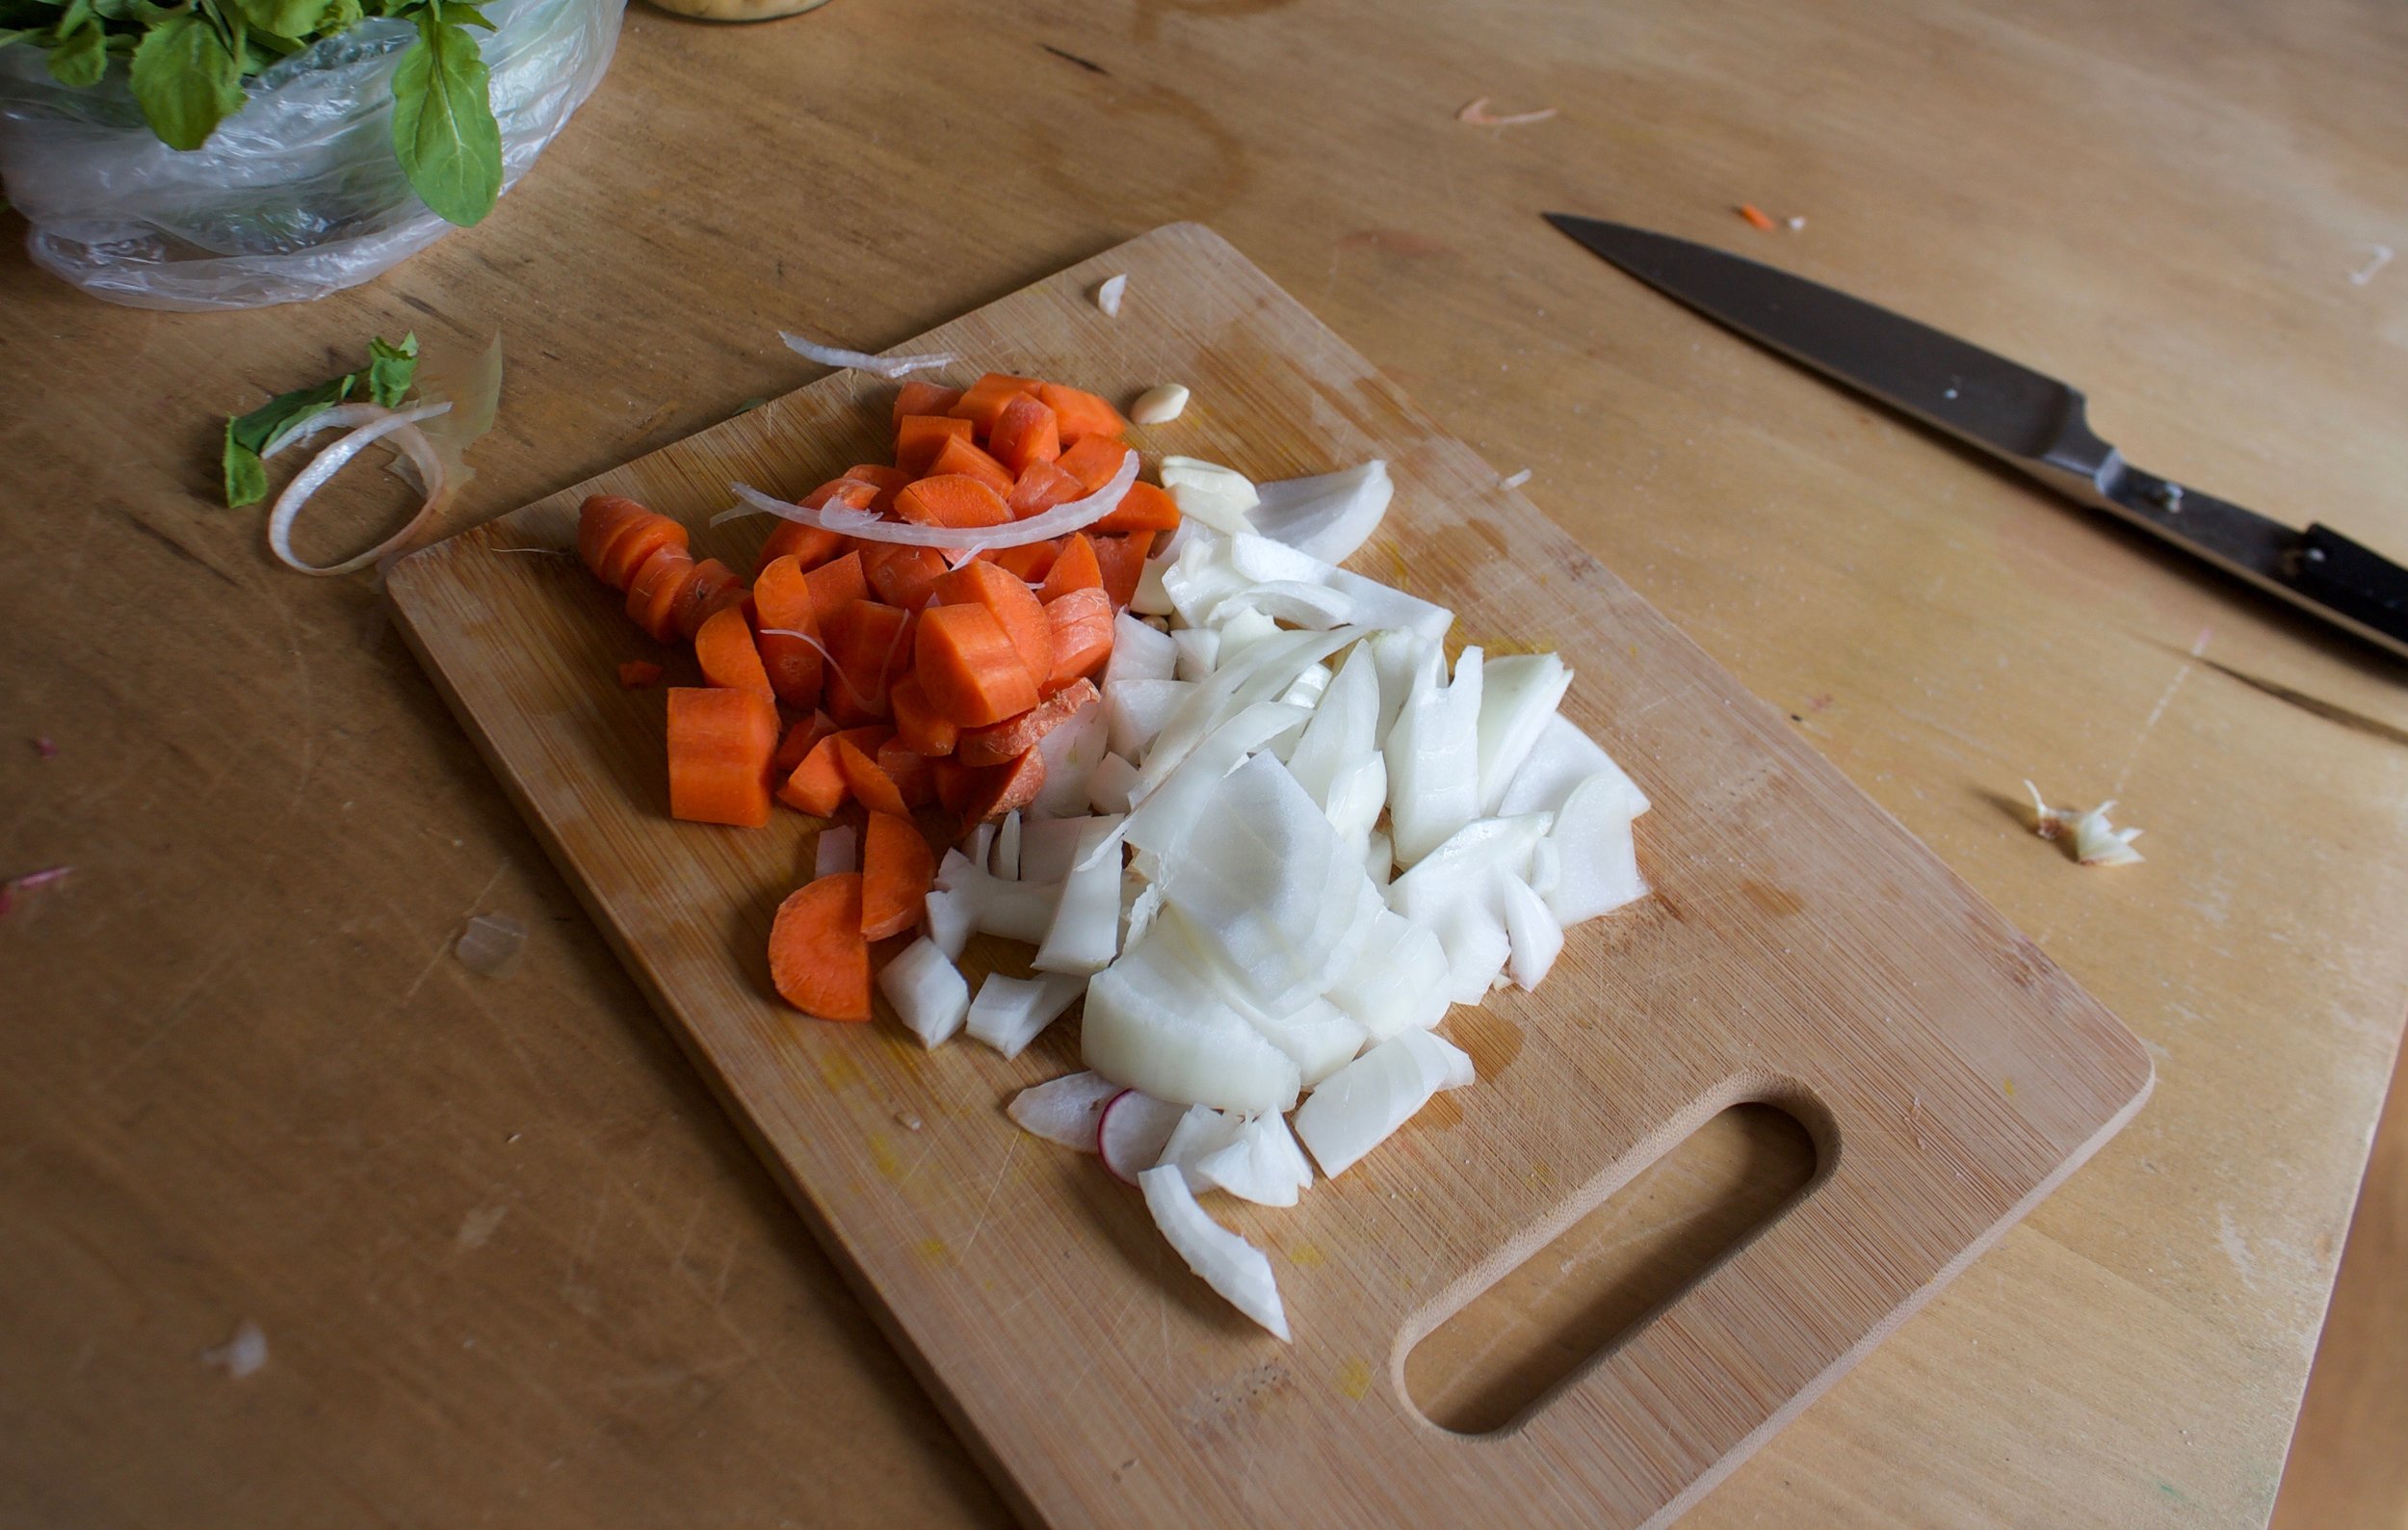
First off, chop the carrot and onion into chunks.

IMG_1932.jpg
IMG_1953.jpg

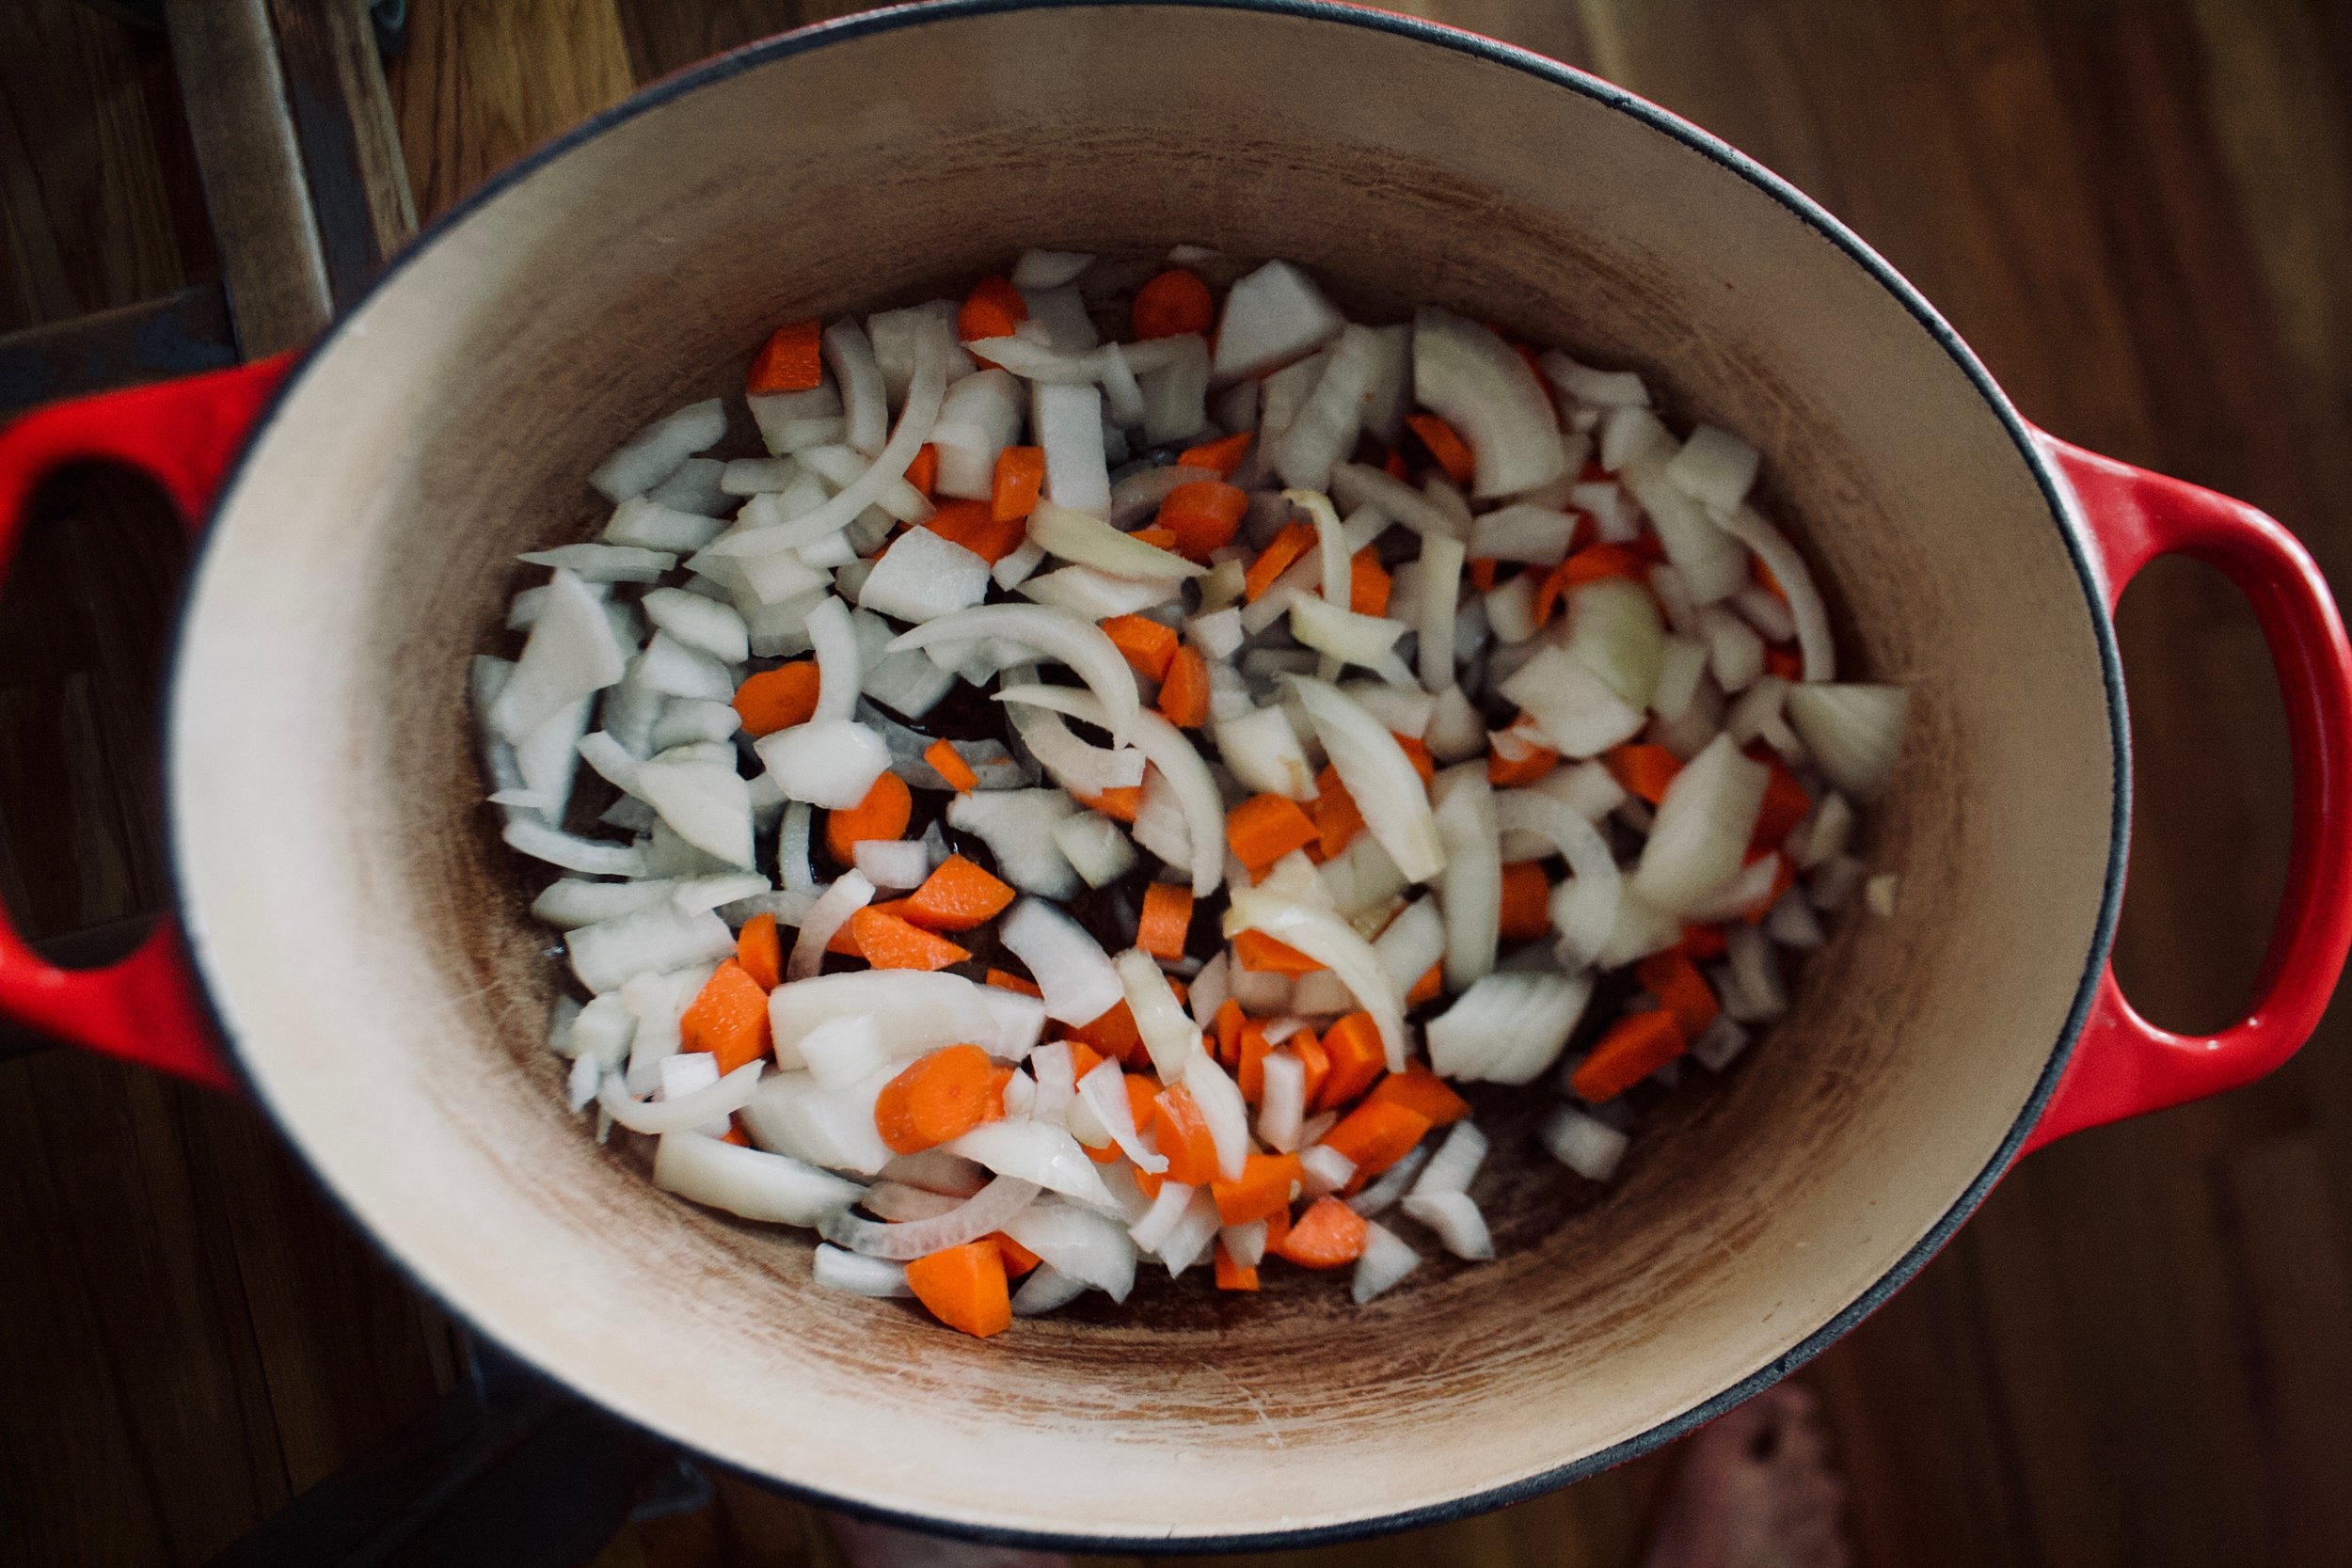
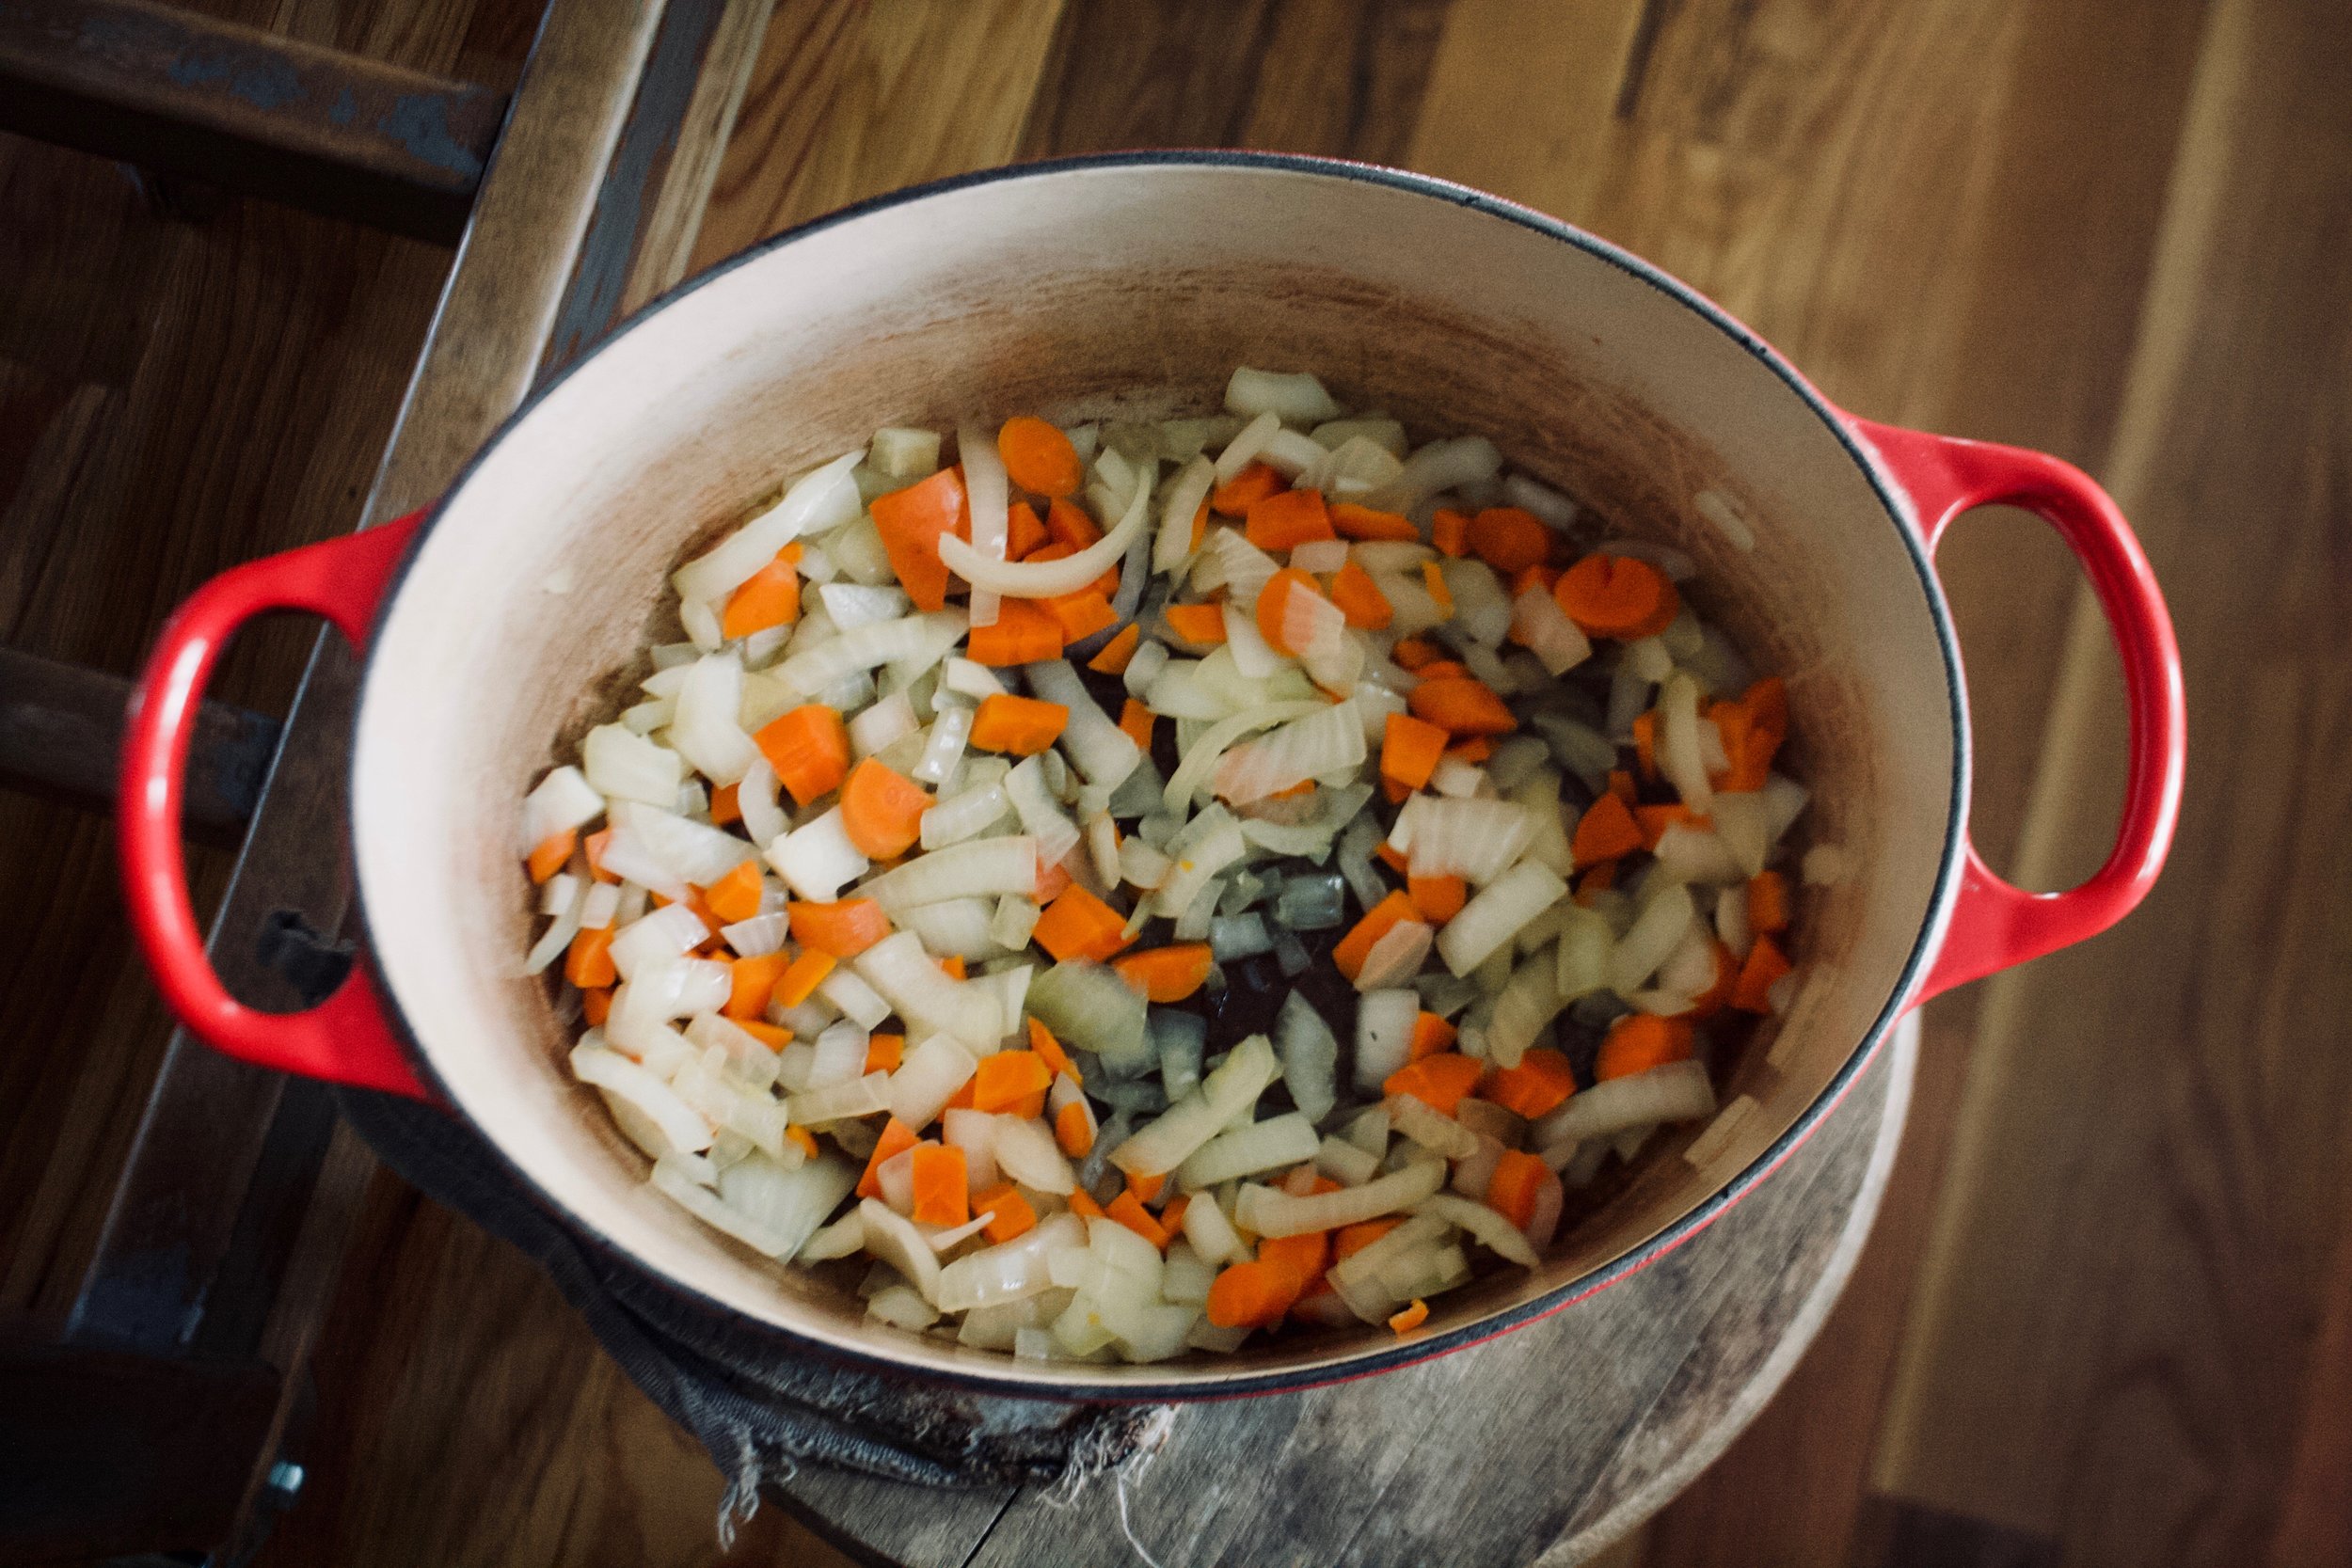
Toss the chopped stuff into a big ol' pot with a drizzle of olive oil and cook on a medium heat until nice and soft. 

IMG_1941 2.jpg

While veggies are cooking, core and cut up all those tomatoes. 

IMG_1989.jpg

When the veggies have cooked up a bit, add the tomatoes, the beans, and a sprinkle of salt and pepper to the pot and give it a good mix. Return to high heat, stirring even so often, until the tomatoes give off enough juiced to start boiling then turn heat down to medium and cook for a little while, like 1/2 an hour or 45 minutes.


IMG_2017.jpg

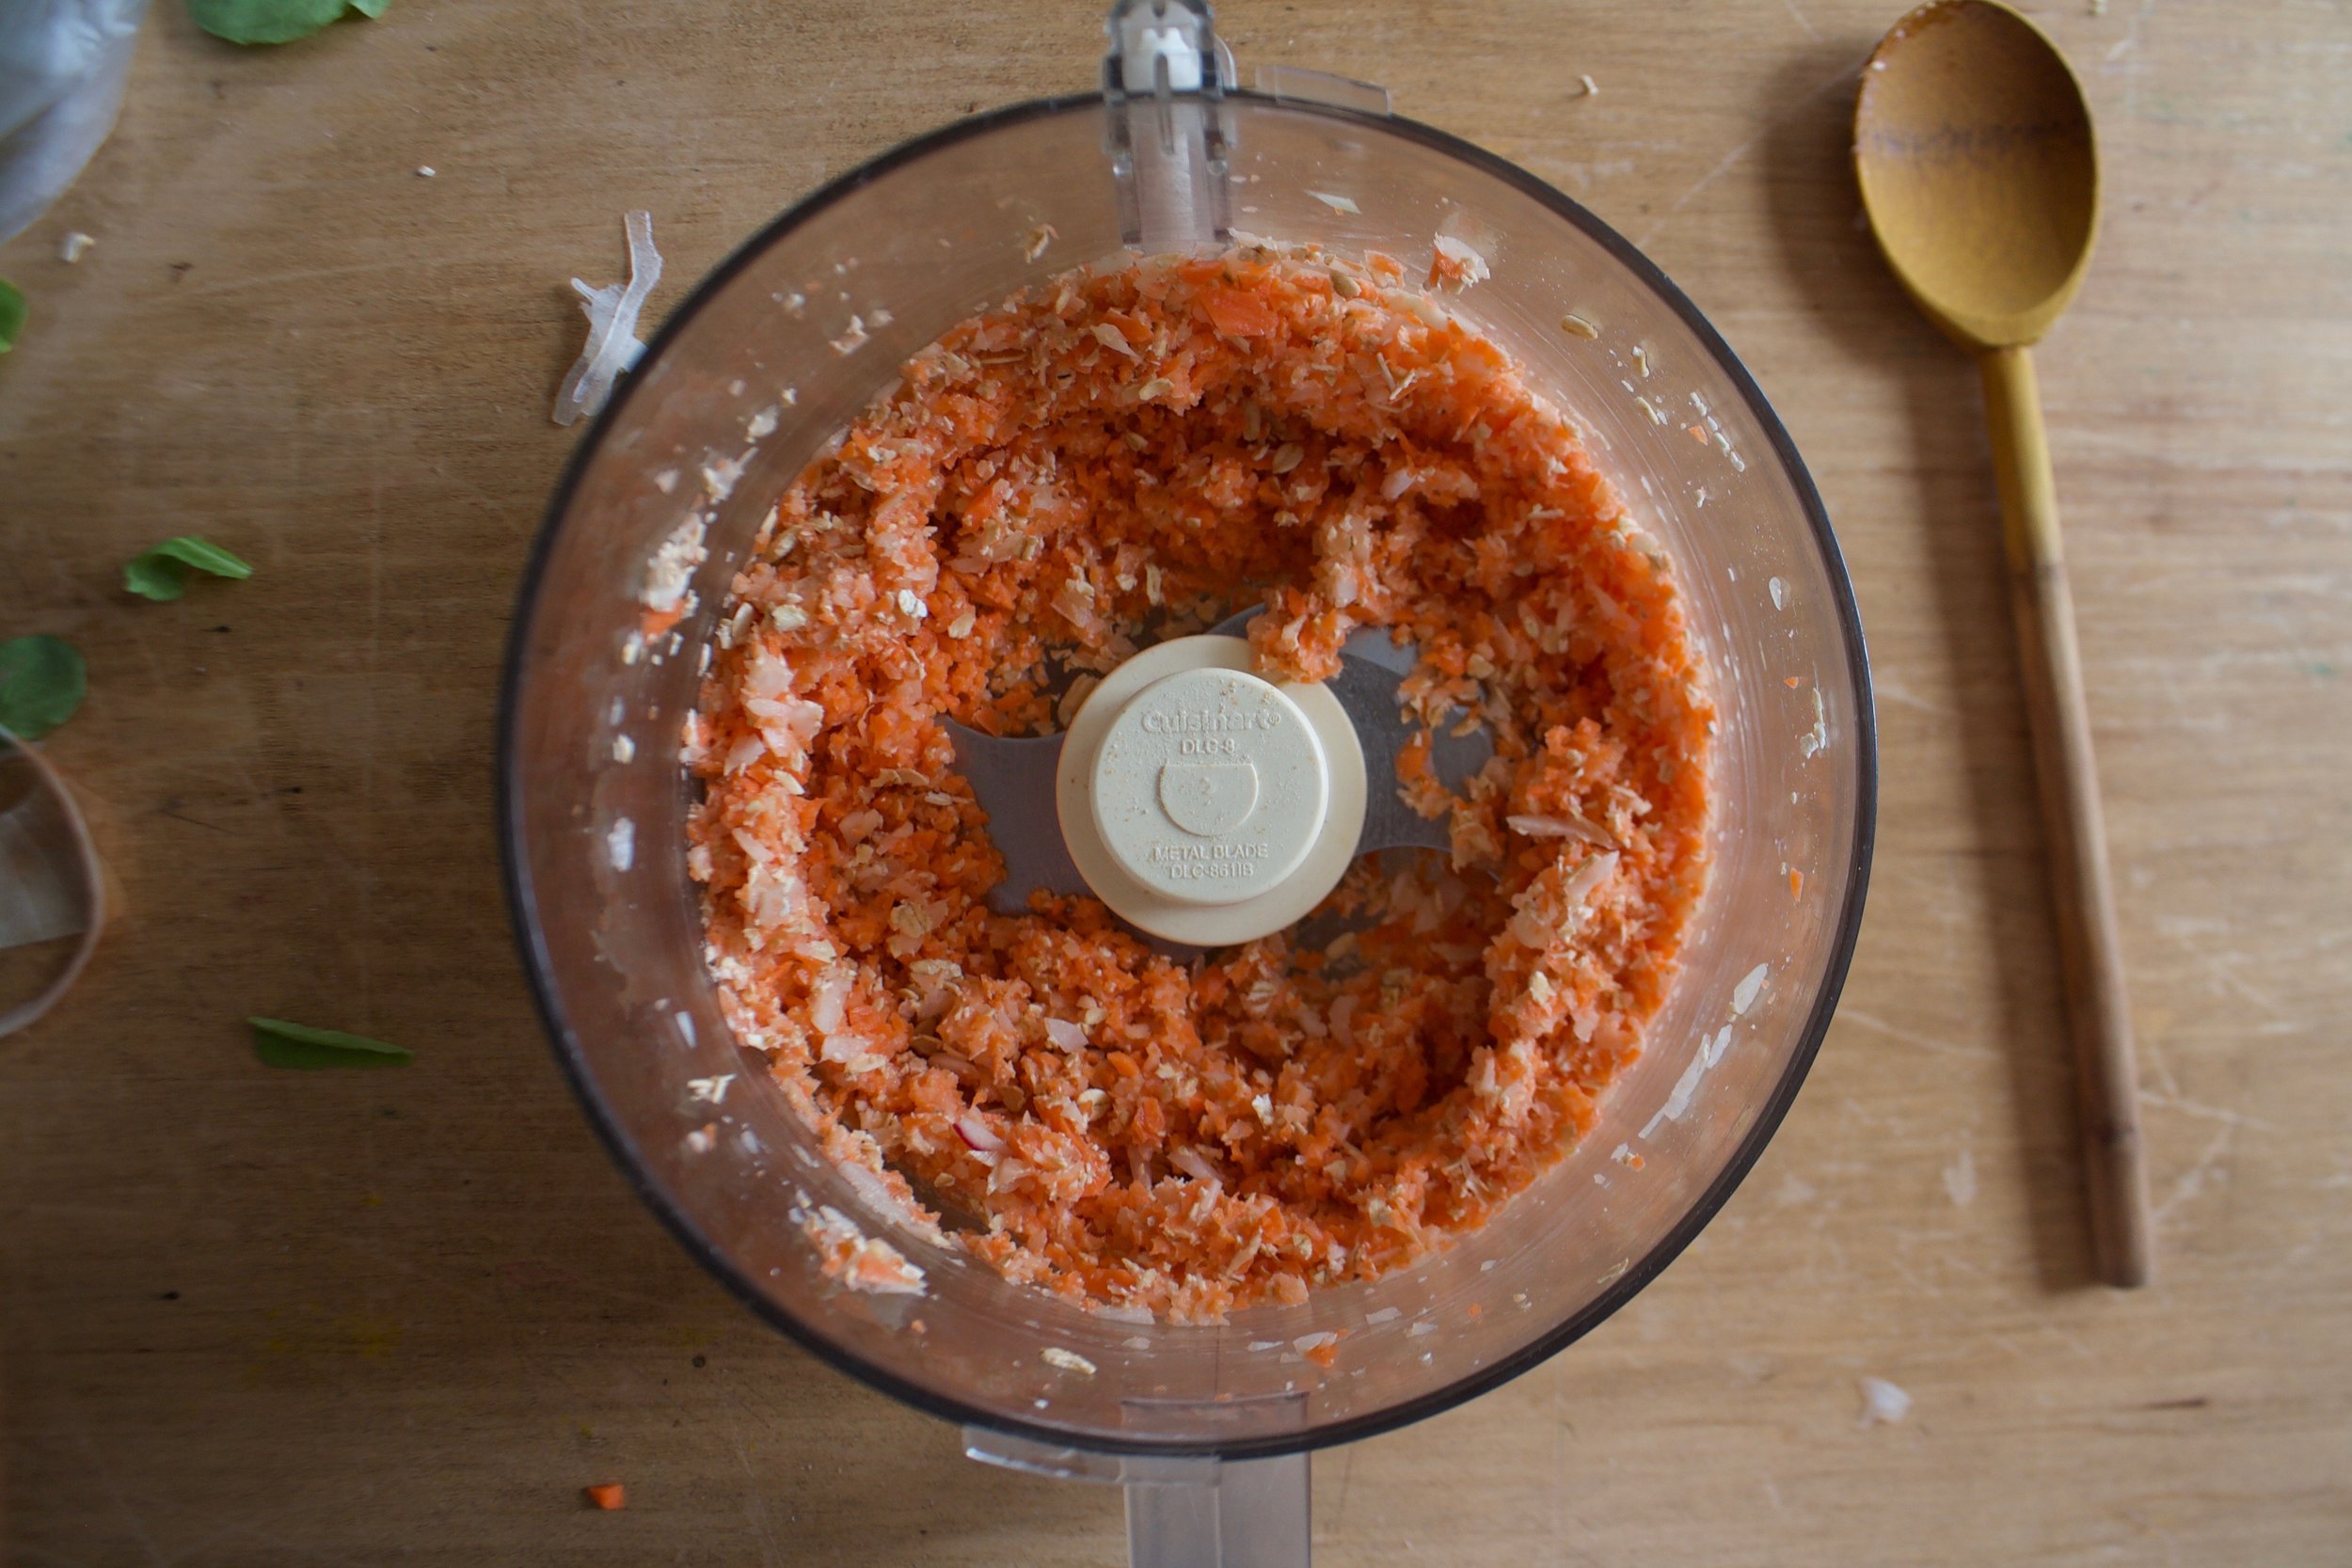
Until it looks lit this. The tomatoes have all fallen apart and the beans, carrots and onions are mushy. 

Blended with the juice of the lemon and a sprinkle of pepper and more salt if needed. 

IMG_2137.jpg

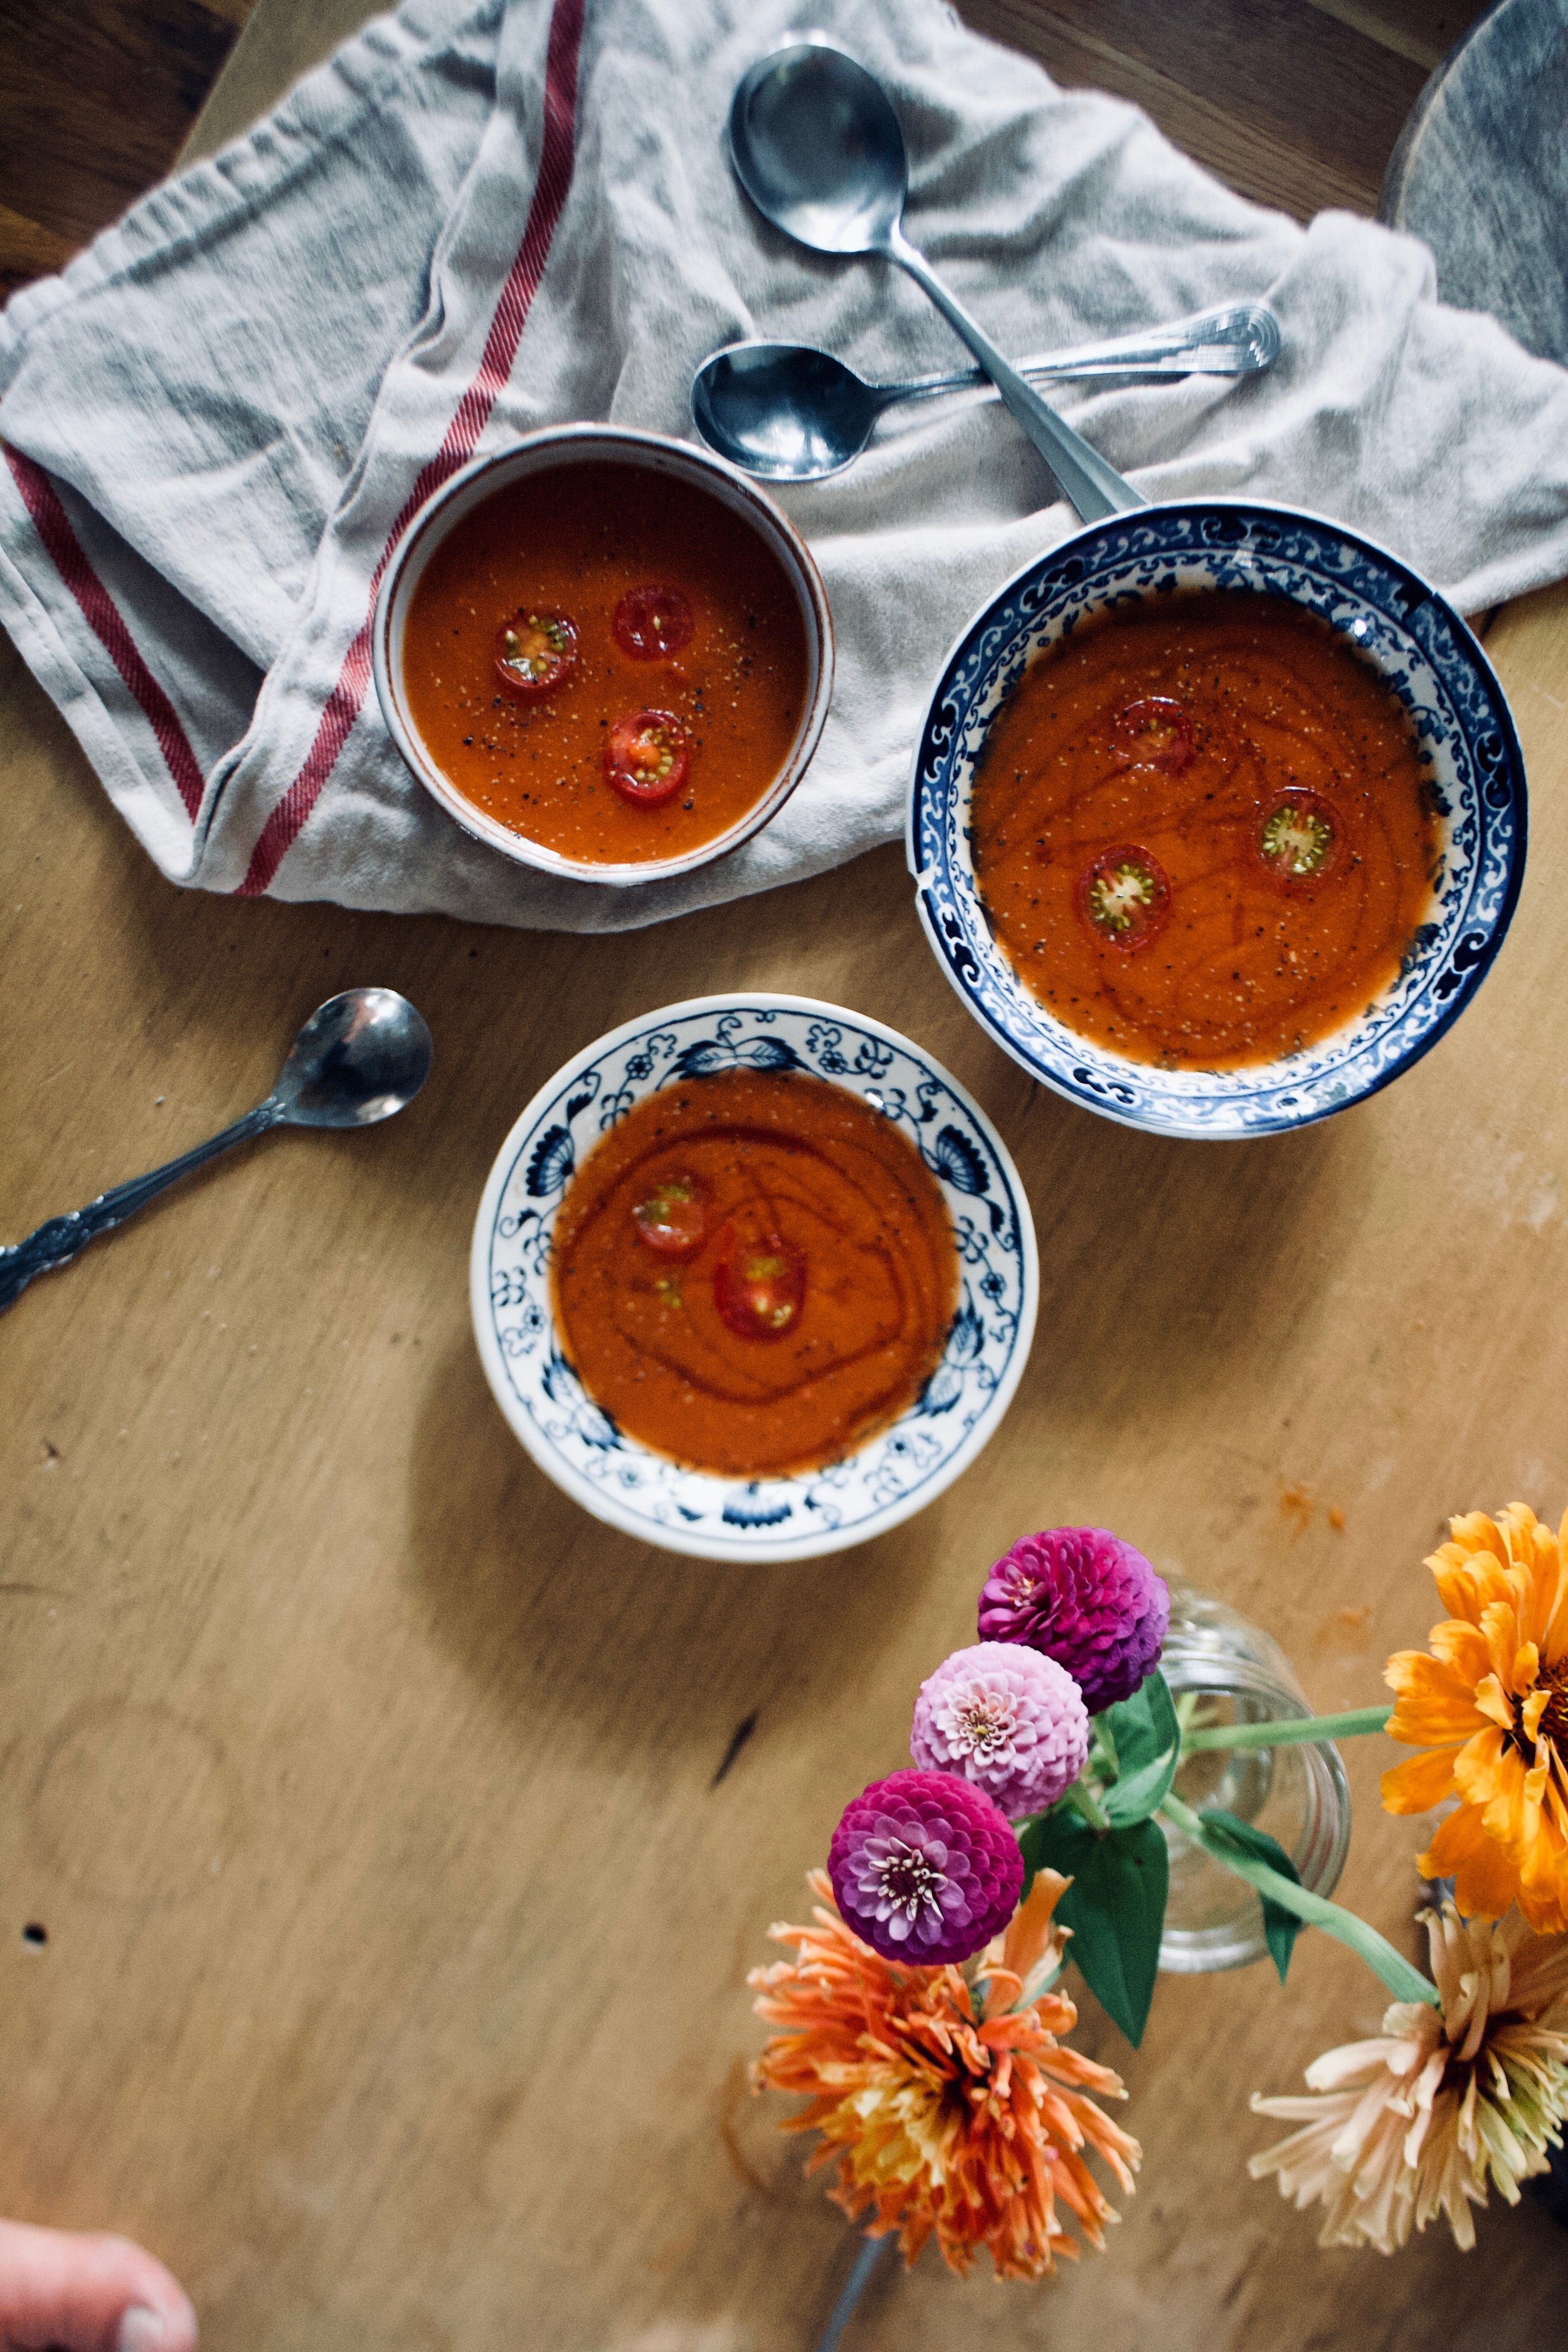
Now serve into a  bowls. Garnish with a drizzle of honey if you are feeling it. Sliced cherry tomatoes make for fancy garnish. 

IMG_2073.jpg

Creamy tomato bean soup for everyone!

Hurray for soup!

-C


Creamy Tomato White Bean Soup

Makes about 1/2 gallon (enough to serve a crowed or enough to serve one for a few days and maybe freeze some for later)

  • 10-12 large tomatoes 
  • 2 1/2 cup or 1 can of cooked white beans (I used navy but any white bean will be good)
  • 1 large onion
  • 1 large carrot
  • I lemon
  • olive oil
  • salt and pepper
  • honey (optional)

Start by chopping the onion and carrot up into small chunks. Grab a large heavy bottom pot, drizzle a teaspoon or two of olive on the bottom then toss in the chopped veggies. Place the pot on a medium heat, stirring occasionally until the onion and carrot start to soften. 

While the veggies are cooking, core and cut up all the tomatoes. Once the veggies are soft, dump in all the tomatoes, along with the beans and all the liquid they are in. Sprinkle with salt and pepper and turn heat up to high, giving it a good stir until the tomatoes start to get super juicy then bring the pot to a boil. Once boiling, reduce heat to medium and cook for another half hour to 45 minutes, giving it a stir ever so often.  When the tomatoes have completely fallen apart and the carrot, onions, and beans are mushy, you know its done. 

Remove the pot from heat and dd in the juice of the lemon. Using a hand blender, blend until it's a smooth creamy consistency. If you only have a counter belnder, let soup cool a little before handling and  be really freaking careful and blend a few cups at a time, making sure to have the blender lid on. Hot soup in the face is no fun.

Once soup is creamy and smooth, serve in bowls with a drizzle of honey (totally optional, but some people really like a touch of sweetness to their tomato soup) and more pepper to a taste. Garnish with thinly sliced cherry tomatoes if you are feeling fancy. 

Any extra soup can be refrigerated for up to a week. Can also be frozen. 

In Vegetables, Vegan, summer, soup, quick and easy, pulses, Dairy Free, beans Tags Creamy Tomato White Bean Soup, Tomato Soup, Soup, Beans, pulses, vegan, fall, tomatoes, fresh, simple, easy, few ingredients, creamy, gluten free, whole foods, plant based, garden food, dairy free
Comment

Ginger Garlic Blistered Green Beans with Almonds

July 21, 2018 Colleen Stem
IMG_0257 2.jpg
IMG_0242 2.jpg

I sometime struggle with certain veggies, not like in a eating way (I have no snuggle eating any veggie) but in a making something with that certain veggie kind of way, like I don't make anything out of them, I just eat them raw as they are. (That was terribly long winded and does it even make sense?) I don't find this to be a problem most of the time, but sometime I think I need to be less lazy about eating and maybe prepare a dish for a meal rather then just eating raw beans out of the garden for lunch.....I mean, I am not going to stop doing that but I am going to start being a little more creative and planning meals with a little more substance. Adding nuts is more substance right?

These beans were freaking fantastic.  Blistered and charred, and not soggy and soft. They were perfect. (I like my veggies either raw or burnt) I made them late morning and was going to save them for dinner but the mr, Barb, and I ate them all just on snacking on them.  Just a really good, A+ veggies situation here. Highly recommended, hot or cold. Almost beats a bean lunch in the garden. Almost. 

IMG_0122.jpg

The stuff. Green beans, almonds, garlic, ginger, soy, and a little oil. 

IMG_0142.jpg
IMG_0147 2.jpg

Quick fast, rough chop the almonds and give them a toast in a dry skillet (you can skip this part if you have already toasted almonds) 

IMG_0171.jpg

And here would be the time to trim the beans if you are a person that does that. I am however, not a bean trimmer. But you must wash them, so give them a good rinse , and keep them a little wet. The moisture will help them cook. 

Just washed beans go into a medium high hot skillet (add in a tablespoon of oil) and get a nice little cover to start the cooking process.  Leave them alone for a few minutes, then remove lid and toss them around. Do that ever few minutes. 

IMG_0151.jpg
IMG_0156.jpg

While the beans start cooking, mince the garlic and the ginger and add to the soy sauce.

Smells so good!

IMG_0195.jpg

Beans have cooked for about 10 minutes here and are all nice and blistered and just about done so now add in the ginger garlic soy mixture and toss around. Keep cooking for a minute or two.

IMG_0211.jpg

And now don't forget those almonds, mix those in too. Then it's into a bowl they go. 

IMG_0217.jpg

Green beans so good. Can't go wrong with these.

Have a marvelous weekend, maybe go pick some green beans!

-C


Ginger Garlic Blistered Green Beans With Almonds

  • About a pound of green beans (trimmed if you want to trim them)
  • 2-3 cloves garlic
  • 2 tablespoons freshly grated ginger 
  • 1/4 cup almonds
  • 3 teaspoons soy sauce
  • tablespoon oil

Rough chop almonds into small pieces and place in a dry skillet (meaning no oil). Turn heat on to medium high heat to toast for about 5 minutes or until you can start to smell the almonds and they are slightly browning. (you can skip the tasting  part if your almonds are already toasted, jus chop them into small pieces)

Dump the almonds into bowl and set aside. Keep skillet on heat and add in the oil. Rinse beans off, keeping them damp, and very carefully, dump the damp beans into the hot skillet. Place a lid on beans and let cook about 4-5 minutes. In the meantime, mince garlic and ginger and combine with the soy sauce. After a few minutes, remove the lid from beans and toss the bean around. Keep doing this for another 8-10 minutes or until the beans are cooked though and blistered in places. Once the beans are cooked,  dump the garlic ginger soy mixture into pan. Toss around and leave in pan for another minutes then stir the toasted almonds in. Transfer the whole bit of it into a big bowl or plate. 

Eat right away or.. They taste freaking fanatic cold too. 

In beans, Vegetables, Vegan, summer, side dish, snack, Nuts Tags Ginger Garlic Blistered Green Beans With Almonds, Green beans, Blistered Green Beans, vegan, side dish, plant based, almonds, quick and easy, garden fresh, vegetables, green beans, fresh, simple
Comment

Black Bean Tortilla Chips

May 5, 2018 Colleen Stem
IMG_1812 2.jpg
IMG_1840.jpg

The mr has a soft spot for tortilla chips. He doesn't get chips often, but when he does it is usually the super fried, super salty, in a plastic bag, tortilla chips. And I am ok with that because it is not often and the dude deserves chips when he wants them. But I hate how crappy they are for him, especially all the salt. So much salt that I can smell it in my mouth (yes, I said that right). So, as with everything else we eat in the house, I now make chips from scratch. (Slowly I have eliminated just about everything that is pre packaged and started making it myself. I think it's pretty much just the dried pasta and the mr's yogurt and cheese that I haven't gotten to.Yet.) This way he can eat his chips and I don't have to sit there tasting the smell and thinking about the crap that he is eating.  I know I say this a lot, but lets just take a minute here and acknowledge how I really am the best girlfriend ever. 

Ok, now about these chips. I have made plan tortilla chips a few times before and figured it was time for a twist.  In come black beans. Why, because I was pretty sure beans were going to be awesome, and lo and behold, I was completely right. Adding the beans take little to no more effort then making the chips without, and bonus here, more fiber and protein and good stuff going into a chip. Then they are lightly oil, lightly salted, and eaten without any guilt because I made them and they are the best. Seriously, the mr thinks they are amazing and doesn't miss those pre package ones a bit.  And sure, they might take a little time and minimal effort, but really they are super easy and the time and effort to make them is probably no more then going into a store, waiting in line to pay, and driving home to eat your chips. You can have these chip made in that amount of time. So you might as well just make them.

To the chips. 

The stuff. Masa harnia, black beans, water, salt, and a little oil. There should be a lemon or lime here too, but I forgot to stick it into the picture. Oops. 

IMG_1707.jpg
IMG_1710.jpg
IMG_1713.jpg
IMG_1716.jpg

Pretty easy.  Add the beans to a food processor and blend untill completely smooth. Add in the masa and pulse then gradually add in water until a dough forms. Stop and feel the dough. If it feels like play dough and comes together into ball easily, then you are good. If it is to wet, add a little more masa, to dry, more water.

IMG_1719.jpg

Dump the dough onto the counter and form into a ball. Place the doguh into a bowl and cover with a damp closer for 15-30 minutes to let the dough rest.

After the rest, divide the dough into 12 pieces and roll into balls. Place the balls onto a damp cloth and cover while you are making the tortillas so they don't dry out. 

IMG_1735.jpg
IMG_1741.jpg
IMG_1739.jpg

To flatten those balls into tortillas.  After doing this a bunch of times, I have a system that works the best for me.  I use a large ziplock bag (the plastic is a little thicker and easier to deal with, plus I don't use plastic wrap), a cutting board, and a rolling pin. Place a dough ball into the center of the bag then take the cutting board and press directly on top, placing all your weight onto it. It gets flat, but not flat enough so take the rolling pin and flatten some more. Then press the rolled out dough with the cutting board one last time. Carefuly remove from bag and place direrely onto a hot dry skillet. 

Cook each side 3-4 minutes or until it starts to get a few light brown spots. Once cooked, place on a plate or baking sheet. If I were just making tortillas, I would place then in between a kitchen towel to keep them warm, but because they are destined for chips and don't care. 

IMG_1758.jpg

Black bean corn tortillas. Hey, you could stop here and make a taco or something if you need to. Feel free to use a tortilla or two before using the rest to make the into chips. 

IMG_1769.jpg

So chips. Grab baking sheets, oil, salt, a knife, and the tortillas. Take a few of the tortillas and oil them. (The easiest way I found to do this is to rub oil on with my hands then rub the oil onto the tortillas. ) Oil 3 at a time, stacked them on top of each other and cut into 8 triangles, 

Get as many of the triangles onto a baking sheet as you can, without overlapping.  Once all nice and tight, sprinkle the tops with salt and pop them into preheated oven. 

Pull the chips out of the oven when they are crispy and done (about 10 minutes) then squeeze a little lemon juice all over the chips. Toss around and pop the pan back into the oven for another minute or two just so the juice doesn't  leave the chips soggy.

Dump cooked chips  onto a wire rack to cool. Eat as you work, you deserve it.

IMG_1837.jpg

Pile chips into a bowl, and serve with some salsa or guacamole or whatever you eat you chips with.  They are your chips. 

-C


Black Bean Tortilla Chips 

Makes 98 chips, or like a good sized bag worth

  • 2 cups masa harina 
  • 1 cup cooked black beans in bean juice
  • 1- 1 1/4  cups warm water
  • couple teaspoons neutral oil (I used grape seed oil)
  • 2-3 teaspoons salt
  • A lemon or lime

Beans go into a food processor and blended until completely smooth. Add in the masa and blend, slowly adding 3/4 cups water until a dough starts to forms.  Stop and check dough. It should feel like play dough and come together easilty onto a ball. If it feel wet, add in a couple of tablespoons more of the masa. If it is still too dry and crumbly, add in more water until it's to the right consistnacey. Dump dough onto counter and form in a ball. Place dough in a bowl and cover with a damp towel and let sit for abut 15-30 minutes.

Preheat a skillet on medium high heat on stove.

Once dough has rested, divide into 12 pieces and roll into balls. Place balls onto a damp towel and cover when not working with them. Grab a large ziplock bag, a cutting board, and a rolling pin. Take a dough ball and place in the center of the bag. Press down with the cutting board, placing all your weight on top. It got flat, but not flat enough. Continue to flatten out with the rolling pin until it is about  1/8 inch thick. Press again one last time with the cutting board. Gently remove from bag and place directly onto the hot skillet. Cook each side for 3-4 minutes or until it  starts to get a few light brown spot. Place cooked tortilla on a baking sheet or in between a kitchen towel. Repeat until all 12 dough balls are cooked into tortillas.

Preheat oven to 375

Working in 3's. dump a little oil onto your hand then lightly rub it all over the tortillas. Stack them on top of each other then cut into 8 wedged. Place wedges onto a baking sheet, get as many as you can onto sheet without any overlapping, then sprinkle with salt. to taste. If you have them, use multiple baking sheets.  Place in oven for about 10-12 minutes or until the chips are crispy. Remove and sprinkle lemon juice all over the chips. Toss around and place back into oven for a minute or two just until lth lemon juice evaporates. Remove and dump chips onto a wire rack to cool.

Eat chips. Any left over can be placed into a airtight container or bag and will last about 3-4 days. 

In 5 ingerdients or less, beans, Dairy Free, Vegan, snack, Savory, pulses, Gluten Free, crackers and chips Tags Black Bean Tortilla Chips, Masa harina, chips form scratch, cinco de mayo, cron chips, Vegan, Gluten free, plant based, beans, black beans, black bean chips, corn chips, snack, chips, dairy free, gluten free
1 Comment

arugula walnut chickpea burgers with quick pickled radishes and onions 

April 21, 2018 Colleen Stem
IMG_5321.jpg
IMG_1552.jpg

I love me some spring time fresh greens, especially arugula. The last farm share pick up there was arugula for the first time since late fall and as soon as I saw it my mouth started to water for the fresh springy, peppery taste of  fresh spring time greens. As I bagged my greens, I shoved a fist full into my mouth. Ah, nothing better then a mouth full of fresh greens after a long long winter. Am I right or am I right?

I ate  a lot of those greens fresh, but did you know that arugula makes for a nice accompaniment to walnuts and chickpeas? And if you mashed all that together with a few other things and shaped the mixture into patties and you get yourself some dank ass burgers?  Well now you know. And now you can make them for yourself and experience the greatness of spring fresh arugula. Just make sure you have enough fresh to shove a handful into your mouth. It is spring time refreshing. 

The stuff. Chickpeas, arugula, walnuts, and big onion, and some radishes. Also a couple carrots, some oats, a few cloves of garlic, a Leon, salt and pepper, red wine vinegar, and a little olive oil. 

IMG_1449.jpg

To start, halve the onion. Thinly slice one half and thinly slice the radishes

Scoop it all into a bowl, sprinkle with salt and toss in vinegar. Set aside on the counter to do it's thing. 

Chop the rest of the onion, the carrots, and the garlic into small chunks.

IMG_1464.jpg
IMG_1468.jpg

Carrot, onion, garlic, and oats go into the food processor and pulsed until a medium crumble.

Walnuts and arugula next. 

IMG_1481.jpg
IMG_1489.jpg

Pulsed until combined then add in the juice of the lemon a good pinch of salt and pepper, and the drained chicken peas.

IMG_1493.jpg

Pulse until just combined. Some big chunks are good, you just want the mixture to be able to hold together.

IMG_1499.jpg

Dump the mixture into a bowl and place in the fridge for at least and hour and up to a day. 

After the time in the fridge, divide the mixture into 6 equal parts and form each into a patty about an inch think. Take a clean cloth and pat each applies dry on both sides.  

IMG_1525.jpg

Grab a skillet, lightly oil it, and place on a medium heat. Sear each side of each burger until browedthen place on a lightly Ould baking sheet. 

IMG_1529.jpg

Place the burgers into a preheated oven to finished cooking. 40 minutes, flipped after 20.

After the burgers are cooked, it time to assemble. Bread or buns of some kind(I used sourdough rolls) the pickled radish and onion mixture, some mustard( I used honey mustard) and more fresh arugula.

Do it up, do it right. Serve with some fries or chips and eat while knowing that spring is here, even if as you are eating, it is snowing. Damn snow. 

At least we have arugula. 

-C


Arugula Walnut ChickPea Burgers with Quick Pickled Radishes and Onions 

makes 6 burgers 

  • 1 can or 2 cups  cooked chick peas drained
  • 2 large handfuls arugula  (about 2 packed cups)
  • 1 large sweet onion
  • 2 small carrot
  • 1 cup old fashion oats
  • 1/3 cups walnuts
  • 2-3 cloves garlic
  • A lemon
  • salt and pepper
  • 2 tablespoon red wine vinegar
  • handful of radishes (5-7 of them)
  • salt and pepper
  • olive oil

To assemble burgers

  • Burger buns or baguettes
  • Maple or honey mustard
  •  fresh arugula 

Start by cutting half of the onion as thinly as you can. Do the same with the radishes and place the onions and radishes in a bowl with a sprinkle of salt and drizzle the vinegar all over Toss around and set the bowl aside.

Grab the food processor and dump the oats in. Roughly chop the other half of onion, the carrots, and the garlicand toss those into the processor too. Pulse until a medium crumble. Add in the arugula, the juice of the lemon, the walnuts, the chickpeas, and a good pinch each of salt and pepper. Pulse again until just combined and the mixture has come together. Taste and make sure the salt and pepper are good for you then dump the mixture into bowl and set in fridge for at least a half hour or as long as a day.

Preheat oven to 400.

When ready for burgers, take mixture out of the fridge.  Place a lightly oiled skillet on the stove on medium heat. 

Divide the mixture into 6 equal balls and pat into inch think patties. Take a clean cloth and pat eat patties dry.  Place each burger on hot skillet and cook each side for 4-6 minutes or until each side is nicely browed. Transfer burgers onto a lightly greased baking sheet then place them all into the oven to finish cooking for  40 minutes, flipping them after 20 minutes.

Once burgers are cooked, remove from the oven. They will be slightly fragile, but will firm up if you let them set  for 5-10 minutes.

Assemble the burgers. Grab a bun or bread of some kind (if you want), top with a good fork or two full of the pickled radish onion mixture, drizzle with some mustard and top with more fresh arugula.

Get on to eating it. 

If you don't eat all the burger at one time, the freeze really well. I almost prefer them after they have been frozen. 

In Vegetables, Vegan, Spring, pulses, Nuts, Gluten Free, entree, dinner, Dairy Free, beans Tags Arugula Walnut Chickpea Burgers With Quick Pickled Radishes And Onions, Vegan, Vegan Burgers, Veggies Burgers, Pulses, Beans, Burgers, Vegan Food, food, Pickled onion and radishes, spring, Walnuts, Nuts, Protien
Comment

Sweet Potato Chickpea Hash with Lemon Tahini Sauce

March 10, 2018 Colleen Stem

Easy quick dinners are no joke because sometimes life happens and then you are hungry, then hangry,  then maybe yelling and or tears start and nothing is ever going to be good again. And then you eat and everything is A OK, but that time between tears and food can be long, especially when you just can't think so one should have a least a good 2 or 3 good dinners up there sleeve (besides pasta) that can be made quick and easily to avoid the fallout of food deprivation. This bowl of goodness here is one of those. And sure some people might not always have a sweet potato, tahini, or chickpeas is the house  (I ALWAYS have a sweet potato or some type of winter squash and tahini and chickpeas... they are staples here) but with a tiny it of foresight, you can make these things happen too. And then you will make it and realize that you must have these ingredients on hand at all times because yeah, a good go to meal that will prevent the tears.

Admittedly I have made this for the mr but he is not that into it. Says he is not a huge fan of sweet potatoes. (what the fuck is wrong with him?) But me, I eat is and I eat it all.. The sweet potato/chickpea/tahini combination is classic fantastic. This hash is sweet potato sweet, a little chickpea crunchy, salty, savory, and creamy citrusy.  It's all sorts of goodness. I tossed this hash on a big bed of kale (any sturdy green would be good) and only good things happen in my mouth. So the mr. might not like it but I am starting to realize (after 15 years) that my taste is far superior to his. Haha. (but really)  Quick and easy (and healthy) and good.  Make it once and it will turn into on of your go to dinners, unless you don't like sweet potatoes. In that case there is pasta. 

The stuff. Chick peas (I had just made a batch but if you don't have any made already, grab a can) a sweet potato, an onion, a lemon, some tahini, and garlic Also some cumin and chili powder, olive oil, and salt and pepper. 

Preheat your oven and chop up the onion and sweet potato into mouth sized pieces. 

IMG_0745.jpg

Toss the chopped stuff onto a baking sheet with the chickpeas.

IMG_0743.jpg

Drizzle the whole shebang with olive oil and toss with cumin, chili powder, and salt and pepper.  

Into the oven it goes.

Half hour later it is all roasted and ready.

IMG_0733.jpg

Oh quick, make this before the stuff is out of the oven. Tahini, minced garlic, a dash of salt, a bit of the liquid from the chickpeas and the juice of a lemon. Just stick it all in a cup or bowl and mix it around. Then it's done.

IMG_0766.jpg

Scoop the hash into a bowl (I like a large pile of greens underneath) and cover with the tahini sauce. 

Eat is all to your face.

-C


Sweet Potato Chickpea Hash With Lemon Tahini Sauce 

dinner for one, a side for two. Very easily doubled or tripled. 

  • 1 sweet potato
  • 2 cups or 1 can cooked chickpeas drained but liquid reserved 
  • 1 medium yellow onion
  • 1 tablespoon cumin
  • 1 teaspoon chili powder
  • salt and pepper
  • 2-3 tablespoons olive oil
  • 3 tablespoon tahini
  • 1 lemon
  • 1/4- 1/2 cup of aquafaba (chickpea liquid)
  • 2-3 cloves garlic

Preheat oven to 425

Chop sweet potato and onion into mouth sized cubes and place on a baking sheet. Add the drained chickpeas and drizzle with olive oil and toss around. Sprinkle on the cumin, chili powder, salt and pepper, and toss that around again. When the oven is preheated, slide the baking sheet on in. 

While the stuff is baking, mince the garlic and place it in a bowl with the tahini, the juice of a lemon, and a pinch or two of salt to taste. Add in 1/4 cup of aquafaba and mix it all around. If to thick for your liking, add a little more of the aqaufaba until its a good consistency. 

Check the stuff in the oven after 20 minutes and give it a toss.  Keep baking for another 5-10 minutes or until the sweet potato is cooked and starting to brown. Remove from oven and dump into a bowl (maybe on a bed of greens or rice) and drizzle all over with the tahini sauce.

Eat


In Vegetables, Vegan, side dish, sauce, quick and easy, pulses, Potato, grain free, Gluten Free, entree, dinner, Dairy Free, beans Tags Sweet Potato Chickpea Hash With Lemon Tahini Sauce, vegan, grain free, gluten free, sweet potato, tahini, dinner, quick and easy, plant based, heathy, vegan dinners, pulses, beans, chickpeas, sheet pan dinner
Comment
← Newer Posts Older Posts →
 

https://thelovelycrazy.squarespace.com/config#/|/about/

Me. Food Maker.Food eater. Woo HOO!

STEM+NODE  SMALL BATCH AND ONE OF A KIND POTTERY

stem+node ceramics


____________________

Subscribe

GET NEW POSTS IN YO EMAIL

You are AWESOME!!!


@thelovelycrazy 2014-2021