• stem+node ceramics
  • HOME
  • Food Recipes
  • About
  • Contact
Menu

The Lovely Crazy

Street Address
City, State, Zip
Phone Number

Your Custom Text Here

The Lovely Crazy

  • stem+node ceramics
  • HOME
  • Food Recipes
  • About
  • Contact

Beet Chips

August 31, 2019 Colleen Stem
IMG_1570.jpg
IMG_1518 2.jpg

When your sister drops off 50 lbs of beets, on top of the 50 lbs that you have to harvest that are growing in your garden, what do you do?

Well chips of course.

Yeah, chips. That’s right. When I got home from camping on Monday and there was a humongous pile of beets sitting next to my front door, I am not going to lie, I was a little shocked. I mean there wasn't just a few little ones. These beets were freaking huge, like the size of my arm, and so many. But pretty much right after my initial shock I knew what needed to be done. First, eat a few roasted, second, roast extra to freeze for later, and lastly, make a few bunches of chips.

Have you ever had beet chip? They are amazing. Crispy, crunchy, tasty as all heck. If you like beets, even in the slightest, you will love these. If you hate beets, well maybe don’t? Either way, beet chips are the best chip. Wha't’s not to love? Pink, and chippy. Sweet, and salty. And then you add the fact that making beets into chips is a good way to get your veggies in and that you can eat a whole bowl full and feel zero guilt because you are just eating beets. Plus making beets into chips is a good way to use up any extra beets you might have laying around or that have been dropped off at your front door.

These chips, once they are made, will not last long. So when you do make them, know you will probably be making them again soon there after. Me, I have still have to harvest all my garden beets so beet chips are happening again soon. Real soon (like this afternoon!)

To the beets!

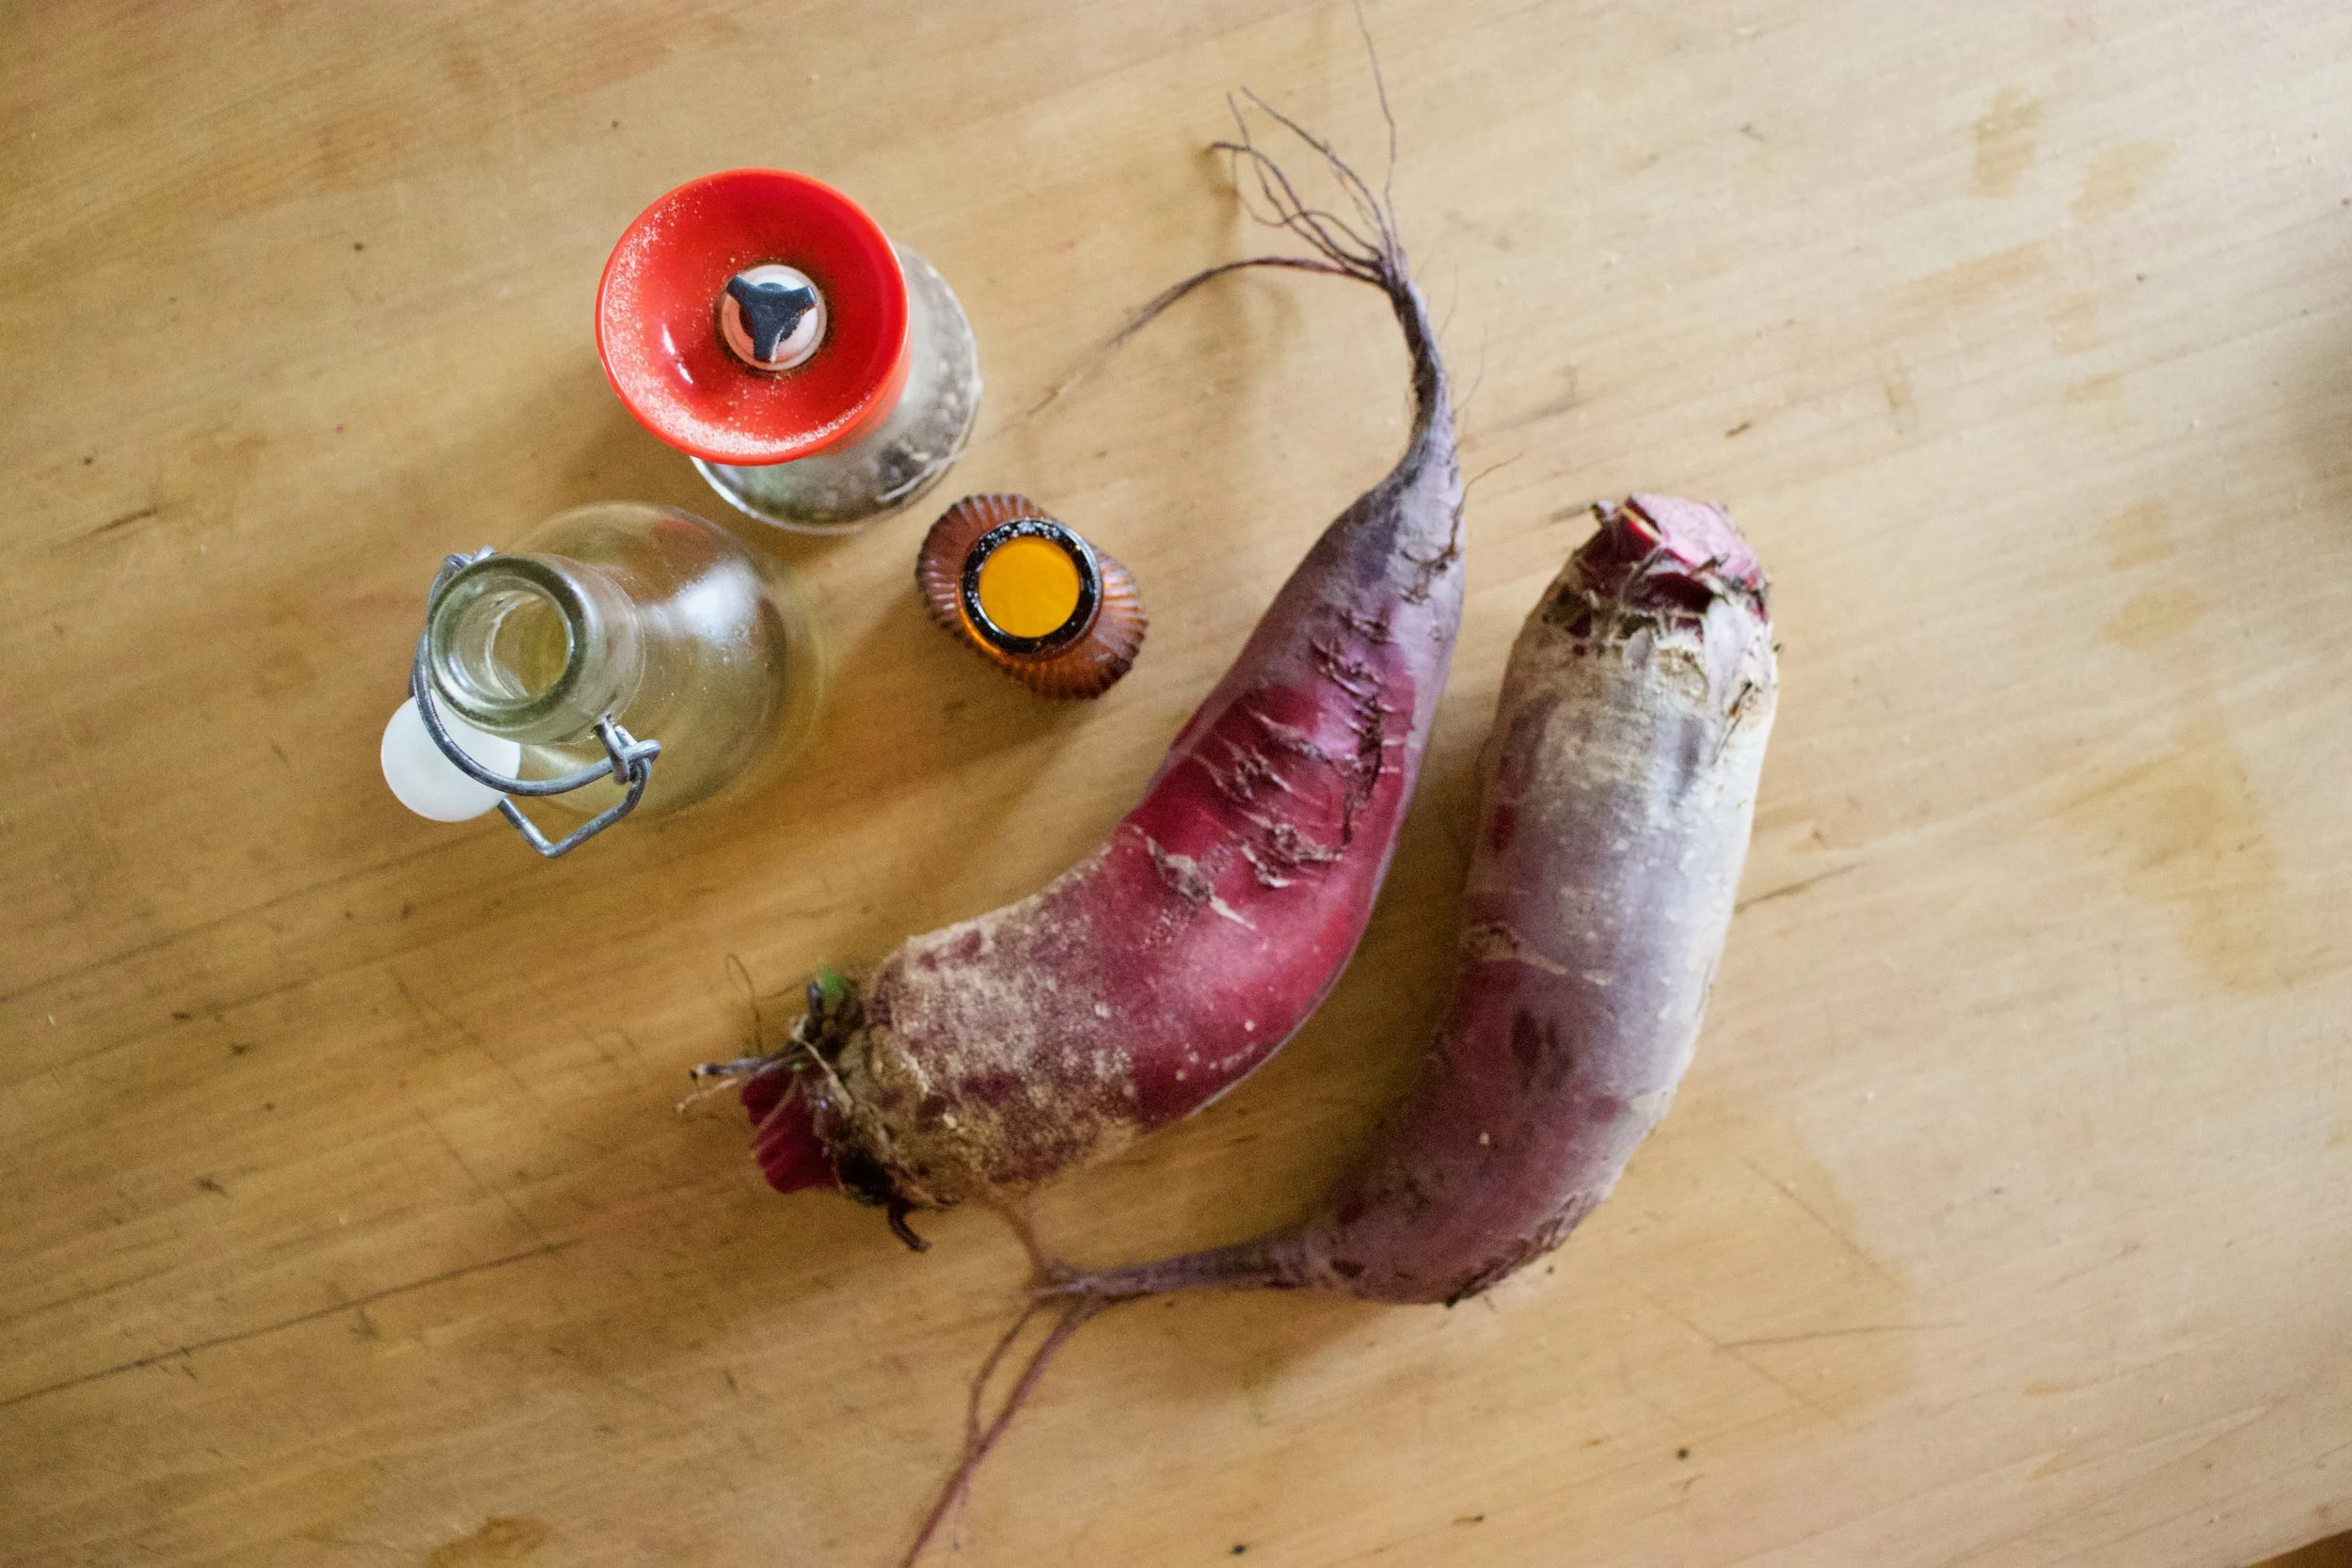
The stuff. Beets (these are Formanova beets but any variety works) salt and pepper ,and oil.

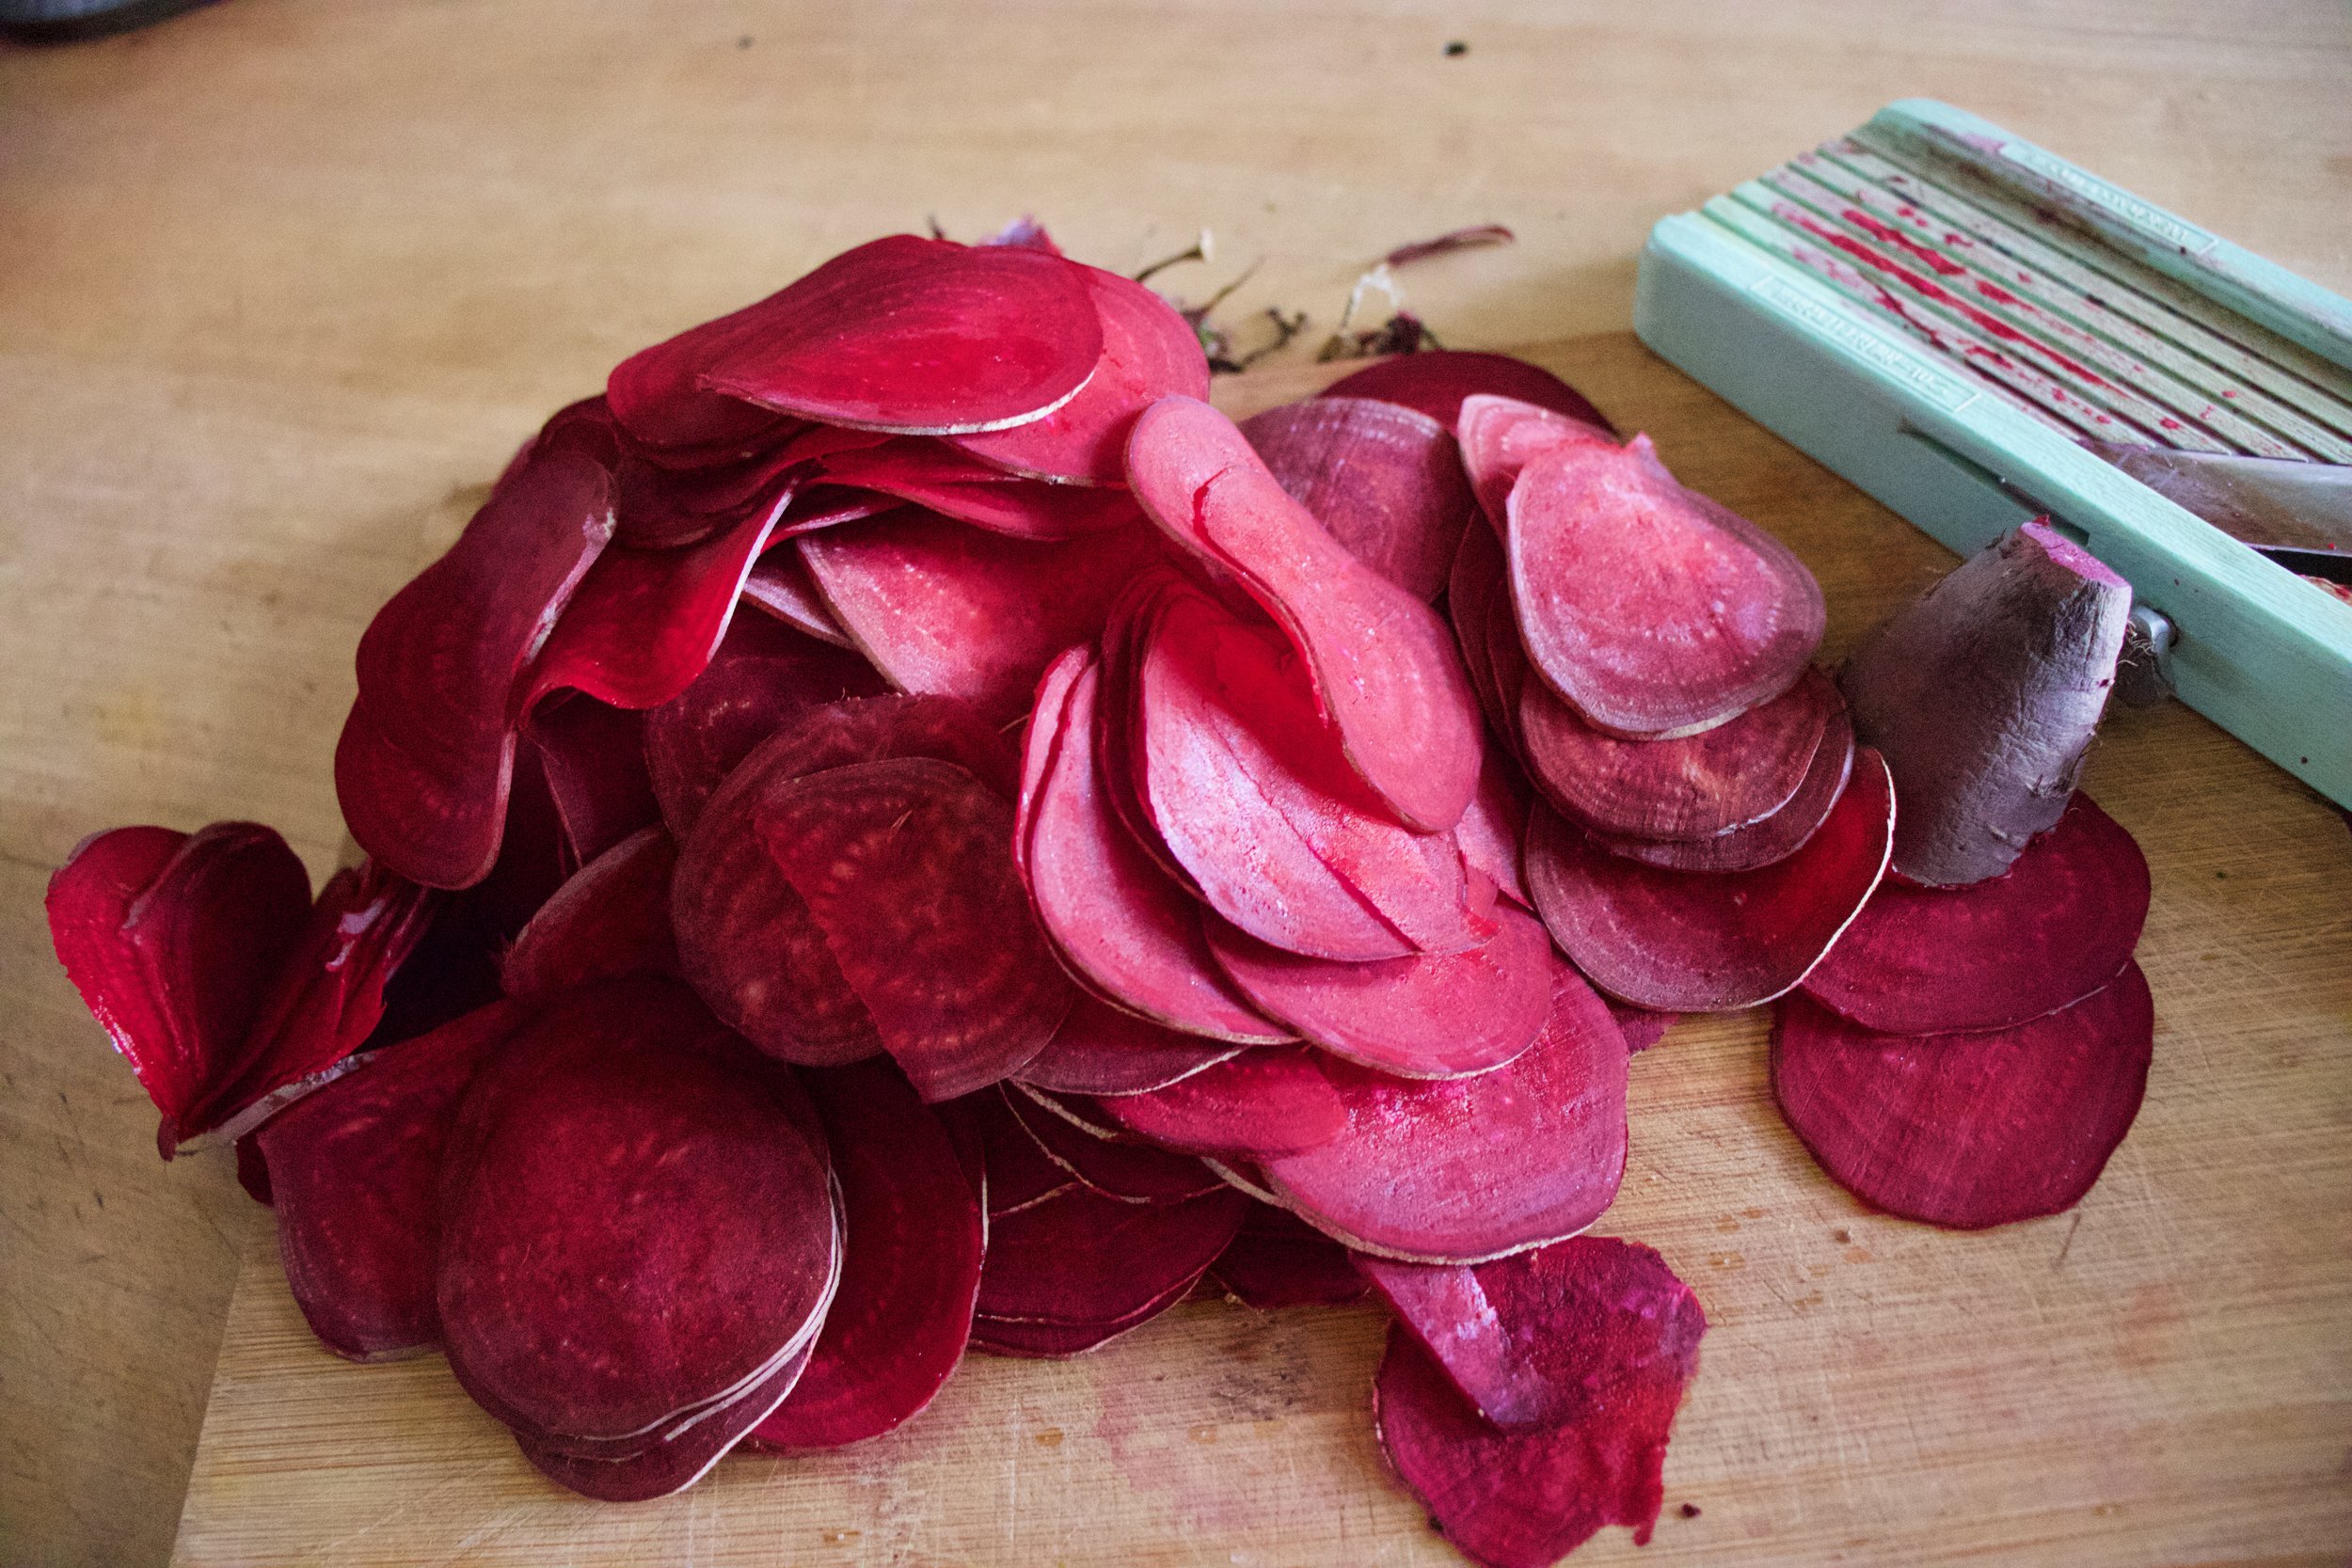
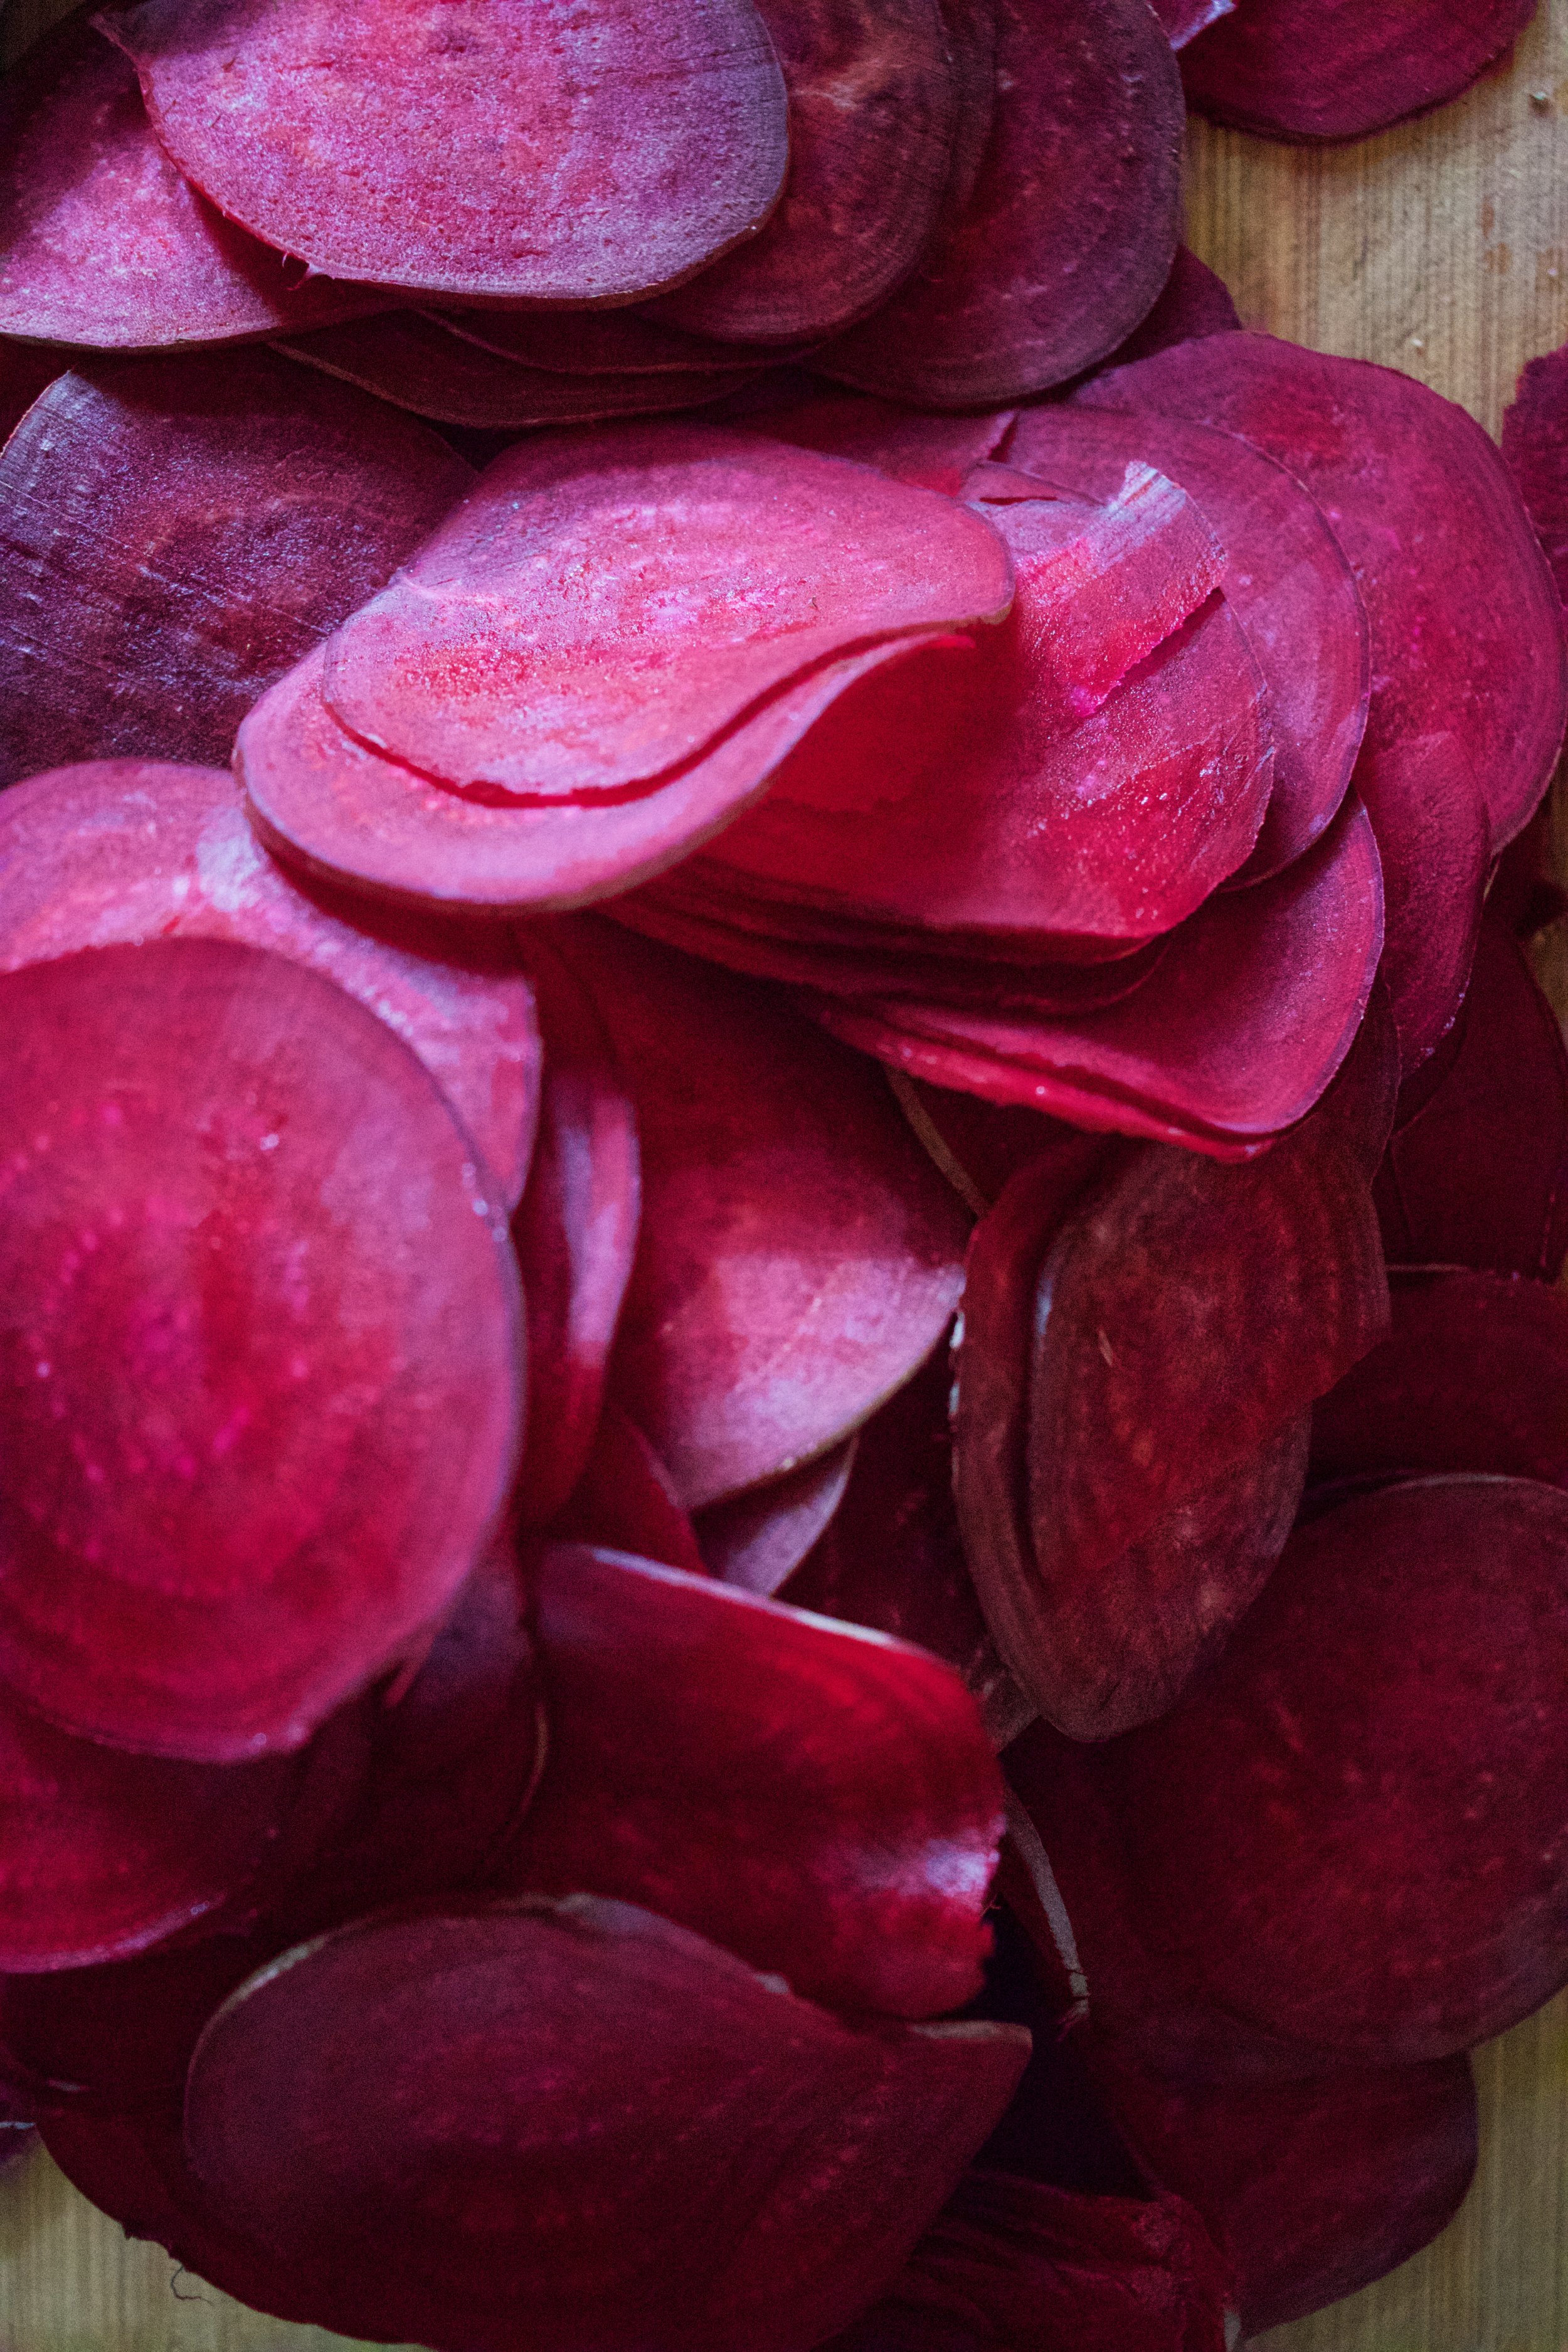
Ok so you need to cut these bad boys reallllllly thin. Like 1/15th a inch. So, what I am saying is, use a mandolin. If you don’t have one, a knife will do, but you are going to have a hard time getting them as thin as you need to and all of them consistent so baking is going to be a little more tricky so maybe you should just go borrow or invest in a mandolin.

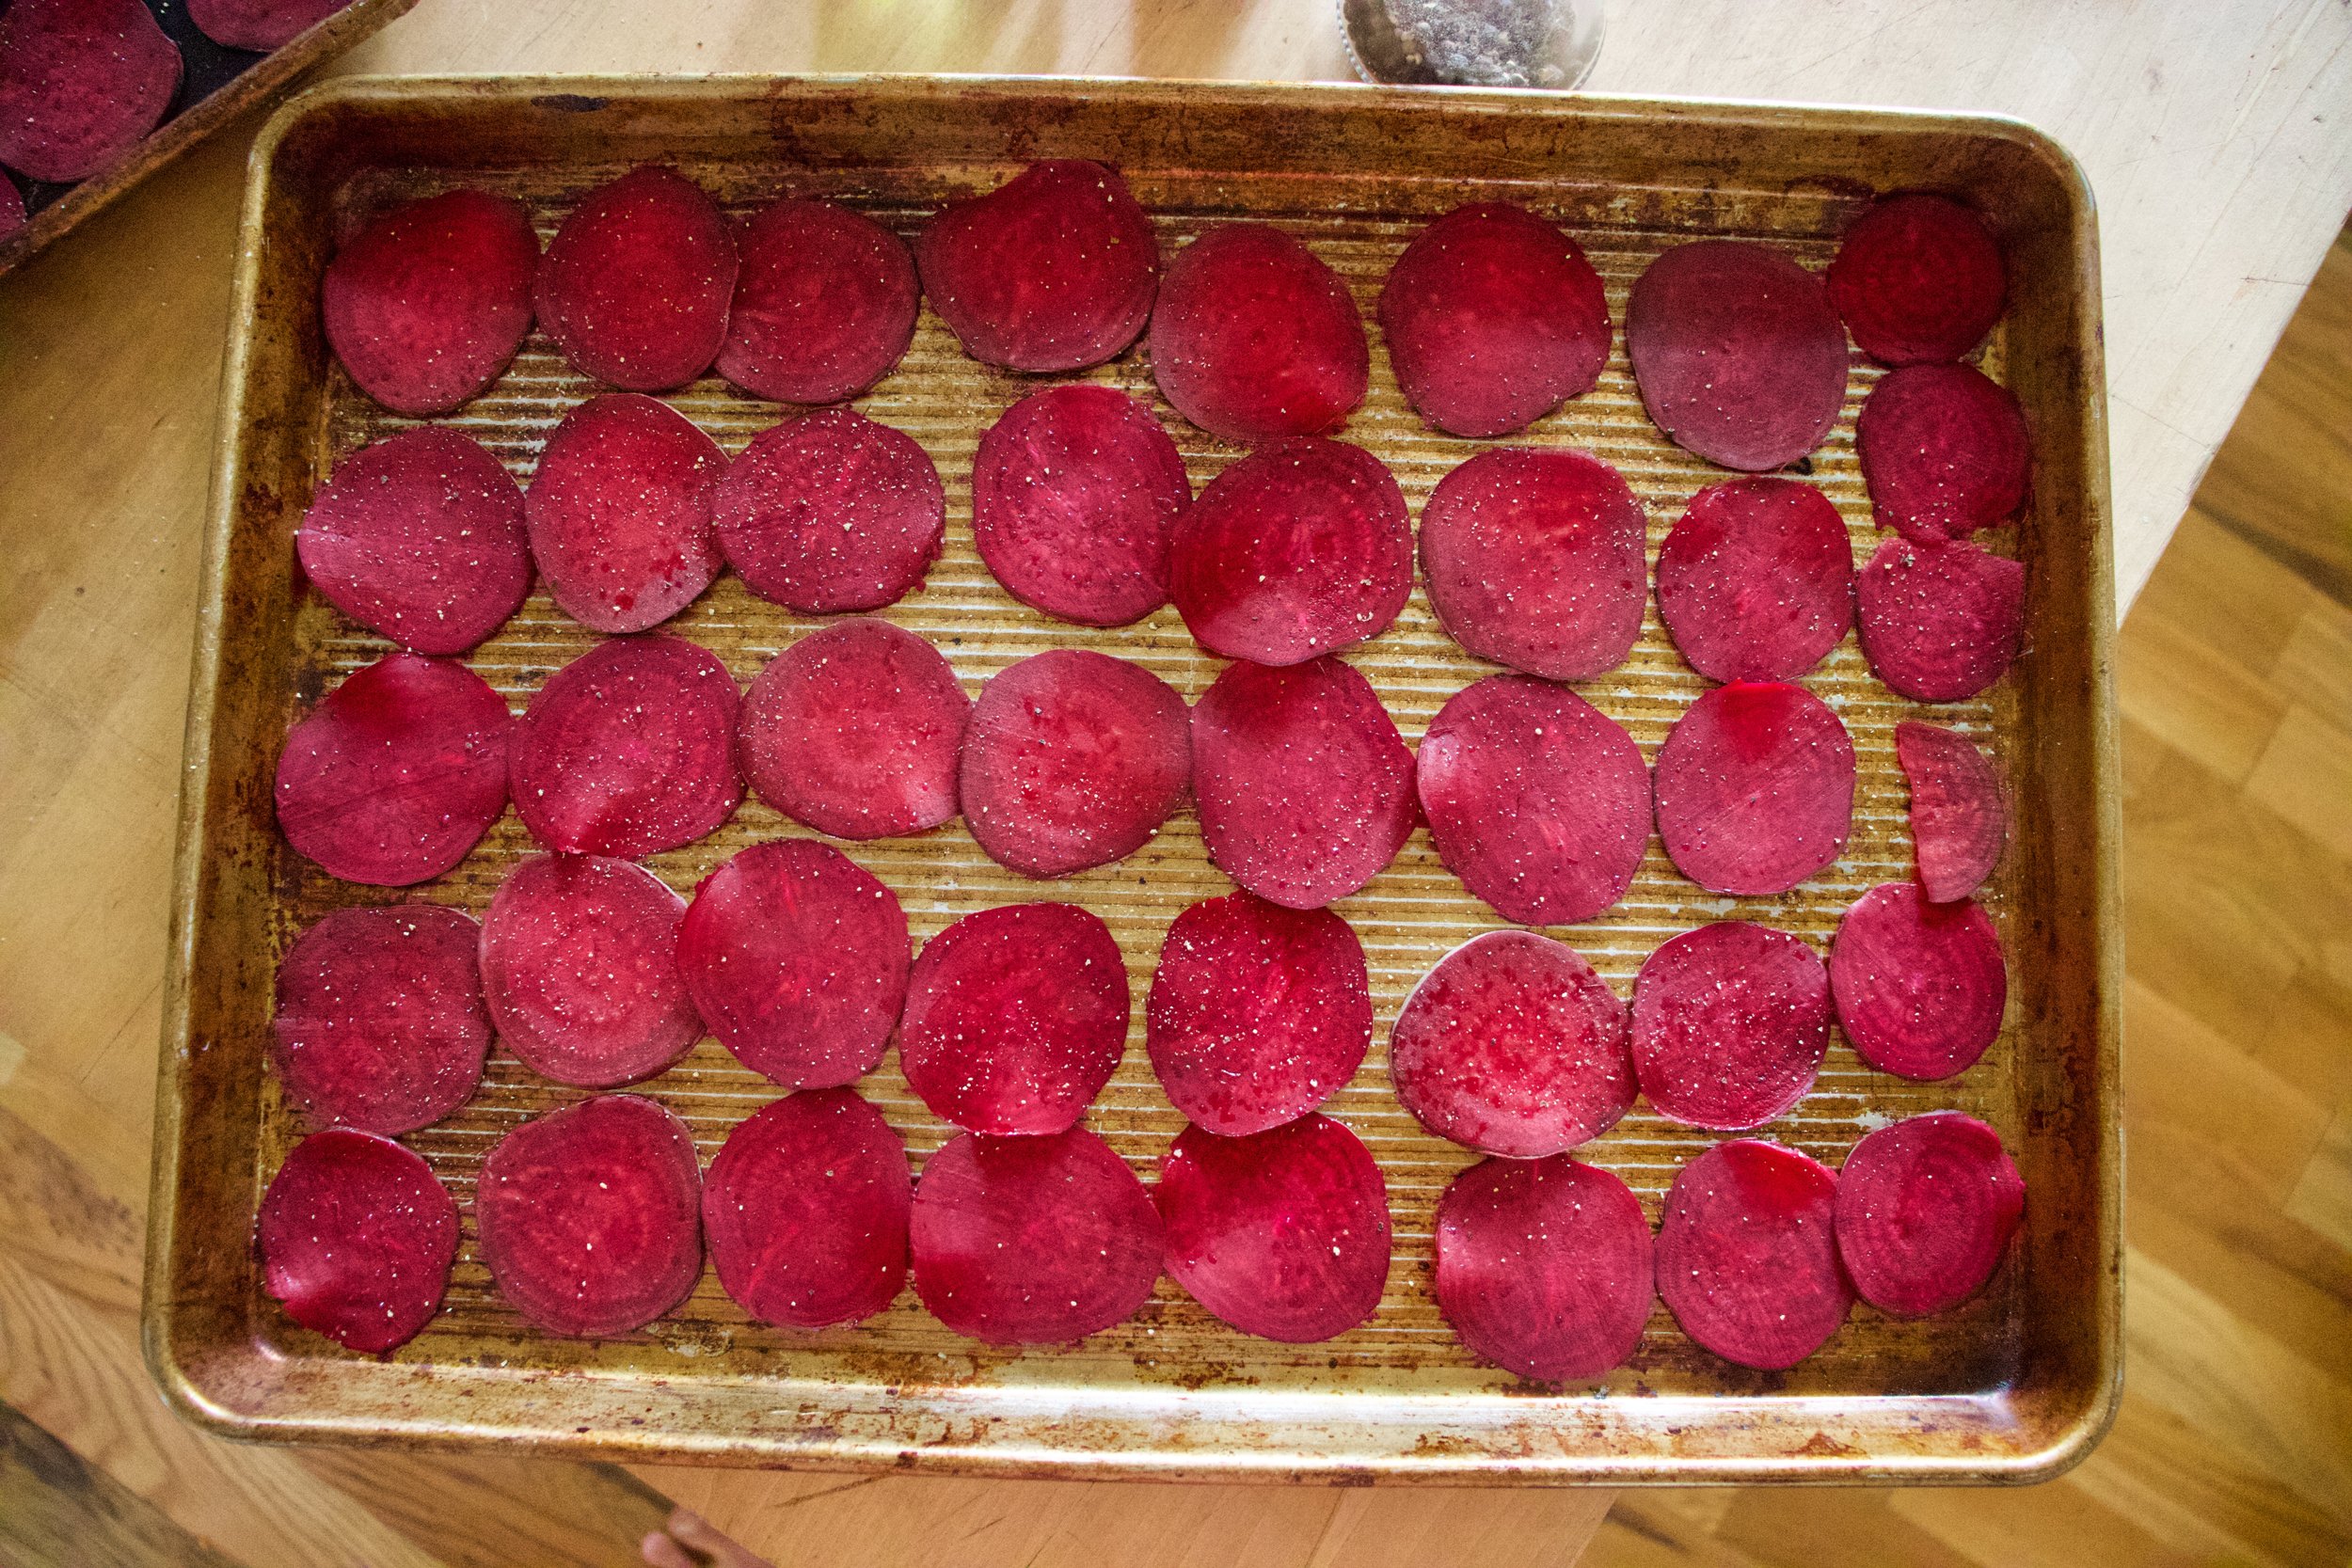
Grab baking sheets, oil, and salt and pepper. You can either dump the oil directly onto the pile of sliced beets and really toss to make sure each one has been coasted or do what I did which was I drizzled oil into my hands and rubbed each sliced beet between my oiled hands before placing on the sheet.

After you get them on there, single layered with no overlapping, sprinkle tops with a pinch of salt and pepper.

On the way into the oven.

IMG_1552.jpg

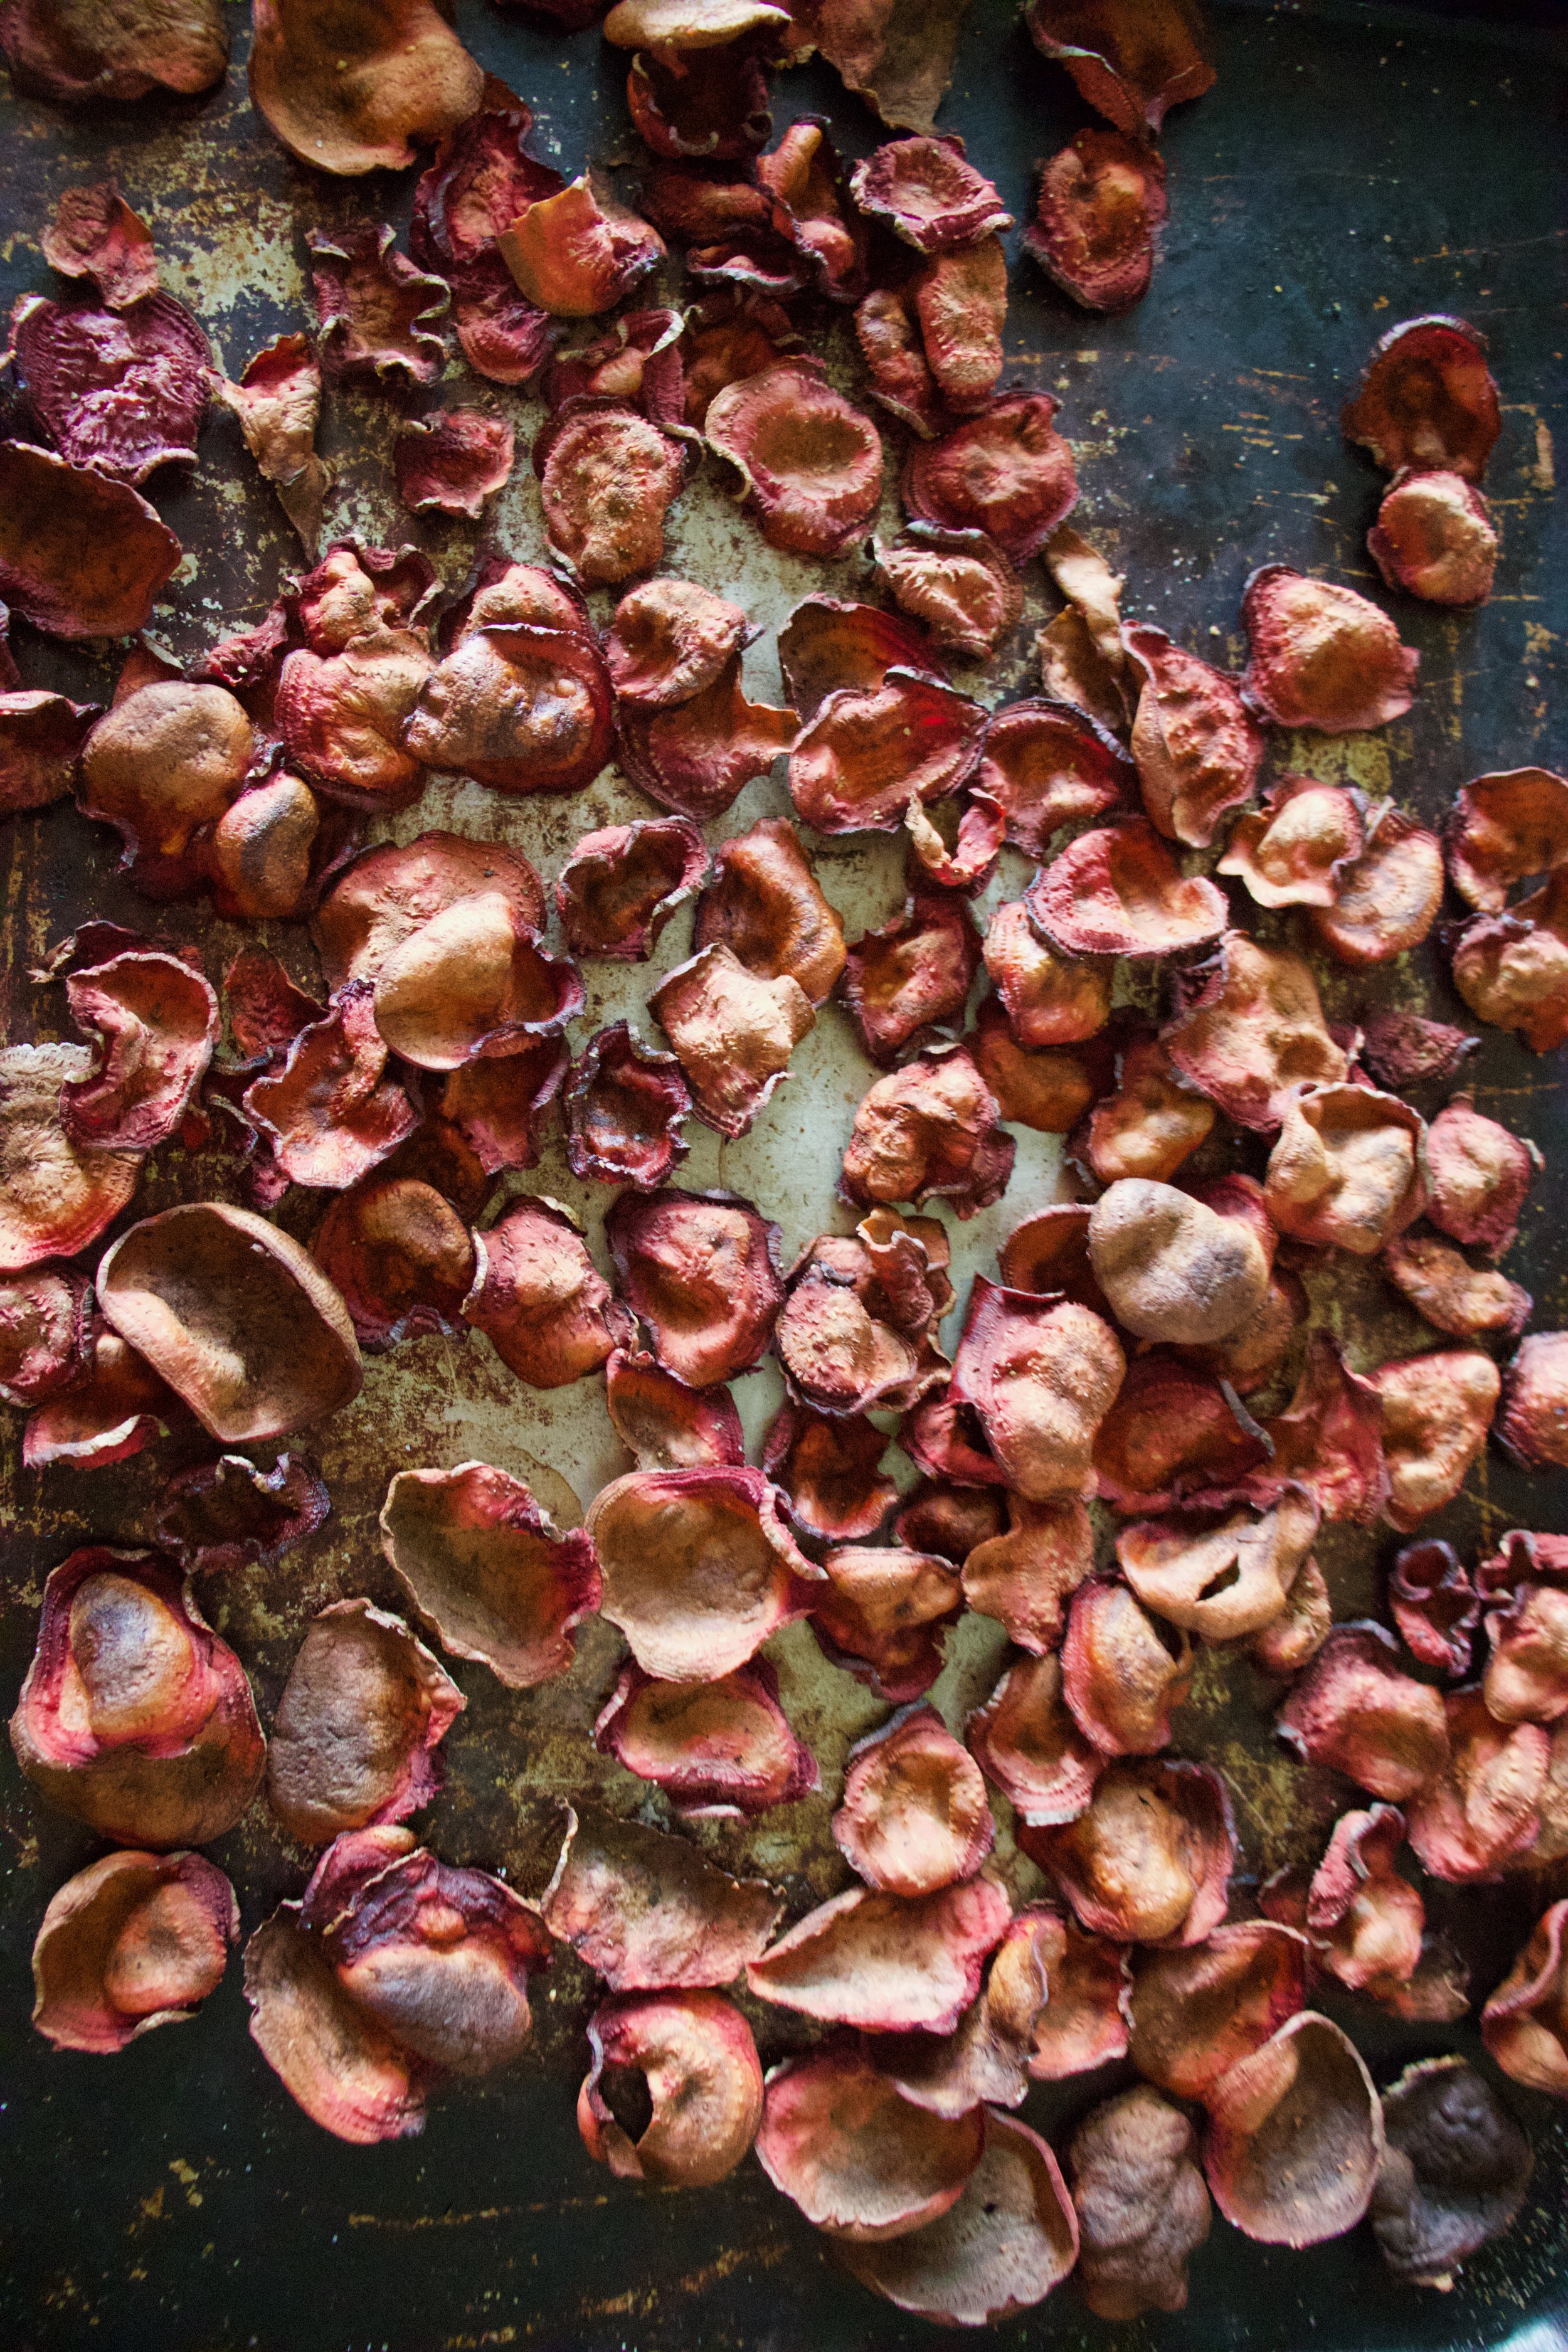
After the oven. Baked for about 18 minutes. You really have to watch after the first 13 or so minutes to make sure you catch them at the perfect time. Crispy, but not burnt.

IMG_1550.jpg

A side by side shot. Crazy shrinking will happen!

IMG_1540.jpg

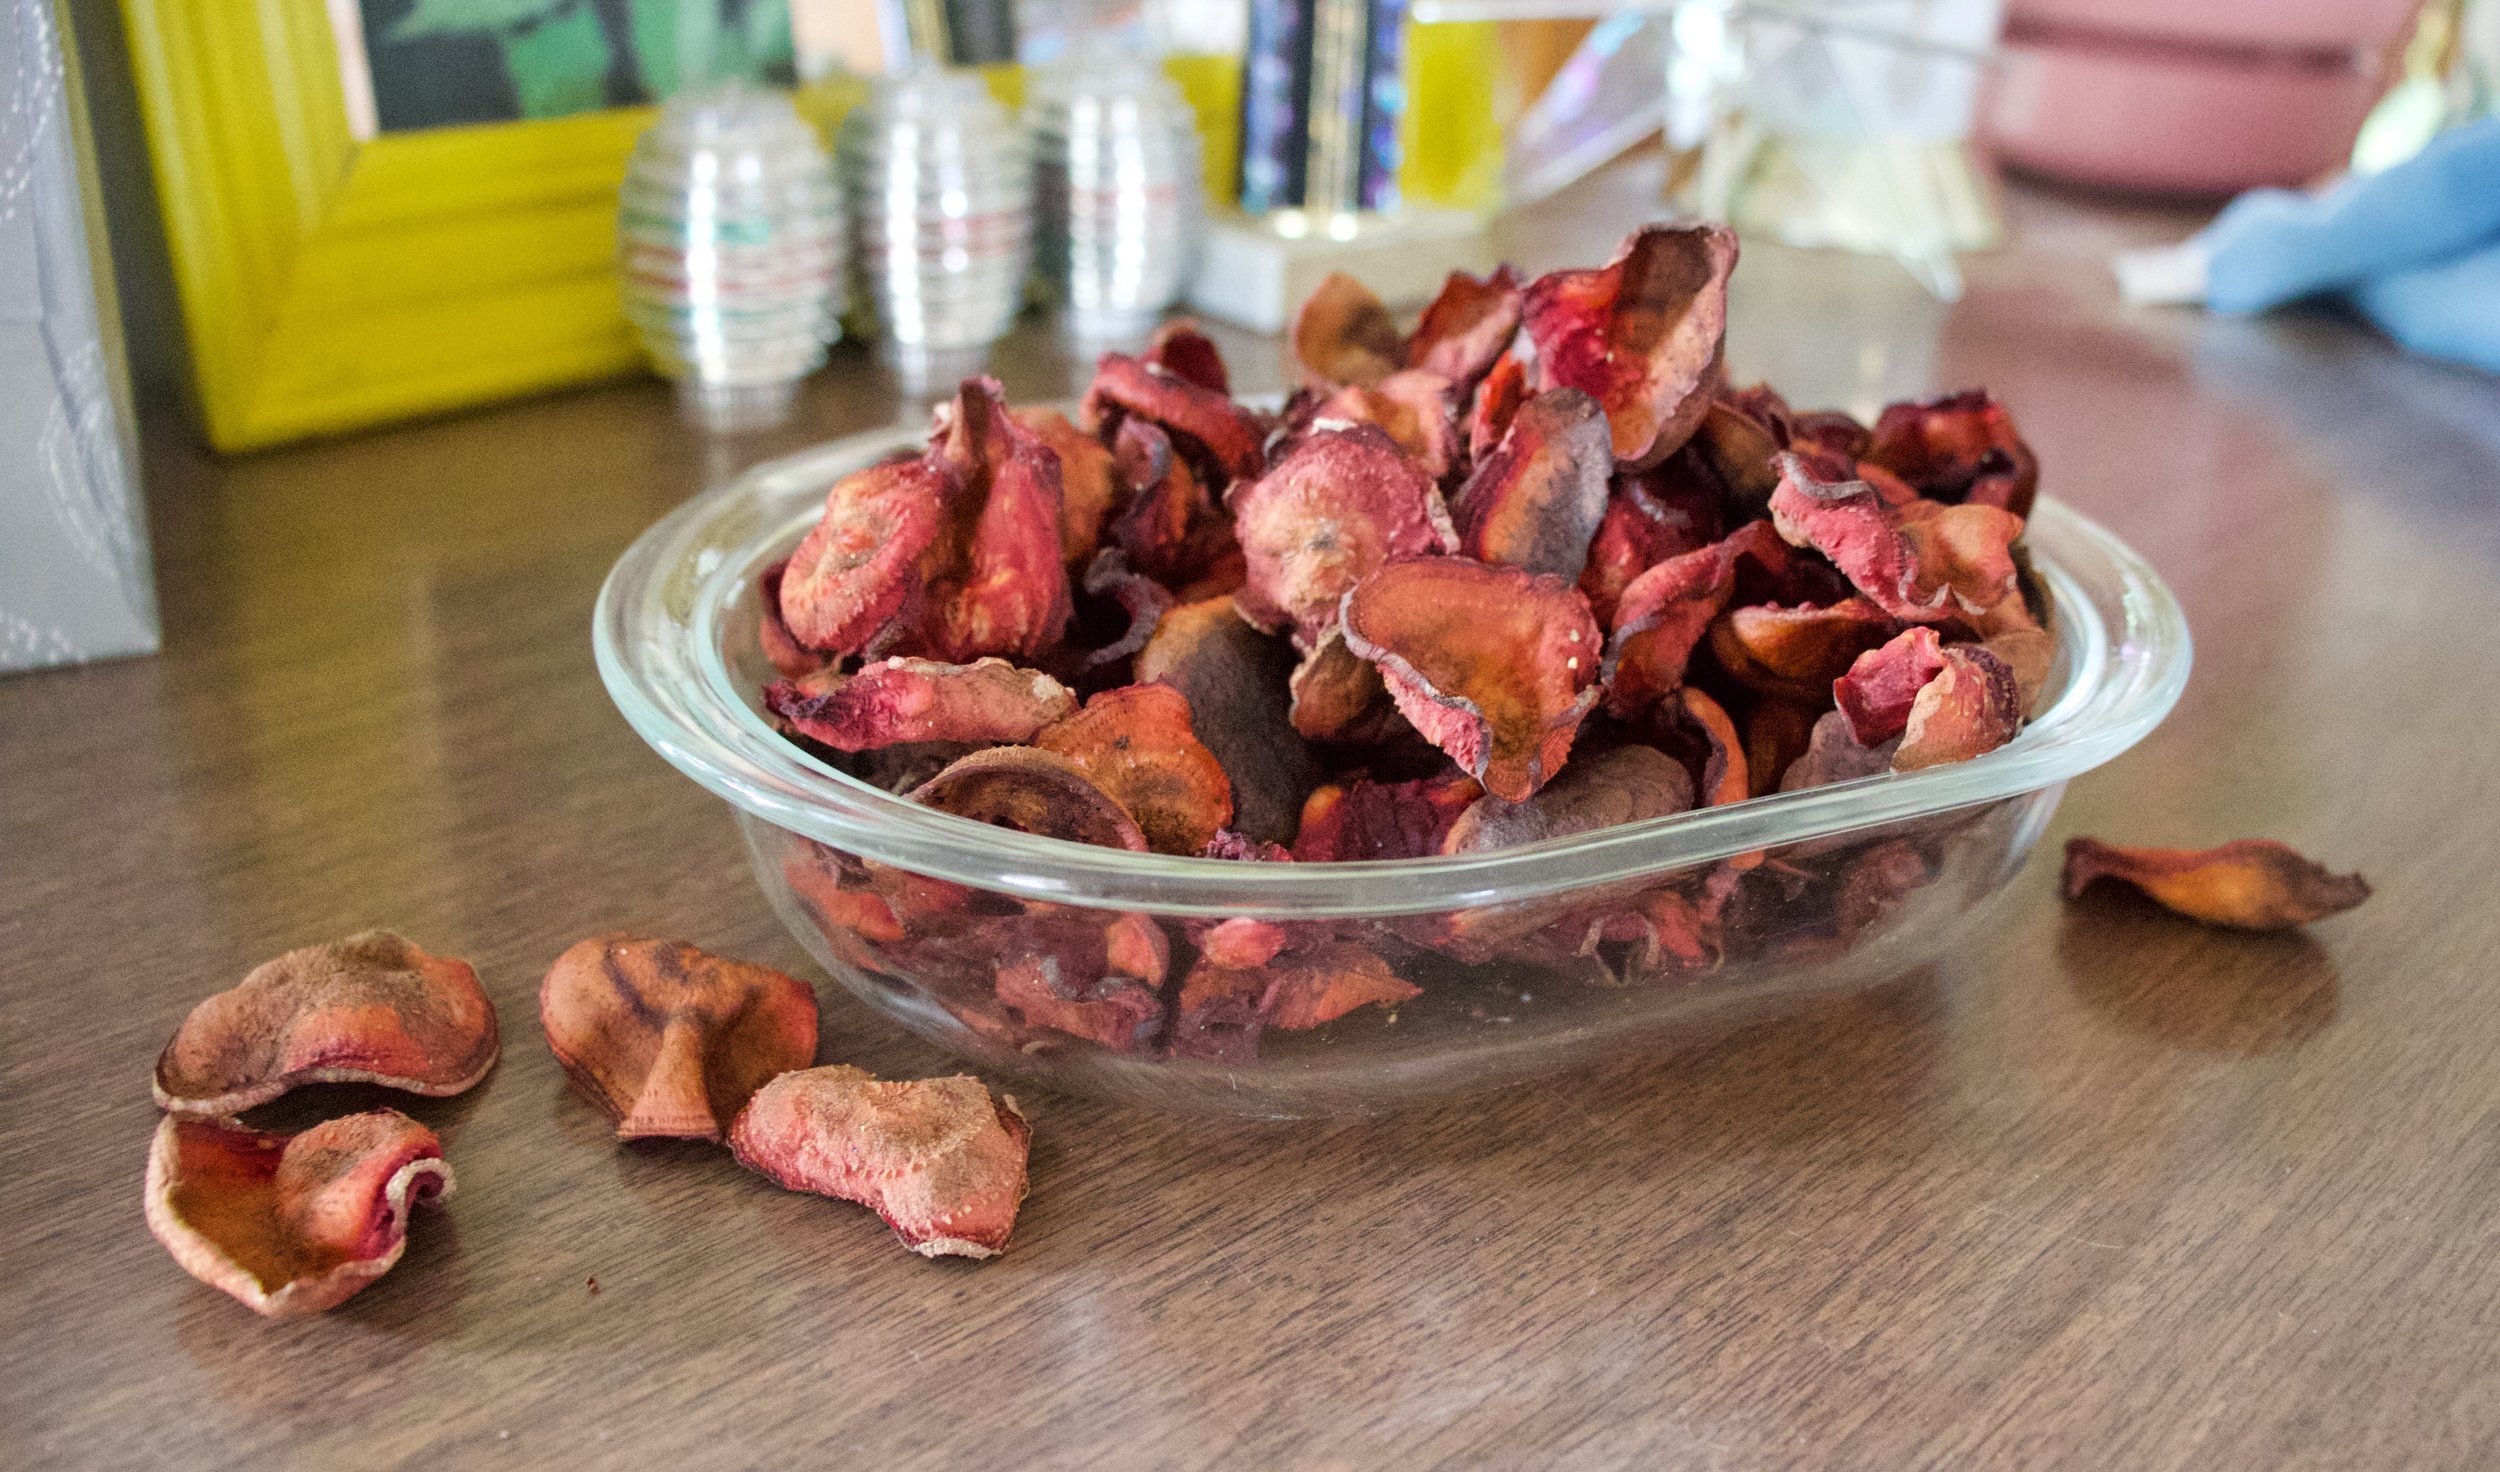
Oh man, so delicious. And so pretty!.

Let the chips cool before eating, you know, so you don’t burn your tongue. Plus they crisp up a wee bit more.

IMG_1600.jpg

Once cooled, pile them into bowl, and then eat them. And eat them all. They are only beets after all. And you won’t be able to stop yourself anyway. Ha

-C


Beet Chips

Makes enough for an evening of chip eating for 1-2 people

  • 2 Large beets (think softball sized)

  • a tablespoon or two of oil (I used grape seed but really any would work)

  • salt and pepper

Note. Making these without cutting with a mandolin will be a pain in the ass. It can be done, but if you have a mandolin, use it.

Preheat oven to 350

With a mandolin, slice the beets about 1/15 inch thick. (No need to peel the beets unless you want to.) Once beets are all sliced, either drizzle them all with a tablespoon or so of oil and toss until all are coated. OR what I did and found worked really well was drizzled oil into my hands and rubbed each beet between my oiled hands as I was placing them on the baking sheets. Either way.

Now place oiled beets, single layered, without overlapping, on baking sheets. Sprinkle with a pinch of salt and pepper and place into oven. Bake for about 13 minutes without worrying then start to check every minute or so until the beets are a deep golden brown and crispy ,which will be between 15-20 minutes. Also, even though you cut them all the exact same thickness, some might crisp up faster so you should remove done chips as they happen. Once they are done, place on a rack to cool. And then do another batch. And not, they do crisp up a tiny bit more as they cool.

Once chips are cool and crisp, eat.

Store uneaten (how did you not eat them all?) chips in an air tight container. If you notice that they turned a bit chew, just place them back into oven while preheating oven to 300 then turn oven off and let sit in there for a few minutes.

In 5 ingerdients or less, crackers and chips, quick and easy, snack, Vegan, Vegetables Tags Beets, Baked chips, Beet Chips, chips, veggie chips, veggies, plant based, vegan, food, recipe, gluten free, heathy, snack, baked, not fried, simple
Comment

Chili Lime Chickpea Flour Crackers

July 27, 2019 Colleen Stem
IMG_0580.jpg
IMG_0602.jpg

We have officially kicked off our summer camping adventures. And with camping comes all the greatness of all the things, including camping food.

Recently a friend asked me what it is that we do for camp food. So I told her. Camp food is basically aways the same and consists of a big pot of spiced warm lentils or split peas (both cook really fast and have lots of protein), a shredded summer squash in the summer, or pumpkin in the colder months, maybe fresh tomatoes or a bunch of kale to chop and mix in, and a side of cut up carrots, cucumbers, green beens or whatever else I have.. Then I'll bring a hunk of bread for the mr to eat and me, usually a small head of cabbage to squirt mustard on and crunch into. (Always have the mustard on hand.) And I bring apples to snack on too, but that usually it. (Sometime I’ll back a desert for the mr. If I am feeling nice.)

She was a little taken aback. Said when she (and basically everyone in the world, which I disagreed with) goes camping it is bags of chips, cookies, meat, and everything and anything that she (they) wanted. Basically that camp food was junk food and that she though we were weirdos. But cool weirdos so you know.

So our camp food… not like many others. But honestly it is everything that I want to eat and I love it so whatever whatever. As for the mr, he is happy with the food and when he is not, he brings along something else, but that rarely happens because my lentils be so good. HA!

But she got me thinking that I should have a few more snack options beside cut up carrots and apples. So that is why I made crackers. These chickpea chili lime, freaking amazing crackers. Because crackers are a very appropriate snack food, and these crackers in particular are even greater because they are made with the goodness of chickpea flour which is packed full of protein and is well received after a day of hiking or other fun outdoor camping activities. And how can you go wrong with chili lime? Well i’ll tell you, you really can’t

So the plan was to make a batch, eat a few, save the rest for this camping weekend. But guess what? I have to make another batch. They didn’t make it. We ate them all. (not sorry) At least I know we will be liking our new camping snack addition well and right.

So if you like crackers, camping or elsewhere, you should really gives these a go. They will not disappoint.

Now to the crackers!

IMG_0509.jpg

The stuff. Chickpea flour, chili powder, a lime, a little baking powder, olive oil, salt and pepper, and water.

IMG_0517.jpg
IMG_0523.jpg

Combine the flour, zest of the lime, half the chili powder and half the salt, and the baking powder and some pepper in a bowl. Mix until completely combined then add in the oil, water and the juice of the lime.

Mix until dough forms. It might feel a little sticky, if that is the case, just mix other tablespoon of chickpea flour.

Knead dough on a well chickpea floured surface for a good minute until the dough is a even consistency then let it sit for a few minutes to rest. Once rested, cut dough into 2-3 pieces because working smaller is easier.

IMG_0551.jpg
IMG_0555.jpg

Roll out your first piece of dough about 1/8 inch thick. (Again, make sure to really flour your work surface and rolling pin.) Mix salt and chili powder together and sprinkle on top. Cut out your crackers (squares are nice but triangles would be nice too) then poke each cracker with a fork.

IMG_0558.jpg

Up close and personal.

IMG_0564.jpg
IMG_0565.jpg

Crackers on a baking sheet before baking and after baking looking all crackery and delicious. And yeah, they shrink a bit.

And lastly, cool the crackers on a cooling rack. They will crisp up a even more. Then it’s all you.

Ready to eat whenever you make the move. You can pack them away for later or place these delicious crackers in a very pretty bowl and eat them away. Or both.

A cracker win!

-C


Chili Lime Chickpea Flour Crackers

make 75 crackers

  • 1 1/2 cups chick pea flour plus about 1/3 more for dusting and rolling

  • 1/2 teaspoon baking powder

  • 1 tablespoon olive oil

  • 1/3 cup room temp water

  • 1 teaspoon chili powder split in half

  • 1 lime

  • 1 teaspoon salt split in half

  • 1/2 teaspoon fresh crackers pepper

Preheat oven to 350.

In a bowl combine the chick pea flour, baking soda, pepper, 1/2 teaspoon chili powder, and half a 1/2 teaspoon salt. Mix until evenly incorporated. Add in oil, the juice of the lime, and and water and mix until a dough forms. Dump dough onto counter and knead until completely uniform in texture. Add more flour if the dough is really sticky. Set dough aside for a few minutes to rest.

To make the crackers, really dust the counter with chickpea flour. Cut the dough into 2-3 pieces and roll1 piece out at a time to about an1/8 inch thin. Again, really flour the surface and rolling pin or else the dough will stick Once rolled, combine the remaining chili powder and salt and sprinkle the top with it. And then cut the crackers. Take a knife of bench scrapper or pizza cattier and cut the dough into inch long strips vertically, then diagonally. Poke each cracker with a fork then gently place them onto a baking sheet. Repeat with remaining dough.

Bake crackers for 15-20 minutes or until a nice deep golden brown. Remove from oven and let cool on a wire rack.

And then eat.

Store uneaten crackers in an airtight container for about a week.

In Vegan, snack, pulses, grain free, Gluten Free, Dairy Free, crackers and chips, beans Tags Chili Lime Chickpea Flour Crackers, gluten free, grain free, vegan, camp, cracker, snack, chili lime, pulses, protein, beans, dairy free, quick and easy, chick pea flour, gram flour, besem flour
Comment

Pretzel And Potato Chip Chocolate Chunk Cookies

January 19, 2019 Colleen Stem
IMG_4677.jpg
IMG_4661.jpg
IMG_4704 2.jpg

What with all the holiday and family get togethers we have had over here at my house the past few week, we have had quite a few bags of chips and pretzels left over. Always almost empty… Always dumped into the compost because I mean, I am not so keen on seeing bags of little bits of chips and pretzels in the pantry that I know will never get eaten. Plus it is not like I am saving carrots or grapes or anything I would eat, it’s junk food. But still. I hate the food waste. That is why I made these cookies. To not waste food. And because we had people coming over to the house for dinner and I cannot not have something for dessert. That would be just wrong. And lastly because I am pretty sure that chips and pretzel pieces only make a plain chocolate chunk cookie into an amazing sweet and salty cookie that will just blow your mind.

And I was right. I made the cookies, I feed them to the mr, the sister, friends and all the littles and they just couldn’t get enough.

Current thought. I am sitting here typing and have come to the conclusion that I should start a bakery that makes cookies out of people almost empty bags of chips, like a Cheeto dust cookie, or a peanut butter Funyun cookie or chocolate chocolate chip Dorito cookie.

Yes. this is a good idea. Oh man, I am a genius.

But back to theeese cookies. Start with these. I’ll let you know when I open the storefront to Garbage Cookies (that is what I'll call the place) You can stand in line for the peanut butter Funyun cookies. I have a feeling about that flavor. Until then…

To the cookies!

IMG_4430.jpg

The stuff. The small bowl has flour, baking powder and baking soda. The big bowl has brown and white sugar. Then you need oil, almond milk, vanilla, chocolate chunks, some pretzels and some plain salted potatoes chips.

IMG_4442 2.jpg
IMG_4459 2.jpg

Start with the wet. Mix the oil, the milk, and the vanilla into the sugars until completely smooth

IMG_4465.jpg

Whisk together the dry stuff.

IMG_4467.jpg

Dump dry into wet.

IMG_4471.jpg

And mix until its a cookie dough. Now here is the thing, you need to stick the dough in the fridge for a couple hours and if you mix in the chips and pretzels now, well I think that might make them extrealemy soggy, so hold off. For now, cover dough and refrigerate for 2-4 hours.

IMG_4490.jpg
IMG_4495.jpg

When the time comes for baking, grab the mix ins and with whatever method you chose, crush the chips and pretzels into small bits. (avoid turning into a dust, you want bits)

IMG_4502.jpg

All salty and crumbly and ready to go

IMG_4519 2.jpg

Grab the dough from fridge and dump in the stuff that needs to go in (crushed chips and pretzels and chocolate chunks).

Mix until incorporated.

IMG_4544.jpg

Scoop dough into balls and place on a baking sheet.

IMG_4550.jpg
IMG_4559.jpg

Into the oven and out they come all golden brown and smelling like yes and mmmmmm.

Get those cookies on a wire rack to cool and to free up the baking sheet to keep baking.

Look at this proud cookie. Chips, pretzels, and chocolate chunks all on display.

Now is when you get yourself a plate, pile it up high, and eat.

Remember, sharing is caring so maybe share a cookie or two. (but like you don’t HAVE to)

Stay happy this weekend.

-C


Pretzel And Potato Chip Chocolate Chunk Cookies

makes about 2 dozen cookies

  • 2 cup all purpose flour

  • 1 teaspoon baking soda

  • 1/2 teaspoon baking powder

  • 1/2 cup packed brown sugar

  • 1/2 cup white sugar

  • 1/2 cup canola oil

  • 1 teaspoon vanilla

  • 6 tablespoons plant milk

  • 1/2 cup crushed potato chip

  • 1/2 cup crushed pretzels pieces

  • 3/4 cup chocolate chunks or chips

In a large bowl, mix together the sugars, oil, milk, and vanilla until completely combined. In a separate bowl, whisk together the flour, baking powder and soda. Dump the dry into the wet and mix until the dough comes together. Gather the dough together in the bowl and cover with plastic and stick in the fridge to rest for at least 2 hour and up to a day.

When ready to bake, preheat oven to 350

Right before you take the dough from fridge, get your chocolate chunks, pretzels, and chips out. If the chips and pretzels are not already in little bits, place them in a bag (just use the chip bag if you have it) and smash with a heavy object until you turn the chips and pretzels into bits. Be carful that you don’t turn it all into a dust, look for small bits. Pull dough from fridge and mix the stuff in. Scoop out balls of dough and place on baking sheets. Bake cookies in oven for 11-12 minutes or until lightly browed. Remove from oven and immediately transfer cookies to a wire rack to cool.

And now you eat.

Store uneaten cookie in a airtight container for up to a week or freeze them but I doubt you will have too. The cookies went fast.

In cookies, crackers and chips, Dairy Free, desserts, Potato, Vegan Tags Pretzel And Potato Chip Chocolate Chunk Cookies, vegan cookies, vegan desserts, cookies, oil cookies, chip cookies, chips, pretzels, pretzel cookies, King Arthur flour, chocolate, sweet and salty, snack, home made, fresh baked, food, plant based, dairy free, egg free
Comment

Tomato Basil Crackers

August 4, 2018 Colleen Stem
IMG_1027.jpg
IMG_1060.jpg

It happens every year. SO MANY TOMATOES! This is not a complaint, just a fun fact. And so for the forseeable future, besides canning and freezing tomatoes at a rapid pace, I will also be sticking them into everything. Enter here a tomato cracker. But who wants just a tomato cracker? I( bet some would love just a tomato cracker) But a tomato basil cracker, well that is something people will want. And yes, I have a buttload of basil at he moment too.. I cook with what I got!

Tomato basil crackers. First off, I needed to make a road snack for the mr and cut up chunks of raw tomatoes would not have gone down well with him, so I figured what better way to use up some tomatoes then a cracker situation because why the hell not.  I was a little hesitant to use fresh tomatoes and not cook them or roast the in anyway before using them in the crackers, but I glad I didn't. The tomato flavor really shines through, pairs beautifully with the basil, and you get to skip having to deal with cooking down the tomatoes, which makes them all the more easy to make.

So I made the crackers and gave a baggie to the mr to eat, which he did right then and there (with some sweet ass baba ganoush because yes) then packed a big bag for the road trip. Not only was the mr chowing down, but my sisters were gobbling them up too, even the one who is gluten free.  That is good cracker validation. 

If you have never made your own crackers and you are a cracker person, now is the time to start doing it. I don't eat crackers personally, but the mr and every one around me really seem to be cracker people so a while back I started to make them at home, and once you make a homemade cracker, the store bought ones will just not be acceptable anymore. But they really are super easy so you really should be making them at home anyway.. No pressure though.

IMG_0844 2.jpg

The stuff. Flour, olive oil, tomatoes, fresh basil, and sea salt. 

IMG_0867.jpg
IMG_0870 2.jpg
IMG_0897 3.jpg

Chunks of fresh tomato go into blender and get blended up all nice and smooth. Add in basil and oil and pulse until basil turns to little specks.

IMG_0913.jpg

Pour the blended mixture into the flour.

IMG_0917.jpg

Mix with a spoon until you can't mix anymore then dump onto the counter.

Keeping the counter nice and floured, knead dough for a minute until it all comes together into nice ball.

Working with half of the dough at a time, roll out one of the pieces  about 1/4-1/8 inch thick.  (really flour counter and rolling pin) 

And cut into crackers.. Shapes are up to you, but inch to 2 inch squares are easies to cut. 

IMG_0947.jpg
IMG_0958.jpg

Place crackers onto backing sheet. Before oven time and after oven time.  They shrink and puff up a little bit in the oven. That is what a cracker is suppose to do. (but if you don't like that you can prevent it by piercing the crackers with a fork before they go into the oven) 

Crackers be cooling. 

And that's it. Simple, and delicious. 

Crackers are looking all pretty like I am about to have party or something. I even made baba ganoush to serve with them. Lucky mr, he got to have this cracker party all to himself. Ha (He did not eat all of these crackers at once, that would be crazy) 

-C


Tomato Basil Crackers

makes between 100 -125 crackers 

  • 3 cups flour
  • 2 large tomatoes  ( equal to 1 1/4 cup of tomato puree )
  • 1/3 cup fresh basil leaves 
  • 4 tablespoons olive oil 
  • About 2 tablespoons sea salt 

Remove core from tomatoes and place into food processor or blender. Blend until smooth and measure out 1 1/4 cups of the puree. Any left overs rs can be used as food later on. Dump measured puree back into blender and add in the basil and oil and pulse until the basil is in little pieces but not completely blended in.  Add flour to a big bowl then pour in tomato mixture and mix until a dough forms. Dump out onto counter and knead for a minute or two until dough is uniform in texture. 

Preheat oven to 400 degrees

On a floured surface, divide dough in half as to make rolling it easier, and roll dough into a rectangle that is 1/4- 1/8 inch thick. It is important to make sure the rolling pin and counter are well floured to avoid the dough from sticking. Once rolled out, sprinkle with sea salt and lightly roll the dough once more to kind of press the salt in then cut with either pizza cutter or a cracker cutter, or a knife, into 1 1/2 inch squares. The edges are going to be wonky shaped and you can either except them as they are or re roll and recut. (Note. IF you want your crackers to late flat and not puff up while baking, stab the crackers with a fork before they go into oven to create air vents. But honestly, most people really like the puffed up cracker)  Place cut crackers onto a baking sheet and stick into oven. Bake for 15 minutes, checking after 10, until the crackers are golden brown.  Don't forget to roll and bake off the other half of the dough!

Once crackers look good, remove from oven and place onto cooling rack. They will get crisper as they cool. 

Eat as many as you want. Store extra crackers in a airtight container or bag. 


In appetizers, crackers and chips, quick and easy, snack, Vegan Tags tomato basil crackers, crackers, tomato basil, vegan crackers, homemade crackers, plant based, simple, easy, snacks, fresh
Comment

Graham Crackers

May 12, 2018 Colleen Stem
IMG_1939.jpg
IMG_1990.jpg

I have fond memories of young me skipping school and sitting in front of the tv with peanut butter, a package of graham crackers, and a glass of milk to dunk the peanut butter cover crackers in, watching myself some Martha Stewart. I also have some fond memories of the days in college I would skip class (obviously to finish a paper or something), and sit around eating graham crackers covered in peanut butter and nutella, dipped in beer? Wait no, it was coffee. (although....beer? Could be something there.)  Apparently I liked to skip class and eat peanut butter graham crackers. But don't blame the cracker for the bad behavior, blame the eater. And I didn't do it all the time, only once in a while. (A girl needed to watch her some Martha or write a 20 page paper.) 

We had a BBQ this week and for some reason I though people want to eat s'mores at a BBQ. (I guess I got that confused with camping.)  I figured even though the days of skipping life and eating graham crackers has passed me by, that I needed to make the graham crackers for others to enjoy. And then I wondered why the heck no one ever makes graham crackers. They are by far the underrated crispy cookie (lets just call it what it is ) of the snack world.  I think I might make it my new thing. I'll make graham crackers for ever cookie swap situation, every event that requires a dessert, every time a snack is need, until people realize what they are missing. I'll bring the graham cracker into all it's glory. 

These graham crackers were raved over by people who like graham crackers and were absolutely perfect for s'mores.  A few of the littles that don't like graham crackers did not care for them, but I guess you can't make everyone happy. Tthey just wanted to eat the marshmallows.) They are crispy and crackery, tiny bit smokey and sweet but not to sweet, and perfect for all your graham cracker needs.

The stuff. In one bowl there is graham flour, all purpose flour, baking soda and salt. The other bowl has brown sugar, honey and molasses. Also going to need vegan butter, vanilla, and a little bit of plant milk. 

IMG_1860.jpg
IMG_1867.jpg
IMG_1871.jpg

The big bowl of sweet stuff get beaten together with the butter and vanilla until smooth, then the dry mixture and milk go in an beaten until just combined. 

. This is what graham cracker dough looks like. Course  and chunky, but done. Don't beat it anymore, just use your hands to gather it tighter. 

IMG_1883.jpg

Gather the dough into a ball then wrap  in plastic (or stick in a plastic bag)and smoosh flat and rectangular. Place in the fridge for at least 2 hours, if not overnight. IT needs the time firm up. 

After the dough has firmed up, its time to roll it out. Cut the dough in half (place the other half back in fridge until you are ready for it) and roll out on a very floured surface. The dough is sticky and  not super strong so go slow and make sure to keep the surface and the rolling pin floured so it doesn't stick .

When it's all rolled out, trim the sides even the cut  into into squares or rectangular (or any shape you want). I was going to measure and make them all the same size and then I was like, yeah, no. I just eyed it and made them kind of the same size. I don't live in a world where I need perfect graham crackers. 

IMG_1905.jpg

Gently transfer the crackers ( I used the bench scrapper to list them, but a spatula would be good too) on a parchment lined baking sheet. Run a  line the doesn't cut all the way through in the middle of each cracker and then poke 6 (or how many you want) hole on each side. You can use a toothpick or a wooden skewer. I used a size 8 kitting needle.

IMG_1915.jpg

Get all your crackers made and sprinkle the tops with a little graduated sugar. Pop into the preheated oven to bake for 15-20 minutes, rotated around 10 to keep an even bake. 

Done. Golden brown graham cracker success. 

Cool the crackers on a wire rack.

And now you have yourself graham crackers for all your graham cracker needs. 

May I suggest a smear of peanut butter, maybe a glass of milk or coffee and some Martha Stewart on the tv? 

-C


Graham Crackers 

Makes between 20-30 crackers depending on size

  • 1 1/2 cups graham flour (unbolted whole wheat flour with the germ and bran)
  • 1 1/4 cup all purpose flour 
  • 1 teaspoon salt 
  • 1 teaspoon baking soda
  • 1/2 cup light brown sugar
  • 1/4 cup honey (can sub  in golden syrup or brown rice syrup)
  • 2 tablespoons molasses (not black strap)
  • 1/2 cup vegan butter 
  • 1 teaspoon vanilla 
  • 1 tablespoon plant milk 
  • 1 tablespoon white sugar

Stick the butter, brown sugar, honey, molasses , and vanilla  into a large bowl and beat with an electric beater until smooth, In a smaller bowl, whisk together the flours, salt, and baking soda. Dump the dry into the wet, add in the milk and beat on low until mixture just starts to come together,then use your hand and smoosh and knead the dough into a ball. Either wrap or place dough ball  in a plastic airtight bag, smoosh into a flat rectangular shape, and refrigerate for at least 2 hours, if not over night.

When you are ready to bake the crackers, preheat oven to 325 and line 2 large baking sheets with parchment paper. 

Cut dough in half and place one half back in fridge while working with the other half. Flour a surface and the rolling pin and roll dough our into a retangle about 1/8 inch thick. Trim sides ( a pizza cutter or dough scraper works really well here) to make a sides straight (straight enough) and then cut into equal sizes pieces that are the size of your liking. (What it did was cut in half, then each half into thirds  vertically  then the whole thing in thirds hortiztally. I ended up with 18 pieces)  

Place the crackers on prepared baking sheet and take you cutting instruments and run a line along the middle of each cracker without cutting all the way through (if you cut all the way through, it should fuse back together in baking) Take a wooden skewer  and poke 6 holes into each side. Sprinkle with white sugar. Now grab the second half of the dough and do the same thing. And don't forget to gather all the trimming and either roll into more crackers or just make one weird shaped blob cracker for taste testing.

Once all the crackers are prepared, stick into the oven to bake for 15- 20 minutes (15 for a softer cracker, 20 for a more crispy cracker) , rotating after 10 minutes to insure even baking. Once the crackers are a nice  golden brown, remove and place on a wire rack to cool.

Eat the way you do. 

Store uneaten crackers in a airtight container for a up to a week. Crackers can be frozen for later use. 


In cookies, crackers and chips, Dairy Free, snack, Sweets, Vegan Tags Graham Crackers, Graham flour, vegan graham crackers, graham cookies, vegan, Homemade graham crackers, plant based, unbolted flour, S'mores, snacks, biscuits, crackers, dairy free, egg free
Comment
Older Posts →
 

https://thelovelycrazy.squarespace.com/config#/|/about/

Me. Food Maker.Food eater. Woo HOO!

STEM+NODE  SMALL BATCH AND ONE OF A KIND POTTERY

stem+node ceramics


____________________

Subscribe

GET NEW POSTS IN YO EMAIL

You are AWESOME!!!


@thelovelycrazy 2014-2021