• stem+node ceramics
  • HOME
  • Food Recipes
  • About
  • Contact
Menu

The Lovely Crazy

Street Address
City, State, Zip
Phone Number

Your Custom Text Here

The Lovely Crazy

  • stem+node ceramics
  • HOME
  • Food Recipes
  • About
  • Contact

Spinach and Pea Springtime Soup

May 25, 2016 Colleen Stem
IMG_4059.jpg
IMG_4011.jpg

Yesterday we had a few pieces of really log ass metal roofing delivered to the new house so we can finish the little side parts of the roof off. The funny thing is we ended up with way more wood then metal. The roofing is super light and flexible so it has to be strapped to a super long wooden structure. And it was perfect. The mr and I have pretty much finished the fence except for the gate from the driveway which sucks because we still can't bring Washer over to play without it ans we pretty much fenced the yard in for him. But the long ass wooded palette things.. IT was perfect. Well a perfect for now solution. A Already constructed tall and long (too long, we had to cut it down) wooded wall that is now our temporary gate.What a score! And now the pup can spend all day long laying around outside and not getting into any neighborhood fights with the other dogs. And look at us making use of all the scraps. We are so awesome.

Ok, so besides our awesomeness and the new temp gate, let talk about this greenest freaking soup that there ever was. It is probably the best green soup that I have ever tasted. (I know,  I have habit of proclaiming all of my soups as the best soup ever, mostly because they are.) It's one of those soups that is super fast and so simple to make and is perfect for all the spring and summer time eating that will be going on. Eaten hot or cold and out of a bowl or a drank out of a glass. A soup for any time, any place. The mr even liked it and he says he doesn't like peas. (but he so does). Who doesn't like the best soup ever?

Now here is how to make it.

The stuff. A big bowl of fresh spinach and a bowl of peas (fresh or frozen.. mine were frozen) Also need an onion, a carrot, a few cloves or garlic, water, olive oil, and salt and pepper.

First thing first. Get the onion and carrot all nice and chopped up and tossed into a big pot with a drizzle of olive oil, a little splash of water,and salt and pepper. Stick that pot on the stove on medium high heat and start to cook cook.

Soften and yummy carrots and onion. I am not exactly sure if my carrots turned the onion orange or if my pot because it is so stained with turmeric that it turns everything yellow. Keep the pot on low heat and mince and stir in the garlic.

IMG_3995.jpg
IMG_4007.jpg

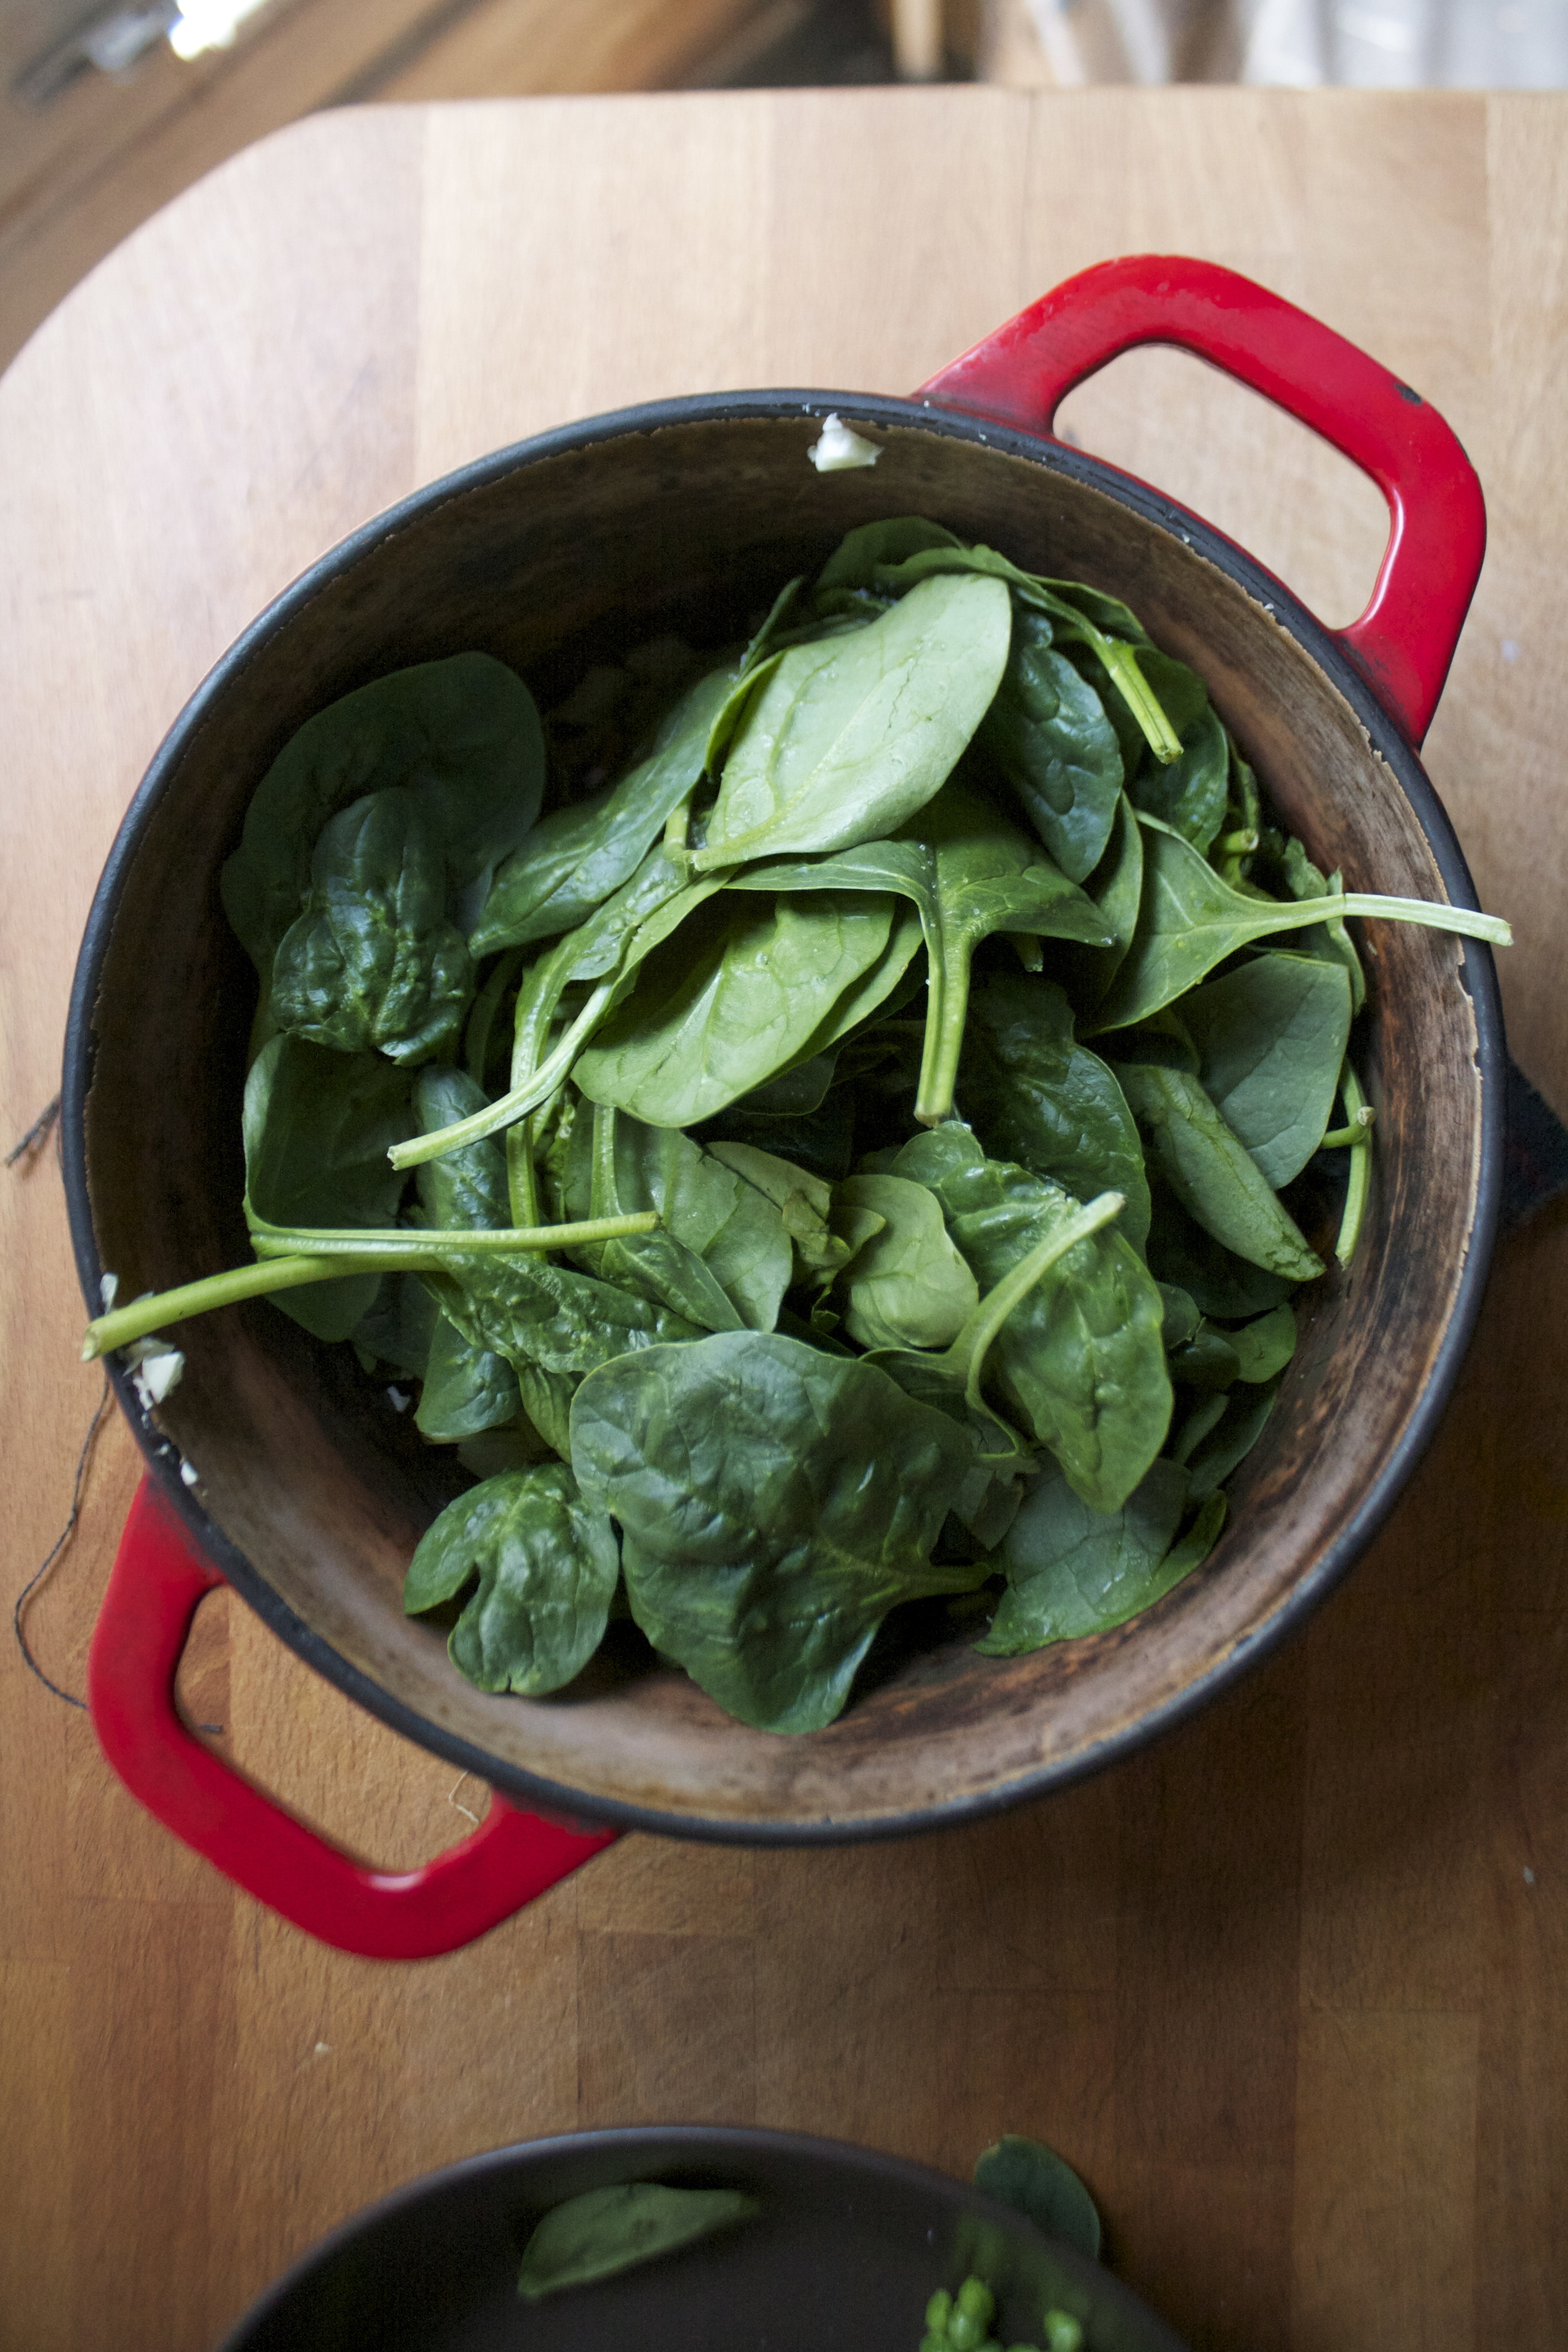
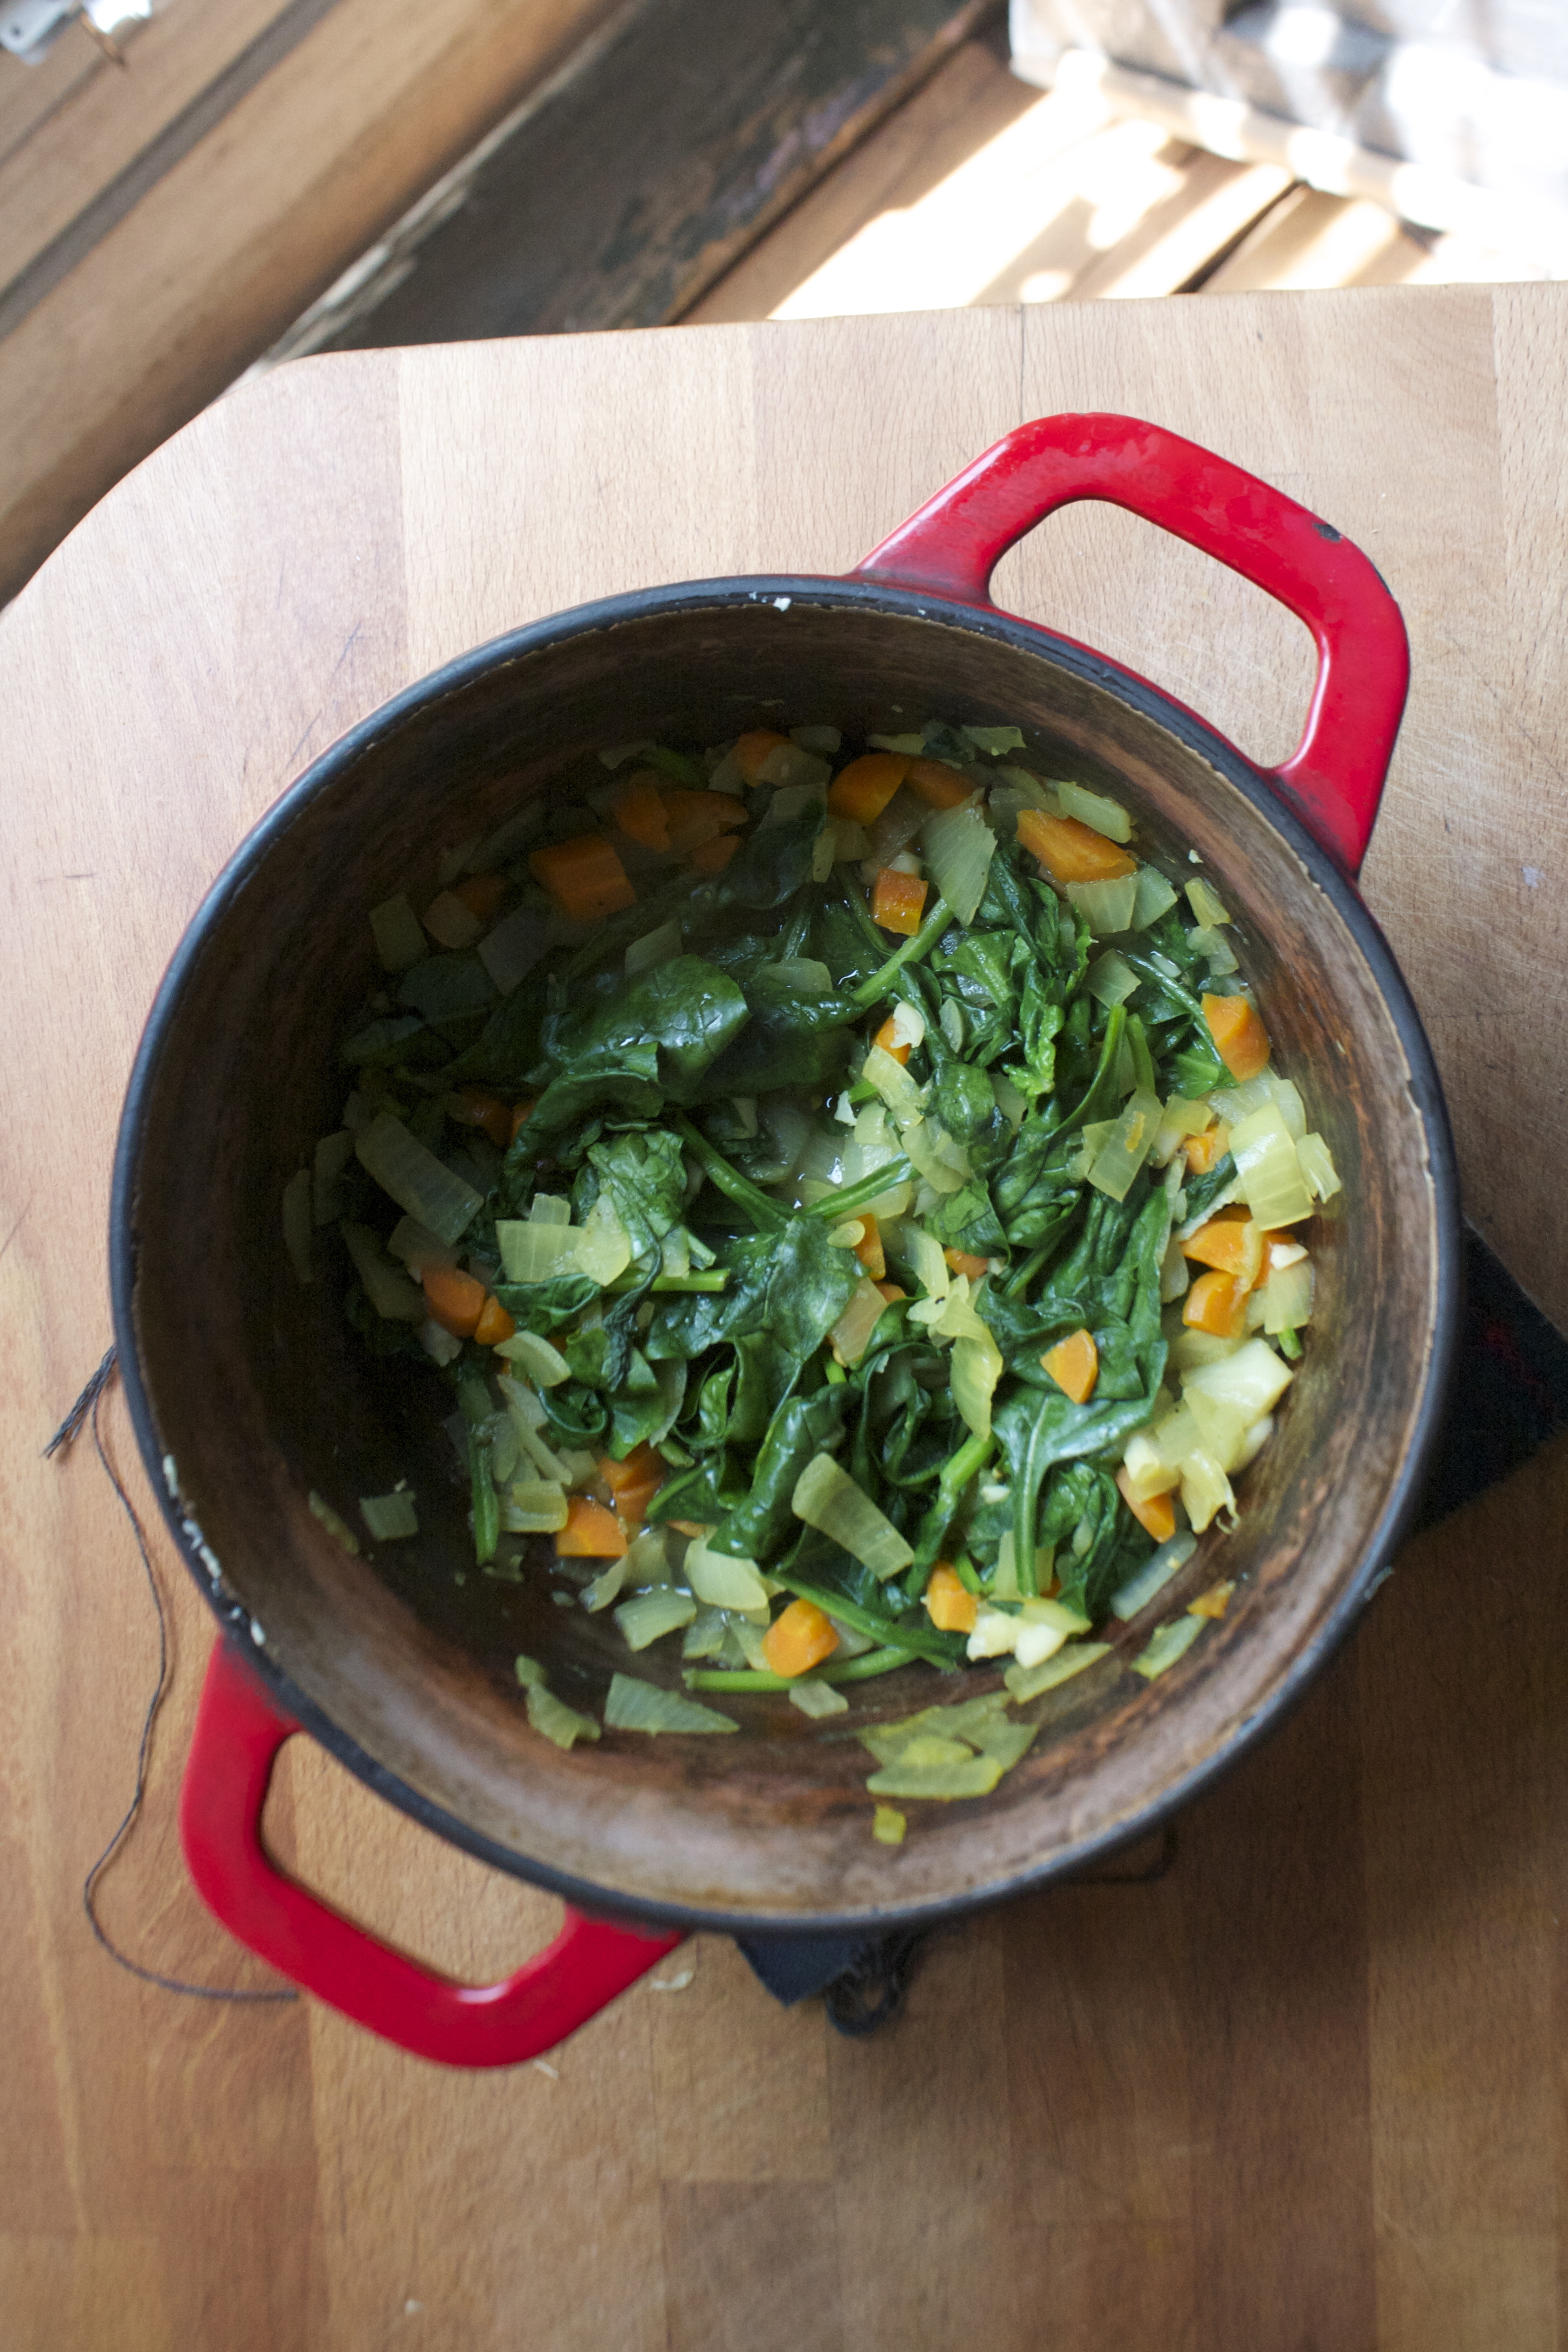
And for magic. The pot is sill on low and you are going to pile all the fresh spinach right on in to the pot. Add a few splashes of water and a lid and let it cook for a few minutes. And when you go back and remove the lid..Ca bang ! All the spinach is gone (not really, it just wilted).

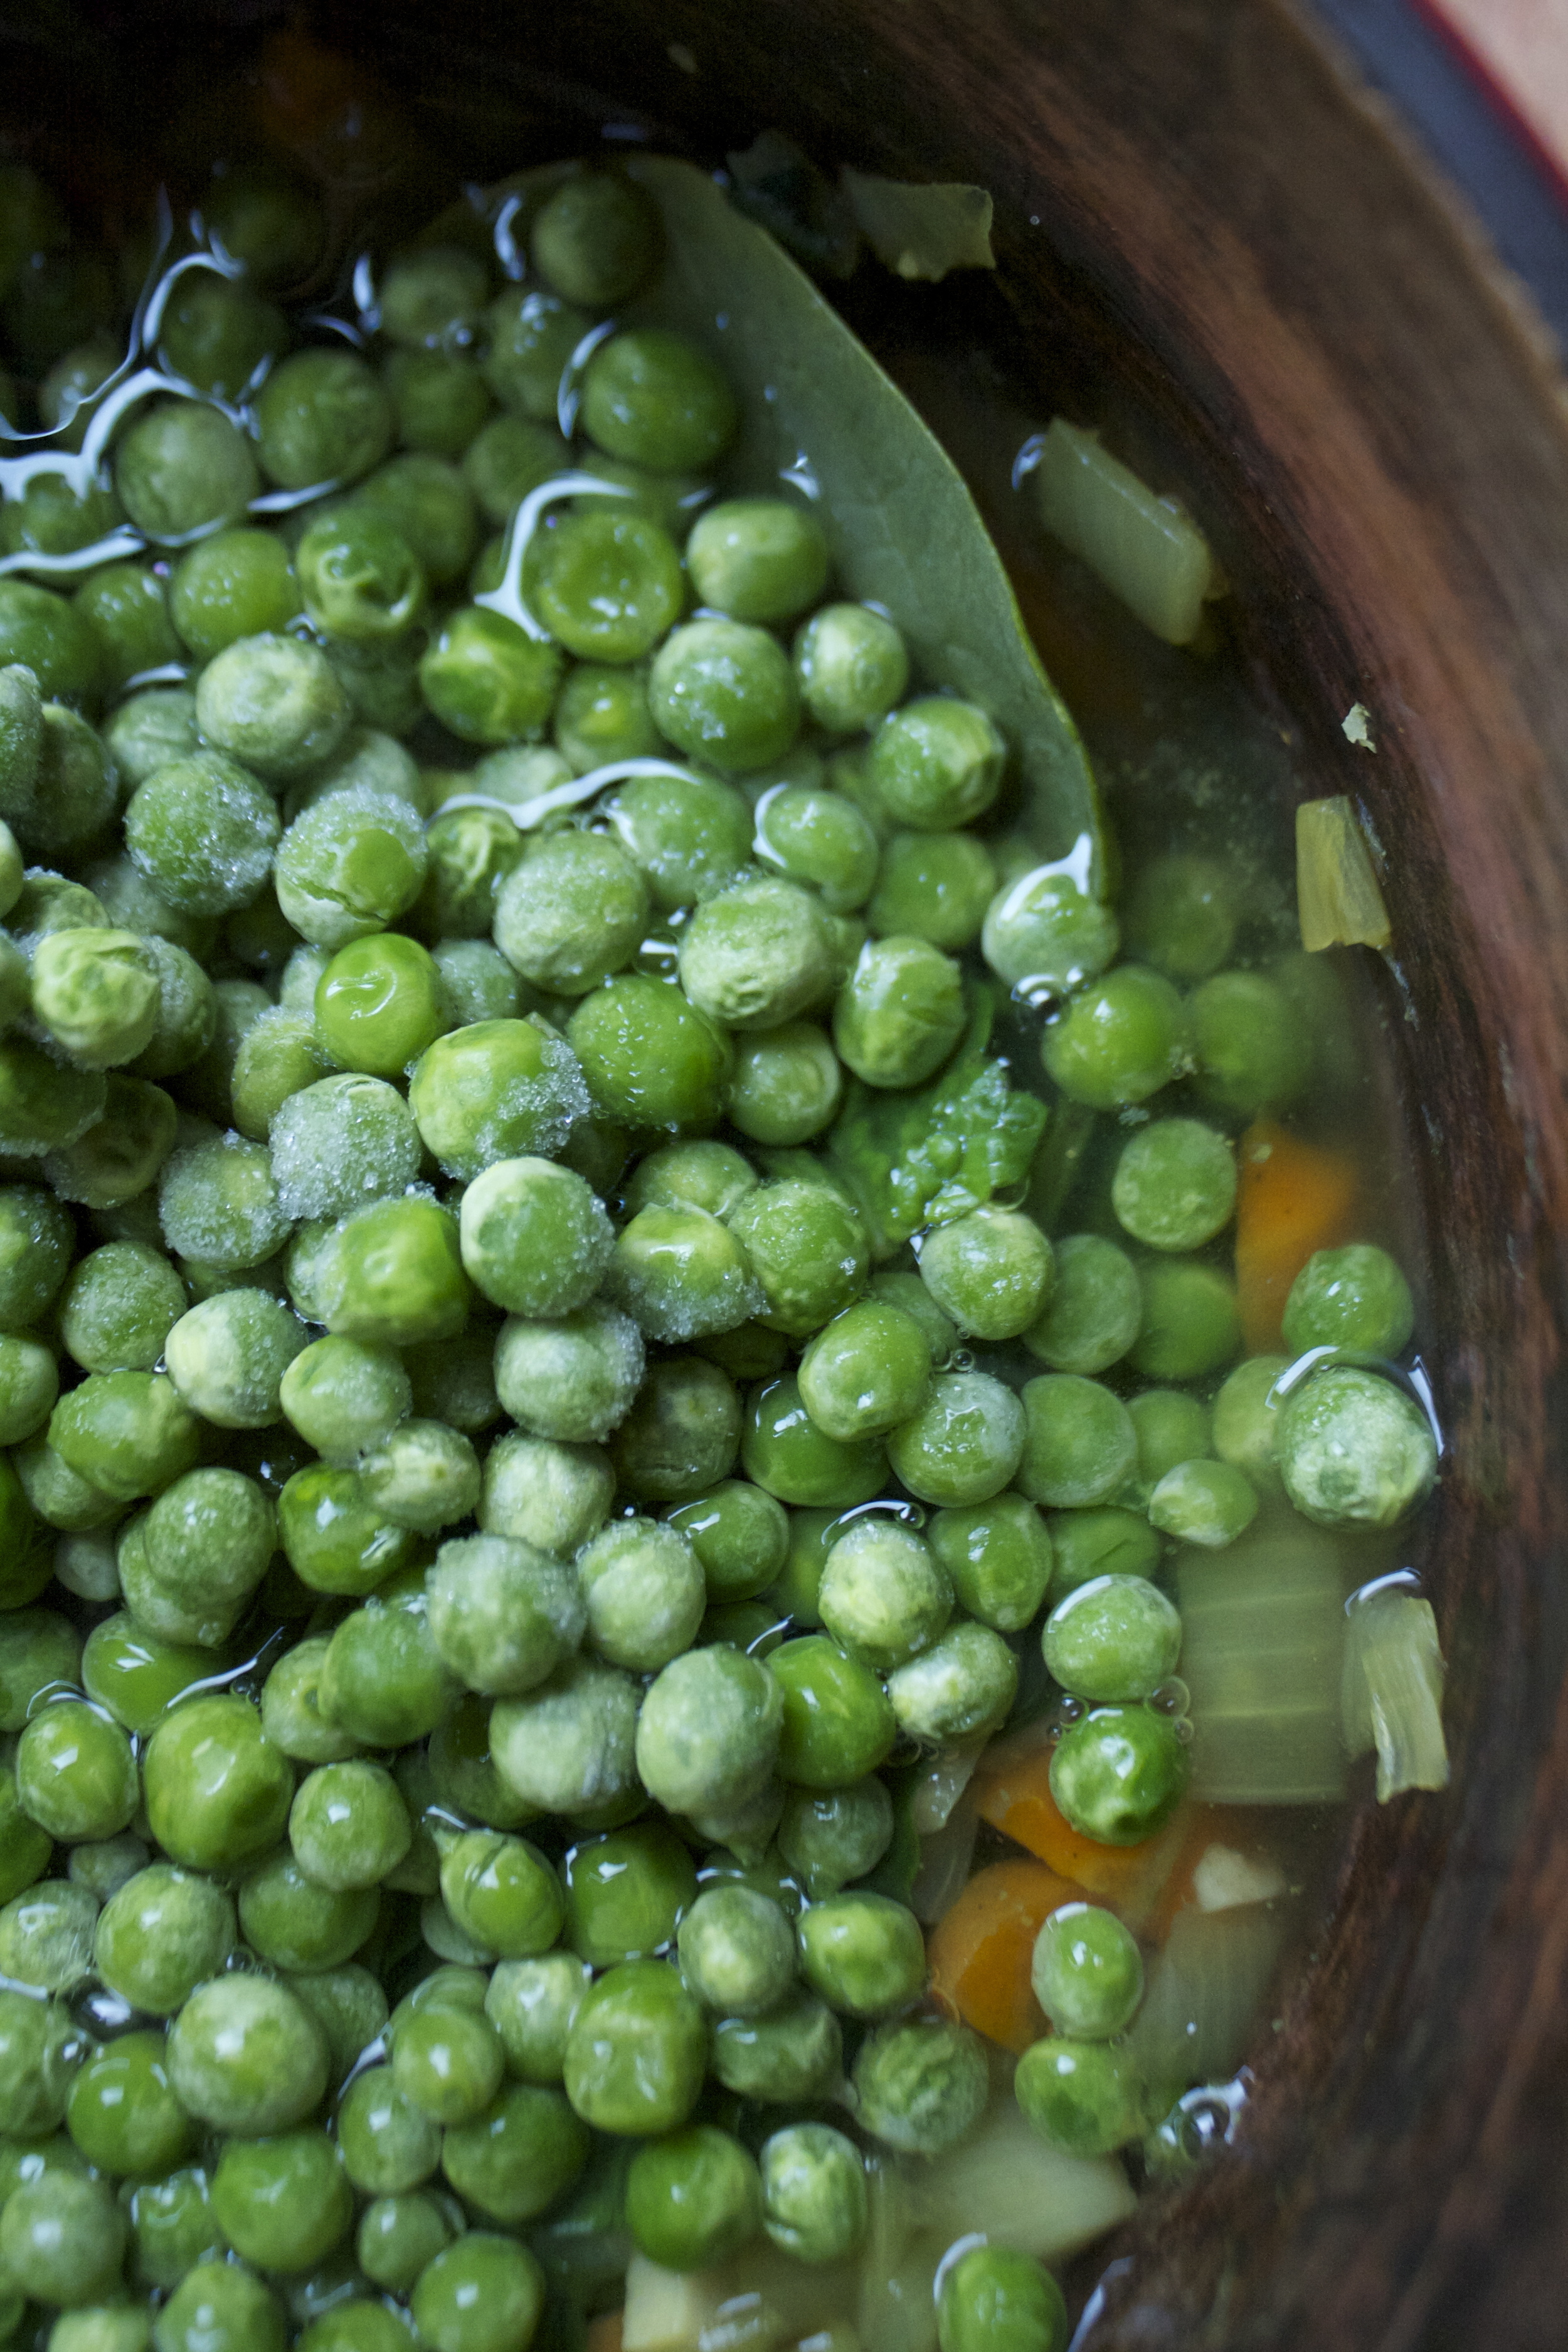
It's time for the peas and water to be added.The blender comes out and the soup gets blended until super smooth.

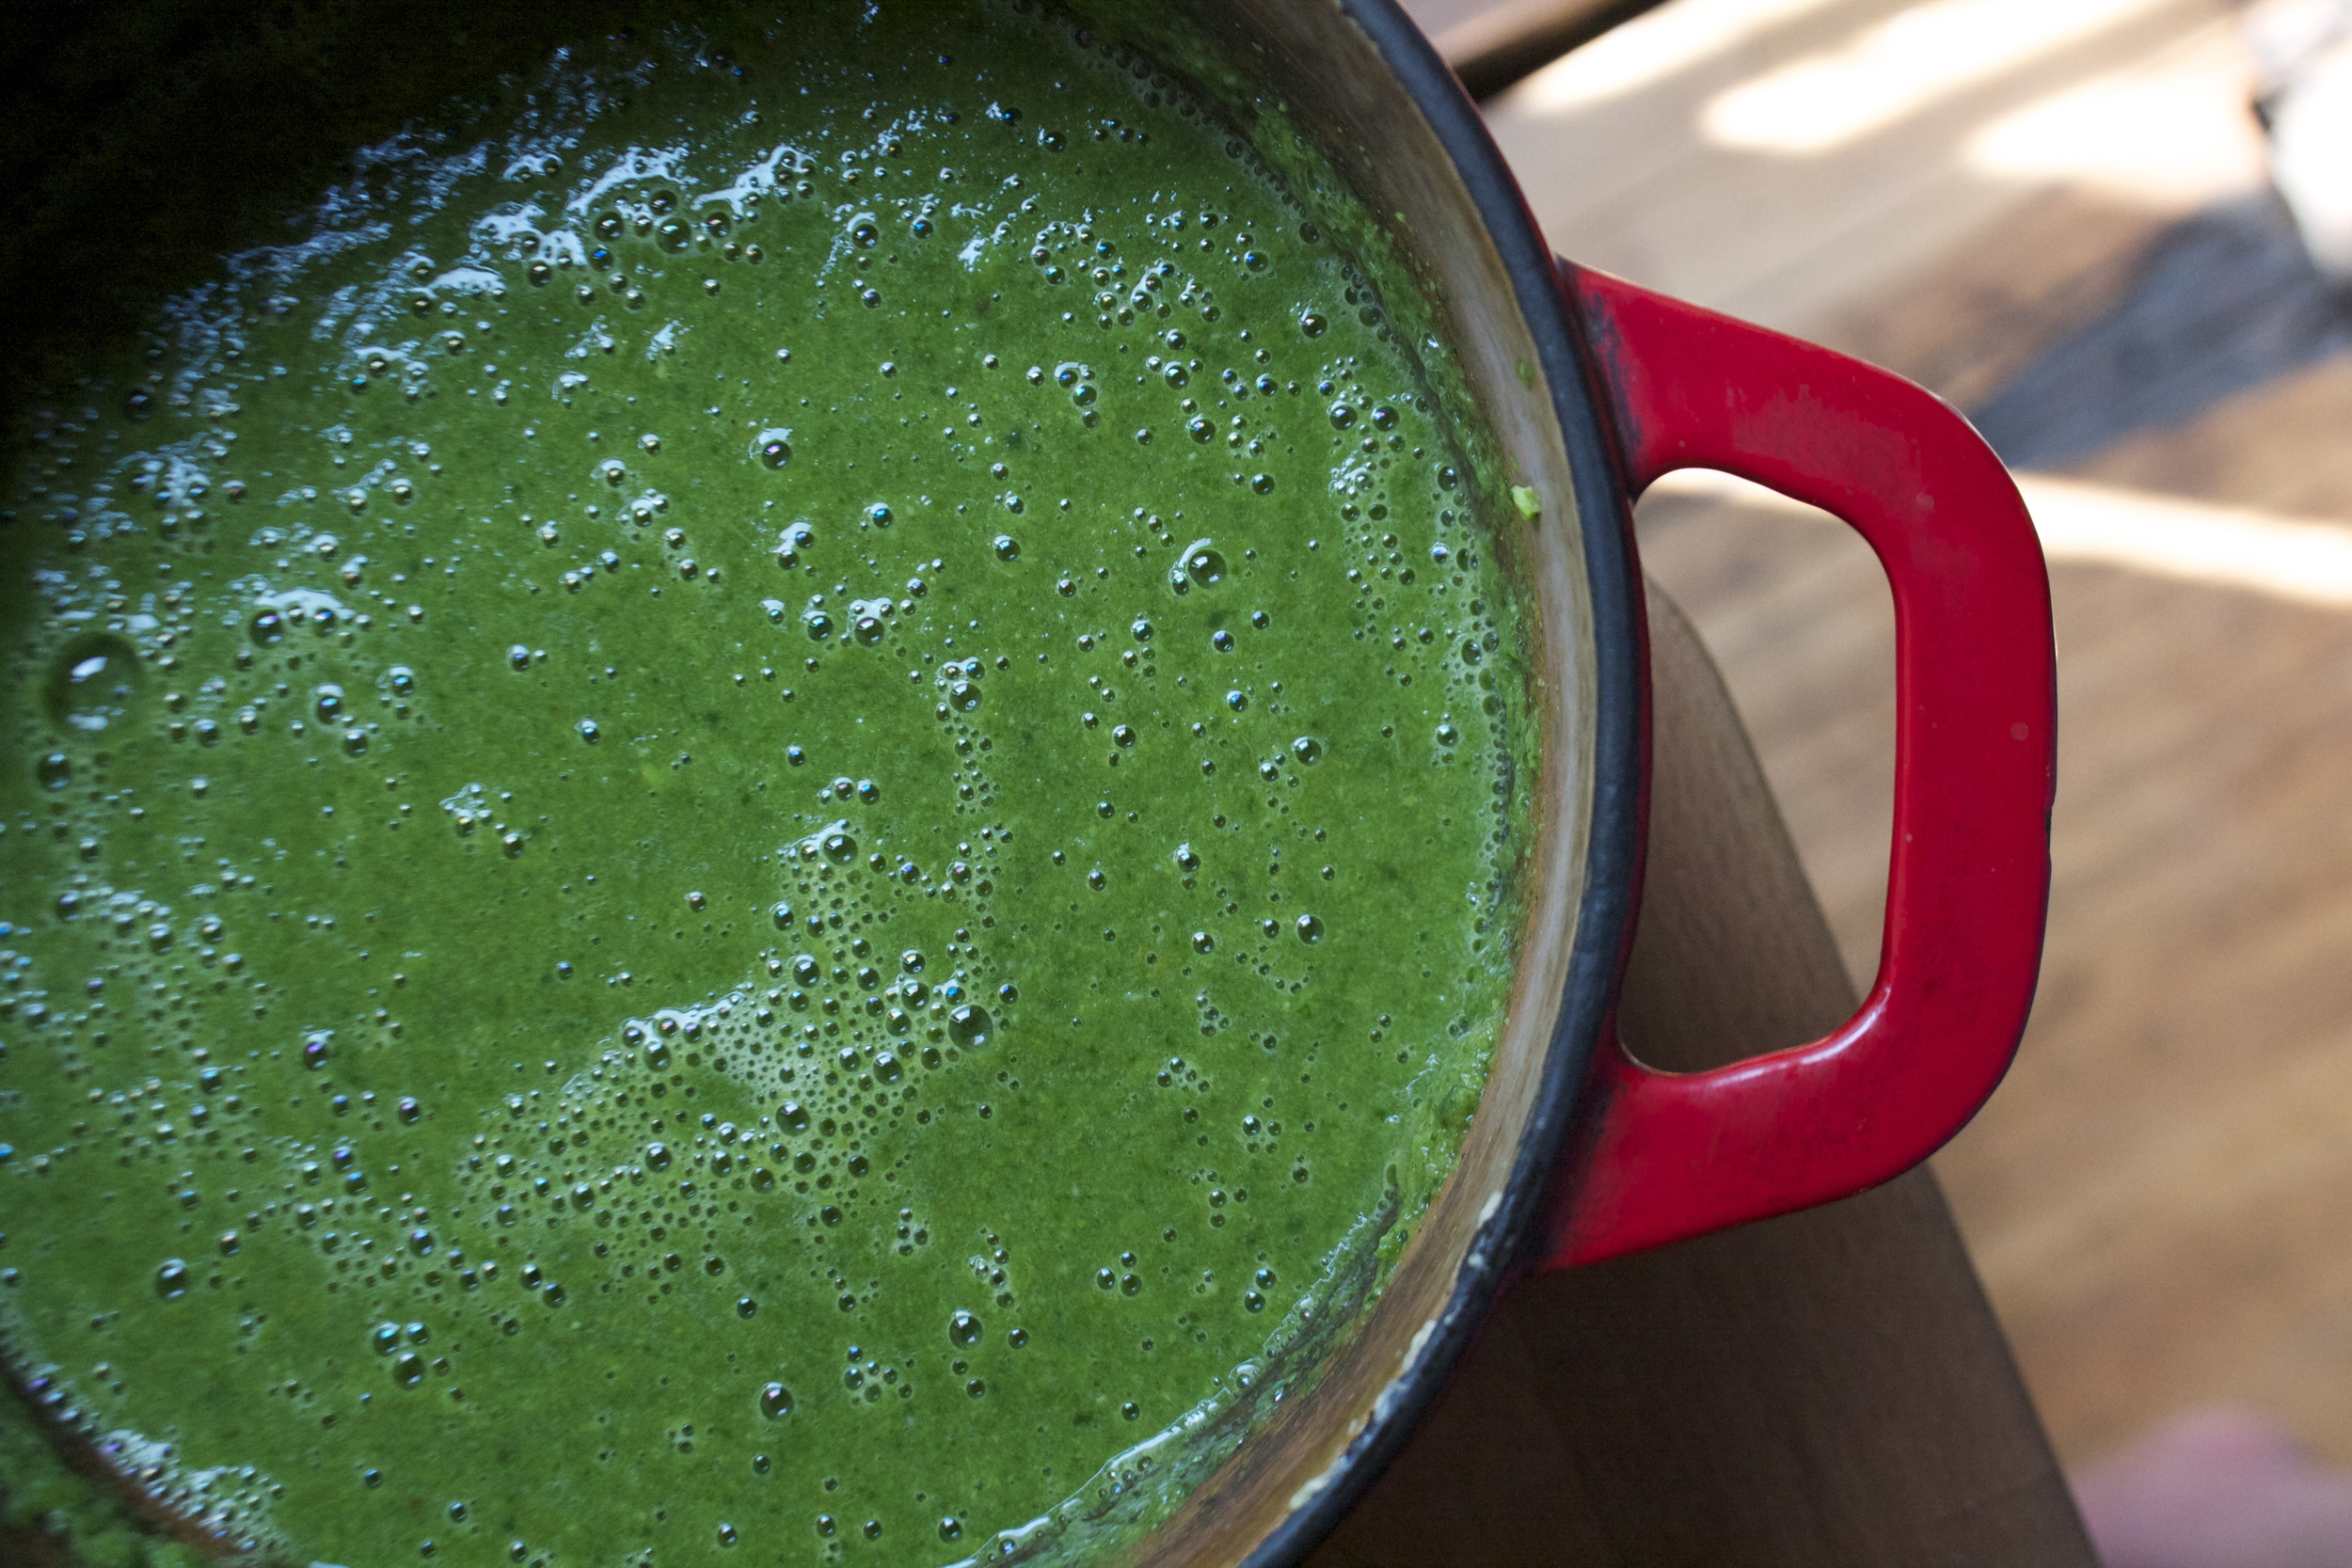
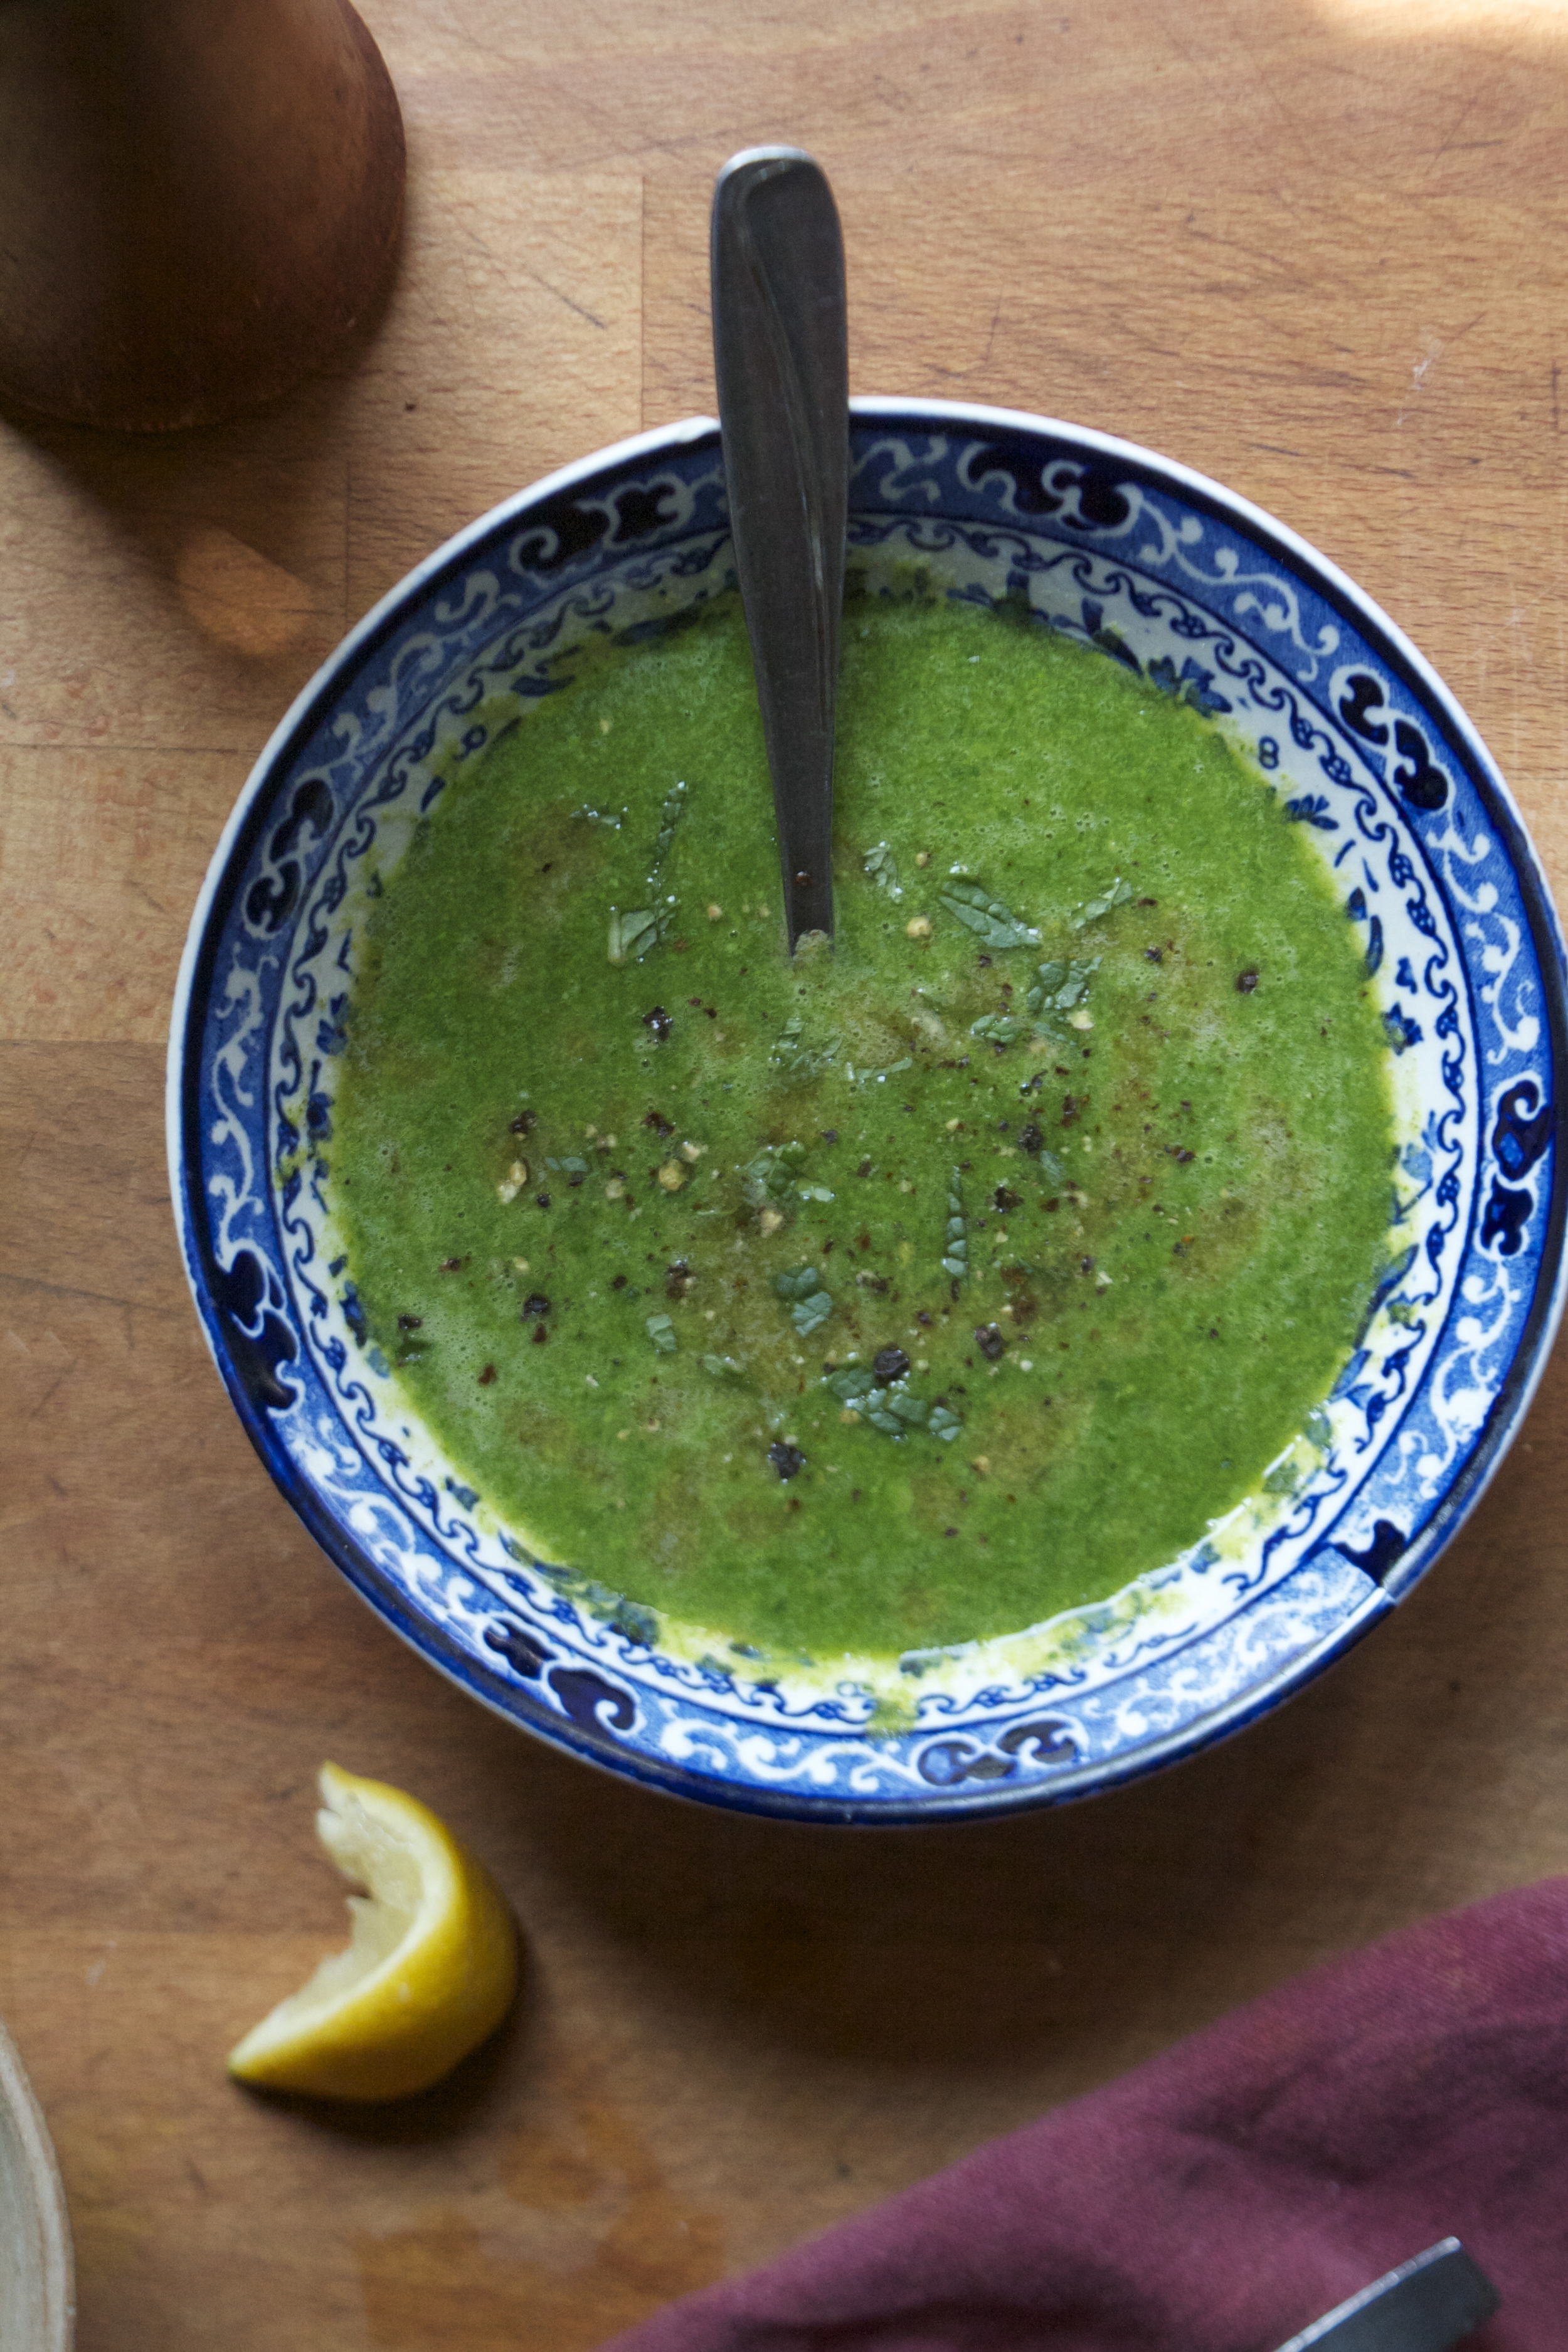
So green, so good.. This soup is all ready to go. But here is the thing, you can eat it at any temperature and it will be amazing so if you want to heat it up a little more, go for it. Cold soup shooters, just stick it in the fridge for a while and wait until its chilled. Or both. I ate a bowl warm then had cold soup for dessert.

And to finish, you must serve with fresh lemon and if you have it, a pretty little mint plant. I love the flavor of a little fresh mint added, but not all do. So mint if you like( it really is so good) but lemon in a must!

Enjoy all the green things!

-C


Spinach and Pea Springtime Soup

serves 3-4

  • 2 cup peas (fresh or frozen.. I used frozen)
  • 3 packed cups fresh spinach
  • a few sprigs of fresh mint (optional)
  • 3 cups water
  • 1 small onion
  • a carrot
  • 3 cloves garlic
  • 1 lemon
  • olive oil
  • salt and pepper

Small chop onion and carrot and toss into a big heavy bottom pot with a drizzle of olive oil and salt and pepper. Stick on stove on medium heat and cook until it becomes soft and fragrant. Now mince garlic and add that it too. Stir and cook for another minute or two then add in all the spinach and a splash of water. Place o lid on pot and let until cook until spinach is all wilted. (give it a stir to get it all cooked down). Once wilted, add the peas and the water. Stir all together and let simmer for a few minutes then remove from heat. Now blend the crap out of it until silky smooth.(use your blending device of choice).

And it's done. You can either serve right away as a hot soup or sick it in the fridge and serve cold! Just remember that you need to serve it with cracked pepper, a squeeze of fresh lemon and some chopped up fresh mint(mint it optional but so good)

Eat with a spoon or forget the spoon and slurp out a a cup like the cool kids.

In Vegetables, Vegan, soup, recipes, photography, Paleo, grain free, Gluten Free, Dairy Free Tags Spinach and Pea Springtime Soup, soup, chilled soup, pea, spinach, fresh, greens, healthy, vegan, gluten free, plant based, clean eating, no need for stock, protein, easy, wuick, dinner
Comment

Pineapple Jalapeno Hummus

May 18, 2016 Colleen Stem
IMG_3866.jpg
IMG_3814.jpg

I eat a lot of hummus. Like a lot. Every day, all day long. (seriously, I am always snacking on veggies dipped in hummus) So I am sorry to all around me that my breath always smells.. (I blame all the garlic in the hummus.)

Recently, during a particularly browsey grocery shop, I ended up in the hummus case (I always end up there) and found a new hummus flavor.  Pineapple jalapeno, WHAT.  I grabbed it right then and there, convinced that hummus gods were rewarding me for all of my hummus eating and have made me my very own flavor.

Got home, tossed all the groceries into the fridge and busted open the new hummus, a bag of carrots, and went at it. Oh man, it was good.(to often the store bought hummus flavors are not so great) The flavors were all there, sweet and spicy, and creamy.  It was fantastic, I ate almost all of it and I knew I had to make my own.

And I did and you know what, it was even freaking better! (Fresh it the best!)

So If you are a hummus person of any kind, this is a fantastic exciting flavor that will make you all sorts of happy.

The stuff for the hummus:  chickpeas, tahini, olive oil, garlic, and salt and pepper. And for flavor add ins,  fresh pineapple and a jalapeno pepper.

Chickpeas (rinsed and drained) go into the food processor with some tahini, the juice of the lemon and salt and pepper.. The garlic I actually pulsed in the processor first (to avoid big raw hunks) and some olive oil are also going in on this.

Blended until a smooth, creamy perfection.

Now for the fun stuff. Dice up the pineapple and remove seeds (or not) from the jalapeno and dice that up too

Toss it all (minus a few little pieces of garnish if you want) into that creamy dreamy hummus.

Pulse pulse pulse until the chunks of stuff are all incorporated . Make it super chunky or super smooth, up to you. I like mine kinda chunky, but not too chunky, if you know what I mean.

Into a big bowl, topped with a few little diced up pieces of jalapeno and pineapple, you know, for prettiness. And lots of cracked pepper.. Lots.

Now eat. With whatever ( I like veggies or just give me a spoon, Ican eat hummus all by itself)

Hummus for life!

-C


Pineapple Jalapeno Hummus

Makes about 2 1/2cups

  • 2 1/2 cups cooked chickpeas (one can)
  • 2-3 cloves garlic
  • 2 tablespoons tahini
  • 1 lemon
  • 2 tablespoons olive oil
  • 3/4 cup fresh pineapple
  • 1-2 jalapenos
  • salt and pepper

Rinsed and drain chickpeas. Add garlic and a little olive oil to the food processor and pulse until the garlic is a little minced. Add in the drained chickpeas,  tahini, a sprinkle of salt ans pepper, the juice of the lemon and another tablespoon of olive oil and blend until smooth.

Dice up pineapple into smaller chunks and remove seeds (if you want) from the jalapeno and chop that into smaller pieces . Add to the hummus and pulse until combined. You can leave it chunky or blend until smooth. Just stop blending when you reach you desired consistency . Garnish with more chopped pineapple and jalapeno and lots of freshly ground pepper.

Serve with whatever you eat your hummus with.

Store left over (there probably won't be any) in a container in the fridge.

In Vegan, snack, Savory, recipes, pulses, Gluten Free, grain free, dinner, Dairy Free, brunch, beans Tags Pineapple Jalapeno Hummus, hummus, beans, pulses, fruit dip, vegan, gluten free, plant based, healthy, clean eating, fun food, summer, dip, spread
5 Comments

Maple Banana Walnut Oat Squares

May 10, 2016 Colleen Stem
IMG_3451.jpg
IMG_3417.jpg

Every year I play this game with myself.. Is it allergies or am I sick. The past few days I have been feeling kinda crappy, waking up with itchy, gunky eyes. My throat hurts, my head is like a balloon, and I am just feeling beat.. 

I think it's that I am sick (because I don't want to have allergies) but whatever it is, it sucks, but usually goes away after a week (like every year because its really allergies). Blah.

But enough about my balloon head, lets talk these maple banana walnut oat squares. These yummy gems of the oat square world are just what you need in your life. Healthy, protein packed, nutty, and a touch sweet. No junk, just good stuff all made with little to no effort. If you like banana bread, you will be all into them. I was inspired to make these by the extremely ripe bananas that need to be eaten asap and the mr's lack of eating a healthy breakfast (I want him to eat, and I want it be oatmeal). I know him well enough that if I make a snack like thing and leave it out to eat, that he will eat it. For breakfast.

So weather or not you are looking for a good way to get in some good stuff into your tummy or just want some good tasting stuff in your mouth, this is the breakfast/dessert for you.

The stuff. A couple of ripe bananas, a bunch of rolled oats, some yummy walnuts, real maple syrup, cinnamon, baking soda and a wee bit of water.

Start with the walnuts in a food processor. Turn it on and process until....

You got this walnut butter. Do not eat it, it's for the squares (it is so good).

IMG_3355.jpg
IMG_3358.jpg

Add in the oats, cinnamon and baking soda and turn the processor back on until you get a nice unified crumbly mixture.

Now in goes the bananas and the maple syrup. And you guessed it, blend some more. While you are blending, if the mixture seems to dry, add in a splash of water, to wet, just toss in another handful of oat. The mixture should be like a muffin batter consistency.

And that's it. If you want some nut chunks, add in a handful more of walnuts (do it) and pulse just to get them mixed into batter.

Then pourthe mixture into a well greased 9x9 baking pan and spread out evenly. Toss those suckers into the oven to bake.

Oh so good bananas give off the best smell when baking. After about a 1/2hour, these bars are nice and golden brown and a fork stuck in the center comes out clean, which means, they are done.

Cut into square , eat one or two, and save the rest. Eat for breakfast, as a snack, or for dessert. And a smear of peanut butter on top is aces too!

Later dudes.

-C


Maple Banana Walnut Oat Squares


  • 3 cups old fashion rolled oats (gluten free ones to keep in GF)
  • 1 cup plus a a small handful walnuts
  • 1/2 cup maple syrup
  • 2 rip bananas
  • 1 /2 teaspoon baking soda
  • 1 teaspoon cinnamon (optional)

Place 1 cup of walnuts into a food processor and blend until it turns into walnut butter.. about 3 minutes. Add in the oats and blend together until it becomes a crumbly mixture. Add in the maple, baking soda, cinnamon and the bananas (break into chunks) and blend until incorporated. If the mixture seems lie its too dry, add in a splash of water, and if to wet, add in another handful of oats. The batter should resemble a muffin batter.  Once blended, mix in the remaining walnuts and pulse just to mix them in.

Pour mixture into a well greased 9x9 baking pan and stick into the fridge for 10ish minutes and preheat oven 350

And after the time in the fridge, remove the pan and slide them into the oven. Bake until golden brown and a tester stuck into te middle comes out clean. (about 30 minutes)

Remove and let cool. Pop out of pan, cut into square, and eat to you face.

Squares will last 3-4 days in a airtight container or freeze them and they will last until you eat them.


In breakfast, bread, Vegan, Sweets, snack, recipes, Gluten Free, desserts, Dairy Free, brunch Tags Maple Banana Walnut Oat Squares, vegan, Gluten free, oatmeal, oat squares, breakfast bars, healthy, clean eating, plant based, bananas, maple, walnut, nuts, protein
Comment

Shaved Asparagus,Radish, and Cashew Pea Cream Pizza

April 26, 2016 Colleen Stem
IMG_2778.jpg
IMG_2669.jpg

When the mr got home from work last night, her got himself a super great dinner suprice

Pizza, on a Monday. Woo Hoo! (I am so awesome, my sister even texted to congratulate him on his unexpected pizza dinner)

But here is the thing. I think pizza is a completely acceptable dinner any night of the week just as long as it is not covered in a shit tone of greasy cheese or any other kinda heavy and not so good stuff.  This is a not one of those types of pizzas. This pizza is light, the crust rolled slightly thin, covered in a creamy sweet pea and cashew cream, (which is really pretty) and topped off with a tons of shaved asparagus and sliced radishes.It's a celebration of spring time veggies and tastes so f*ing good. Sweet and creamy from the peas cashew cream, a nice crispy freshness from the asparagus, and a nice little spicy kick from the radishes. All the flavors that make me happy. It's oh so good. .

And really, It's almost like eating a big salad with a piece of bread. Not a bad dinner right? So do yourself a favor and make that salad and bread into this kick ass pizza.

You can, you should, you, must.

The stuff. Peas (fresh or thawed out frozen.. my were frozen) some cashews soaking in water, a bunch of asparagus (I had purple but you can just use green) ans a few radishes. Also need a lemon, some nutritional yeast, a few coves of garlic, salt and pepper, and a little olive oil. Oh, and a pizza dough.

IMG_2683.jpg
IMG_2691.jpg

To get the cashew pea cream going, strain the water from the cashews and dump them into a blender along with the peas, garlic, nutritional yeast, juice of half of the lemon, and a pinch of salt. Turn blender on and slowly add in a bit of water, just enough to get the stuff to start blending. Keep on blending until nice and smooth.

And now shave the asparagus down. I found the easiest way to do this is to chop op the crown part then place the stock on the counter and peel away from you. Not all peels are going to be uniform and perfect, which is good for a textured pizza. Any pieces that break off or shave off weird, keep them too, it;s all going on the pizza. If you asparagus is not super fresh, they might have woody ends.  When done shaving just toss those into a bag and save for a soup later.

And now that the asparagus is done, thinly slice the radishes up.

IMG_2728.jpg
IMG_2731.jpg

Get that pizza dough onto a baking devise (use a baking sheet, pizza stone, or whatever you usually make pizza on. I used a lightly oiled baking sheet)  and smear lots of that cashew pea cream all over it.

Pile on the shaved asparagus and all the ends and tips that we cut off or broke off.

Top with the radishes and a good pinch of salt and lots of fresh cracked pepper.

Into the oven it needs to go.

Pulled from the oven, looking all pretty and springy and smelling so amazing.

Drizzled with a little of the left over cashew pea cream and a few squeezes of fresh lemon.

Your good to go!

Pizza on a weekday, it's what you need in your life.

-C


Shaved Asparagus, Radish, and Cashew Pea cream Pizza


  • 1 12oz pizza dough (use this recipe, your own, or store bought)
  • 10-15 or so stalks of asparagus (about 1/2 a pound)
  • 3-4 big radishes
  • 1/2 cup peas
  • 1/2 cup cashews (soaked for about 1/2 an hour)
  • 2-3 cloves garlic
  • 3 tablespoons nutritional yeast
  • 1/8-1/4 cup water
  • A lemon
  • olive oil
  • Salt and pepper

Preheat oven to 450

First off, prepare your pizza dough or remove it from the fridge to come to room temperature.

Strain the water from the cashews and add them to a blender with the peas, the juice of half a lemon, 1/8 cup of water, the nutritionalyeast, and a sprinkle of salt. Blend until smooth. If you need to, add in another splash or two of water to thin it out.

Grab your asparagus stalks ans chop off the top crown parts. Take the remaining stalks and peel them. Do this by holding the stalk flat on the counter and while holding to the end, peel the stalk away from you.  I(f your asparagus is not super fresh ans had woody ends, use those to hold on to and when done shaving, just toss them into a bag and save for a soup later)  Shave each piece until you cant shave any more. Some pieces are going to be super thin, some kinda thick... that's totally cool, it add dimension to the pizza.

  And now, as thinly as you can, slice the radishes.

To assemble pizza- Roll out dough kinda thin and place on a lightly oiled baking sheet.(you can bake your dough any way or on any thing that you usually do)  Smear a good amount of the cashew pea cream on dough. You will probably have a little left over which you can either water down a little as a drizzle for the done pizza or just save for a sandwich or a veggie dip for later.  Topthe smeared dough with all the shaved asparagus and chopped off crowns then layer on the radishes .Sprinkle with salt and pepper and stick into the oven. Bake for 15ish minutes or until your crust golden brown and done to your liking.

When you remove the pizza from the oven, feel free to drizzle the remaining cashew pea cream all over and definitelytop with a squeeze of more of fresh lemon.

Cut into pieces (square, triangles or what have you) and serve to your open mouth!

Happy Spring Eating!


In Vegetables, Vegan, Savory, sauce, recipes, entree, dinner, Dairy Free, bread, pizza Tags Shaved Asparagus - Radish and Cashew Pea Pesto Pizza, pizza, vegan, spring, peas, asparagus, cashew cheese, clean eating, plant based, dinner
Comment

Lentil and Broccoli Chopped Salad

April 19, 2016 Colleen Stem
IMG_2451.jpg
IMG_2434.jpg

Holy crap, I swear that everyone in my family is made up of pasta and meat. Over the past few weeks with all of the family spending so many meals together and nobody really in the mood to get fancy and do much cooking, the dinner go to's have been either some type of pasta, potato, or bread with meat dish. Super meat and starchy as hell. (there is usually a veggie somewhere) Good thing I pack my own lettuce and carrots where ever I go.(no joke) But can't blame them really. Food has not been top priority.  If they will eat pasta, well then that's what they will eat and the veggies are starting to make there way back. (I am making zucchini noodles for family dinner tonight)

But yesterday the mr and I spent the day just the two of us (it has been so long) and made dinner at home. I, as well as the mr, wanted nothing to do with pasta, potatoes, or bread. (he even passed up pizza.... what the WHAT) Just simple dinner with no one to cook for, no picky little littles to have to contend with and a fridge full of all the prettiest fresh veggies I can eat!

We (really me) went all out fresh with a hugmongo salad of broccoli and lentils.  Super quick and easy to make, really fresh, crispy, and hardy. A salad just for us,  although I think I might make it again for tonight to bring to the sisters house for dinner.

A salad that that makes me (and the mr) happy to eat and will make you happy too!

The stuff. A nice nig head of broccoli, a small red onion, half an avocado, some dried lentils, water, red wine vinegar and salt and pepper.

Start by getting those lentils and water into a pot and on the stove to cook.  Bring to boil then turn to a simmer, stick on a lid and let cook until lentils are tender but not mushy. (about 20 minutes)

Once you have got those going, chop up the broccoli and the onion into little bits(various size is a ok)

Toss those chopped up veggies into anice bowl and add a good few splashes of vinegar and sprinkle with salt ans pepper. Give it a good toss and let it sit on the counter to meld while the lentils are cooking.

IMG_2346.jpg
IMG_2353.jpg

Oh hey, those lentils be cooked. Dump the whole pot (if there is little extra liquid, dump that in too) into the bowl of chopped veggies and toss it all around.

And lastly , slice up the avocado into chunks (smallish sized) and gently mix that in.

IMG_2442.jpg

Hooray! A no pasta, starch, mayo smothered salad for everyone!

Happy eating.

-C


Lentil and Broccoli Chopped Salad

Serves 3-4 as a side. 2 as a meal

  • 1 big head of broccoli (about 2 1/2-3 cups chopped)
  • 1/2 cup dried green lentils
  •  1 1/4 cup water
  • a small red onion
  • 1/2 of a ripe avocado
  • around 1/4 cup red wine vinegar
  • salt and pepper

Place dried lentils into a pot with water. Bring to a boil then turn heat to a simmer and place a lid on pot. Cook for about 20 minutes or until the lentils are cooked, but still firm. If you think the lentils are still under cooked and there is not liquid in the pot, add another 1/4 cup.

While the lentils are cooking, grab a big bowl.  Chop the broccoli into little pieces and toss into that bowl. Also chop up the red onion into thin slices then into smaller pieces (or big if you like it like that) and toss that in with the broccoli. Drizzle the chop with vinegar and sprinkle with salt. Set aside until the lentils are cooked.

Once the lentils are done and still hot, dump them in with the chop. Give a really good mix to combine it all then grab your avocado,  cut it into little chunk and add it in and gently give it a toss. Season with more salt and pepper and if needed.

This is a salad that tastes good just made, really good 10 minutes later, but tastes best after sitting for an hour or two.

Whenever you decide to eat it, just grab a fork and dig in!


In Vegetables, Vegan, Savory, salad, recipes, pulses, grain free, Gluten Free, entree, dinner, Dairy Free, breakfast Tags Lentil and Broccoli Chopped Salad, salad, pulses, vegan, gluten free, healthy, clen eating, plant based, green, springs, chopped salad
Comment
← Newer Posts Older Posts →
 

https://thelovelycrazy.squarespace.com/config#/|/about/

Me. Food Maker.Food eater. Woo HOO!

STEM+NODE  SMALL BATCH AND ONE OF A KIND POTTERY

stem+node ceramics


____________________

Subscribe

GET NEW POSTS IN YO EMAIL

You are AWESOME!!!


@thelovelycrazy 2014-2021