• stem+node ceramics
  • HOME
  • Food Recipes
  • About
  • Contact
Menu

The Lovely Crazy

Street Address
City, State, Zip
Phone Number

Your Custom Text Here

The Lovely Crazy

  • stem+node ceramics
  • HOME
  • Food Recipes
  • About
  • Contact

Chocolate Chocolate Chip Carrot Muffins

March 26, 2022 Colleen Stem
IMG_2177.jpg
IMG_2181 2.jpg

The people in my family, they really enjoy a muffin, so I find myself making muffins more often then any other baked good. This is fine by me because muffins are pretty easy to whip up and the flavor choices are endless.

This past batch of muffins were for the purpose of a dessert like treat so I made them chocolate and because it’s spring and carrots go hand in hand (right?) they needed to have carrots too. And sure some might question the flavor combination of chocolate and carrot but let me just stop you right there and say that nothing but good things happen when you pair the flavors. Would a 15 year old girl stuff her face with these muffins otherwise?

No, no she would not.

And so I declare this another winner for delicious muffins that the people in my family will now bug me to make them. Oh the burden of being an awesome baker. It is hard sometimes. 😂. But for real.

Now to the muffins!

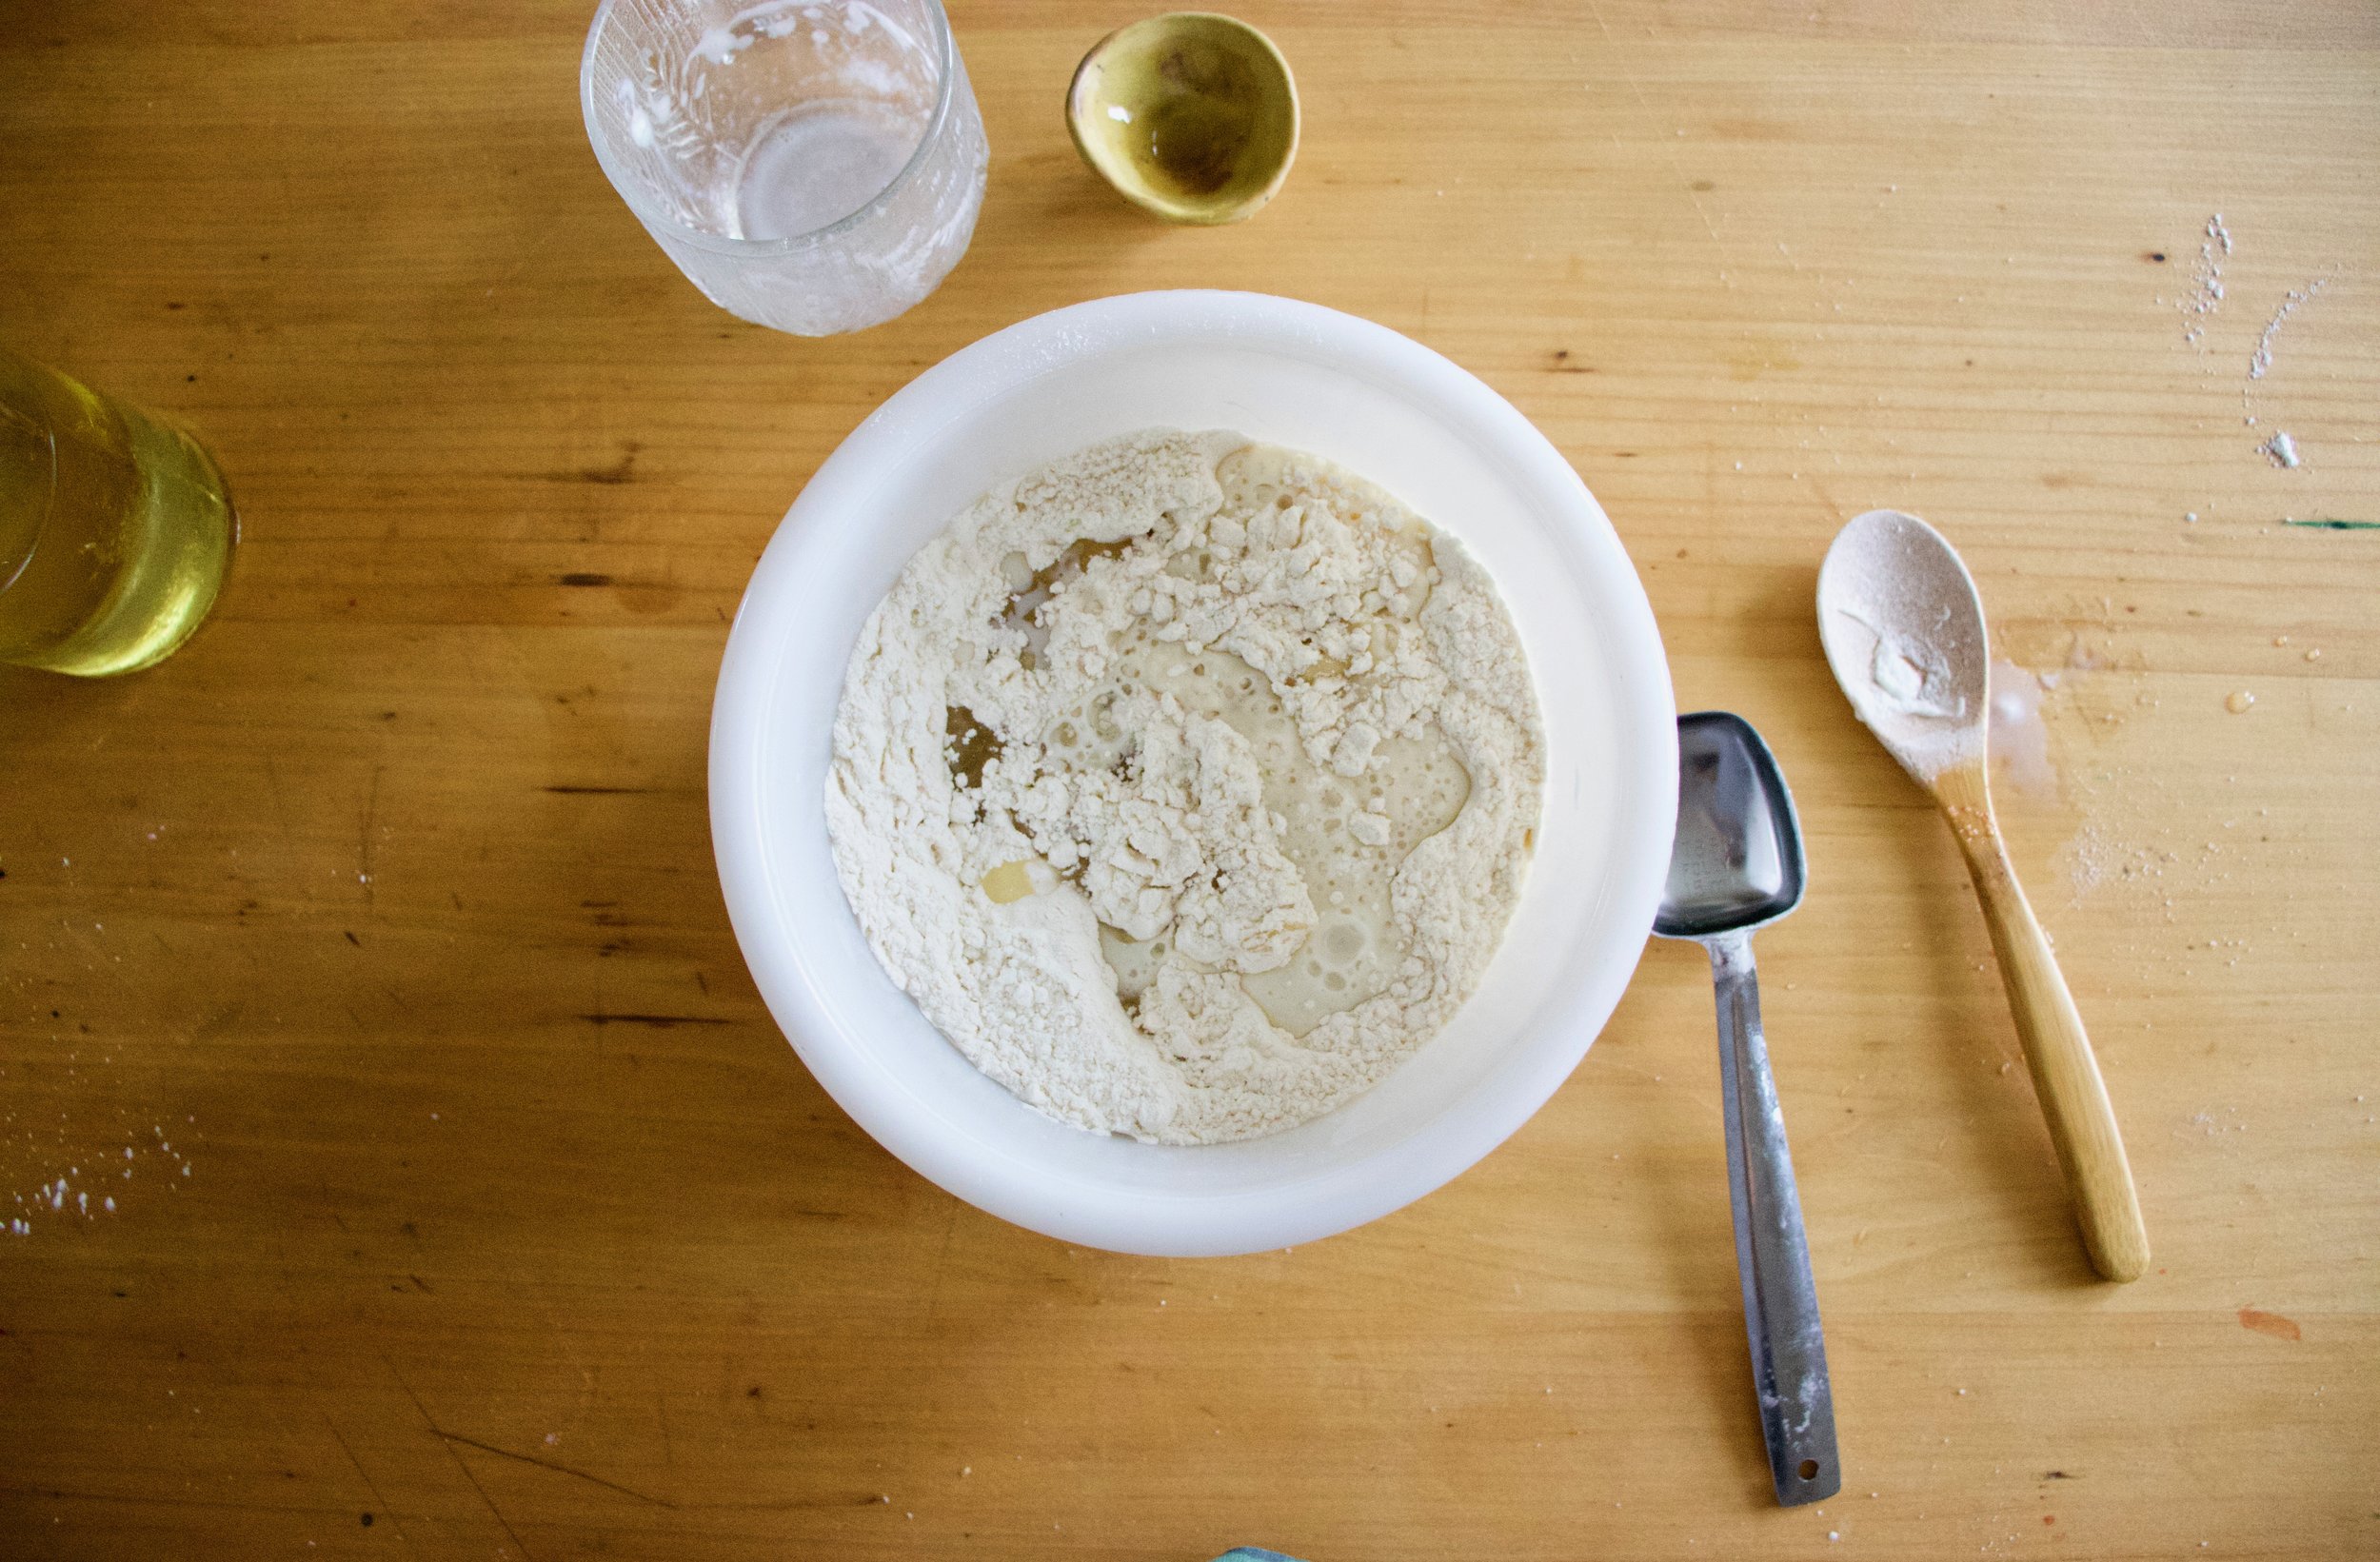
The stuff. Carrots, cocoa, flour, baking powder and soda. Salt, cinnamon, brown and white sugar, plant milk, oil, chocolate chips, and some walnuts,

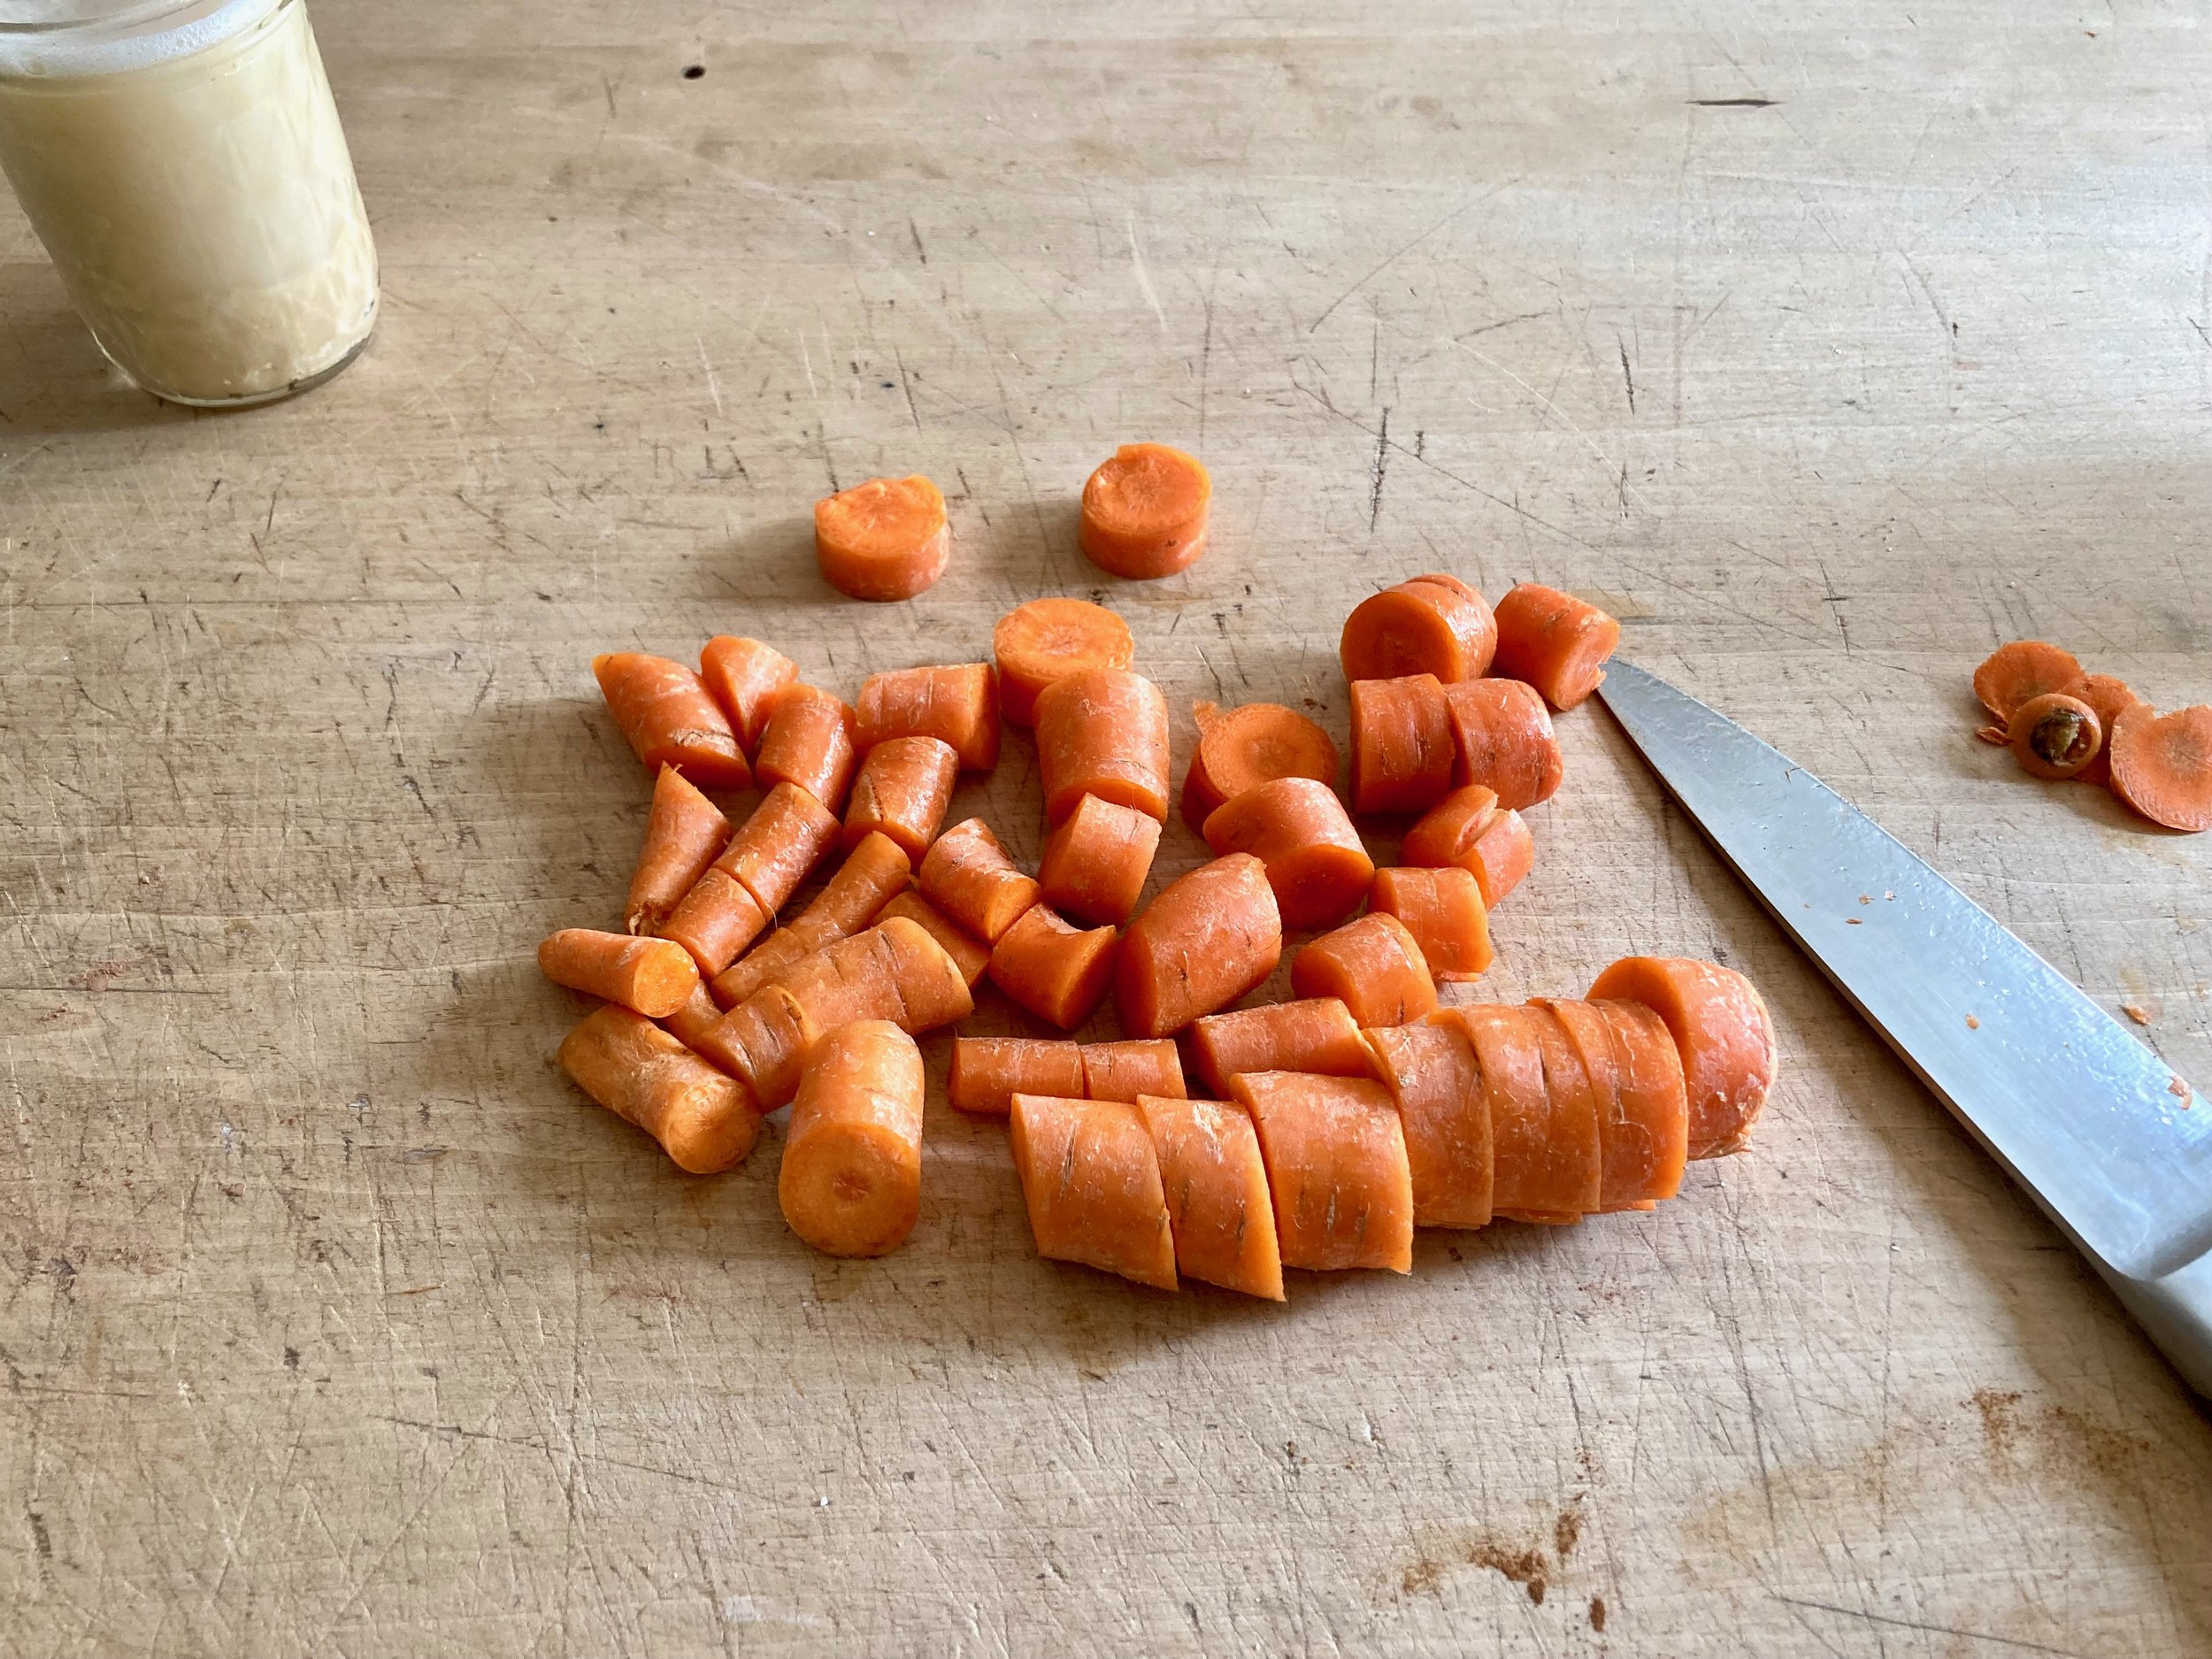
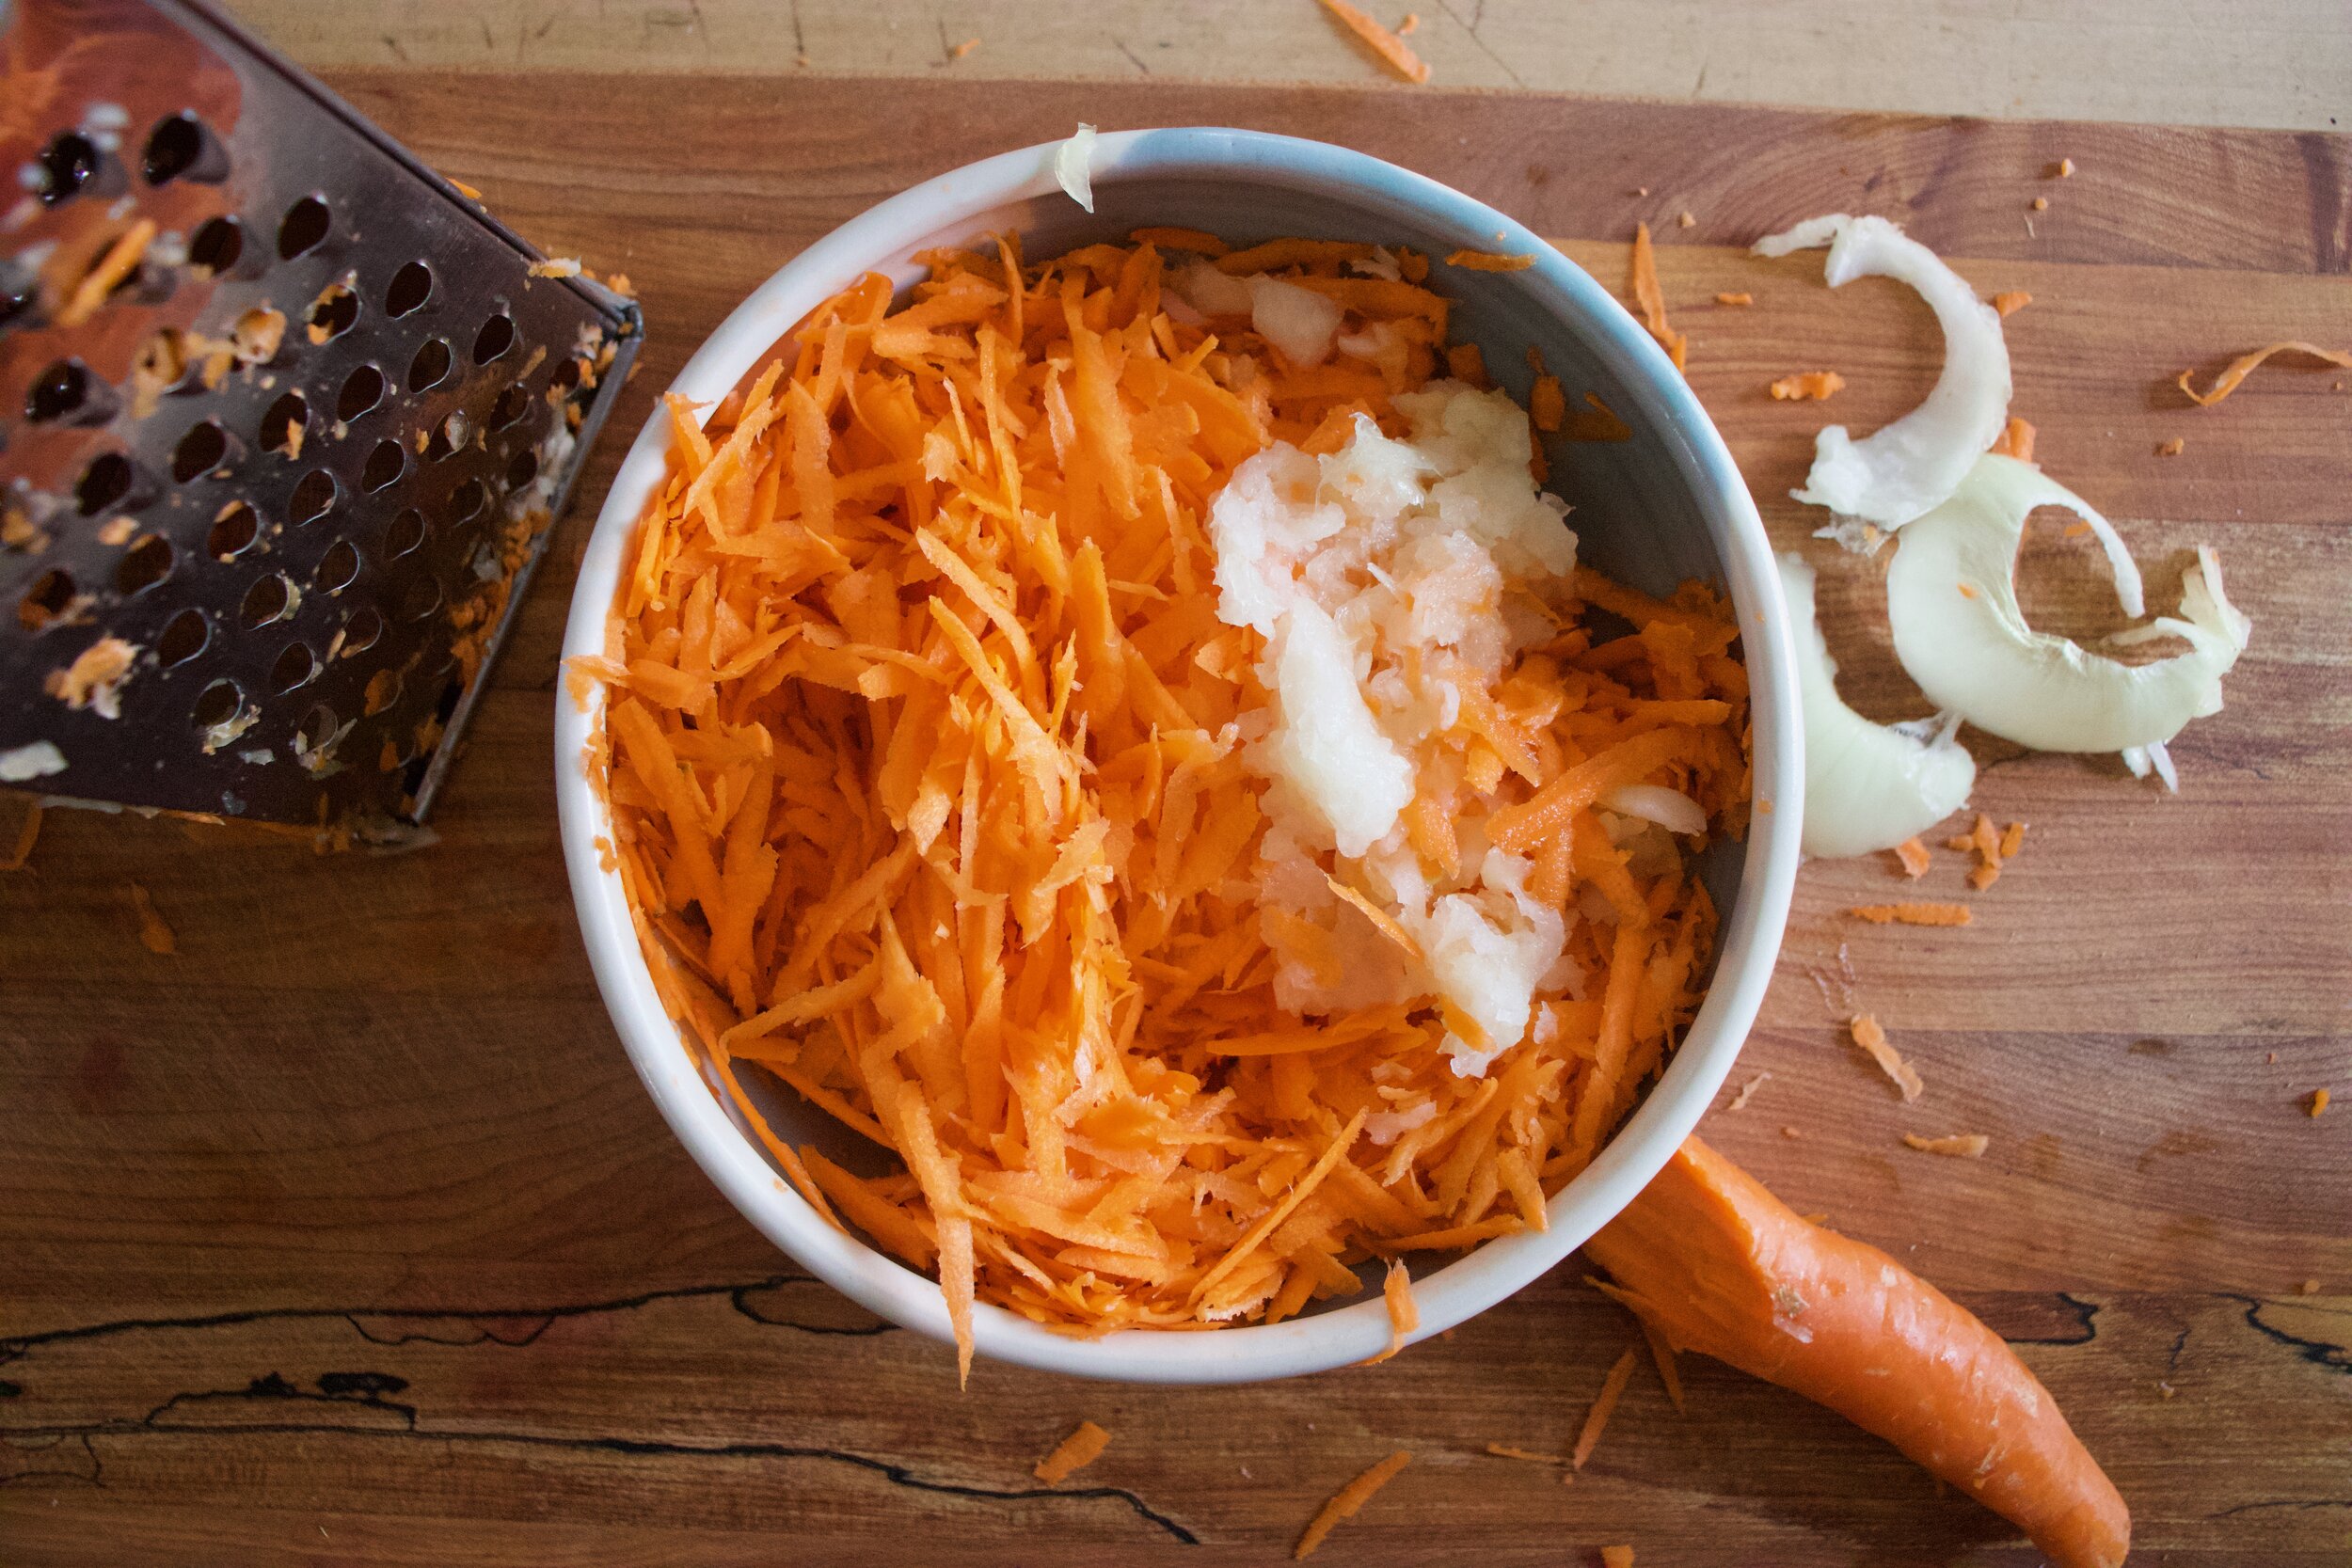
First you need to prepare the carrots so chop them up into chunks.

IMG_2046.jpg
IMG_2061.jpg
IMG_2067.jpg
IMG_2078.jpg

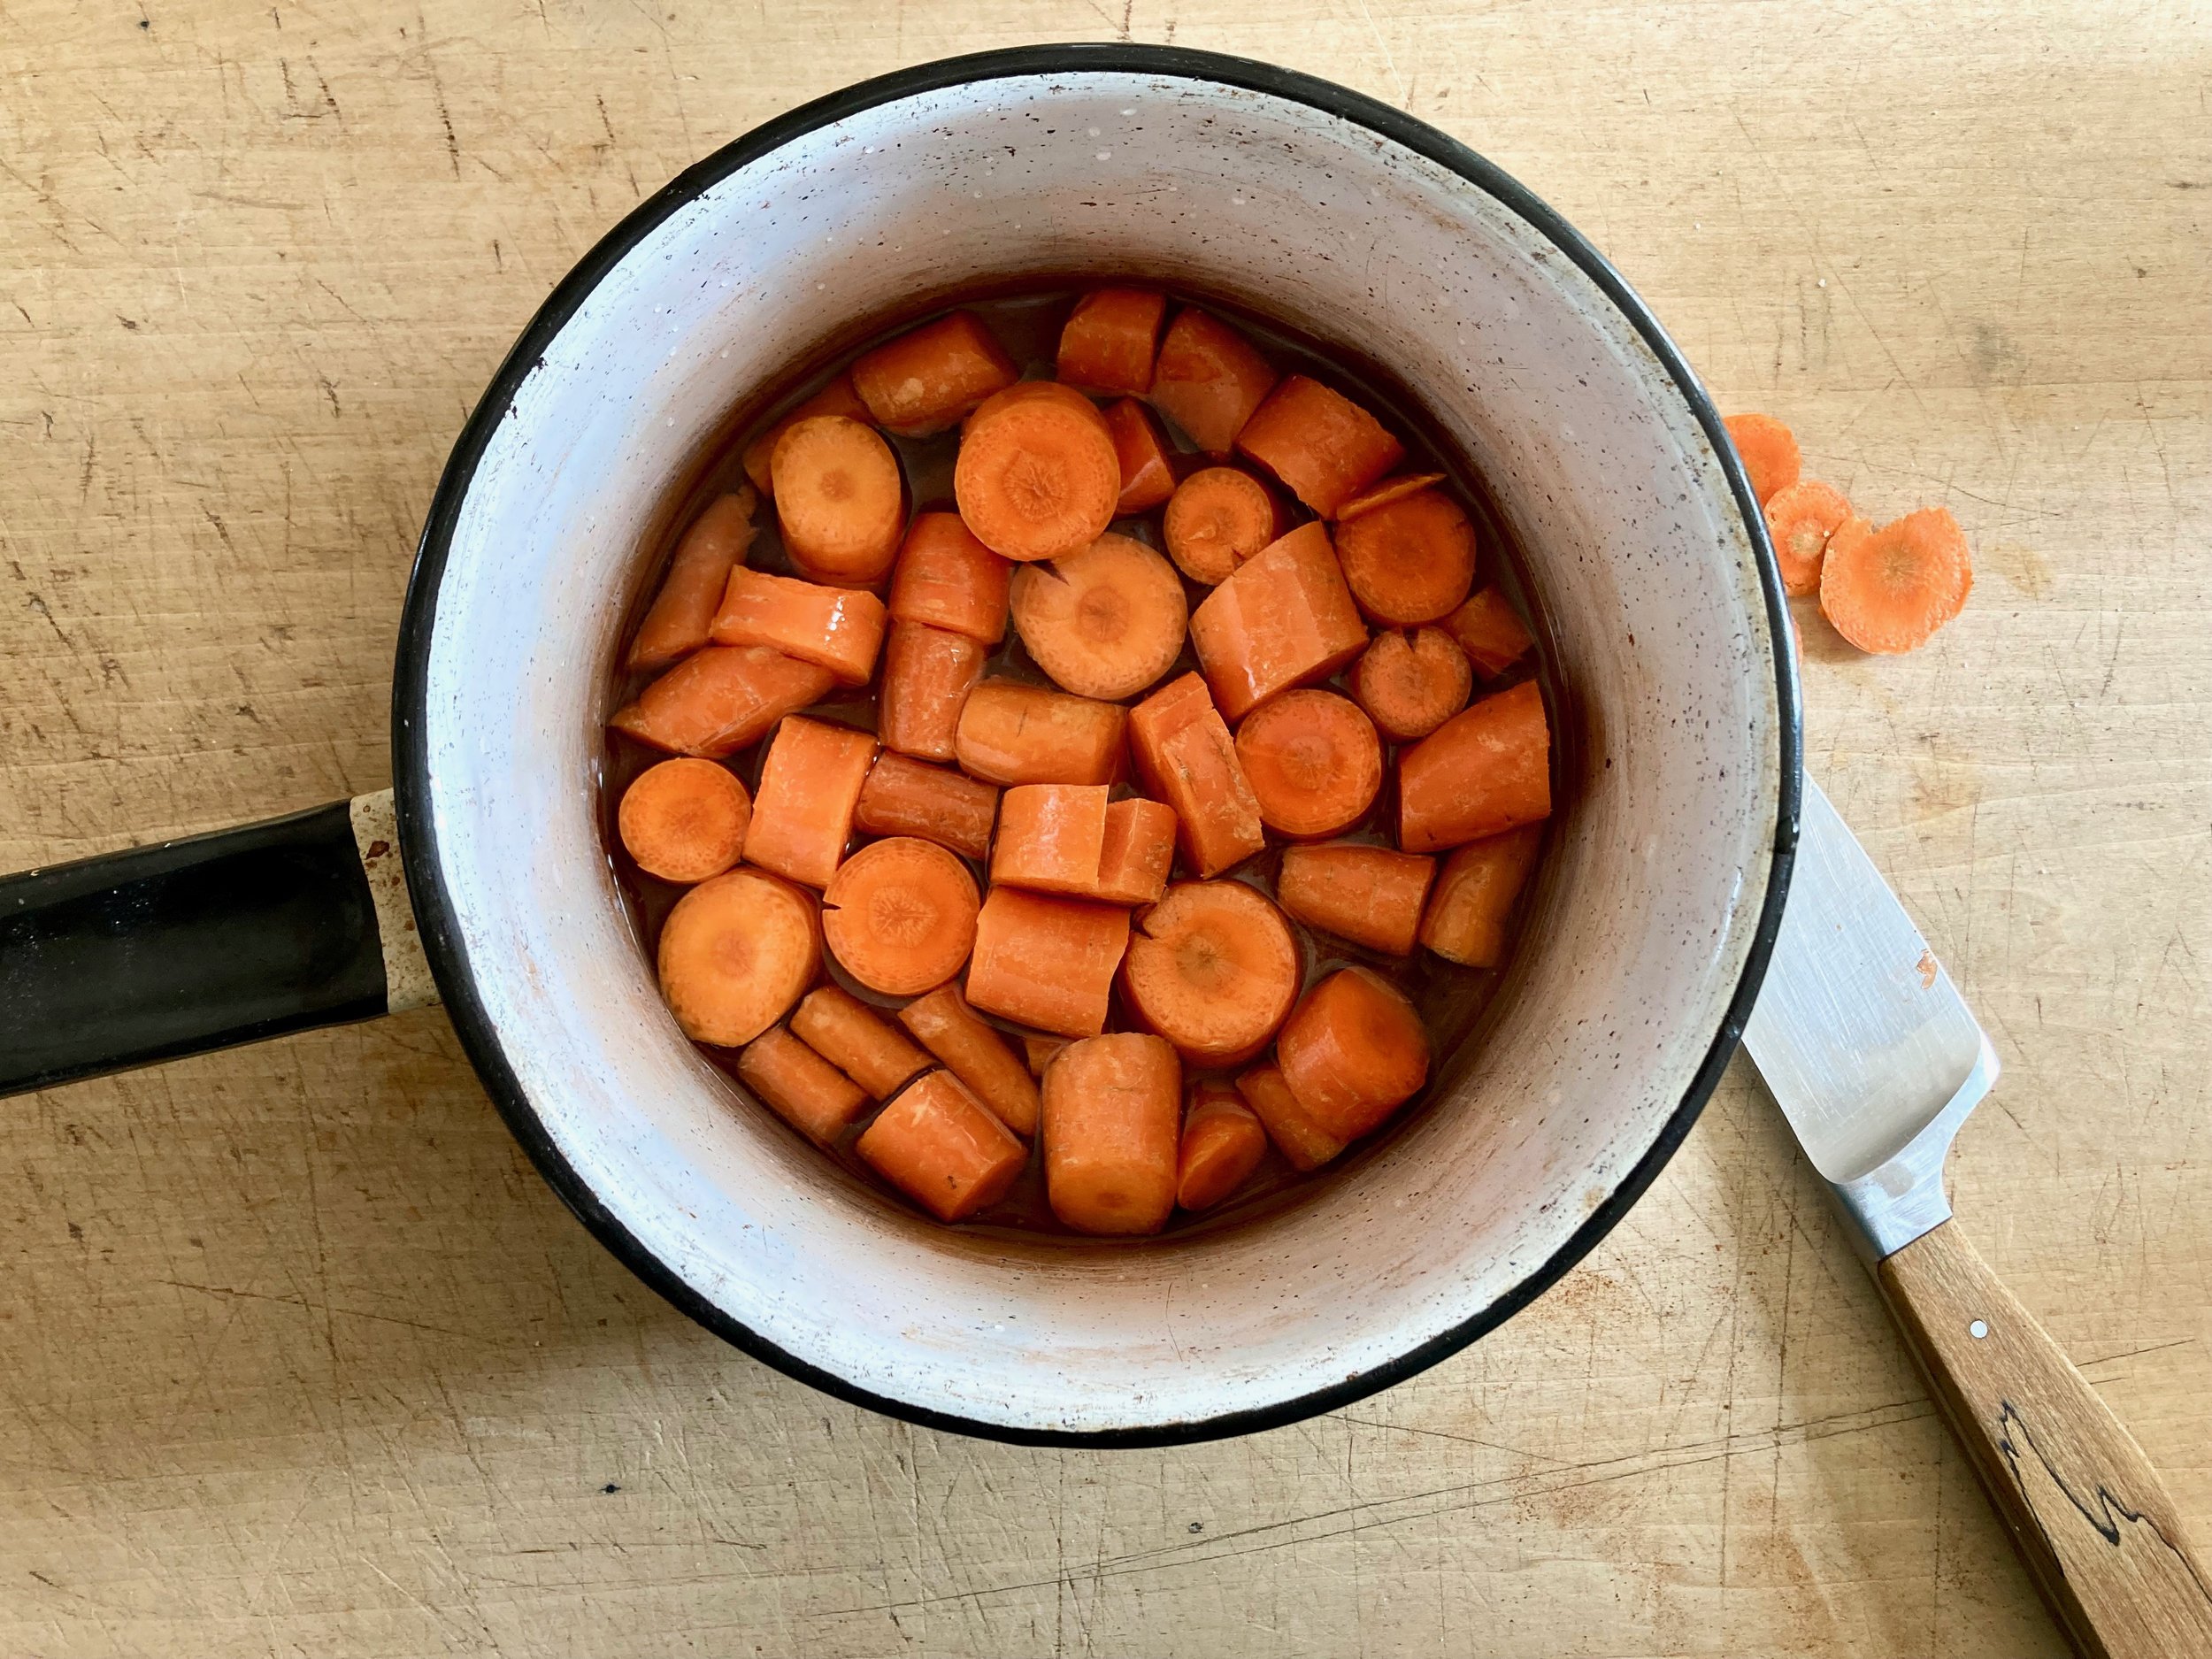
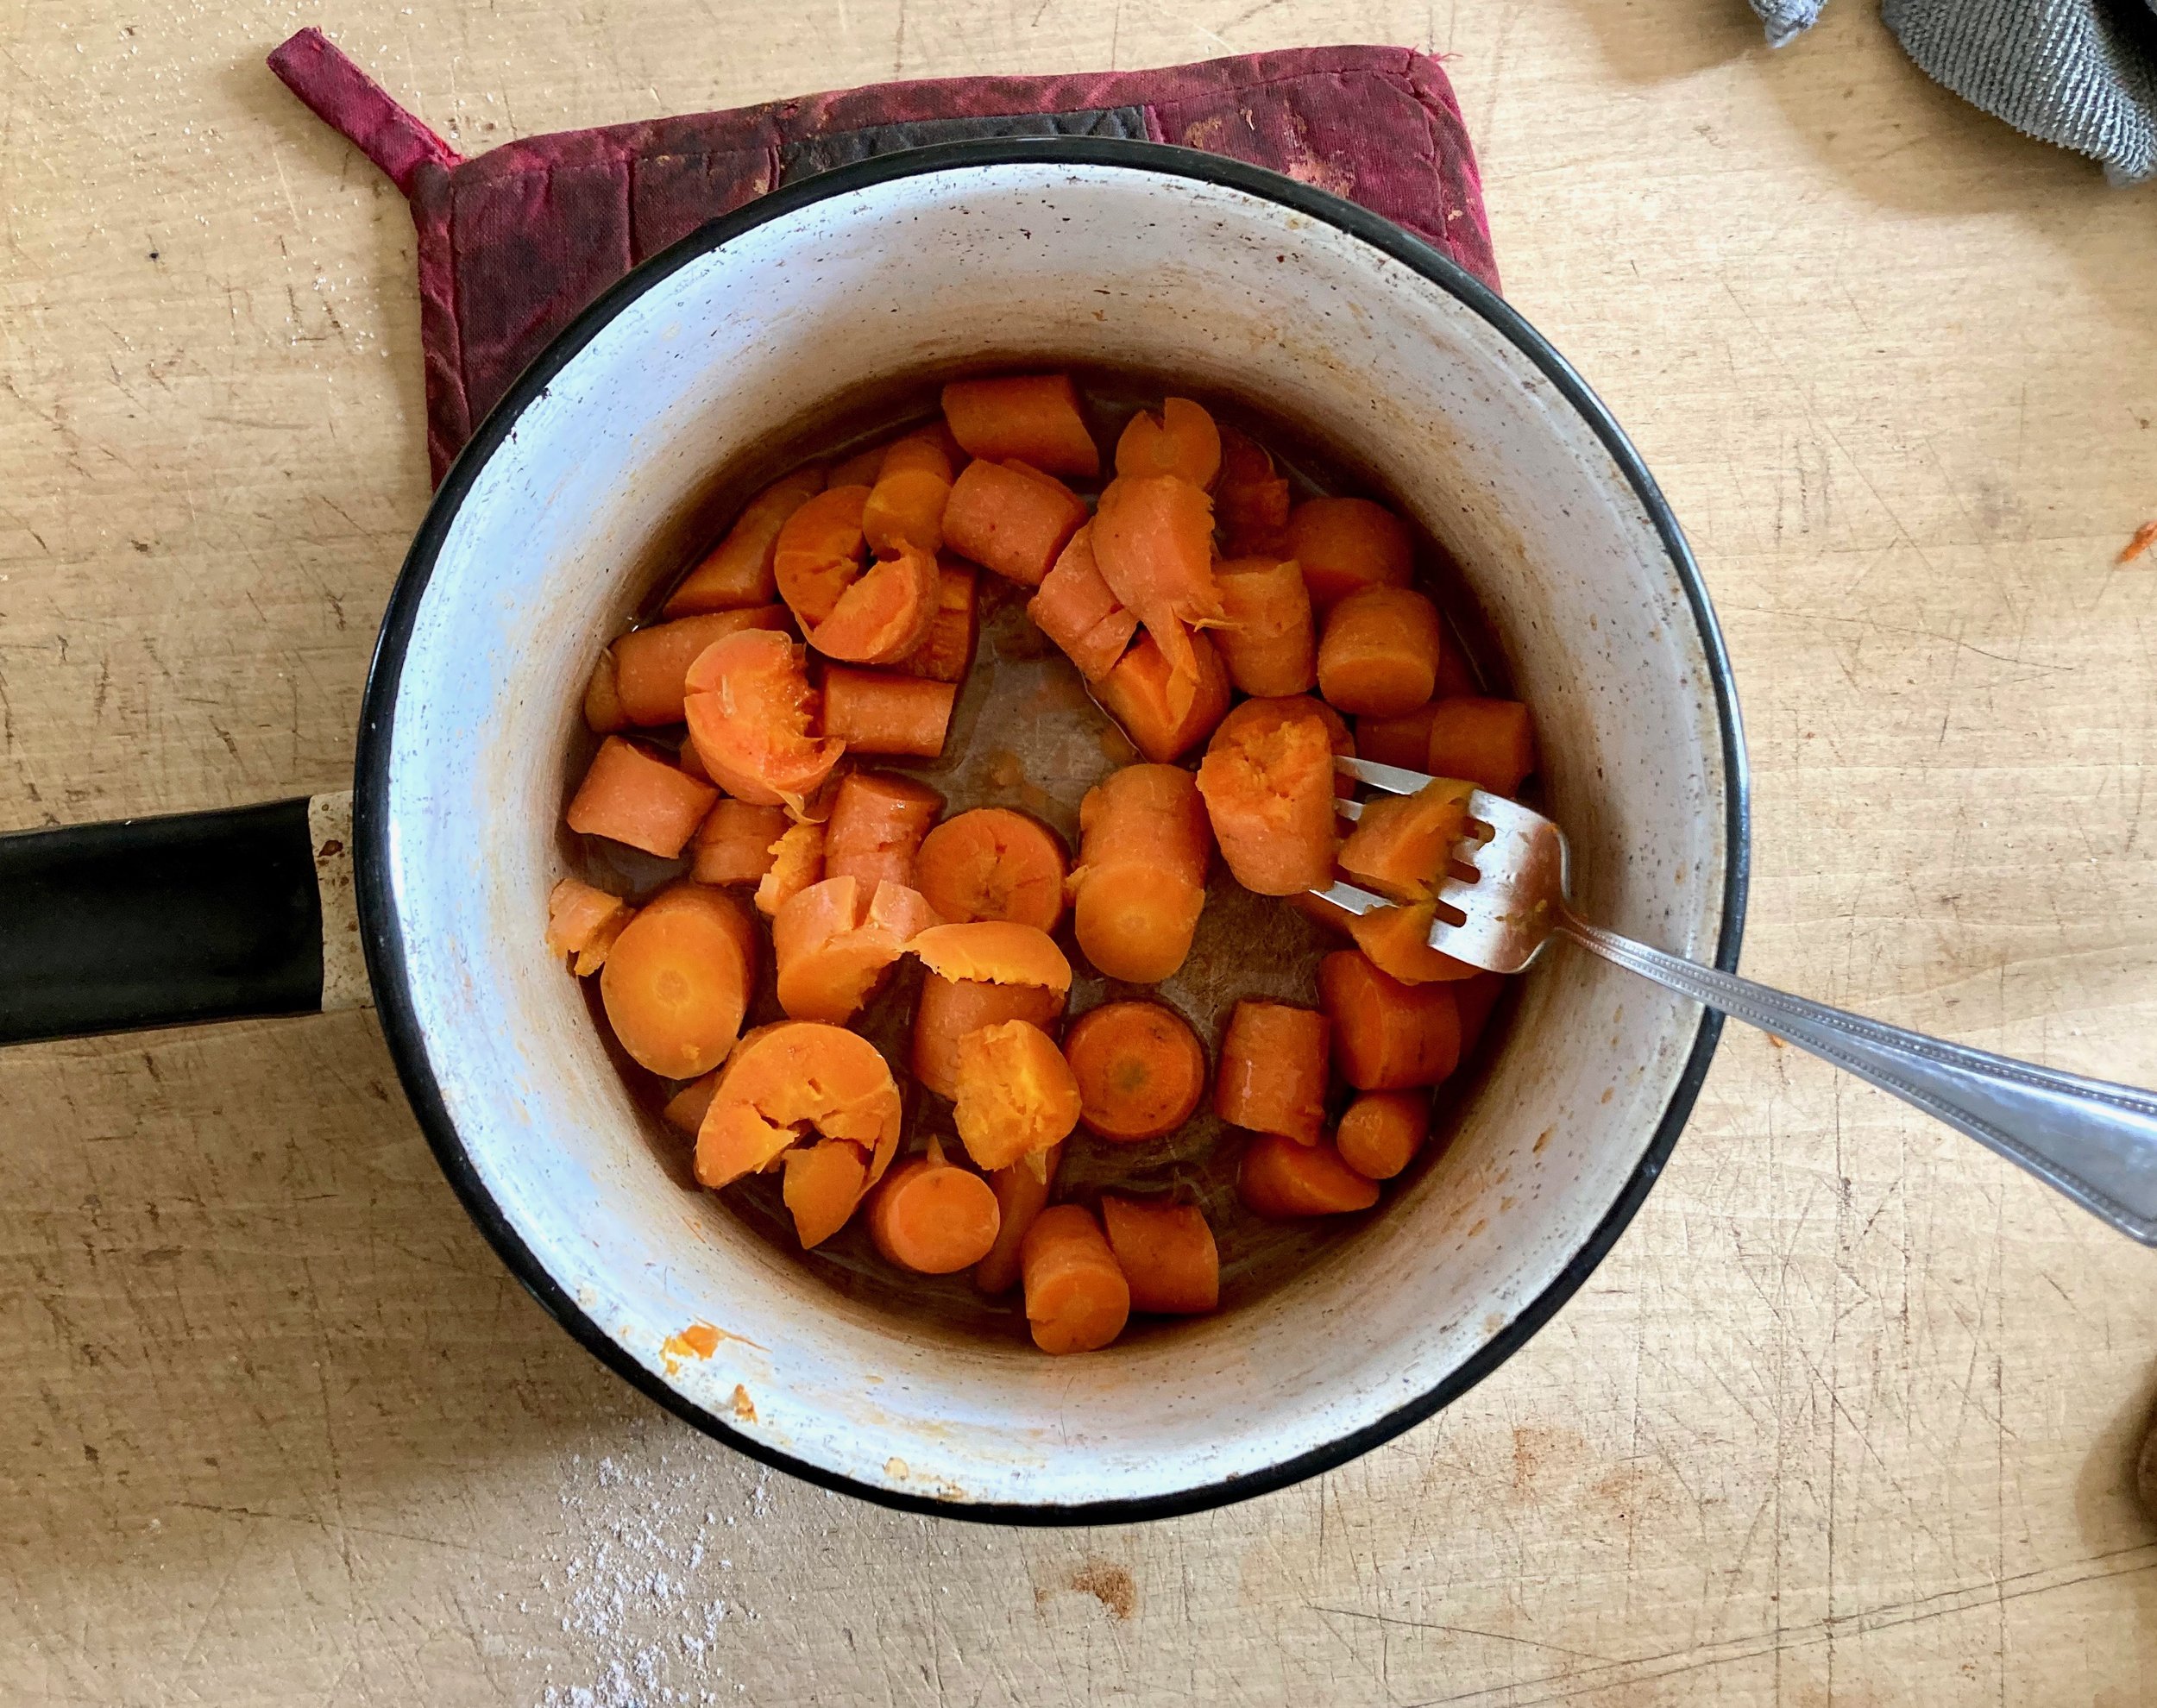
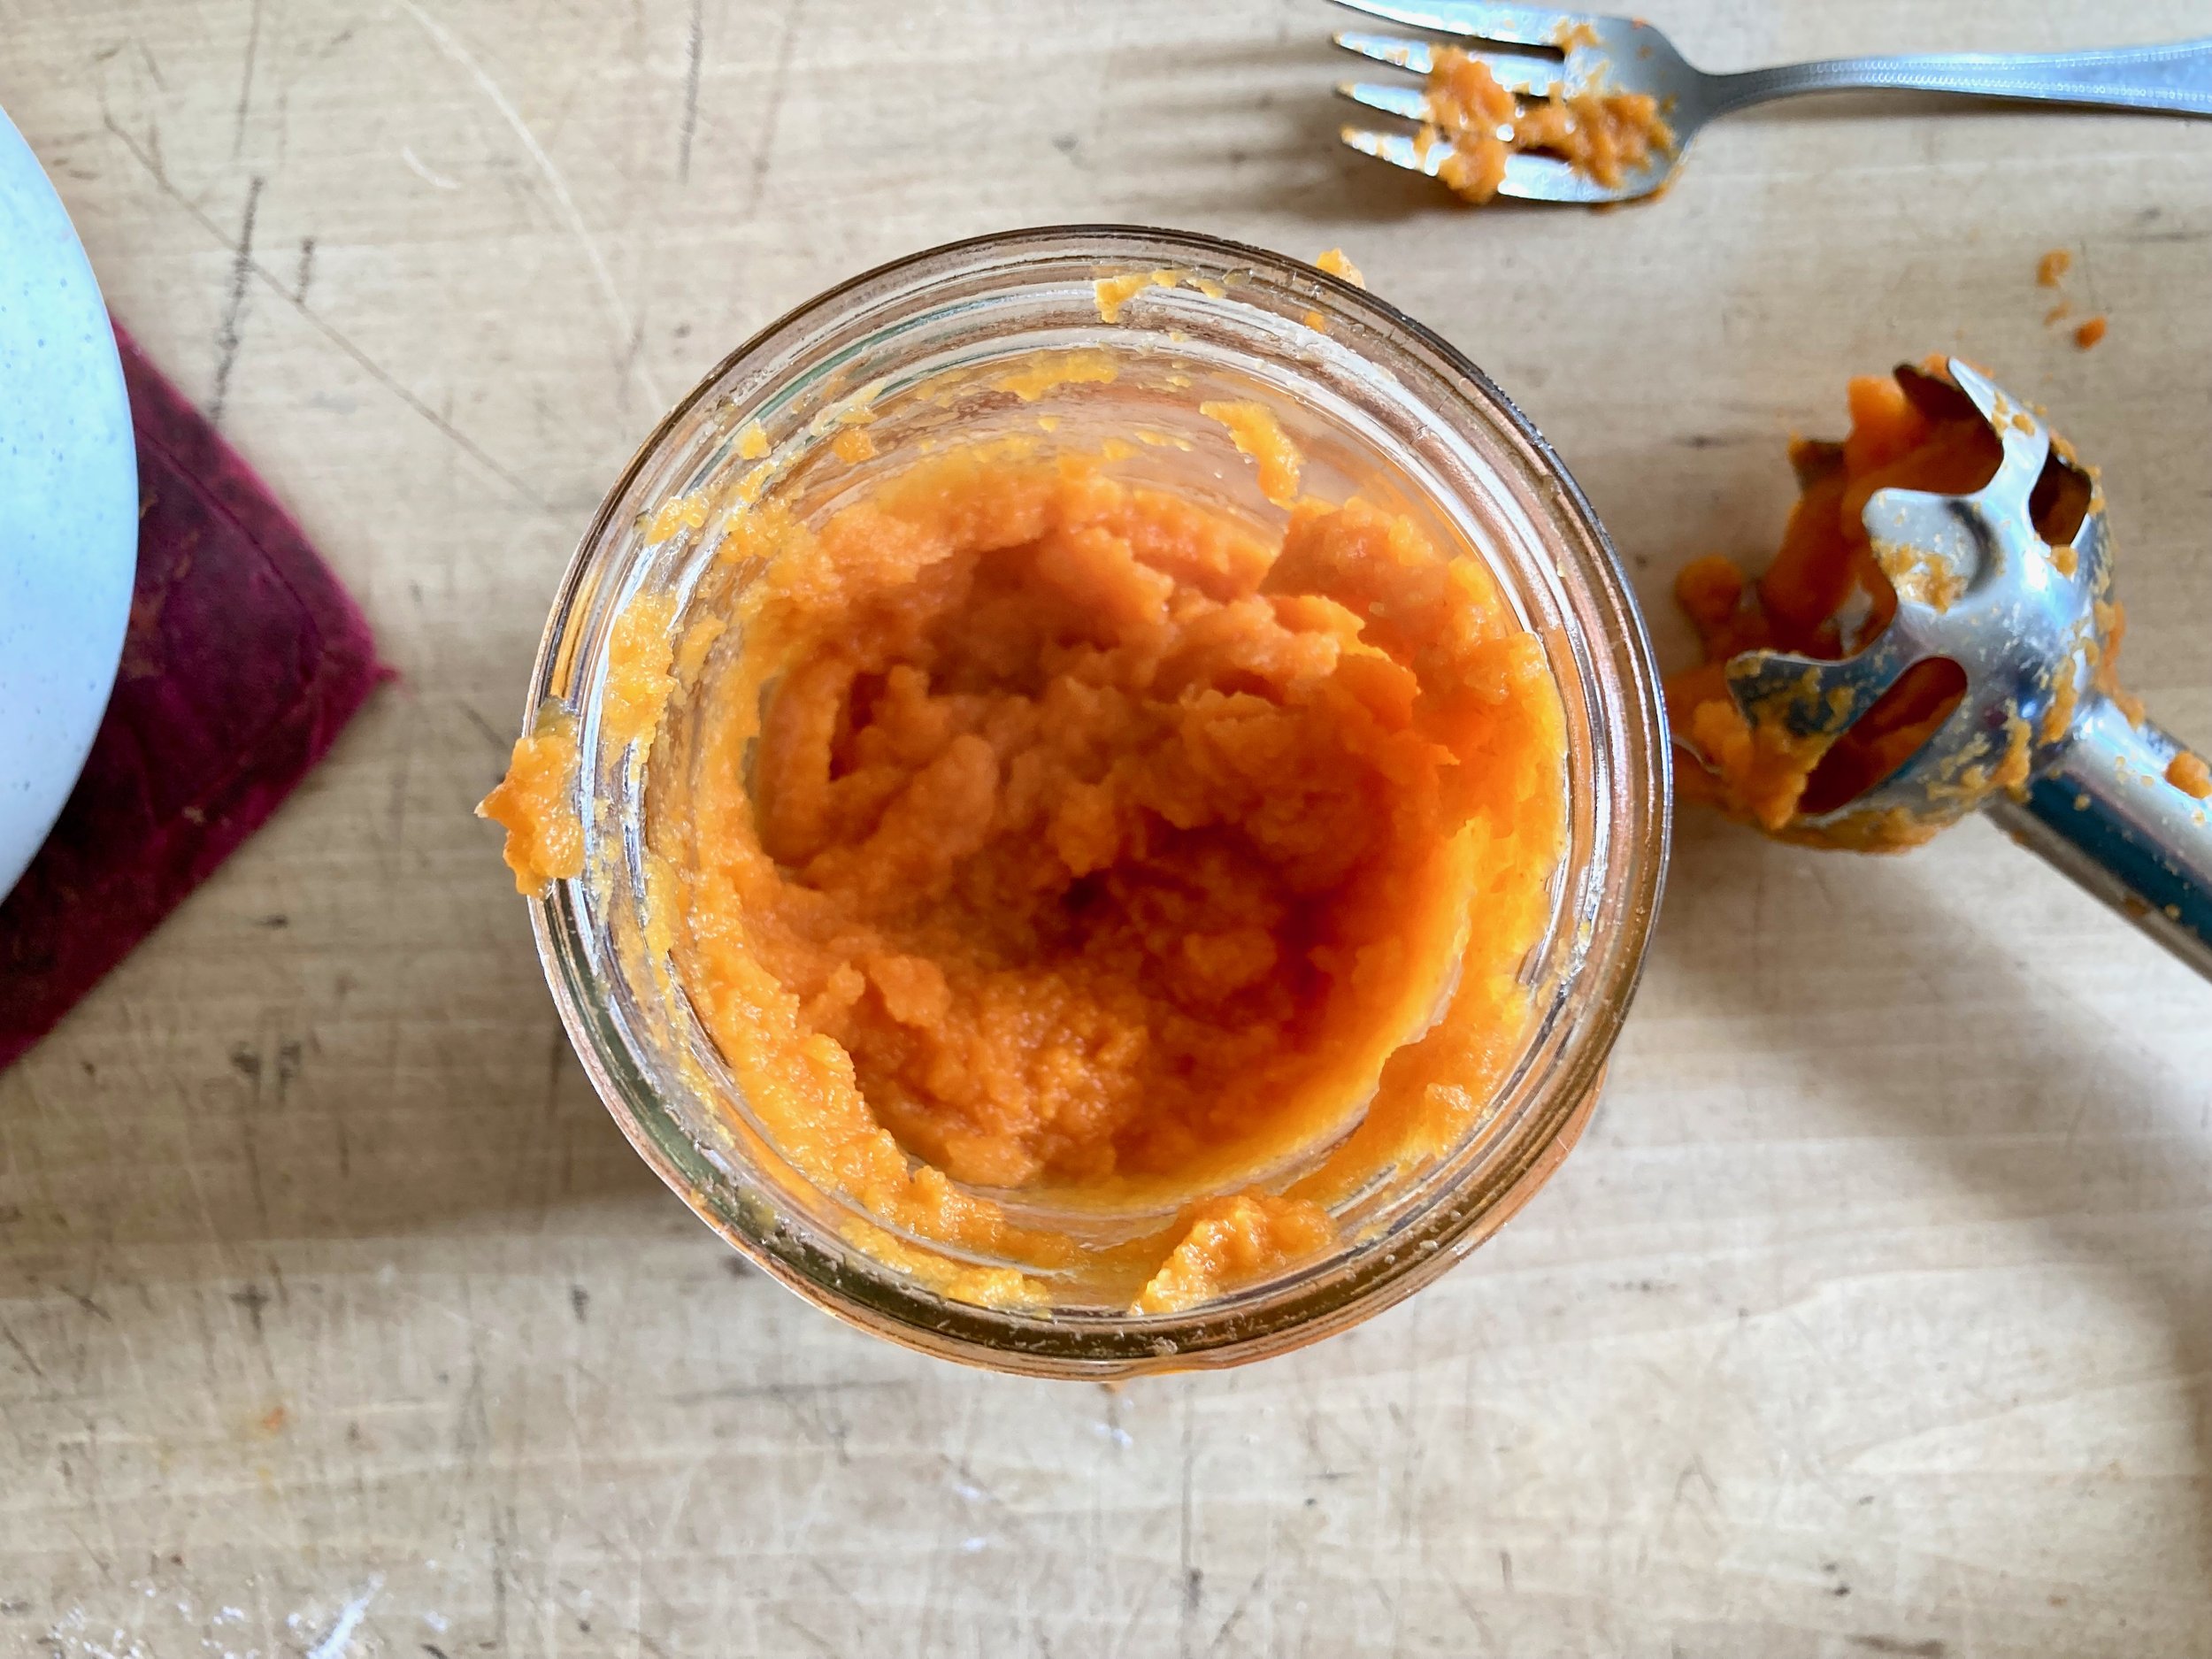
Place the chopped carrots into a pot with some water and steam until tender. Once tender, blend them up into a smooth puree.

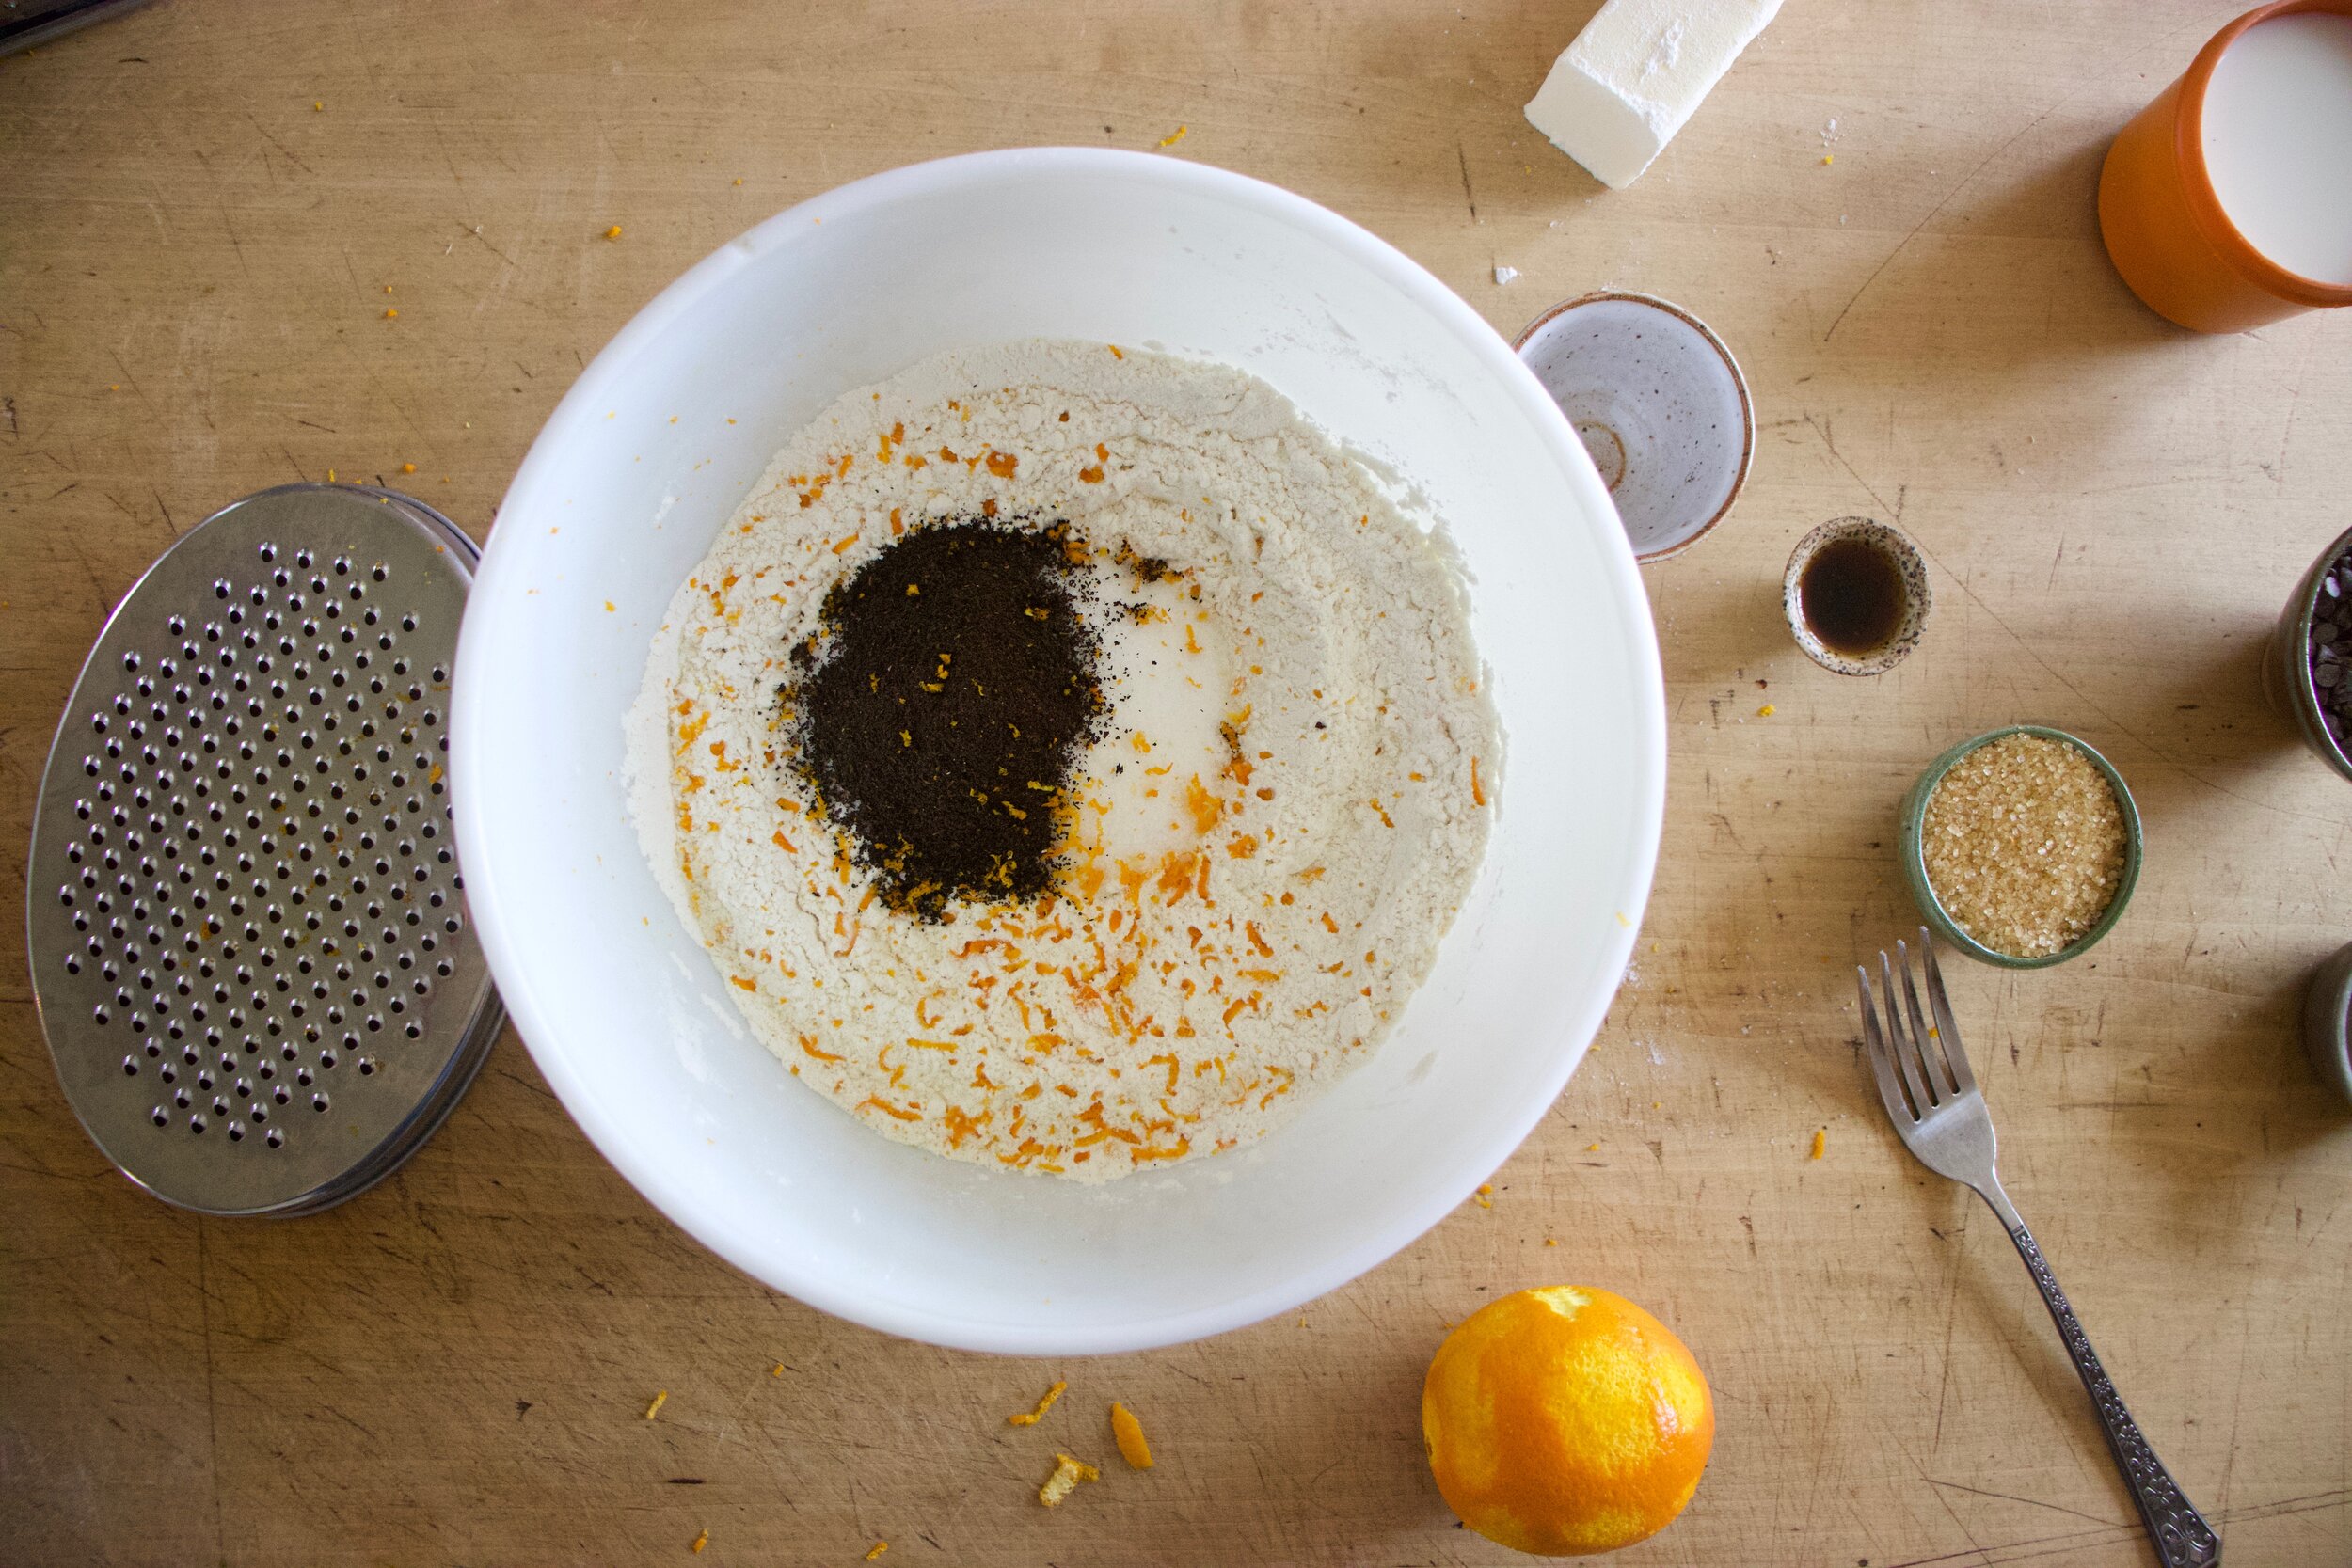
Mix all the dry ingredients together.

IMG_2079.jpg
IMG_2087.jpg
IMG_2093.jpg
IMG_2098.jpg

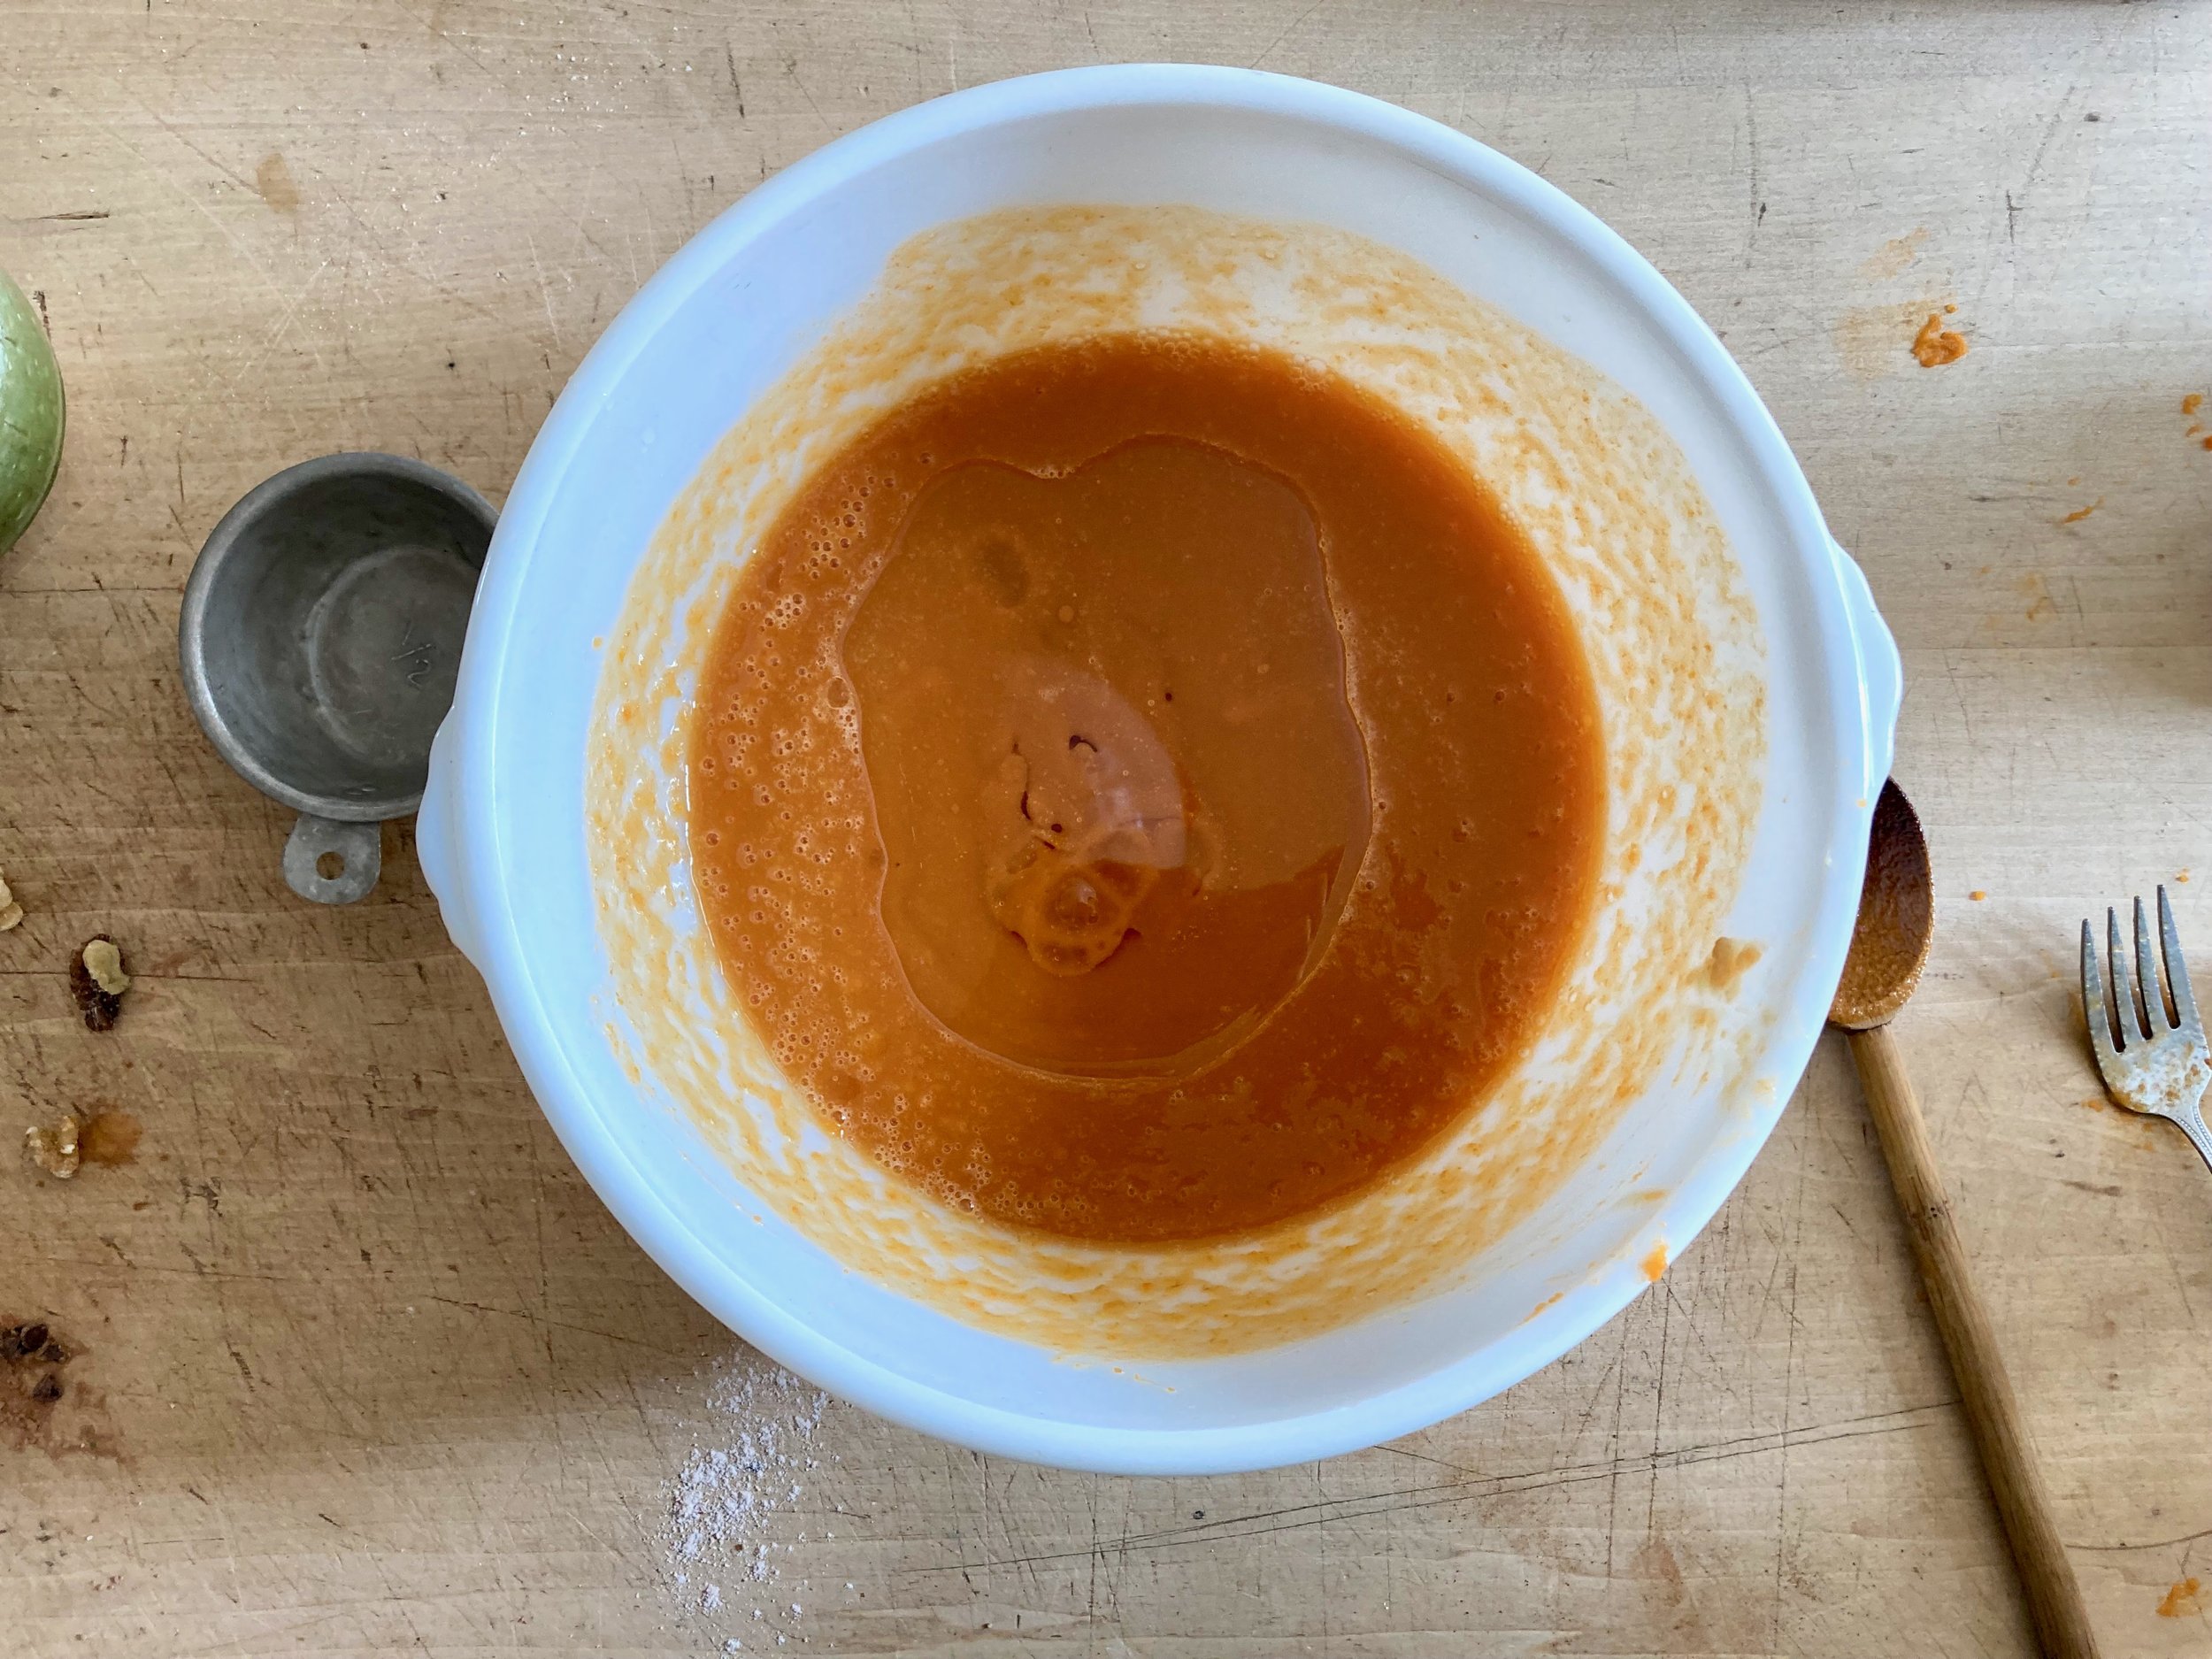
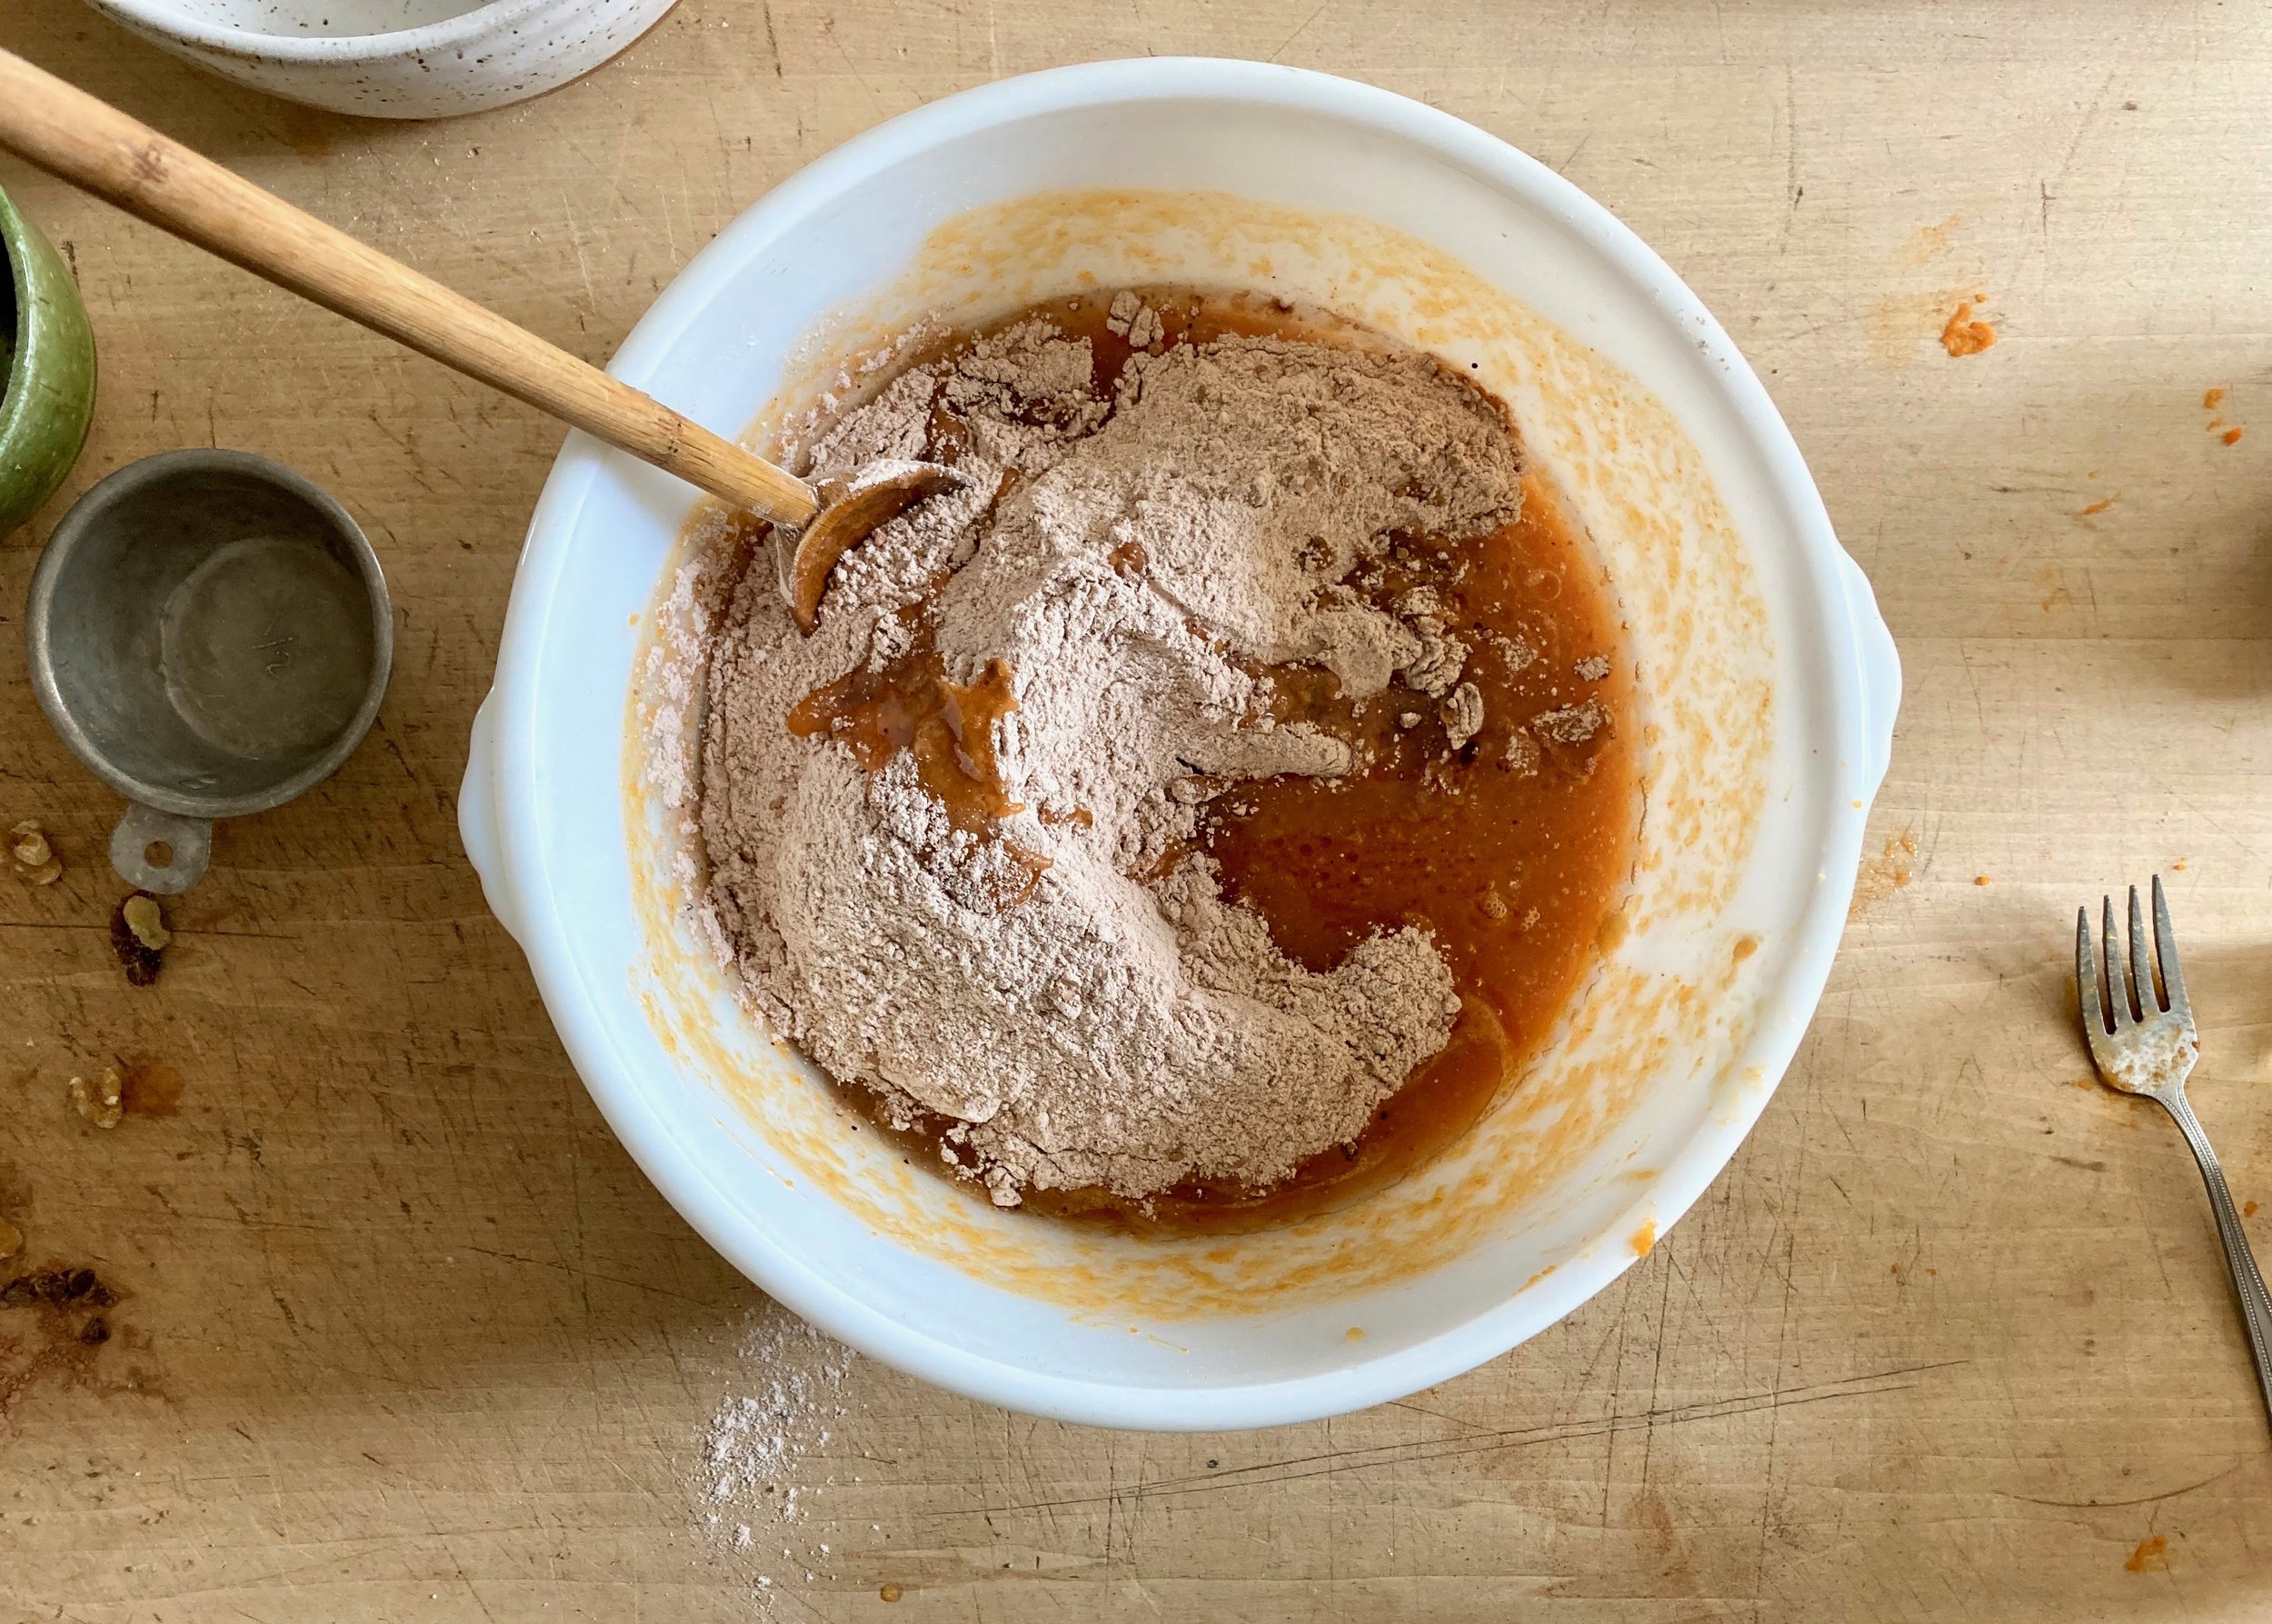
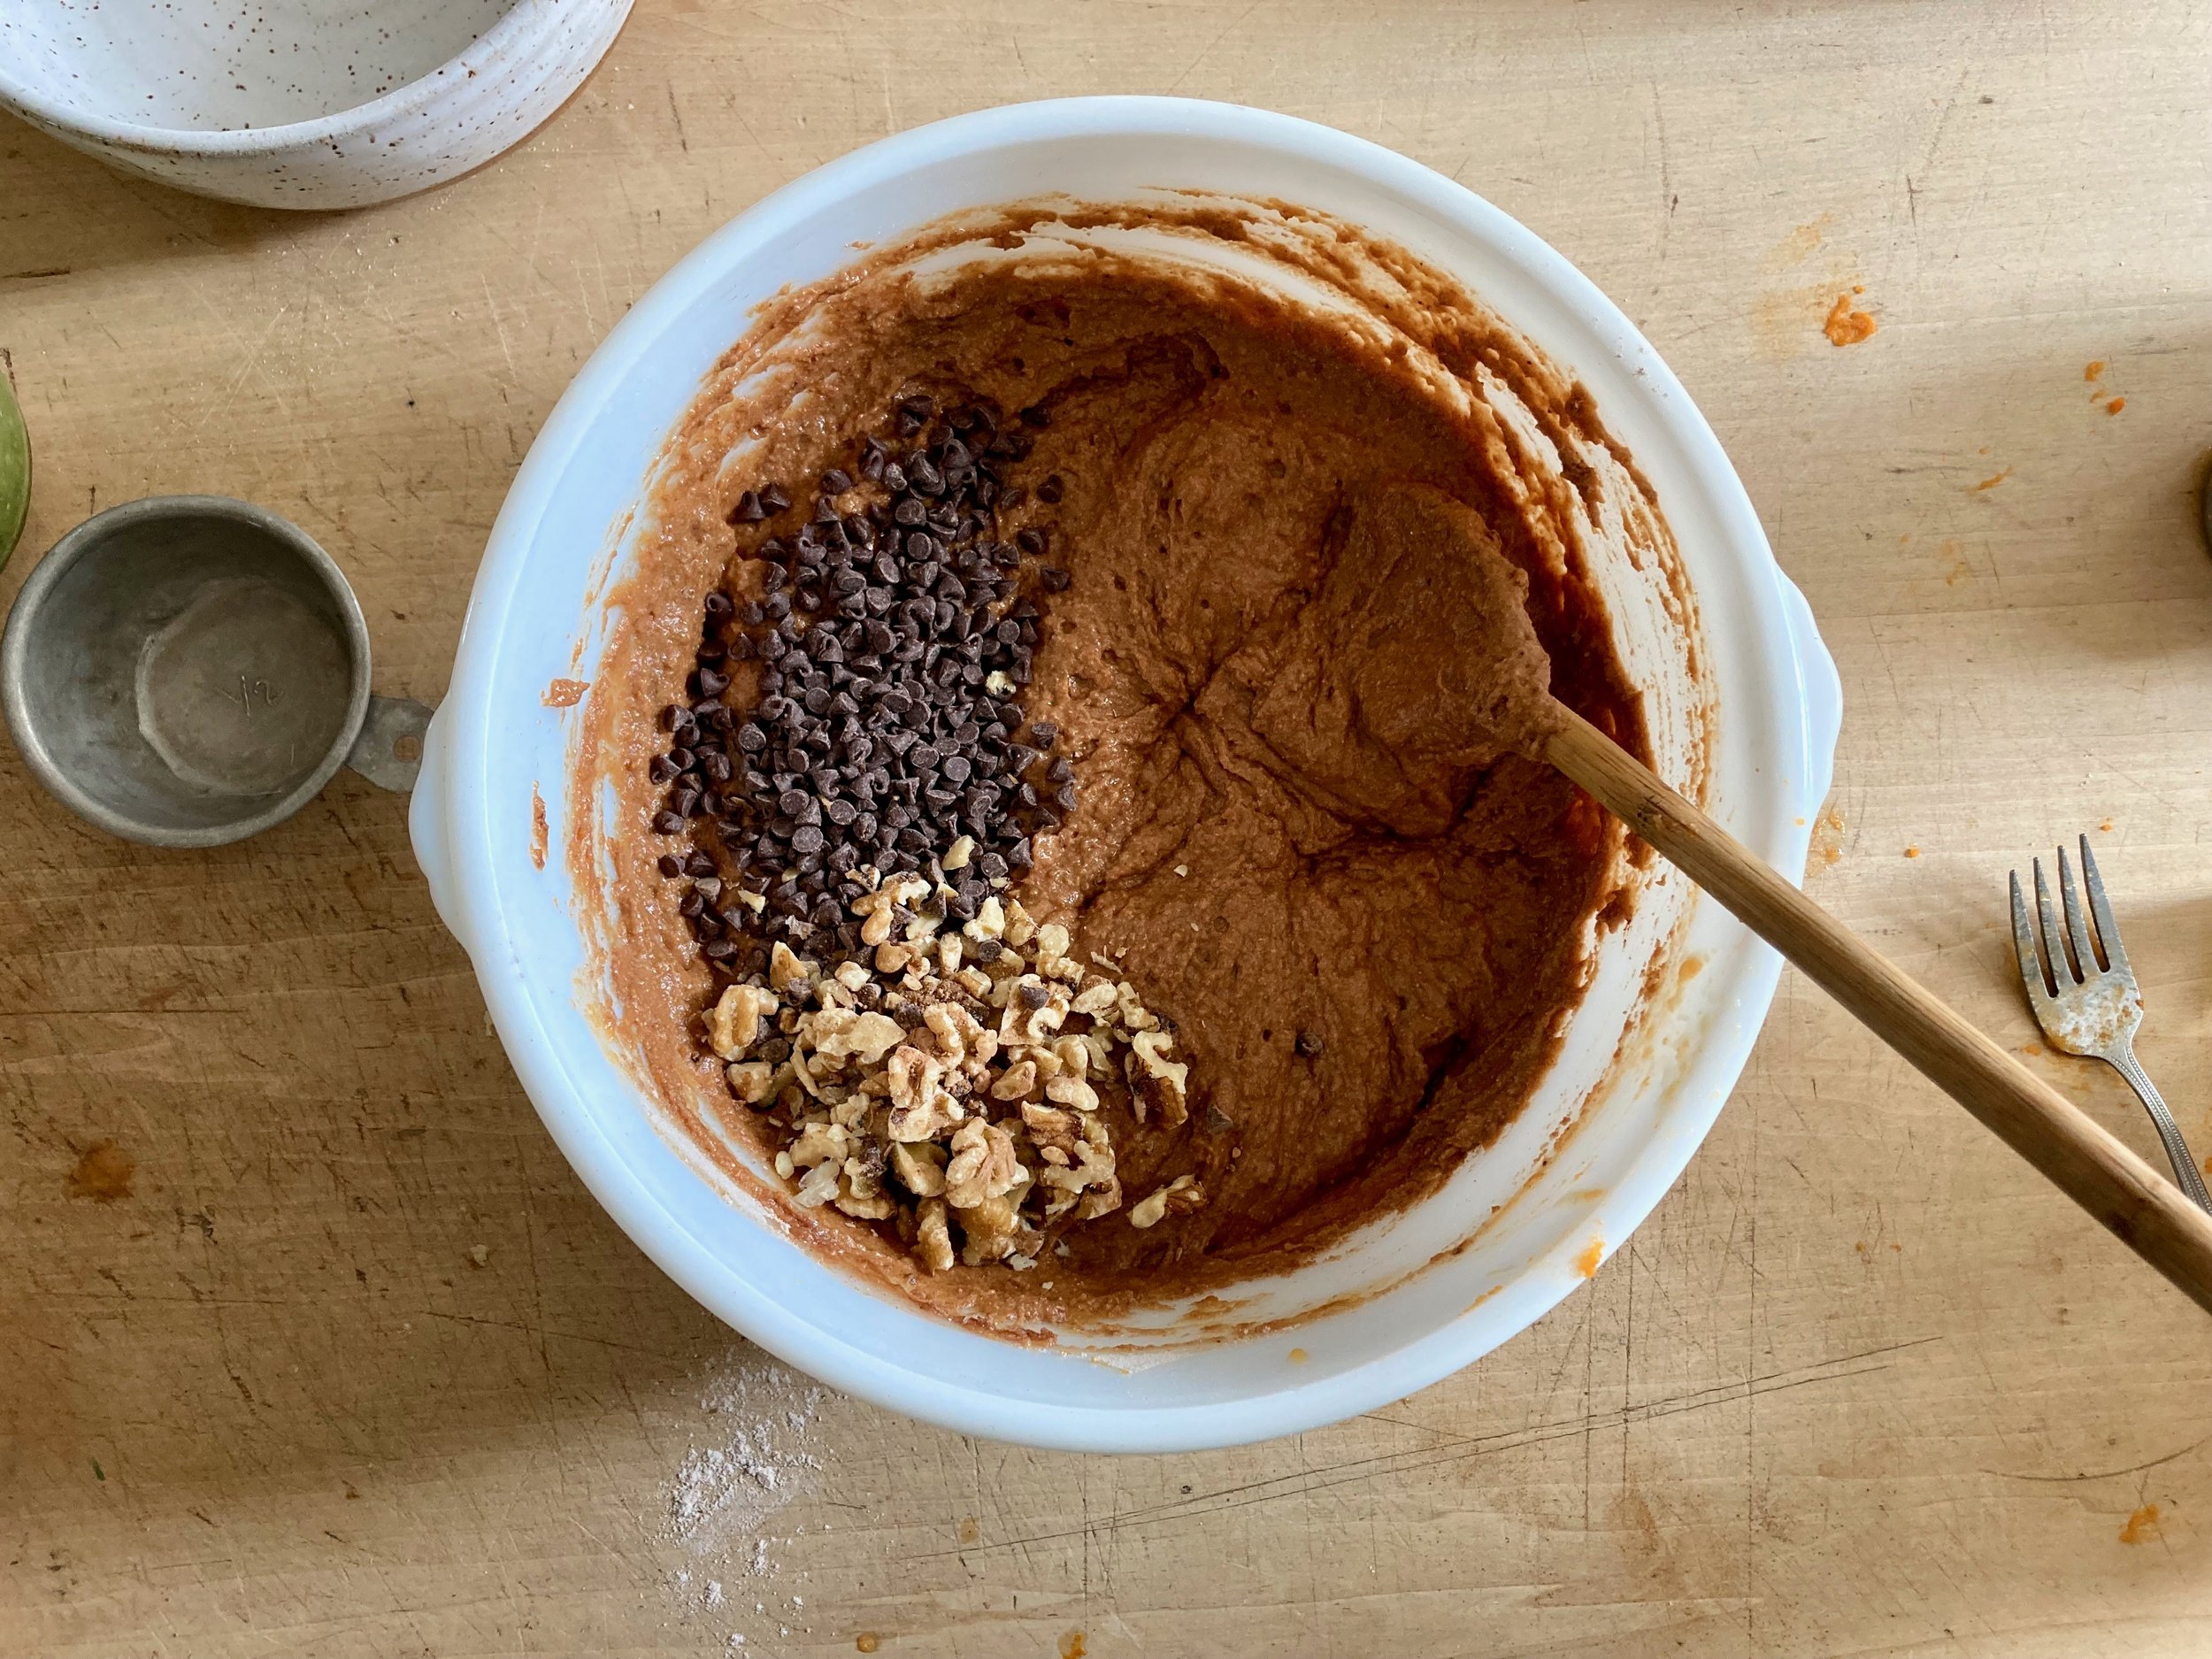
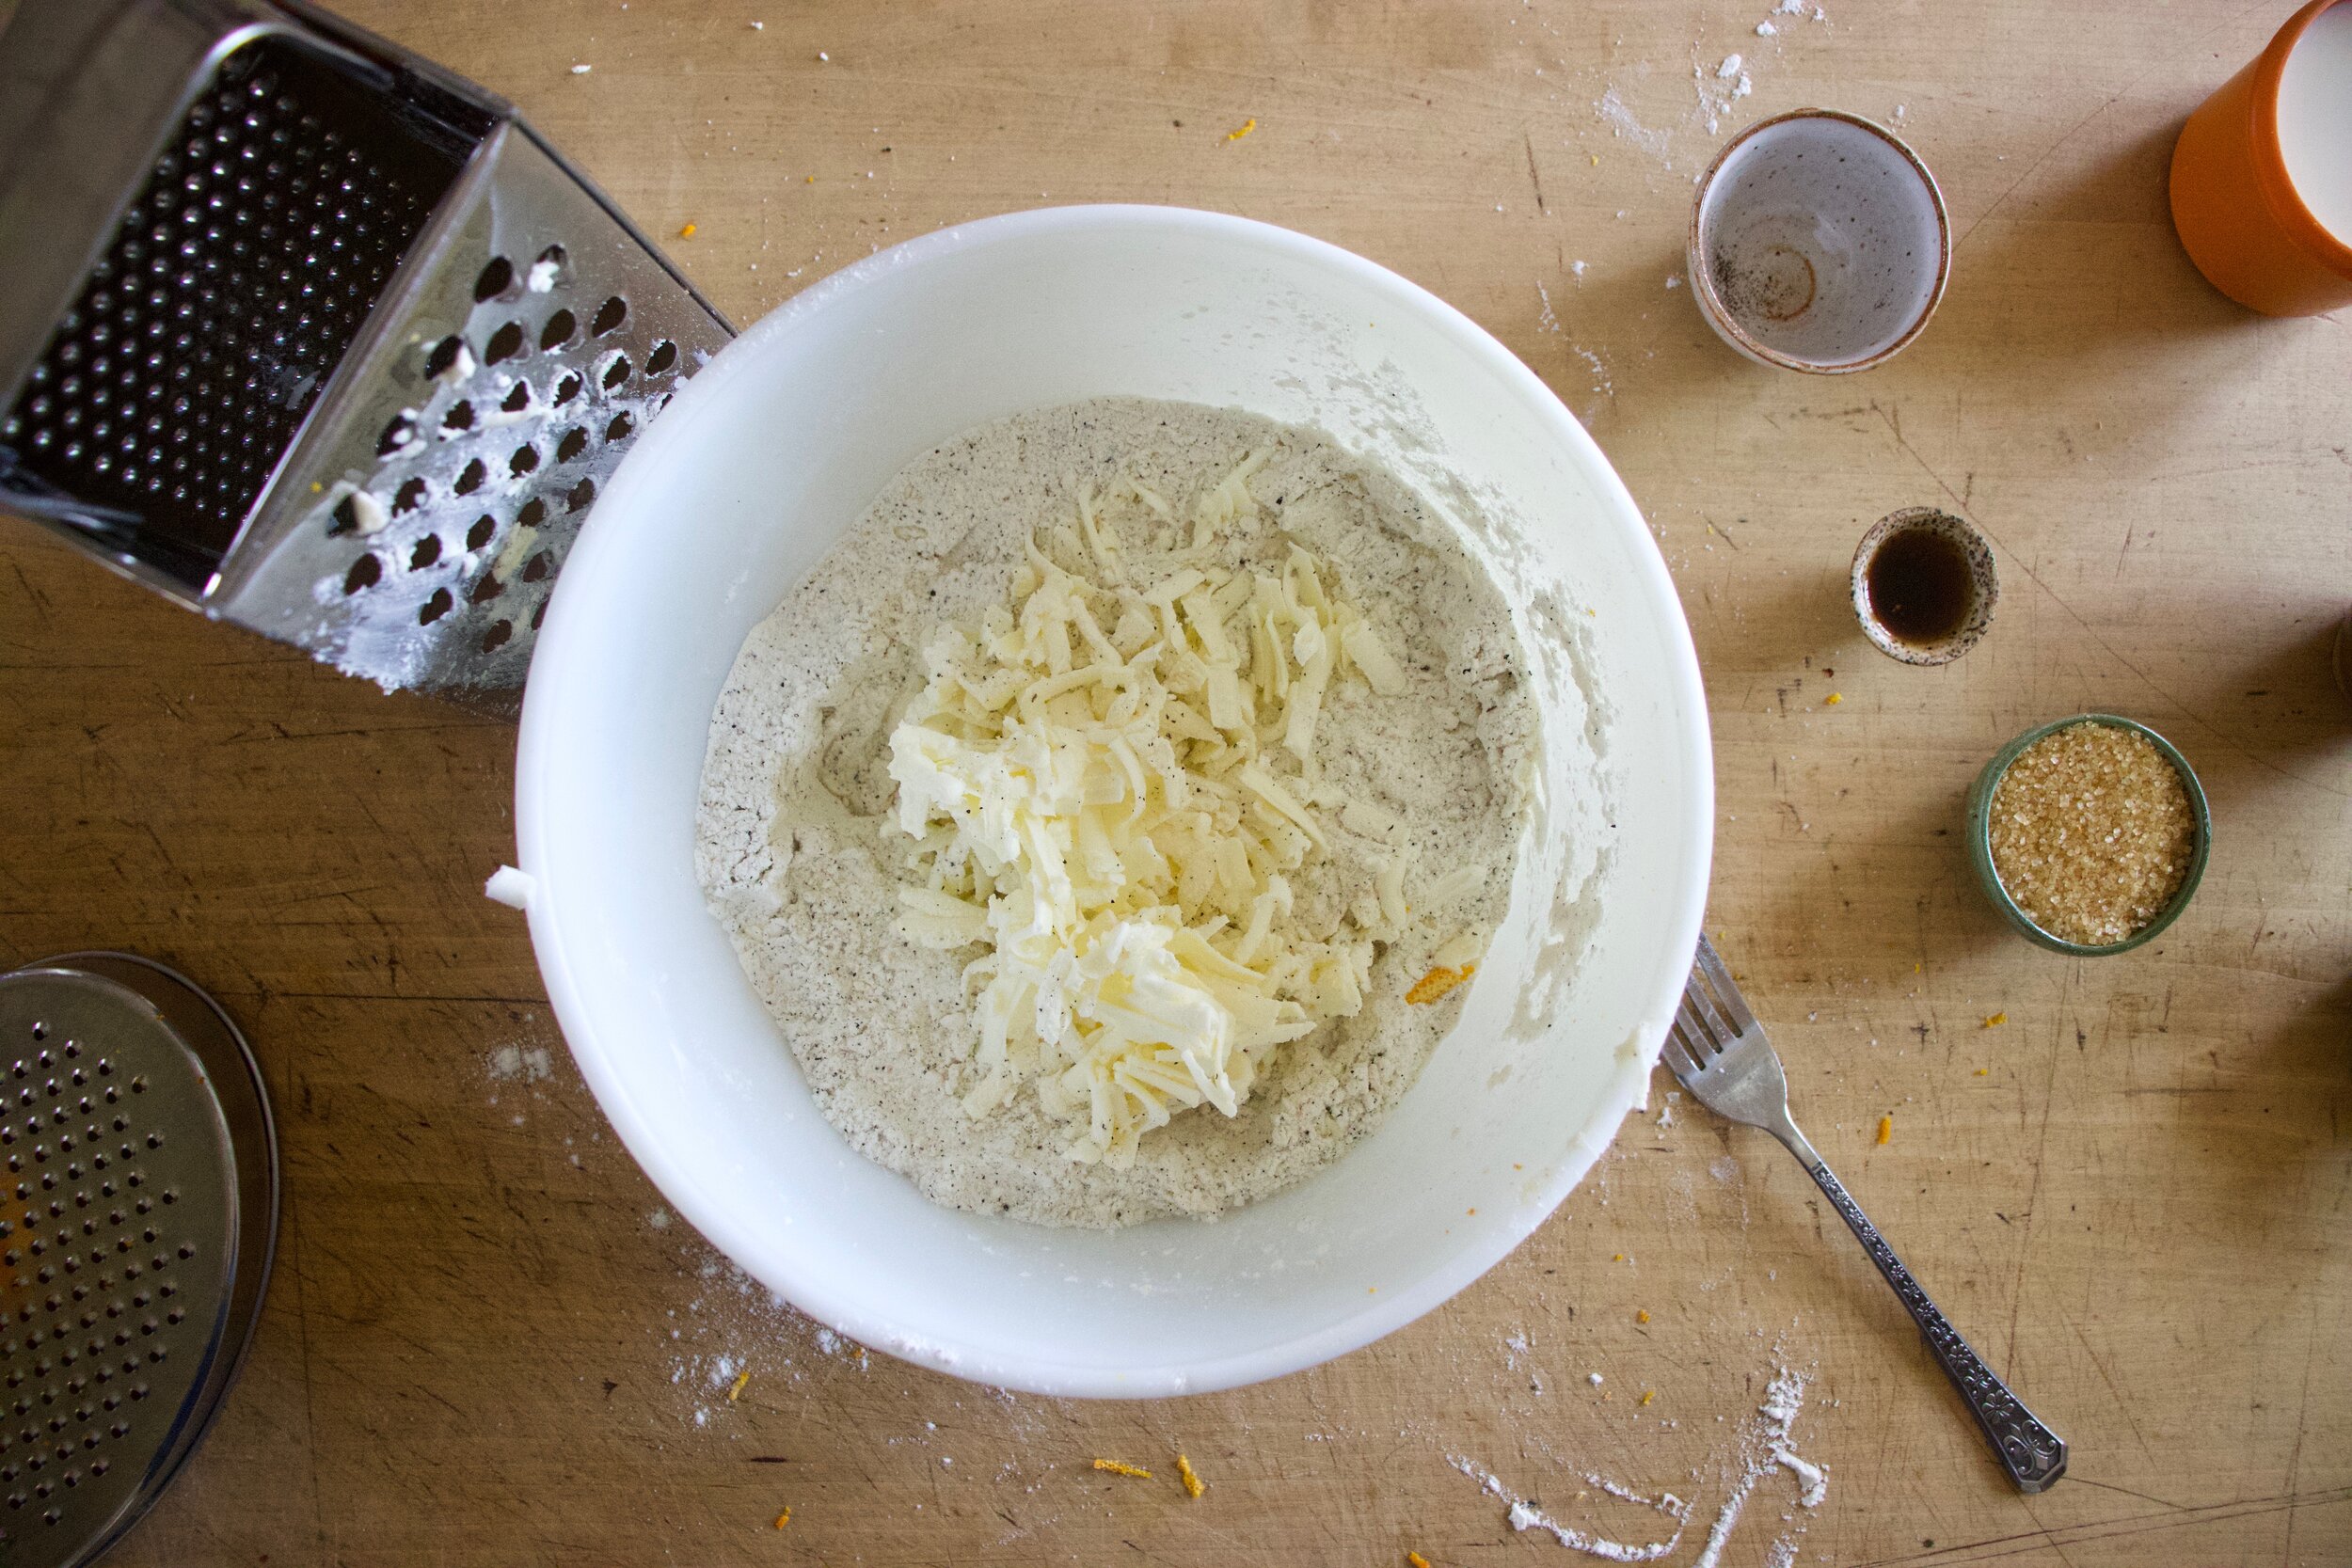
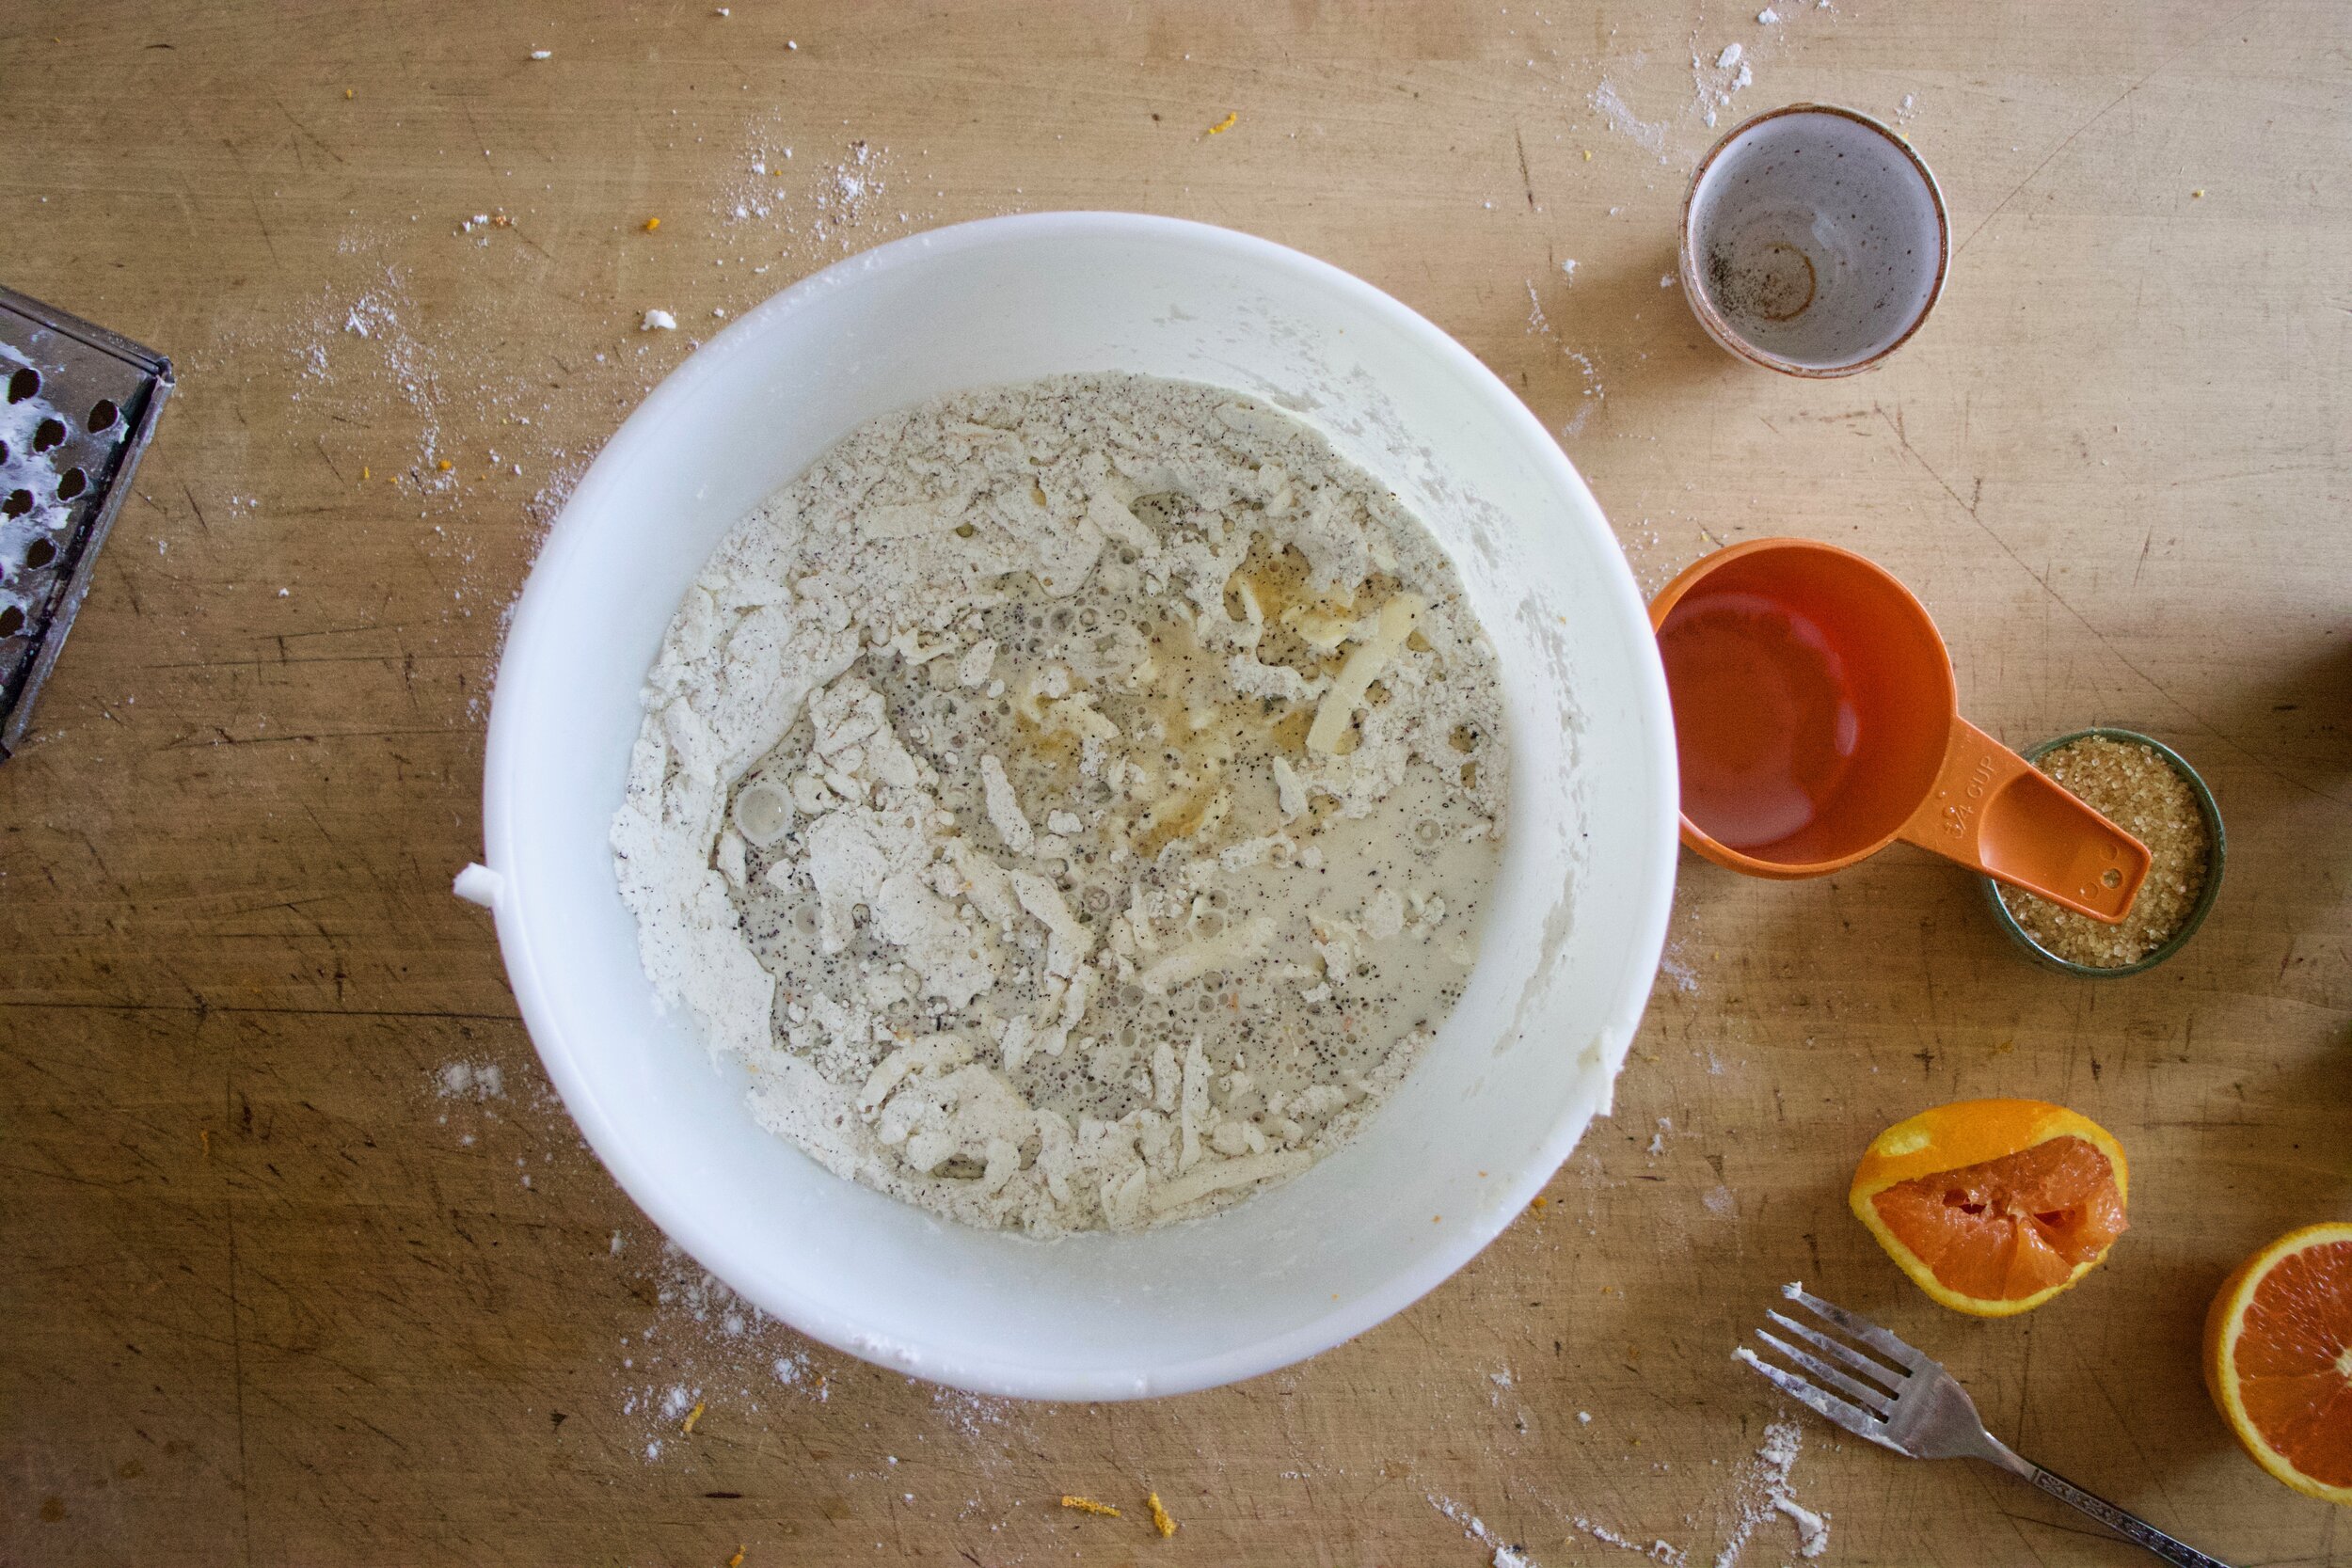
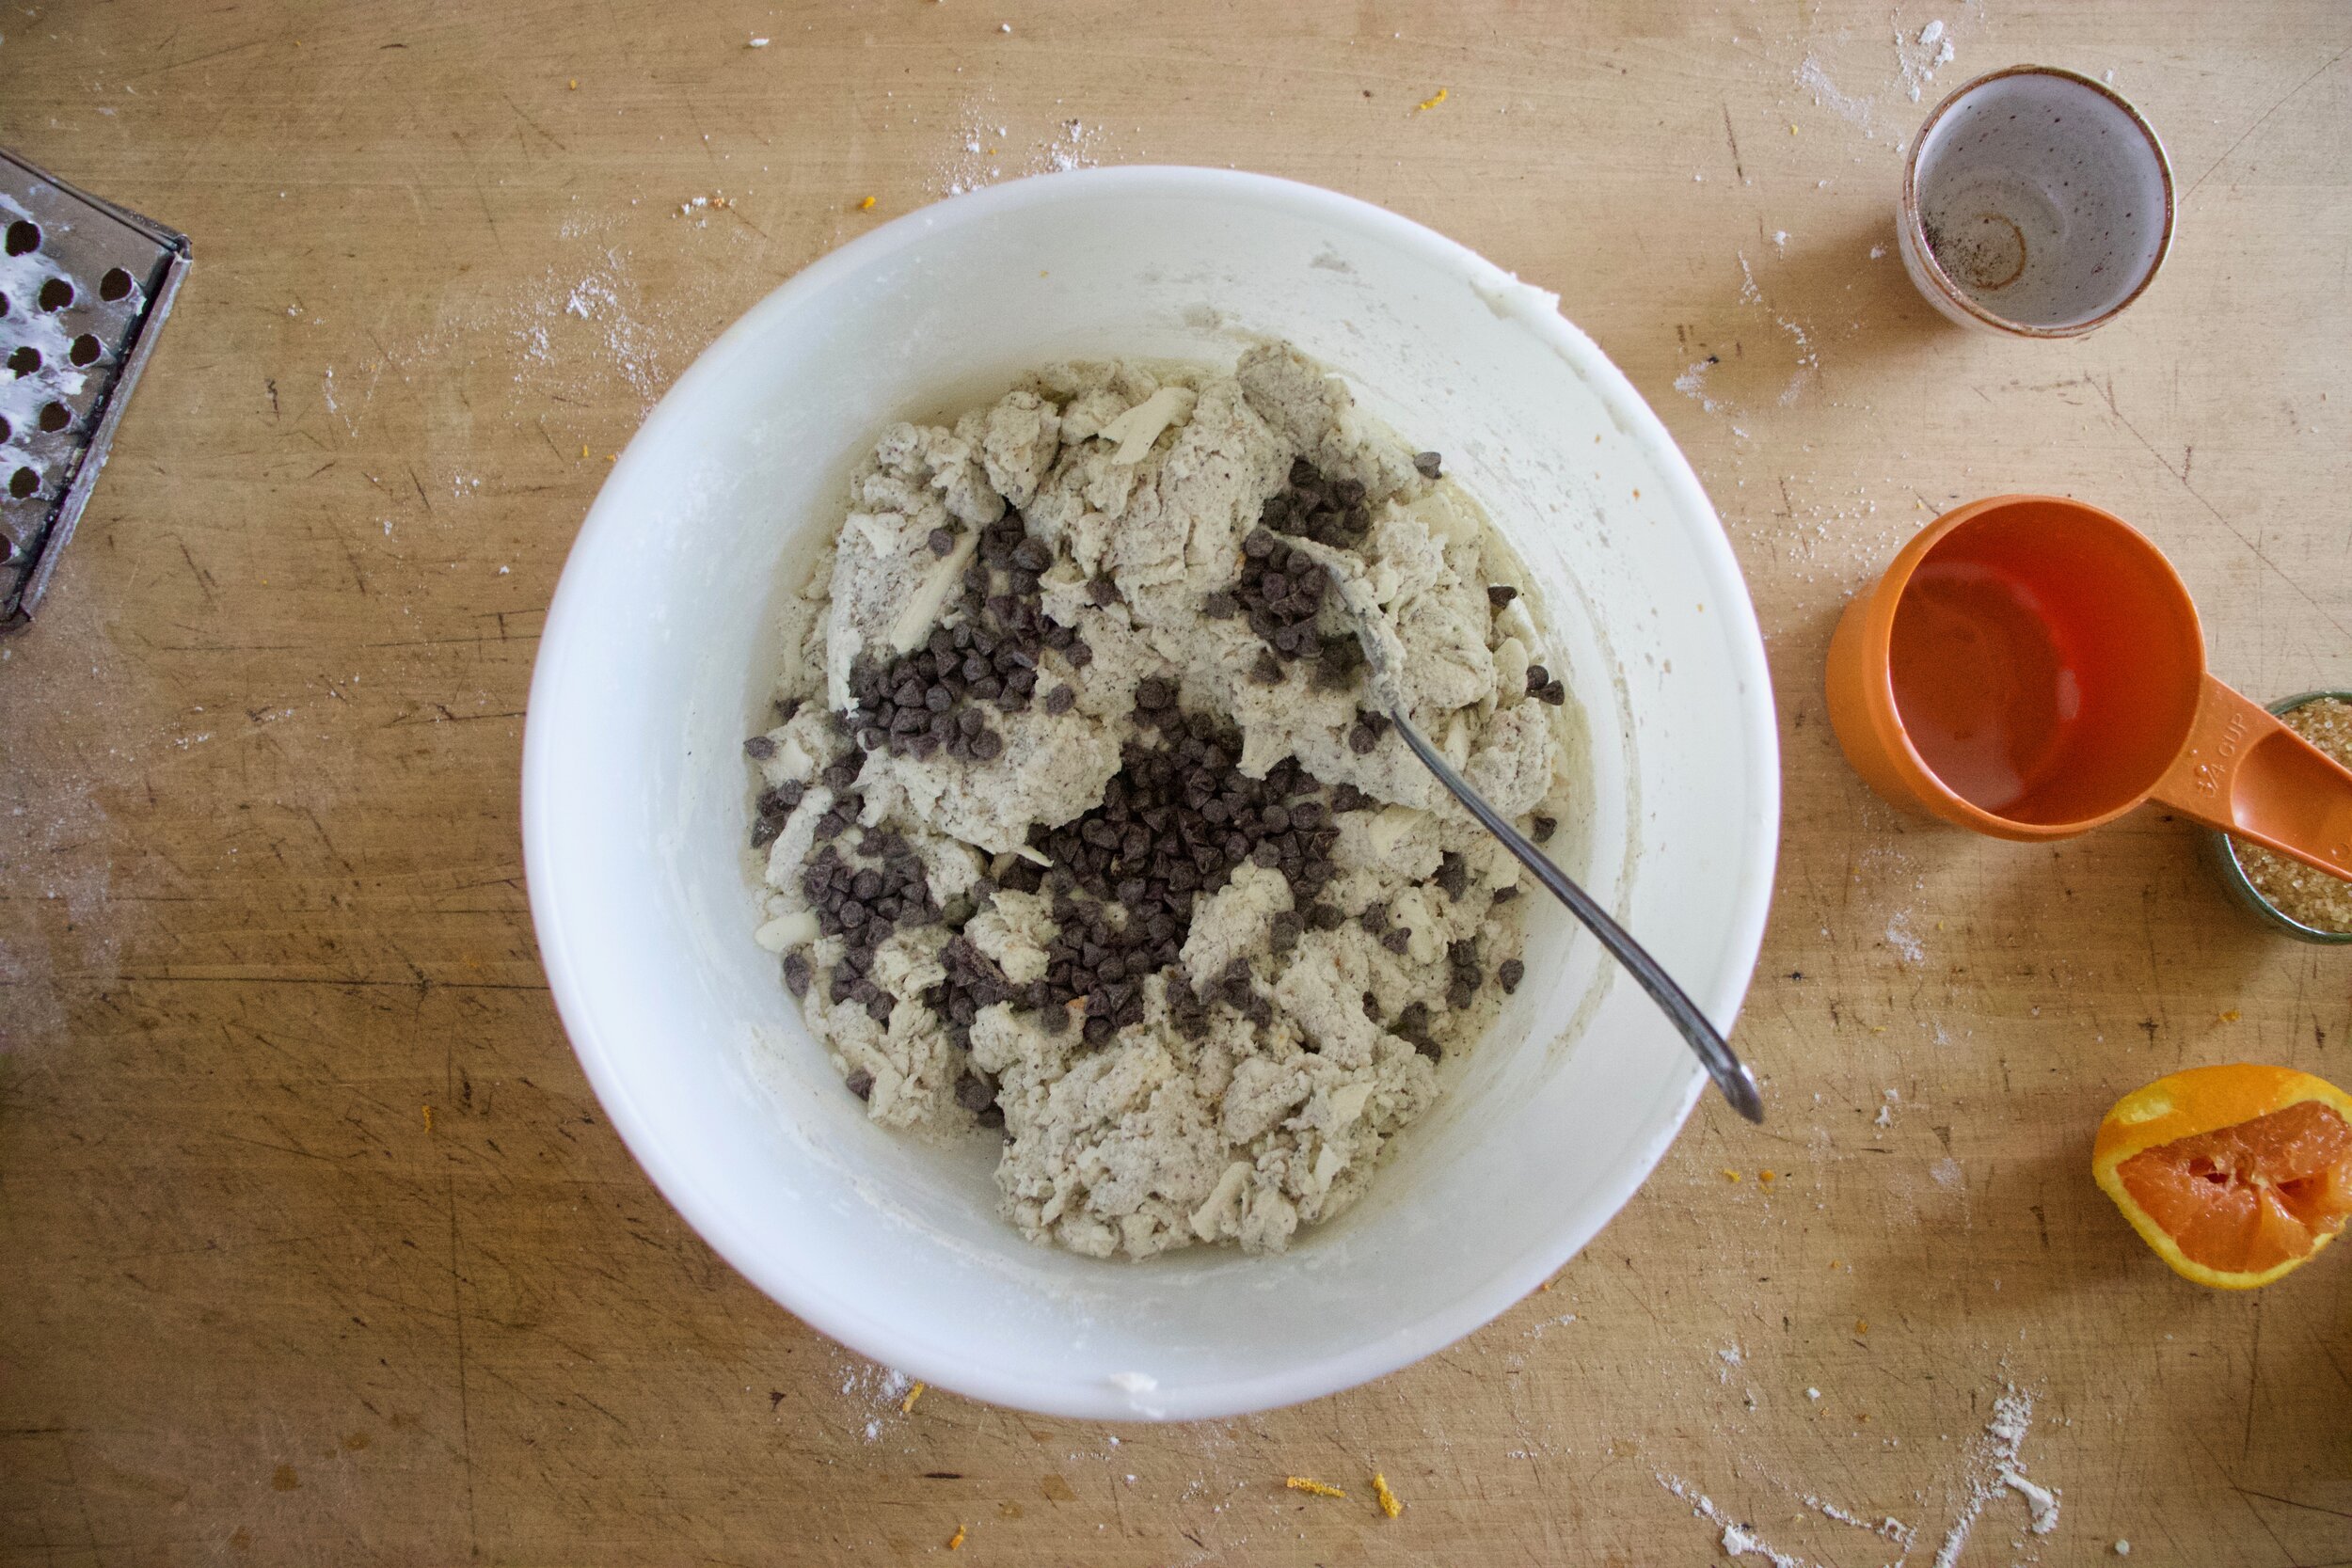
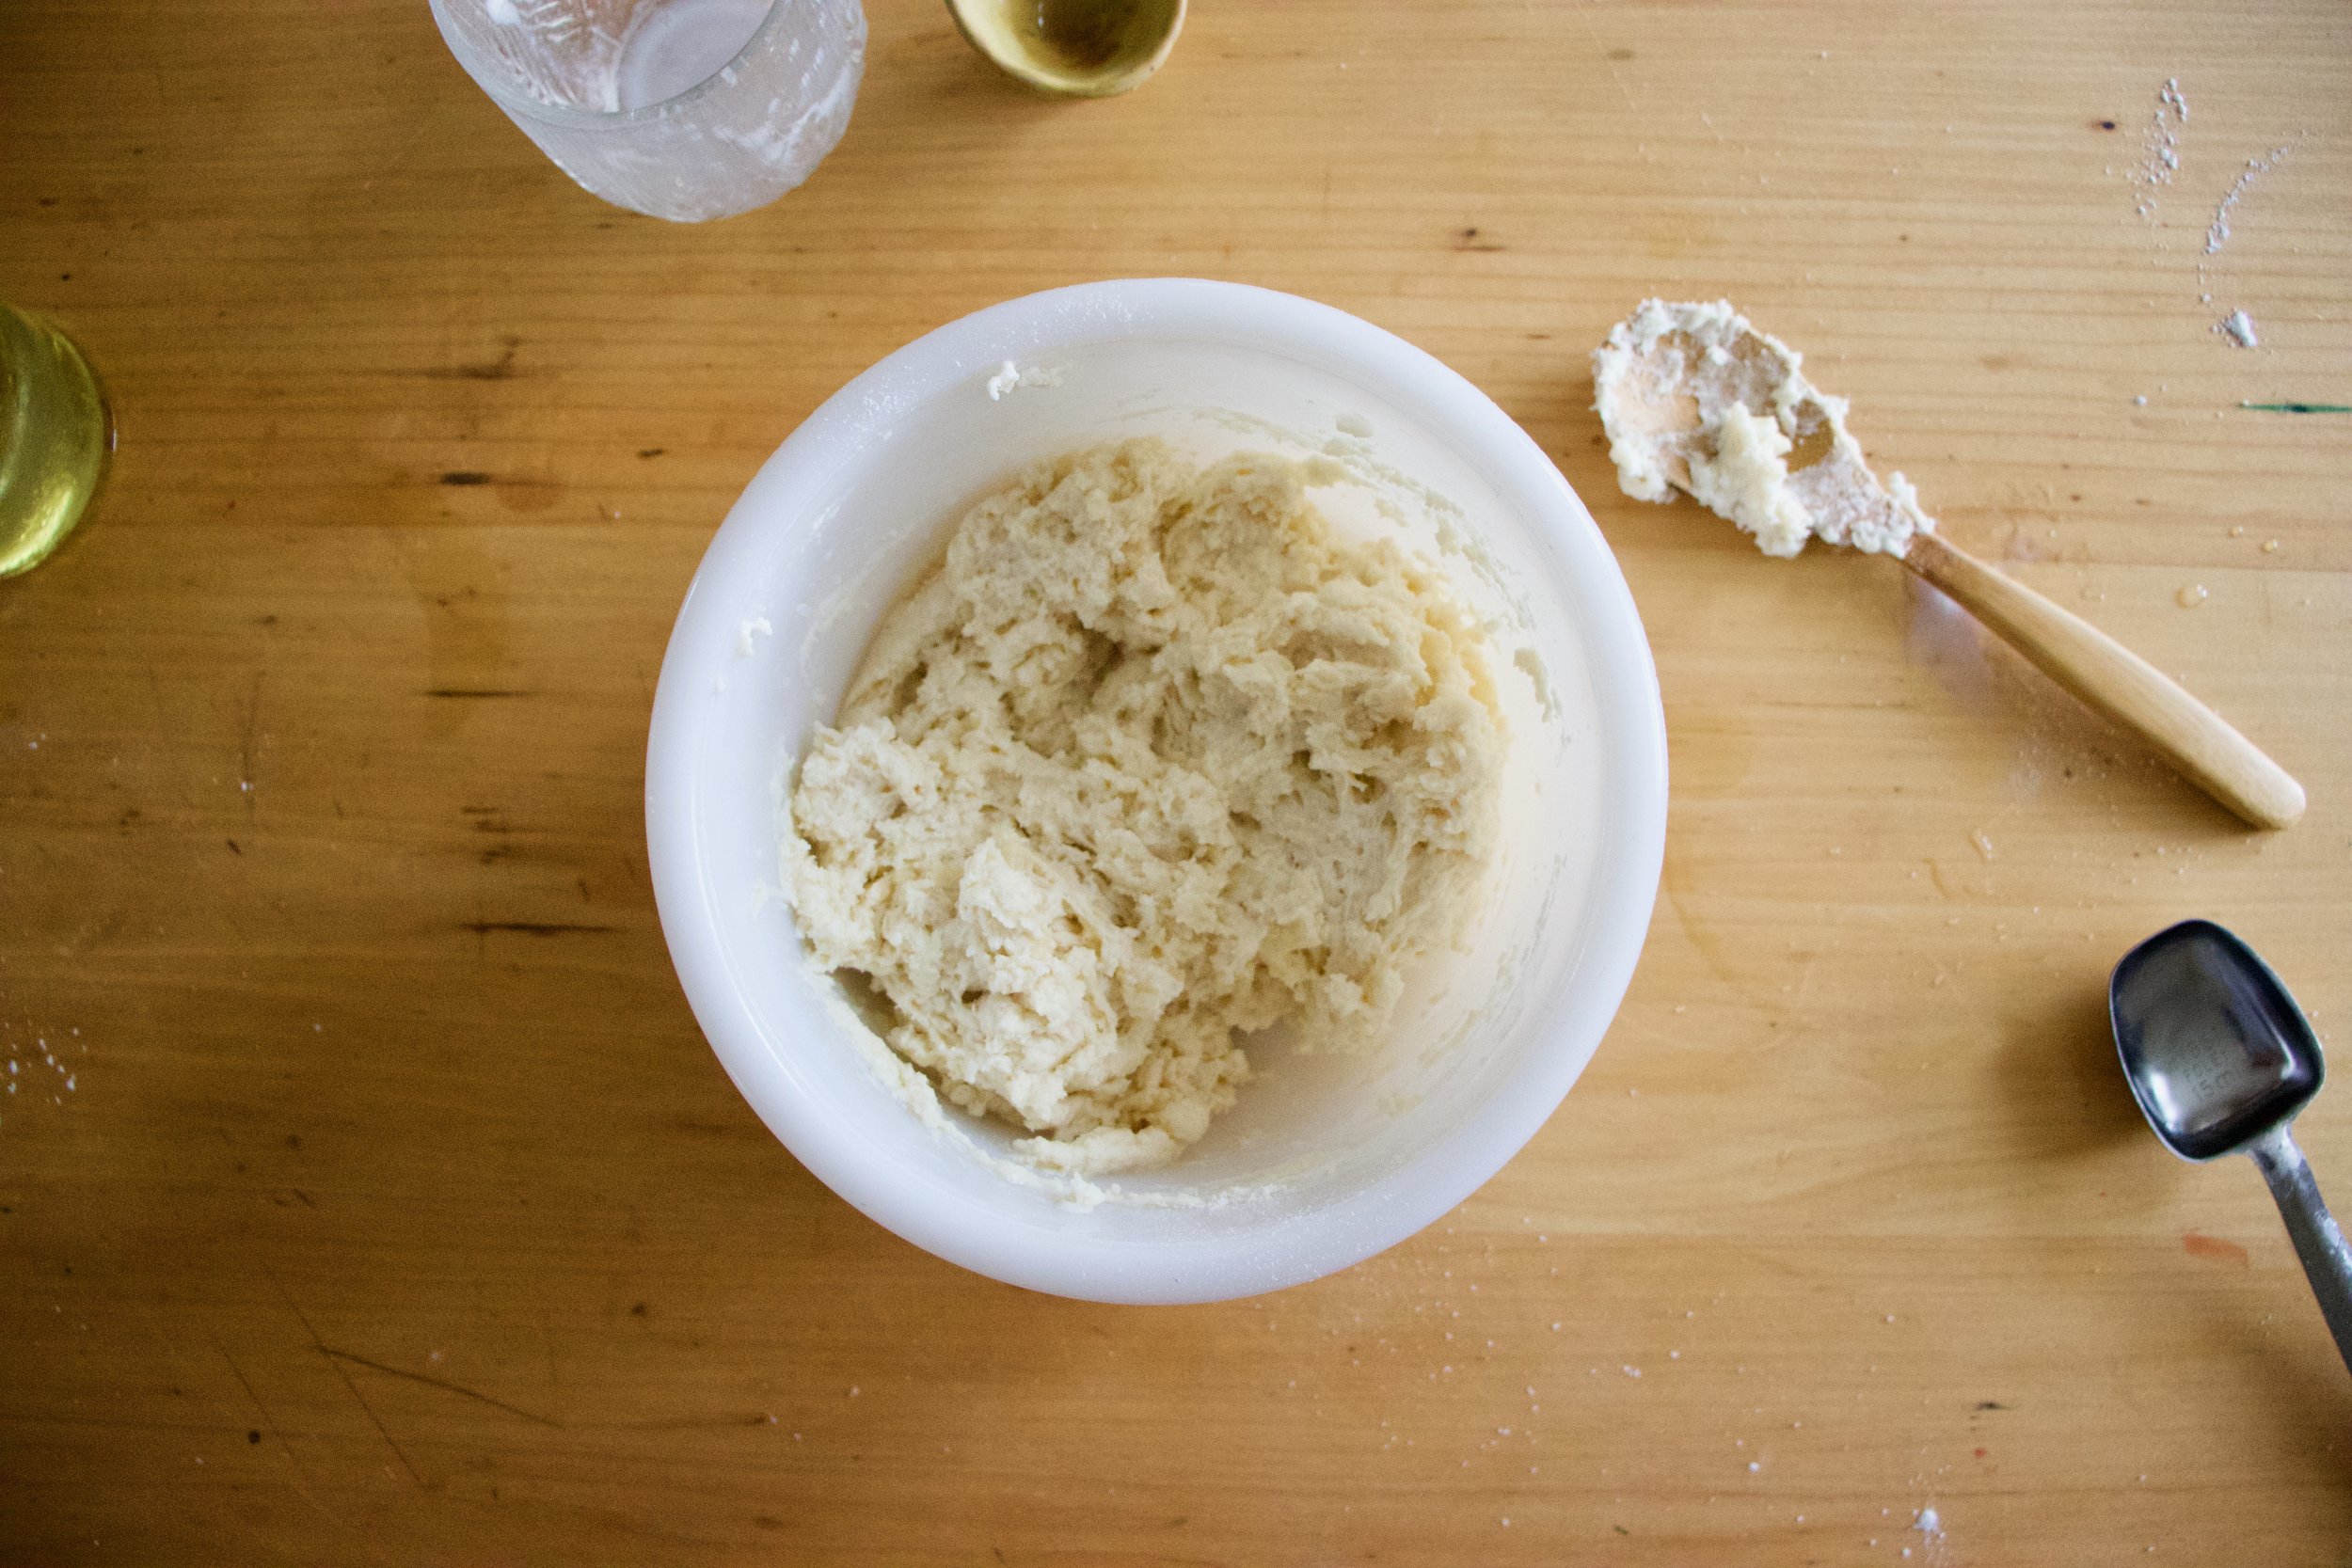
And dump the carrot puree, milk, sugars, and oil into a big bowl and mix until completely combined. Add in the dry ingredients and mix until the dry is incorporated into the wet then fold in the chopped walnuts and chocolate chips.

Scoop batter into greased or lined muffin tins and pop into preheated oven.
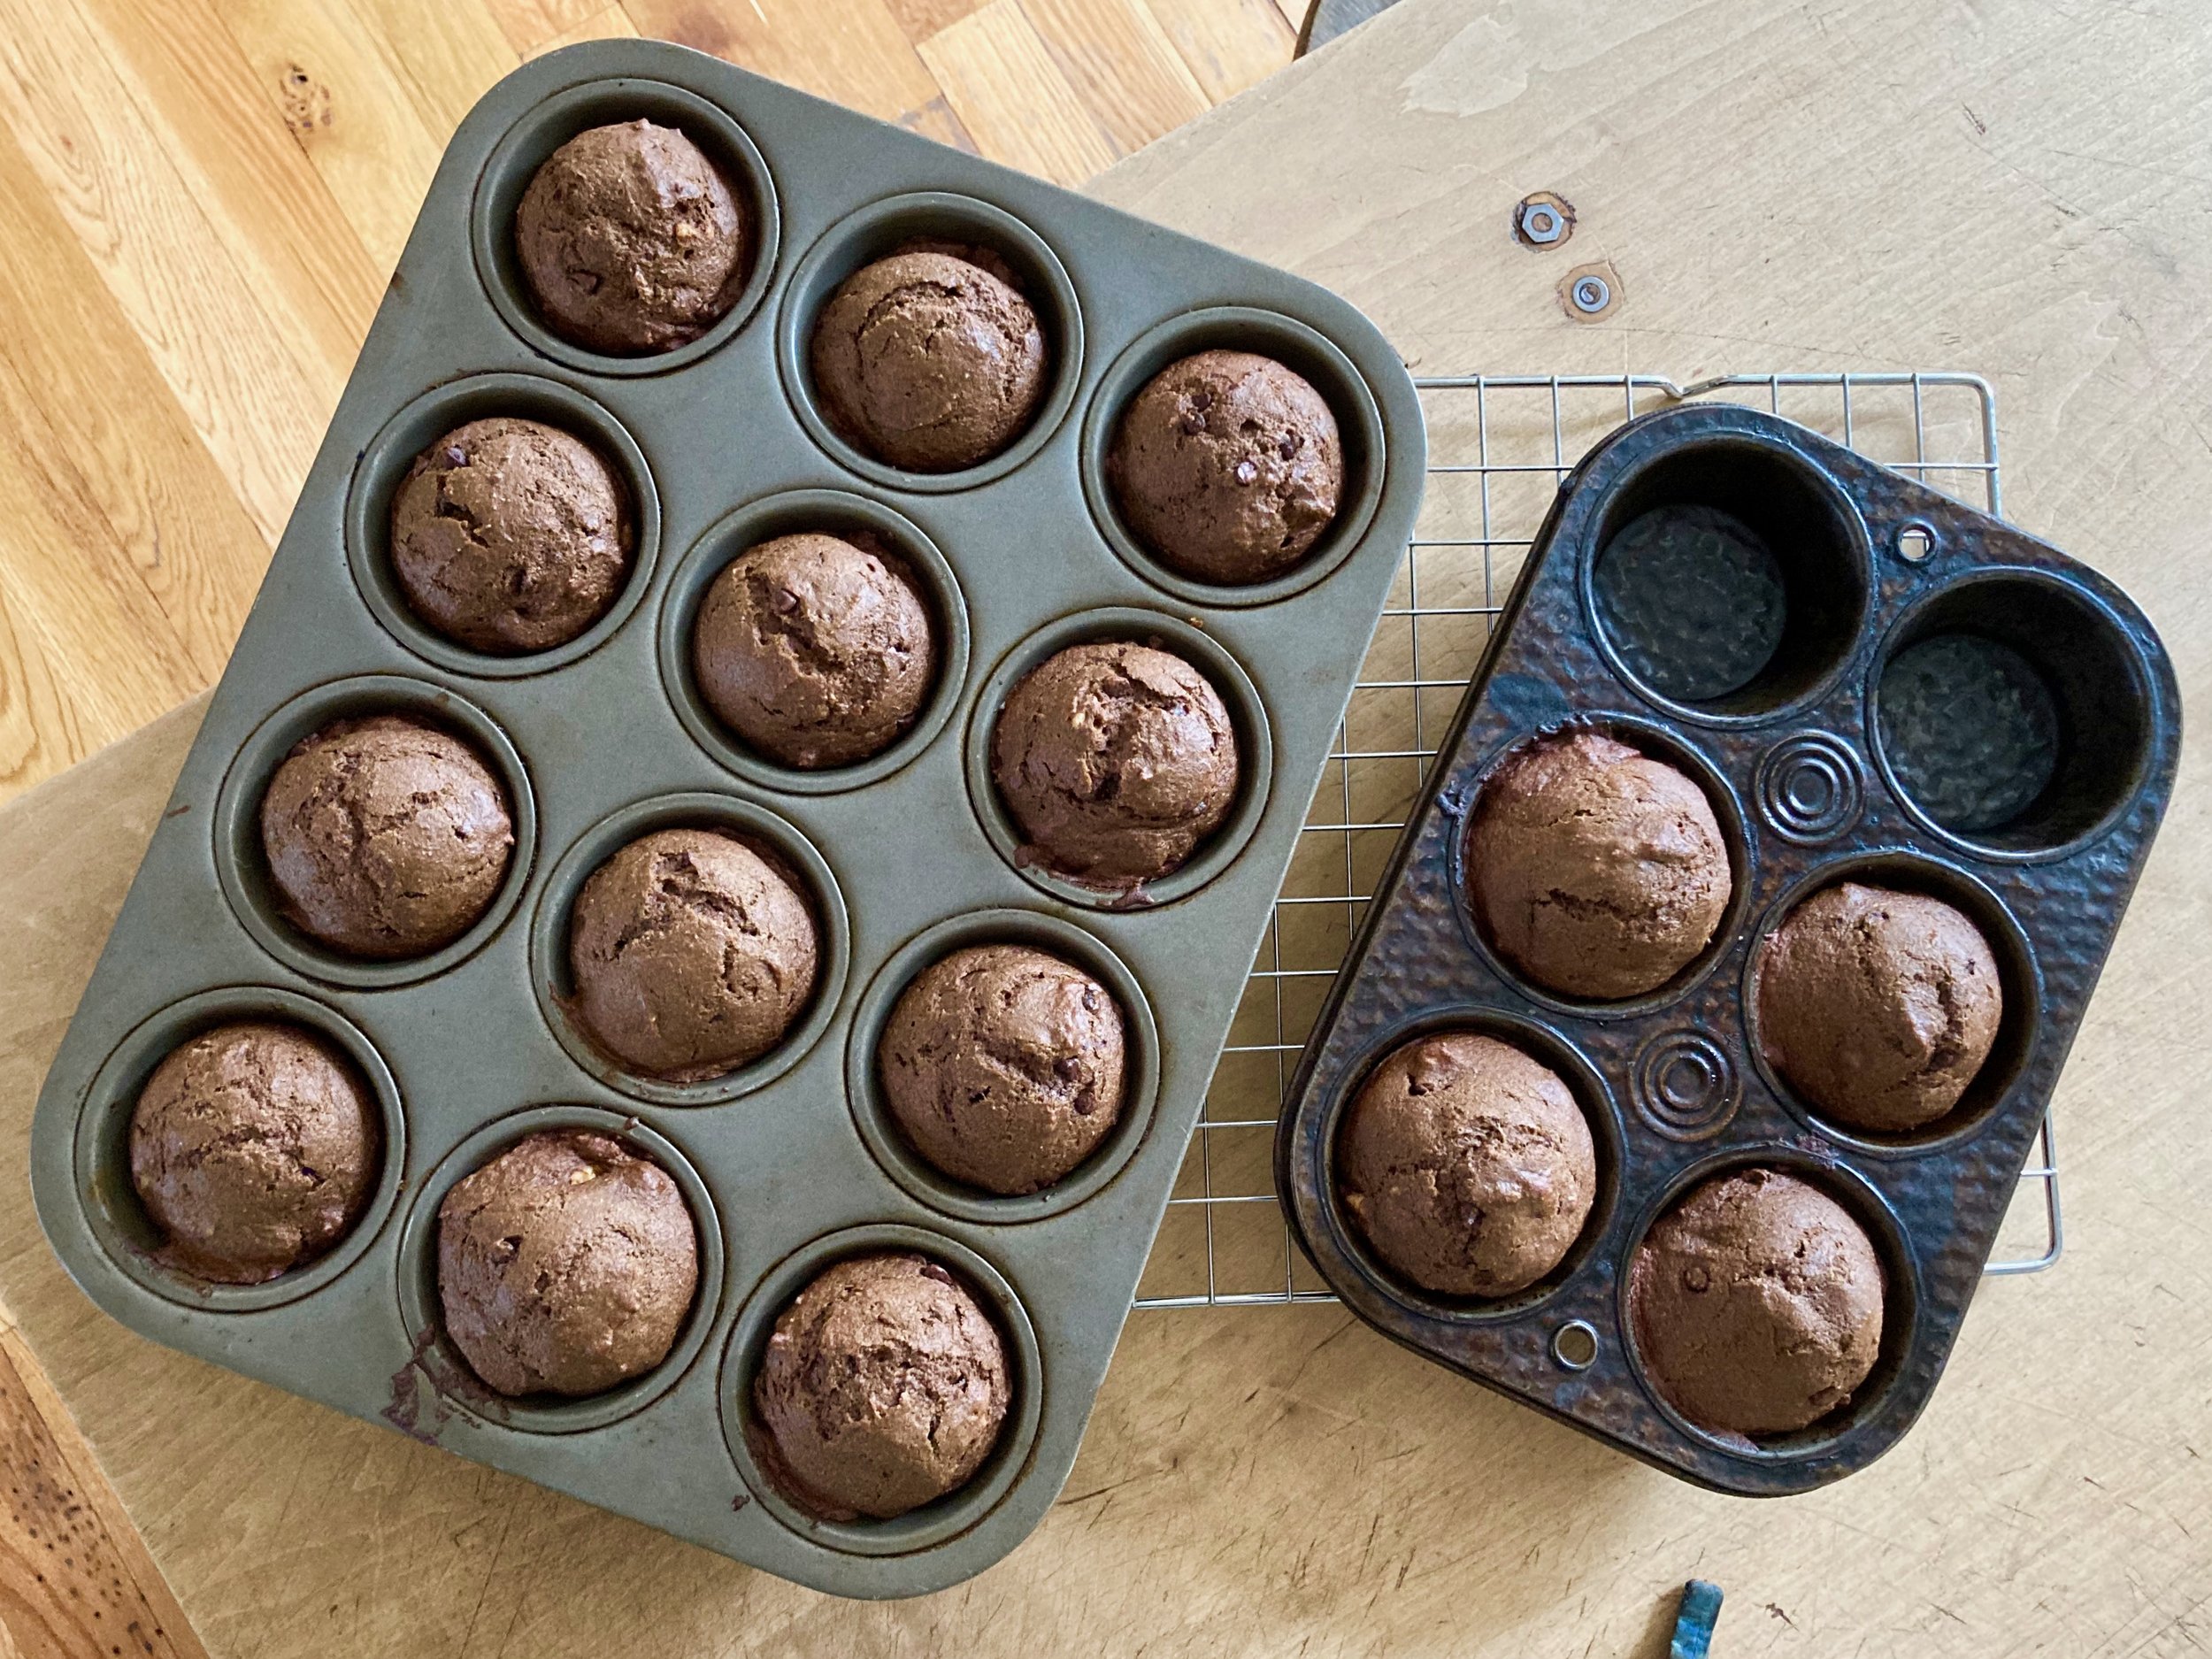
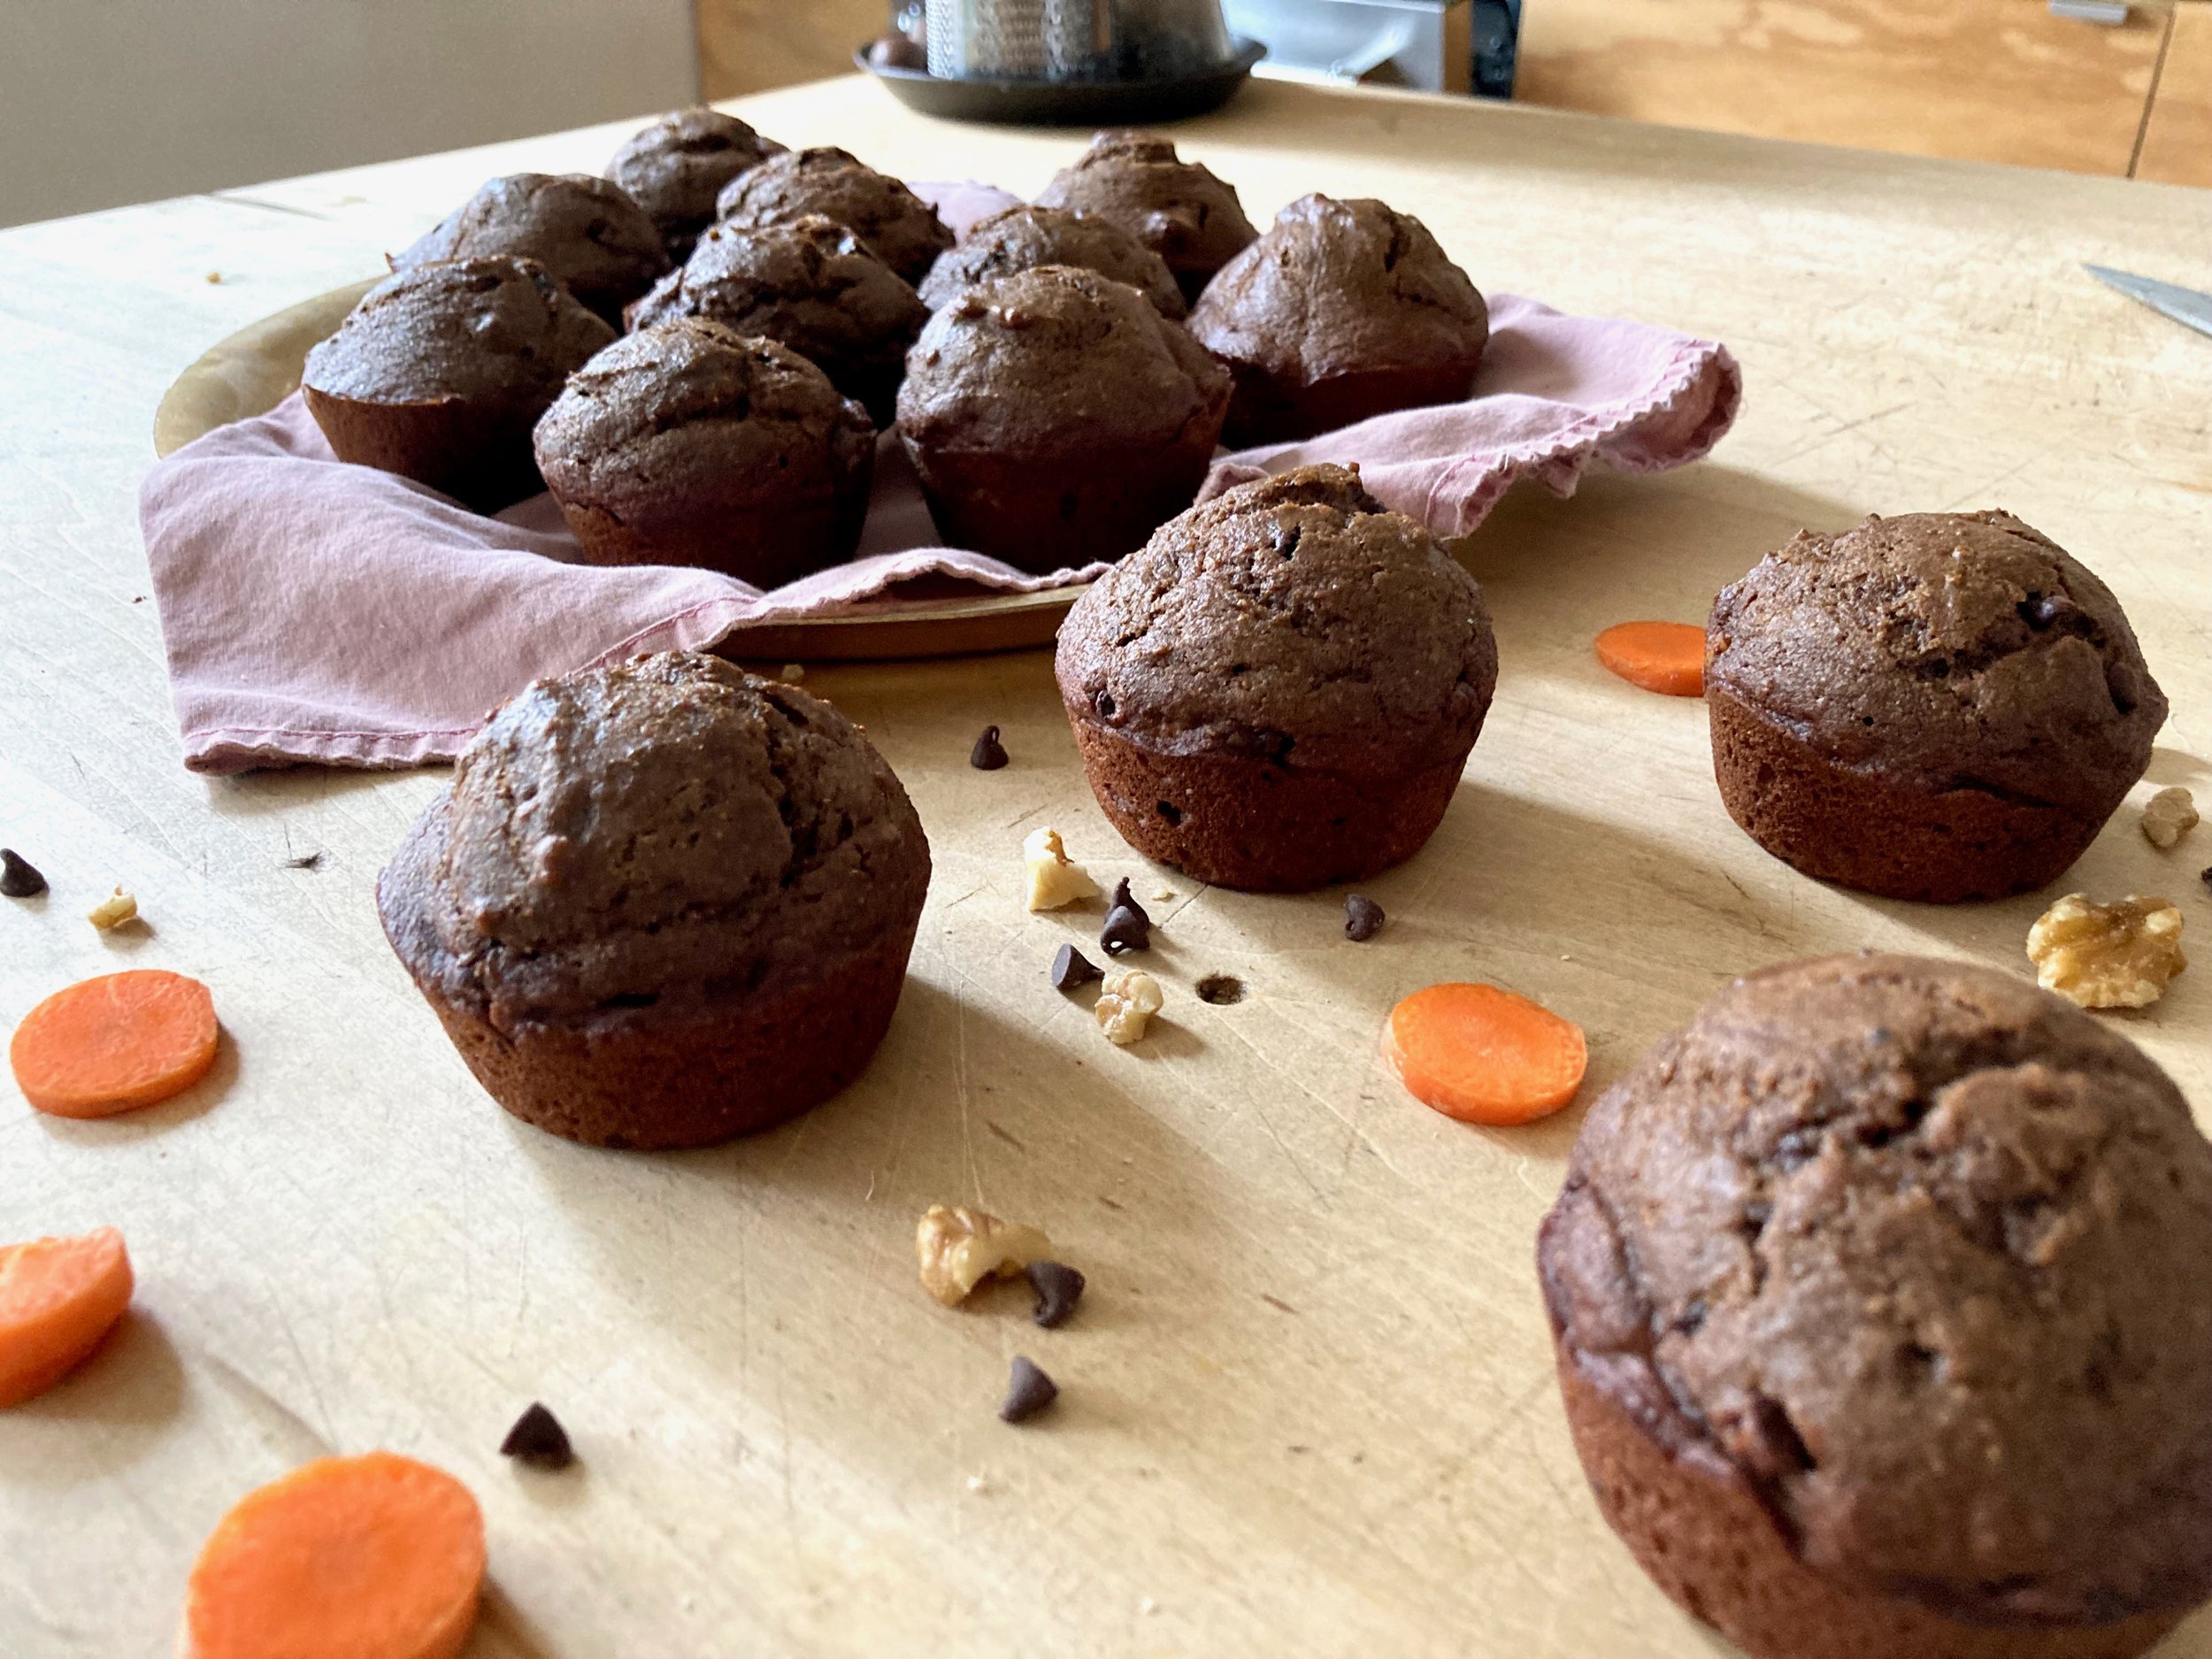
Baked muffins.

When baked and all nice pop them out if the pan and place on a wire rack to cool.

Then you got yourself muffins to eat at your pleasure. Share if you want. No pressure.

-C


Chocolate Chocolate Chip Carrot Muffins

makes 16 muffins

  • 1 1/4 all purpose flour

  • 2/3 whole wheat flour

  • 1 teaspoon baking soda

  • 1 1/2 baking powder

  • 1 teaspoon salt

  • 1/3 cup cocoa powder

  • 1/2 cup neutral oil

  • 1 cup plant milk

  • 1/2 cup white sugar

  • 1/3 cup brown sugar

  • 1 cup carrot puree (about 4 large carrots and 1/3-1/2 cup water)

  • 1 teaspoon cinnamon

  • 1/3 cup mini chocolate chips

  • 1/2 cup chopped walnuts (optional)

preheat oven 350

Take whole carrots and cut into small chunks. Place into a pot with enough water to just cover them and place on medium heat and cover. Cook for about 8 minutes, checking after 4 or 5 minutes, unitl tender. If water completely evaporates before, just add more.

Once carrots are tender, place in a blender with about 1/3 cup cool water and blend until smooth. Add a little more water if needed to get the carrots to a smooth puree.

In a medium bowl mix together the flours, baking powder and soda, salt, cinnamon, and cocoa powder. In a large bowl mix together the oil, carrot puree, milk, and sugars until completely combined. Add in the dry and minx until everything is just incorporated (don’t over mix), then fold in the chocolate chips and chopped walnuts.

Scoop batter into well greased or line muffins pans, filling each well up about 3/4 of the way, then pop the pans into preheated oven. Bake for about 17 -20 minutes or until a poke test comes out clean.

Once baked remove from oven and pop muffins from pan. Place on a wire rack to cool.

Eat. Store muffins in a airtight container at room temapture for up to 5 days. They also freeze great as well.

In Vegetables, Vegan, sweet breads and muffins, chocolate Tags Chocolate Chocolate Chip Carrot Muffins, vegan, plant based, dairy free, egg free, whole wheat, dessert, breakfast, carrot, chocolate, easter, brunch, food
Comment

Earl Grey Chocolate Chip Scones

May 8, 2021 Colleen Stem
IMG_5156.jpg
IMG_5163.jpg
IMG_5196.jpg

Just about every Mother’s Day I make my mom blueberry scones. And if I don’t she is up my butt about it so yeah I just do it. She is my mom after all. Anyways, I forgot blueberries the last time I went to the grocery store. Sooooo yeah. These are different scones. Earl grey chocolate chip scones.

I figured earl grey is a delicious tea so it would make for a delicious scone and chocolate chips because everyone liked them their chocolate. Is my mom going to like these? Probably not because I don’t think she likes tea but that is actually a moot point because this batch was already gobbled up by the mr and Barb. They loved them. But hey, I made scones so that counts t towards Mother’s Day right? (I know I know. I have to go back to the grocery store for the blueberries)

If you or the people you bake for like a good cup of earl grey, well these here sones are for you.

To the scones!

IMG_5009.jpg

The stuff. Flour, baking powder, salt, sugar, earl grey tea, plant butter, plant milk, vanilla extract, and orange, a little raw sugar, and chocolate chips.

IMG_5019.jpg
IMG_5025.jpg
IMG_5038.jpg
IMG_5042.jpg

To start dough first mix the flour together with the salt, baking powder, sugar, tea, and orange zest. Next grate the butter into the flour mixture and gently toss around until evenly incorporated. Then add in the milk and the juice if half the orange and gently mix until dough starts to come together and then finally, add in the chocolate chips and finish mixing. Don’t overly mix, the dough should look kind of shaggy.

IMG_5049.jpg

Dump dough onto a lightly floured surface and gather into a ball.

IMG_5054.jpg

Squash dough into a round flat disk about an inch thick then cut into 8 equal pieces.

IMG_5063.jpg

Place scones on a lined baking sheet. Brush the tops with a little milk and then sprinkle with raw sugar.

Pop into the oven bake.

IMG_5070.jpg

Baked and ready.. You should be too. Ready that is and baked if that is how you roll. Ha.

IMG_5101.jpg

Place hot scones on a wire rack to cool a bit.

IMG_5181.jpg

Now grab a plate, a hot cup of something, and enjoy.

-C


Earl Grey Chocolate Chip Scones

makes 8 scones

  • 2 cups all purpose flour

  • 1/4 cup granulated sugar

  • 1 tablespoon baking powder

  • 1/2 teaspoon salt

  • 3 earl grey tea bags (or 2 tablespoons loose leaf) finely ground in a spice mill of food processor

  • 6 tablespoons vegan butter (very cold or frozen)

  • 2/3 cup plant based milk

  • 1 teaspoon vanilla extract

  • an orange

  • 1/4 cup small chocolate chips

  • 2 tablespoons raw sugar (can use graduated if you don’t have it)

Preheat oven to 375.

Grab a large bowl and add in the flour, baking powder, salt, granulated sugar, earl grey tea, and the zest of the orange. Mix together. Next grate the cold or frozen butter directly into bowl. Gently mix into the flour mixture with a fork until the pieces are covered in flour. Add in the milk, along with juice of half the orange. Mix until a shaggy dough forms. Add in chocolate chips and lightly mix again until they are evenly dispersed in dough.

Dump dough (it will be slightly shaggy) on a lightly floured surface. Gather into a ball and squash into a round flat disk about an inch thick. With knife or dough knife cut in 8 even slices (like a pie). Place each piece on a lined baking sheet and brush tops with a little milk and sprinkle with raw sugar.

Place into preheated oven and bake for 20-25 minutes or unit bottoms are browned and tops are alight golden brown. One baked, remove from oven and transfer to a wire rake to cool.

Eat warm or room temperature. Store left overs completely cooled in an air tight container for a few days.

In Vegan, sweet breads and muffins, breakfast, brunch Tags Earl Grey Chocolate Chip Scones, tea, scones, vegan, mother's day, brunch, chocolate chips, dairy free, plant based, egg free, dessert, sweet, breakfast
Comment

Savory Carrot Dill Waffle Iron Fritters with Creamy Maple Mustard

April 3, 2021 Colleen Stem
IMG_4573.jpg
IMG_4551.jpg
IMG_4523.jpg

The other day I went to grab the cookie cutters out of the pantry and had to move the waffle iron out of the way. That is basically the only reason I used the waffle iron. And just like every single time I grab it out to use, I wonder to my self why the hell I don’t use it more. Maybe it’s time to move the waffle iron to a bette spot in the pantry.

So anyway these carrot waffled fritters. Theyare so so so freaking good! I could barely stop eating them before I got a chance to take a couple pictures. So simple, yet so satisfying. Carrot and dill are such a great combo and when made into a crispy fritter situation with chickpea flour and dipped into with the maple mustard. WOW! I was going to make most of this batch for the mr for dinner but I ended up eating more then half (so I ended up making him a waffled sandwich too).

I think these carrot dill waffle fritters might just be the reason the waffle iron gets a new spot in the pantry. Heck I might even leave it out for while because I am definitely making another batch (or 3 of these before I put it away)

Now to the carrots waffle fritters!

IMG_4467.jpg

The stuff. Carrots, a small onion, dried dill and garlic powder, chickpea flour, water, salt and pepper, maple syrup, brown mustard, vegan yogurt, and a little oil.

IMG_4476.jpg

Maple, mustard, and vegan yogurt get mixed together and that is that. Set aside.

IMG_4490.jpg
IMG_4492.jpg

Shred carrots and onion into a bowl. Add in the chickpea flower, spices, a pinch of salt and pepper, and a bit of water and mix until evenly incorporated.

IMG_4496.jpg

Ready to go

IMG_4510.jpg

Lighy oil hot waffle iron and scoop a portion of the batter in. CLose iron and cook until the top and bottom are browned and crispy. (Use your iron settings but also check to see how the iron is cooking)

IMG_4514.jpg

Crispy and brown and smelling so good. Remove form iron.

IMG_4528.jpg

Fritters can go straight to plates or on a rack… Whatever you want.

IMG_4545.jpg

But eat them. Dip or cover them in the maple mustard sauce (it is so good!) and be happy.


Savory Carrot Dill Waffle Iron Fritters with Creamy Maple Mustard

serves 1-3

  • 3-4 carrots ( 2 1/2 to 3 cups shredded)

  • 1 small onion

  • 3/4 cup chickpea flour

  • 1 1/2 easpoon dried dill

  • 1/2 teaspoon garlic powder

  • salt and pepper

  • 1/3 to 1/2 cup warm water

  • 1 tablespoon REAL maple syrup

  • 1 1/2 tablespoons brown mustard

  • 1/3 cup plant based plain yogurt

  • tablespoon or so of high heat oil

Preheat waffle iron.

Mix maple, mustard, and vegan yogurt together in a small bowl and set aside.

Shred carrots into a large bowl until you have 2 1/2 to 3 cups of shedded carrot. Then shred the onion into bowl as well. Mix around then add in a pinch of salt and pepper, the dill, garlic powder, and chickpea flour.Mix tighter with lesser amount of water until everything is completely incorporated. Add a bit more water if the mixture is still dry.

To make the waffle fritters , lightly oil the iron and add a large scoop of the batter to the iron while it is hot then close and cook until the fritters are browned and crispy. Once cooked to you liking, remove the waffled fritters and place on a plate or rack and continue with the rest of the batter until it is gone.

Serve right away or warm and serve with the creamy maple mustard. Dip it in or scoop it on… It’s all good!

In brunch, dinner, Gluten Free, grain free, quick and easy, Vegan, Vegetables Tags savory Carrot Dill Waffle Iron Fritters With Creamy Maple Mustard, vegan, gluten free, dairy free, vegetable, plant based, waffle, fritter, dinner, breakfast, brunch, maple, food, easy, healthy, Brunch, easter
Comment

Almond Ricotta Tart with Spring Vegetables

May 4, 2019 Colleen Stem
IMG_8114 2.jpg
IMG_8045 2.jpg

Spring is here for reals, I think. No, it is here, it has just been a bit raw and maybe a bit more rainy then it really needs to be, but whatever, it is spring and it is good. Things are greener by the day, the temperatures although not exactly warm are still inhabitable and without cause for winter jackets (although I have still been rocking the mittens) and spring veggies are popping up all over. Things are looking good.

So last week I made a pie crust with the intention to make a veggie pot pie and stuck it into the freezer. When the time came to make said pot pie, I forgot to take it out of the freezer so the crust was not meant to be for pot pie (it will probably end up as a rhubarb pie…we shall see). Without pie crust, I wasn’t exactly feeling like I should make a pot pie, but a tart, well yeah, sure. A crispy and chewy crackery crusted thing with almond ricotta a spring veggies because that is where the mind went and what the mr agreed sounded good. (When I make up recipes I just start taking about ingredient and preparations and wait til the mr says “Yea, that loud good. I’ll eat that “ He usually will say it right away and for anything. Very easy to please or he just doesn’t care…hum? )

And so the tart was made and the tart was eaten in all entirety for dinner by the mr alone. Usually when he eats all of something it means it was one of the really good things. Or he is really really hungry. But he said it was a really good thing. I trust him because I agreed. I got in a few spoonfuls of the almond ricotta mixture and it is really freaking good if I do say so myself (I could eat bowls of almond ricotta all day long).

Anyway, heres to spring and all things that are green and good.

To the tart.

The stuff. Flours (white and white whole wheat), baking powder, and a little salt in the bowl. Water and olive oil, blanched almonds, a lemon, a clove of garlic, asparagus, peas, frozen and thawed spinach, a small red onion, and salt and pepper.

IMG_7961.jpg
IMG_7965.jpg

Start with making the crust. Mix the dry together then add in the oil and water to form a dough. Knead dough a minutes until the dough is uniform and place back in bowl and cover. Dough needs a few alone minutes to rest. I can relate to that.

While dough is resting, make the almond ricotta. Almonds, garlic, the juice of the lemon, and a bit of water go into blender. Add in a pinch of salt and pepper too.

IMG_7979 2.jpg

Blend until creamy and smooth.

Dump in the spinach and blend, just until combined.

IMG_7986.jpg

So good. So. Good.

Scoop ricotta into a bowl and mix in the peas. And sure give it another taste but try not to eat it all.

Grab the onion and slice it all nice and thin.

IMG_8010.jpg

And after the resting time, grab dough and roll it out. Try for a rectangular shape or as rectangular as you can get it, but nice and thin. Thiner is better.

IMG_8012.jpg
IMG_8022.jpg

Place rolled out dough onto a baking sheet and poke the bottom with lots of little hole. Take ricotta mixture and spread evenly all over crust, leaving a 1 1/2 border all the way around.

IMG_8043.jpg

Add a layer of onions.

IMG_8047.jpg

Then top with the asparagus and more onions.

IMG_8052 2.jpg

Fold over the edges of the crust, sprinkle with a pinch of salt and pepper, and into the oven it goes to bake.

And then it is baked. And ready to eat (after a few minutes of cooling).

IMG_8126.jpg

Nothing left but to cut it up and eat it.

Spring. Green. Food.

Things are good.

-C


Almond Ricotta Tart with Spring Vegetables

Makes a 8x12(ish) tart

  • For the Crust

  • 1/2 cup all purpose flour

  • 1/2 cup white whole wheat (can sub for all purpose)

  • 3 tablespoon oil

  • 1/3 cup room temp water

  • 1/4 teaspoon baking powder

  • 1/2 teaspoon salt

  • For the Almond Ricotta and Veggies

  • 1/2 cup blanched almonds

  • 1/4- 1/3 cup warm water

  • 1 lemon

  • 1 clove garlic

  • 1/2 teaspoon salt and pepper or more to taste

  • 1/4 cup frozen and thawed spinach squeezed of liquid

  • 9-10 spears of Asparagus

  • 1/4 cup peas (fresh or frozen and thawed)

  • 1 /2 red onion

First make the crust. Whisk together the flours, salt, and baking soda. Add in the oil and water and mix until a dough forms. Form dough into a ball and knead for minute or two on counter then place dough back into the bowl and cover. The dough needs to rest for 10-15 minutes.

While dough is resting, make the almond ricotta. Place almonds, garlic, and juice of lemon into a blender. Start blending and add in the lesser amount of water, adding a little more until the stuff all starts to blend. Blend on high for a minute or two until the mixture is nice and creamy. Season with salt and pepper, blend a second to mix then add in the squeezed out spinach. Blend until mix together then dump or scoop the mixture into a bowl and mix in the peas. Then thinly slice up the onion.

Preheat the oven to 450

After doughs little rest, lightly flour a counter and roll it out, thin as you can, in a rectangular shape. Try for at least 12in x 16in. The rectangle doesn’t need to be perfect. Rough is good.

Place the rolled out crust onto a baking. Take a fork and dock the surface (poke holes into it to prevent air bubbles). Take the ricotta and pea mixture and spread evenly on crust, leaving about a 1 1/2 inch border all the way around. Add a layer of sliced red onion and then take asparagus (trim off woody ends) and either lay on whole or break in half and lay on. Add more onions on top. Fold the border of the crust over the top. Sprinkle the whole thing with pepper and place into the hot oven.

Bake for 22-25 minutes or until the crust becomes a nice golden brown. Remove and let cool a few minutes

And then cut up and eat. Right away or at room temperature. Or some now and some later. All up you you.

Store left over in fridge in air tight container for up to a few days. the crust will not be crispy but more chewy. Can stick it back in oven for a few minutes to crisp it up.

In appetizers, Dairy Free, Nuts, Savory, Spring, Vegan, Vegetables, tarts Tags Almond Ricotta Tart with Spring Vegetables, Vegan, Cracker Crust, Asparagus, Peas, Spinach, Almond Ricotta, nuts, nut cheese, sping, dinner, tart, galette, easy, protein, vegetables, dairy free, dairy free cheese, healthy, plant based, brunch
Comment

Raspberry Rhubarb Cobbler

April 27, 2019 Colleen Stem
IMG_7865.jpg
IMG_7904.jpg

I found another bag of frozen rhubarb in the chest freezer which is never a bad thing, but my rhubarb patch outside is growing strong and I will have all the fresh rhubarb I could possible eat within the next few weeks. So found rhubarb just means I need to eat it right fast before the fresh stuff comes in. (I haven’t had a problem with that. it’s almost gone already). Plus the other day while I was digging up and transplanting raspberry bushes to the back yard, my neighbor came over and gave me a gallon of frozen raspberries, harvested from said bushes that I was currently planting in my yard. Score for me! Free bushes and berries…I have such nice neighbors.

So the logical thing to do with my new found and giving bounty was of course to hurry up and bake something. Cobbler. Why cobbler? Well, why not? I figured the mr would really like it and eat it and I also didn’t want to make anything to fussy because I was just to dang busy spending all of my extra time outside doing outside things. And cobbler, it’s not fussy because it is basically biscuits and jam baked up all together. Not a lot to think about and comes out looking all homey and sweet and smelling all nice and cozy. Doesn’t that sound nice? And not a pain in the ass?

And best part. A made cobbler works as dessert or breakfasts or just a snack. Just asked the mr. He ate it for all the reasons. With a dollop of yogurt or cream of course because he is fancy like that.

And yeah the fruit I used was frozen, but fresh works just the same here too.

Now, lets get to that cobbler.

The stuff. Raspberries (frozen), rhubarb (frozen), sugar, flour, salt, baking power, cinnamon ,almond milk, apple cider vinegar, cornstarch, and oil.

IMG_7777.jpg

Raspberries, rhubarb, sugar, cinnamon, cornstarch. Its all there in the bowl. Just needs to be mixed. So mix it.

IMG_7781.jpg

Dump fruit mixture into well greased 8 inch pan and pop it into a hot oven to get a head start on baking.

IMG_7797 2.jpg
IMG_7802.jpg

While the fruits in the oven, make the biscuit dough. Mix the dry together then mix in the wet until just incorporated and a sticky dough forms.

IMG_7805.jpg

Pulled from the oven, the fruit is starting to cook down and whoa, it just smells so good!

IMG_7816.jpg

Drop on the biscuits dough on top of the fruit (careful of the hot pan). Evenly if possible, but don’t work to hard to make it look perfect. Imperfection makes it look perfect, you know?

Once biscuits are on, lightly brush the tops with a little milk and sprinkle with more sugar then pop it back into the oven for another 25-30 minutes or until the biscuits are baked.

IMG_7817 2.jpg

Pulled from the oven with a bubbly filling and a golden brown biscuity top. Things are looking good here.

IMG_7929.jpg

And now it’s time.

Dig on in my friend. Sever with something creamy like whipped coconut cream or some type of yogurt or ice cream situation of your choice. And again, this can be your breakfast.

Happy spring people!

-C


Raspberry Rhubarb Cobbler

make a a 8 inch round which serves 5-6

For the Filling

  • 2 cups raspberries (fresh or frozen)

  • 2 cups rhubarb chopped into 1/2 inch to inch long pieces (fresh or frozen)

  • 1 1/2 tablespoons corn starch

  • 3/4 -1 cup sugar (lesser amount if you like a little more tartness. I used lesser amount)

  • 1 teaspoon cinnamon

For the dough

  • 1 cups all purpose flour

  • 1 1/2 teaspoon baking powder

  • 1/2 teaspoon salt

  • 3 tablespoons sugar

  • 3 tablespoons neutral flavored oil

  • 1/2 cup plant based milk

  • 1 teaspoon apple cider vinegar

Preheat oven to 350.

In a large bowl mix together the rhubarb and raspberries with the corn starch, sugar, and cinnamon. Grease a 8 inch round pan the is at least 2 inches deep (can use a slightly large pan or a square) and dump in fruit mixture. Place into oven to bake for about 15 minutes or the fruit starts to break down.

While fruit is baking, mix up biscuit dough. Flour, salt, 2 tablespoons sugar, and baking powder go in a large bowl and mixed until combined. Add in the oil, the milk, and the vinegar. Mix until just incorporated and a dough has formed.

Remove the fruit cooking from the oven. Turn heat up to 375.

Carefully drop spoonfuls of biscuit batter on top of fruit. Brush the top of the biscuits with a little milk and sprinkle with remaining tablespoon sugar. Place the pan back into the oven and bake for another 25-30 minutes or until the biscuits are all nice and golden brown on top.

Remove from oven and let cool for a few minutes before serving. Serve warm with a scoop or dollop of soothing creamy (coconut cream, yogurt, ice cream…..whatever floats your boat.)

Left overs can be stored in pan, just cover it with something and place in fridge. Can be eaten cold to or reheated in microwave or oven.

In Vegan, Spring, fruit, desserts, brunch, breakfast, biscuits and such, cobblers and crumbles Tags Raspberry Rhubarb Cobbler, Cobbler, dessert, raspberries, rhubarb, spring, fruit, plant based, vegan, vegan dessert, biscuits, easy, dairy free, breakfast, brunch
1 Comment
Older Posts →
 

https://thelovelycrazy.squarespace.com/config#/|/about/

Me. Food Maker.Food eater. Woo HOO!

STEM+NODE  SMALL BATCH AND ONE OF A KIND POTTERY

stem+node ceramics


____________________

Subscribe

GET NEW POSTS IN YO EMAIL

You are AWESOME!!!


@thelovelycrazy 2014-2021