• stem+node ceramics
  • HOME
  • Food Recipes
  • About
  • Contact
Menu

The Lovely Crazy

Street Address
City, State, Zip
Phone Number

Your Custom Text Here

The Lovely Crazy

  • stem+node ceramics
  • HOME
  • Food Recipes
  • About
  • Contact

Chili Lime Jicama Slaw

April 24, 2021 Colleen Stem
IMG_4889.jpg

I don’t know about you but springtime has got me wanting to eat all the things that are fresh and bright and not super heavy. Things like big salads are on the top of my list. Or slaws like this jicama slaw. It is A+ and perfect for springtime munching.

Jicama. Maybe you have heard of it, maybe not. It is a vegetable, a tuber to be precise. And it tastes like a crunchy, juicy, not sweet apple, but also kind of reminds me of kohlrabi. And it slightly nutty, with a hint of potato? Just know it is delicious. You might have even had it and not even been aware of it, in say a salad or maybe spring rolls. Anyway, if you haven’t had it, it is definitely worth trying like in this slaw which is basically just jicama with cabbage, carrot and onion tossed in a cumin chili lime situation. It is fresh and crunchy and spicy and filling and all the things that I want be eating right now.

What we have it a really dang tasty and a quick toss together situation. What more can we ask for?

To the jicama slaw!

IMG_4860.jpg

The stuff. A small jicama, a carrot, a hunk of red cabbage, chili powder, cumin, a lime, red wine vinegar,a little maple syrup, and salt and pepper.

IMG_4865.jpg

Cumin, chili, maple, and vinegar go into a big bowl and get mixed around. Pop the bowl into the microwave if you can and heat it up for like 30 seconds, just o take a bit of the rawness of of the spices.

IMG_4872.jpg

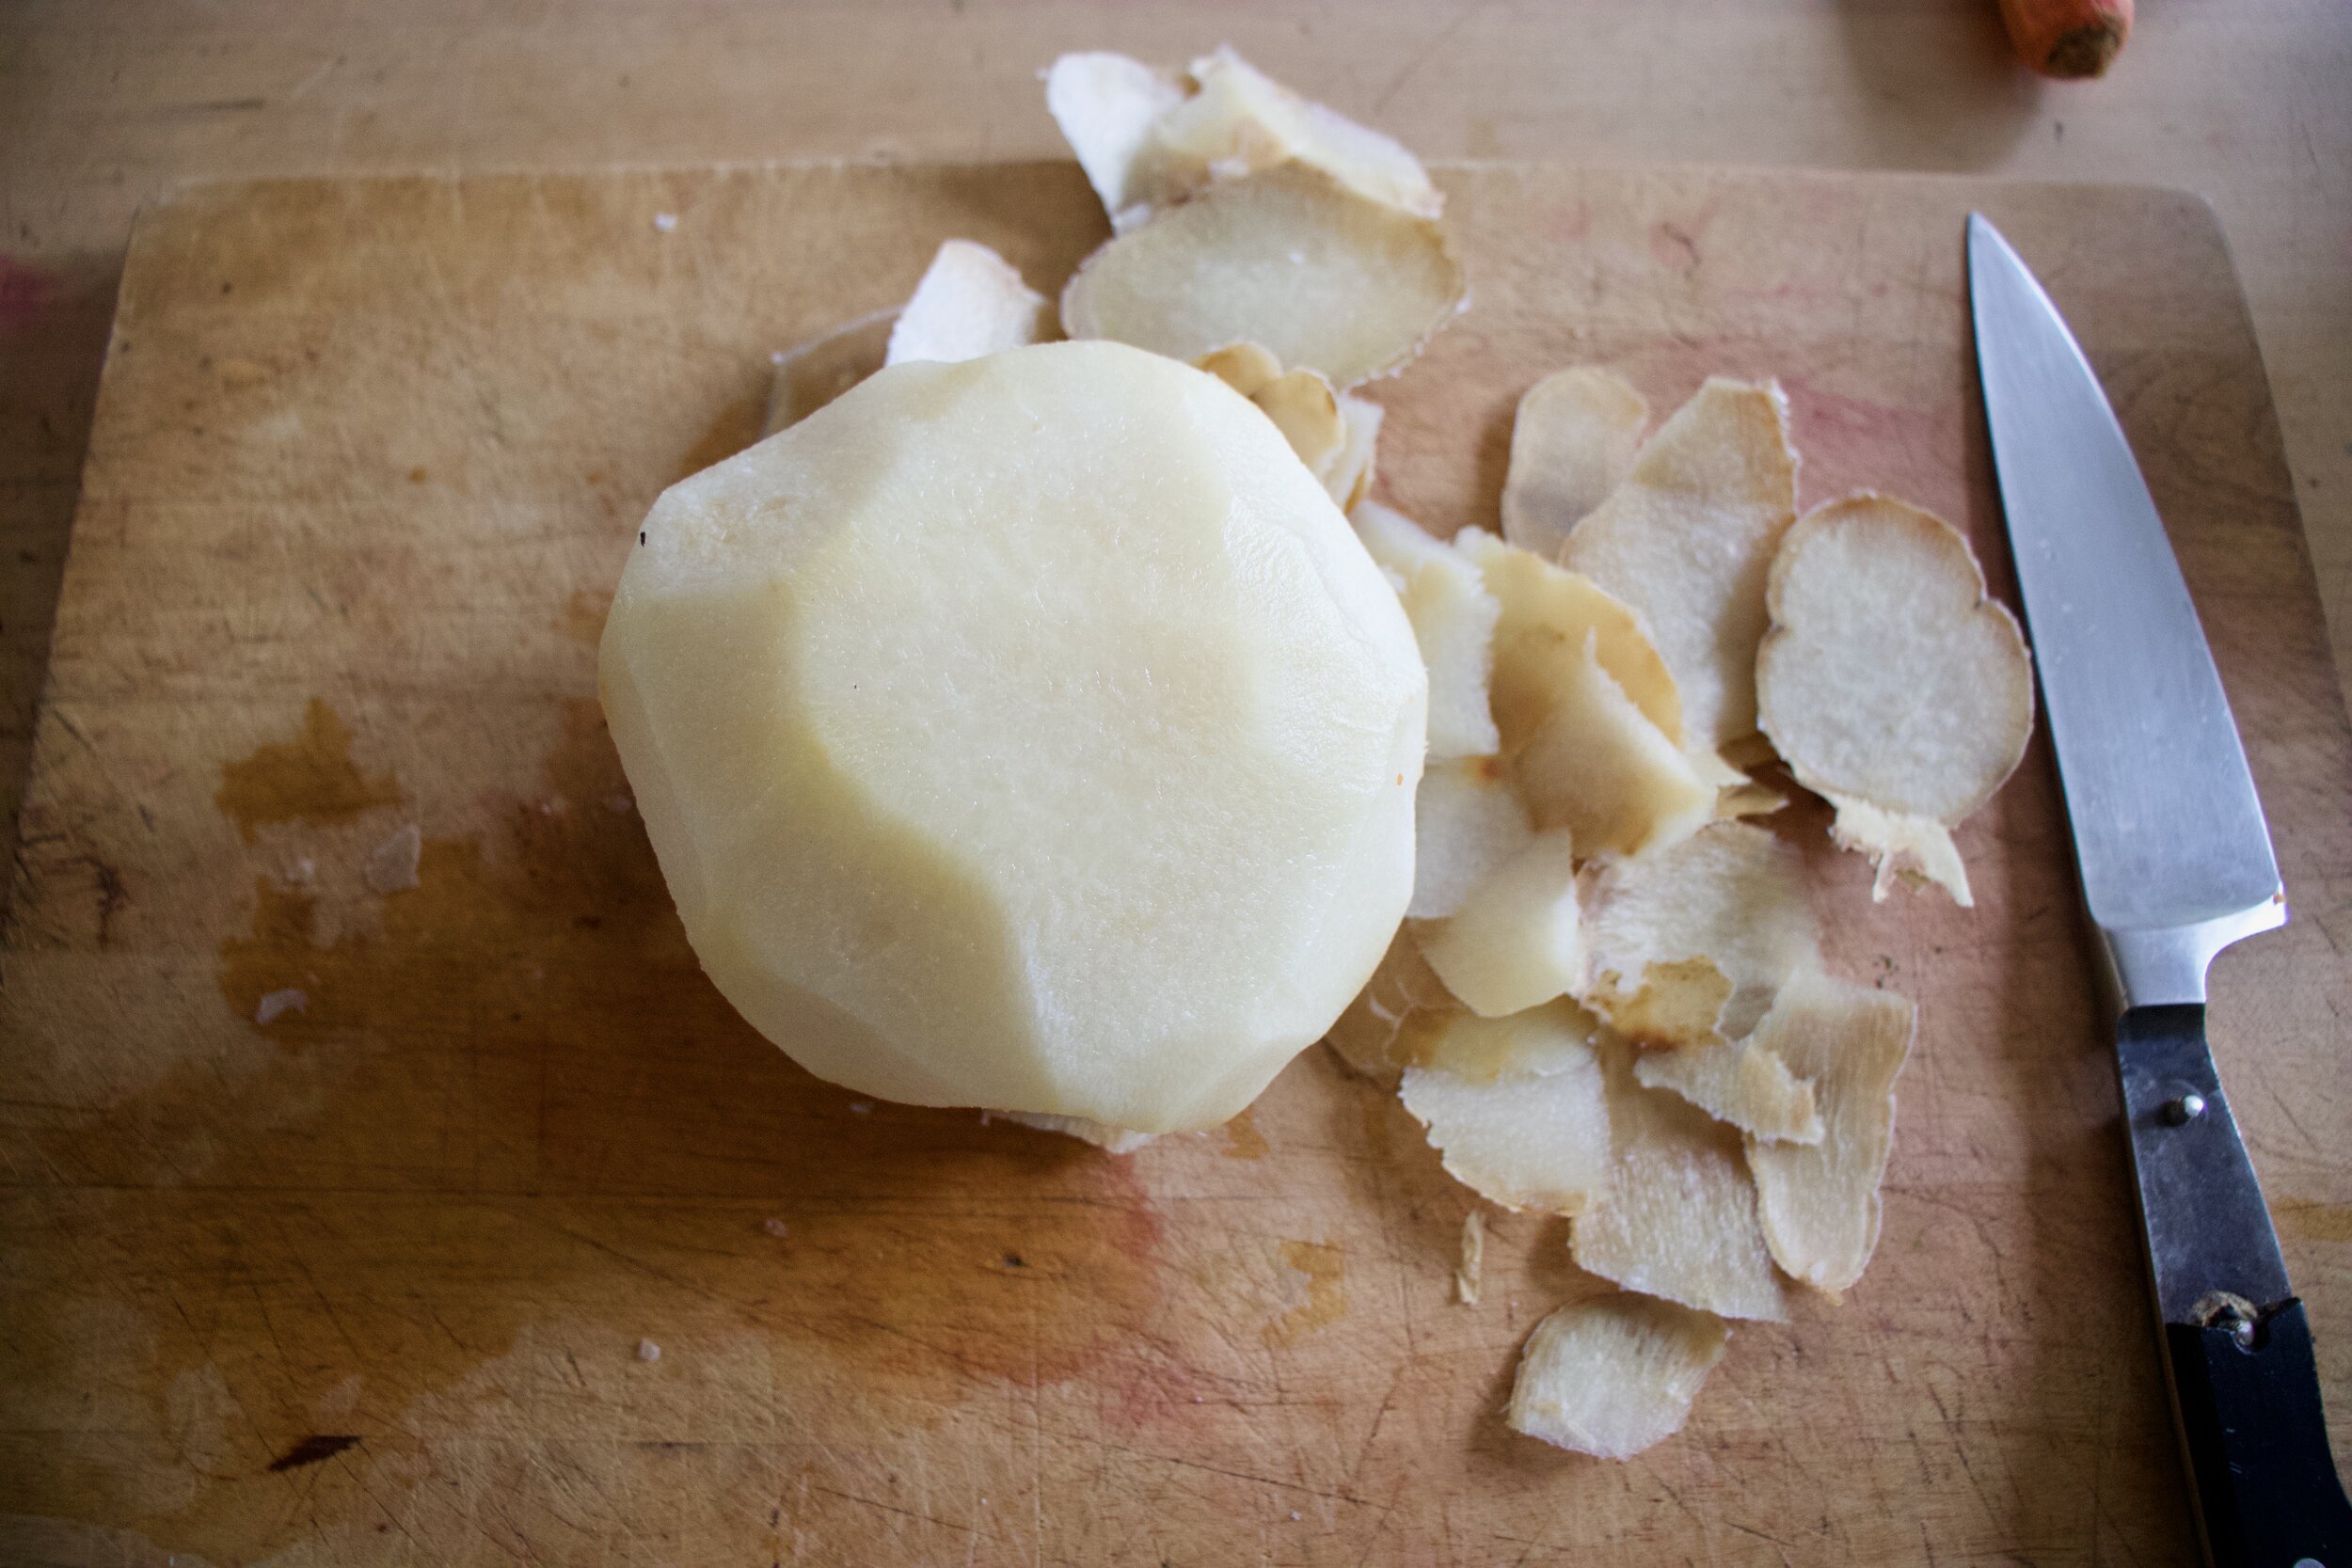
Now peel the jicama. Use a sharp knife and carefully peel away the brown skin from the white flesh. Do not leave any of the skin on cause it is not good to eat!

IMG_4877.jpg

Once the jicama is peeled, grab a mandolin and julienne it (or cut into thin matchsticks with a knife). Then julienne the carrot and shredded the cabbage and onion.

IMG_4879.jpg

Dump all the veggies into the bowl with the spices then add in the juice of the lime and a pinch of salt and pepper.Toss around until evenly combined and coated.

IMG_4897.jpg

There you have it. Chili lime jicama slaw. Now you eat it. As a side to any dish you wish or just as it is, a big bowl of goodness.

-C


Chili Lime Jicama Slaw

Serves 3-4 (as a side)

  • 1 medium Jicama (around 3 cups julienned)

  • 1 small carrot

  • 1 small onion

  • a small hunk of red cabbage

  • a lime

  • 3/4 teaspoon cumin

  • 3/4 teaspoon chili powder

  • 1 teaspoon maple syrup

  • 1 tablespoon red wine vinegar

  • salt and pepper

Place cumin, chili, maple, and vinegar into a large bowl. Mix around and pop into the microwave for 20-30 seconds just to heat it up a bit and remove some of the rawness of the spices.

Peel the jicama. Do it with a knife (so carefully) and remove all of the tough brown skin away from the white flesh. (Do not eat skin..It can make you sick). Now either with a mandolin of a knife, julienne the jicama along with the carrot. Use a thicker setting for the jicama and a thinner one for the carrot. Shred or thinly slice up the cabbage and onion as well. Toss all the veggies into the bowl with the spices. Squeeze in the juice of the lime, add a pinch or two of salt and some black pepper and toss around until everything is evenly combined and coated.

You can eat it right away but It taste better when it has had a chance to sit for a little while.

Serve cold along with anything. Or eat on it’s own. Store left overs in fridge for up to a week.

In quick and easy, Raw, salad, Vegan, Vegetables Tags Chili Lime Jicama Slaw, jicama, slaw, raw, salad, plant based, grain free, gluten free, dairy free, vegetable, fresh, spring, easy, chili lime
Comment

Savory Carrot Dill Waffle Iron Fritters with Creamy Maple Mustard

April 3, 2021 Colleen Stem
IMG_4573.jpg
IMG_4551.jpg
IMG_4523.jpg

The other day I went to grab the cookie cutters out of the pantry and had to move the waffle iron out of the way. That is basically the only reason I used the waffle iron. And just like every single time I grab it out to use, I wonder to my self why the hell I don’t use it more. Maybe it’s time to move the waffle iron to a bette spot in the pantry.

So anyway these carrot waffled fritters. Theyare so so so freaking good! I could barely stop eating them before I got a chance to take a couple pictures. So simple, yet so satisfying. Carrot and dill are such a great combo and when made into a crispy fritter situation with chickpea flour and dipped into with the maple mustard. WOW! I was going to make most of this batch for the mr for dinner but I ended up eating more then half (so I ended up making him a waffled sandwich too).

I think these carrot dill waffle fritters might just be the reason the waffle iron gets a new spot in the pantry. Heck I might even leave it out for while because I am definitely making another batch (or 3 of these before I put it away)

Now to the carrots waffle fritters!

IMG_4467.jpg

The stuff. Carrots, a small onion, dried dill and garlic powder, chickpea flour, water, salt and pepper, maple syrup, brown mustard, vegan yogurt, and a little oil.

IMG_4476.jpg

Maple, mustard, and vegan yogurt get mixed together and that is that. Set aside.

IMG_4490.jpg
IMG_4492.jpg

Shred carrots and onion into a bowl. Add in the chickpea flower, spices, a pinch of salt and pepper, and a bit of water and mix until evenly incorporated.

IMG_4496.jpg

Ready to go

IMG_4510.jpg

Lighy oil hot waffle iron and scoop a portion of the batter in. CLose iron and cook until the top and bottom are browned and crispy. (Use your iron settings but also check to see how the iron is cooking)

IMG_4514.jpg

Crispy and brown and smelling so good. Remove form iron.

IMG_4528.jpg

Fritters can go straight to plates or on a rack… Whatever you want.

IMG_4545.jpg

But eat them. Dip or cover them in the maple mustard sauce (it is so good!) and be happy.


Savory Carrot Dill Waffle Iron Fritters with Creamy Maple Mustard

serves 1-3

  • 3-4 carrots ( 2 1/2 to 3 cups shredded)

  • 1 small onion

  • 3/4 cup chickpea flour

  • 1 1/2 easpoon dried dill

  • 1/2 teaspoon garlic powder

  • salt and pepper

  • 1/3 to 1/2 cup warm water

  • 1 tablespoon REAL maple syrup

  • 1 1/2 tablespoons brown mustard

  • 1/3 cup plant based plain yogurt

  • tablespoon or so of high heat oil

Preheat waffle iron.

Mix maple, mustard, and vegan yogurt together in a small bowl and set aside.

Shred carrots into a large bowl until you have 2 1/2 to 3 cups of shedded carrot. Then shred the onion into bowl as well. Mix around then add in a pinch of salt and pepper, the dill, garlic powder, and chickpea flour.Mix tighter with lesser amount of water until everything is completely incorporated. Add a bit more water if the mixture is still dry.

To make the waffle fritters , lightly oil the iron and add a large scoop of the batter to the iron while it is hot then close and cook until the fritters are browned and crispy. Once cooked to you liking, remove the waffled fritters and place on a plate or rack and continue with the rest of the batter until it is gone.

Serve right away or warm and serve with the creamy maple mustard. Dip it in or scoop it on… It’s all good!

In brunch, dinner, Gluten Free, grain free, quick and easy, Vegan, Vegetables Tags savory Carrot Dill Waffle Iron Fritters With Creamy Maple Mustard, vegan, gluten free, dairy free, vegetable, plant based, waffle, fritter, dinner, breakfast, brunch, maple, food, easy, healthy, Brunch, easter
Comment

Watermelon Radish Orange and Pistachios Salad

March 20, 2021 Colleen Stem
IMG_4348.jpg

Have you ever seen a radish as pretty as a watermelon radish?

Is it weird that I got, what’s the word… giddy at the sight of watermelon radishes at my last farm share pick up? I legit did a little jig, yelled out to the farmers that I loved them and that that farm share pick up was the best on ever!

My farmers love me, but I am pretty sure they think I am crazy. (Maybe just a little bit)

Anyways I got me some of these super beauty radishes and have been munching away on them all week. Then I made this salad because sweet and juicy oranges and creamy pistachios go so well with peppery radishes. I added in some red onion for a little more bite and flavor, gave it a simple dressing of salt, pepper, and vinegar, and ate it all up. A big bowl of color and flavors. A bowl of happiness.

Now to the salad!

IMG_4280.jpg

The stuff. A couple watermelon radishes, oranges (I used a navel and and blood orange) a small red onion, a handful of pistachios, red wine vinegar, and salt and pepper.

IMG_4310.jpg

First slice up the radishes and onion very thinly. Use a mandolin if you have one.

IMG_4311.jpg

Toss the radish and onion into a big bowl along with the vinegar and a pinch of slat.

IMG_4303.jpg

Now cut peels from oranges and then cut oranges very thinly as well.

IMG_4313.jpg

Add the oranges to the bowl with the radishes and onion.

IMG_4320.jpg

Rough chop the pistachios.

IMG_4324.jpg

Toast them into the salad. And then top with pepper.

IMG_4346.jpg

Prettiest salad ever.

-C


Watermelon Radish Orange and Pistachios Salad

  • 2 medium sized watermelon radishes

  • 2 small oranges (navel or blood)

  • 1 small red onion

  • a handful of unshelled pistachios

  • 1 1/2 tablespoons red wine vinegar

  • salt and pepper

Start by slicing the rashishes and onion pretty thin. (use a mandolin if you have one) then place into a big shallow bowl. Sprinkle with a pinch of salt and drizzle in the vinegar. Toss around

Grab oranges and cut away peels. Then cut the whole oranges as thinly as you can (You can see the segments who or cut into smaller pieces) then place into bowl with the radishes and onions. Toss around.

Grab pistachios and give the na little rough chop then toss them into the salad. Add a little black pepper to taste then give the whole salad a little toss.

Eat.

In fruit, Nuts, Raw, quick and easy, salad, Vegan Tags Watermelon Radish Orange and Pistachios Salad, salad, vegan, plant based, spring, citrus, healthy, fruit, vegetable, nuts, color
Comment

Crispy Green Beans

March 6, 2021 Colleen Stem
IMG_0704.jpg

I rely pretty heavily on frozen produce in the mid to late parts of winter. I do have my winter farm share but that is never enough so I pack my freezer as full as I can with stuff in the fall (mostly shredded zucchini and lots of tomatoes and eggplant). And then sometime between Christmas and New Years its pretty much gone. Once that happens I start in with store bought frozen veggies. I usually by frozen broccoli, peas, and green beans and right now me and the frozen green beans are having a moment.

I don’t know how it started but almost everyday I dump like half a bag of frozen green beans (sometimes a whole bag) onto a baking sheet without any oil or seasoning, and pop it into a hot oven for like 15 minutes. And that is it. I pull them put and they are crispy, crunchy, and probably one of the tastily way a green bean can be eaten (besides fresh). And the weird thing is, I have tried to mimic the crispness and crunchiness with fresh green beans but it never works out. There is something about roasting them frozen that gives them the perfect crispy texture. And no no to oil. They don’t need it, it only makes the beans soggy.

So it might seem kind of weird and it’s not a recipe, but I highly, HIGHLY, suggest that next time have a hankering for a tastely crunchy treat, try roasting some frozen green beans. And then let me know if you become addicted too.

Sometimes it’s the simplest things, you know?

IMG_0694 2.jpg

Frozen beans go straight from freezer onto baking sheet and into the oven.

IMG_0700.jpg

They then come out crispy. That's it.

IMG_0703.jpg

And yes, I usually just eat them off the baking sheet with my fingers because why bother dirtying a dish?


-C


Crispy Green Beans

  • Frozen green beans

Preheat oven to 400

Dump frozen green beans onto a non oiled baking sheet single layered and place into hot oven. Bake for 15-20 minutes or until crispy. Remove and eat.

In Vegan, snack, side dish Tags crispy green beans, frozen green beans, one ingredient, snack, vegan, vegetable, plant based, simple, delicious, grain free, gluten free, beans, winter, roasted, no oil
Comment

15 Bean and Greens Soup

January 2, 2021 Colleen Stem
IMG_2960.jpg
IMG_2981.jpg

What are you doing today, first weekend of a new year and all.

Me, I am doing what I do every weekend. Clean and make soup! And a few stupid annoying things that I won’t get into…( I hate having to deal with phone shit!)

Anyway lets talk about soup, the best food in the world. You might not think that yourself, and that is just fine, but me, I could, and do, eat soup just about every day (seriously, and I have years of blogging to prove it). It is just so good, well, most soups. Some soups are not good and that is when I do not eat them and nor should you.

This soup just so happens to be a good New Years omen.. Someone just told me beans and greens are good luck to eat at the beginning of a new year so I guess we are in luck. But tell me this, shouldn't I be freaking winning lotteries and shit with the amount of beans and greens I eat all year long? I mean seriously. But back to this soup. A basic 15 bean (or however many types of beans) soup situation. Cooked with a few but delicious veggies, some good spices, a little tomato, and served up whenever it is done and whenever you feel like eating it. A great soup to pop onto the stove, blast the tunes, get into a cleaning grove and basically ignore, and come back to it whenever you are feeling hungry. I mean, what better then to finish off a crazy deep clean and organize of all the closets plus wiping down every single surface in the house (including all the baseboard and window trim) and scrubbing toilets, then with a big ass bowl of warm beans and greens soup. This. This is a good day to me. And don’t say that you wouldn't love it too…but in case you wouldn’t don’t at me and you do you.

Now to the lucky beans and greens soup and maybe some New Years cleaning (or however you want to send your time!)

The stuff. A 15 bean mixture that has been soaking in water overnight, tomato puree, a carrot and and onion, parsnip and celeriac, a couple cloves of garlic, a bunch of collard greens, spices (cumin, paprika, chili powder, red pepper, oregano, and ginger), apple cider vinegar, and salt and pepper.

Basically the only work needed done, to dice it all up. Small dice the onion, carrot, parsnip and celeriac, mince the garlic, and then thinly shill up the collard greens.

Toss it all into a big pot with the spices and a cup or so of water and place on medium heat to start to cook.

IMG_2921.jpg
IMG_2924.jpg

Once veggies have become fragrant and are slightly tender, dump in the soaked beans!

Add water and bring to a boil. Once boiling, reduce to a medium heat and pop a lid on it. Let cook for about an hour.

IMG_2940.jpg

And once the beans become tender, dump in the vinegar and tomato puree. Mix it all up, add another cup or so water, and keep in cooking

IMG_3041.jpg

Soup, with all the beans, DONE. And so so good.

And basically you jest serve it up whenever you want and eat it. Bread makes a great accompaniment.

Happy New Year!

-C


15 Bean and Greens Soup

  • 2 cups dried bean mixture (can use any number of bean mixture that you want) that has been soaking for a least a few hours but overnight is good

  • 2 teaspoons cumin

  • 1 teaspoon each paprika, chili powder, ginger, oregano

  • 1/2 teaspoon chili flakes

  • a medium onion

  • 2-3 cloves garlic

  • 2 1/2-3 cups total of small diced carrot, celeriac, and or parsnip

  • a small bunch of collard greens (or kale)

  • 1 1/2 cups tomato puree

  • 2 tablespoons apple cider vinegar

  • salt and pepper

  • 7-9 cups water

Start by small dicing up the onion, mincing that garlic, and small dicing up the carrot, celeriac, and parsnip. Dump it all into a large heavy bottom pot along with about a cup of water and all the spiced. Cut the collard greens into thin strips and toss those in too. Put on stove on medium heat and cook for 7-10 minutes or until it comes fragrant and the veggies seems to be tender. Dump in presoaked beans and 6-7 cups water (make sure beans are fully submerged) and bring whole pot to a boil. Once boiling, reduce to a medium heat and place cover on pot. Cook for an hour or so and then add in the tomato puree and vinegar. Add in another cup or two of water and cook for another 1/2 hour to 45 minutes (longer if you want. You can cook and set on simmer and leave on stove for a few hours. Just add more water when needed and stir occasionally) or until all the beans are tender and completely cooked. Season with salt and pepper and then serve.

Left overs should be stored in fridge for a week or so or can be frozen for a few months.

In soups/stews/chilis, Vegetables, Vegan Tags 15 beans and greens soup, soup, vegan, beans, pulses, protein, New Years, grain free, dairy free, gluten free, heathy, plant based, easy, dinner, all day, greens, collard greens, vegetarian, vegetable
Comment
← Newer Posts Older Posts →
 

https://thelovelycrazy.squarespace.com/config#/|/about/

Me. Food Maker.Food eater. Woo HOO!

STEM+NODE  SMALL BATCH AND ONE OF A KIND POTTERY

stem+node ceramics


____________________

Subscribe

GET NEW POSTS IN YO EMAIL

You are AWESOME!!!


@thelovelycrazy 2014-2021