• stem+node ceramics
  • HOME
  • Food Recipes
  • About
  • Contact
Menu

The Lovely Crazy

Street Address
City, State, Zip
Phone Number

Your Custom Text Here

The Lovely Crazy

  • stem+node ceramics
  • HOME
  • Food Recipes
  • About
  • Contact

Pickled Ginger Dilly Sprouts

December 5, 2020 Colleen Stem
IMG_2269.jpg
IMG_2289.jpg

What are you even doing if you are not pickling Brussel sprouts?

Ok, I get that you might have some other stuff going on in your life right now so I won’t judge you, but you all really need to get on getting some sprouts in the next few weeks while they are good and seasonal and pickle yourself some. They are truly some kind of amazing. Crisp and crunchy. Vinegary with all the flavors of dill and ginger and the slightly sweetness of the sprouts themselves . Oh jeez, they are just so good. And they are refrigerator pickled so you don’t have to do a hot water bath which means you really have to excuse to not make them.

And while you are at it you might as well just make a bunch of jars to give to people this holiday season. Think about it, wouldn’t you love a delicious jar of deliciousness instead of another stupid whatever or what not? You will be the coolest person with your jars of sprouts. Guarantied!

Now to the pickled sprouts!

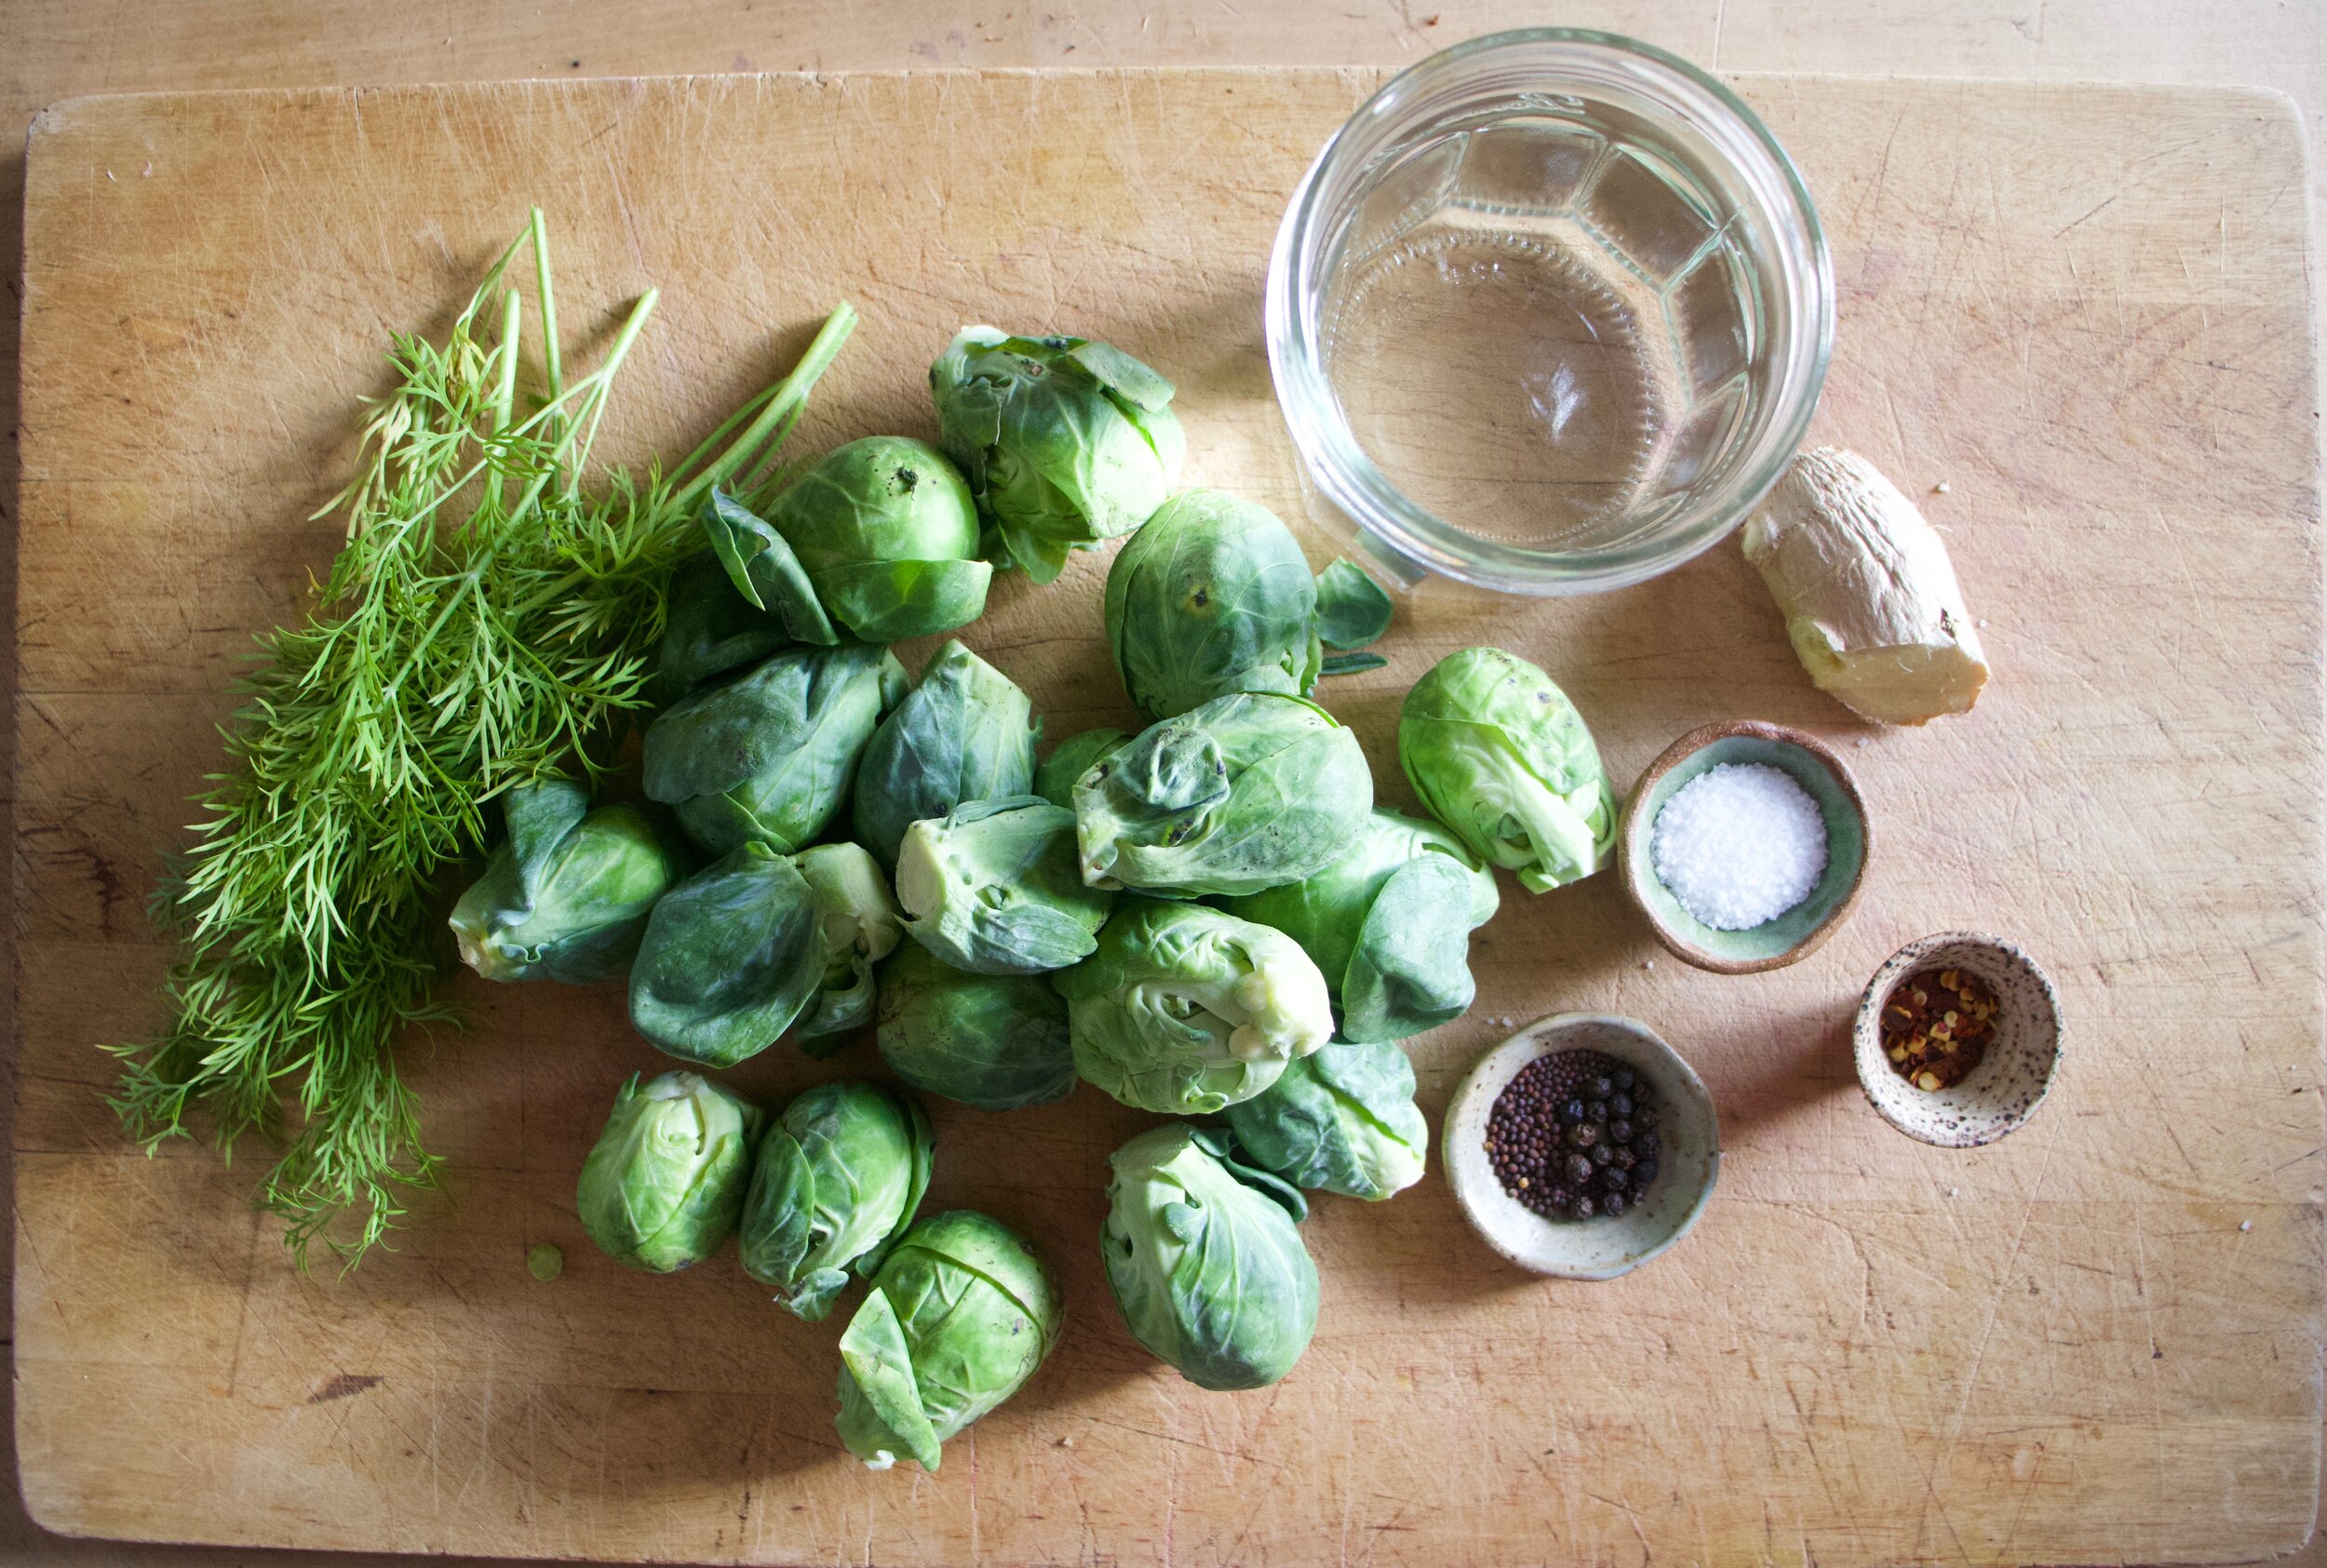
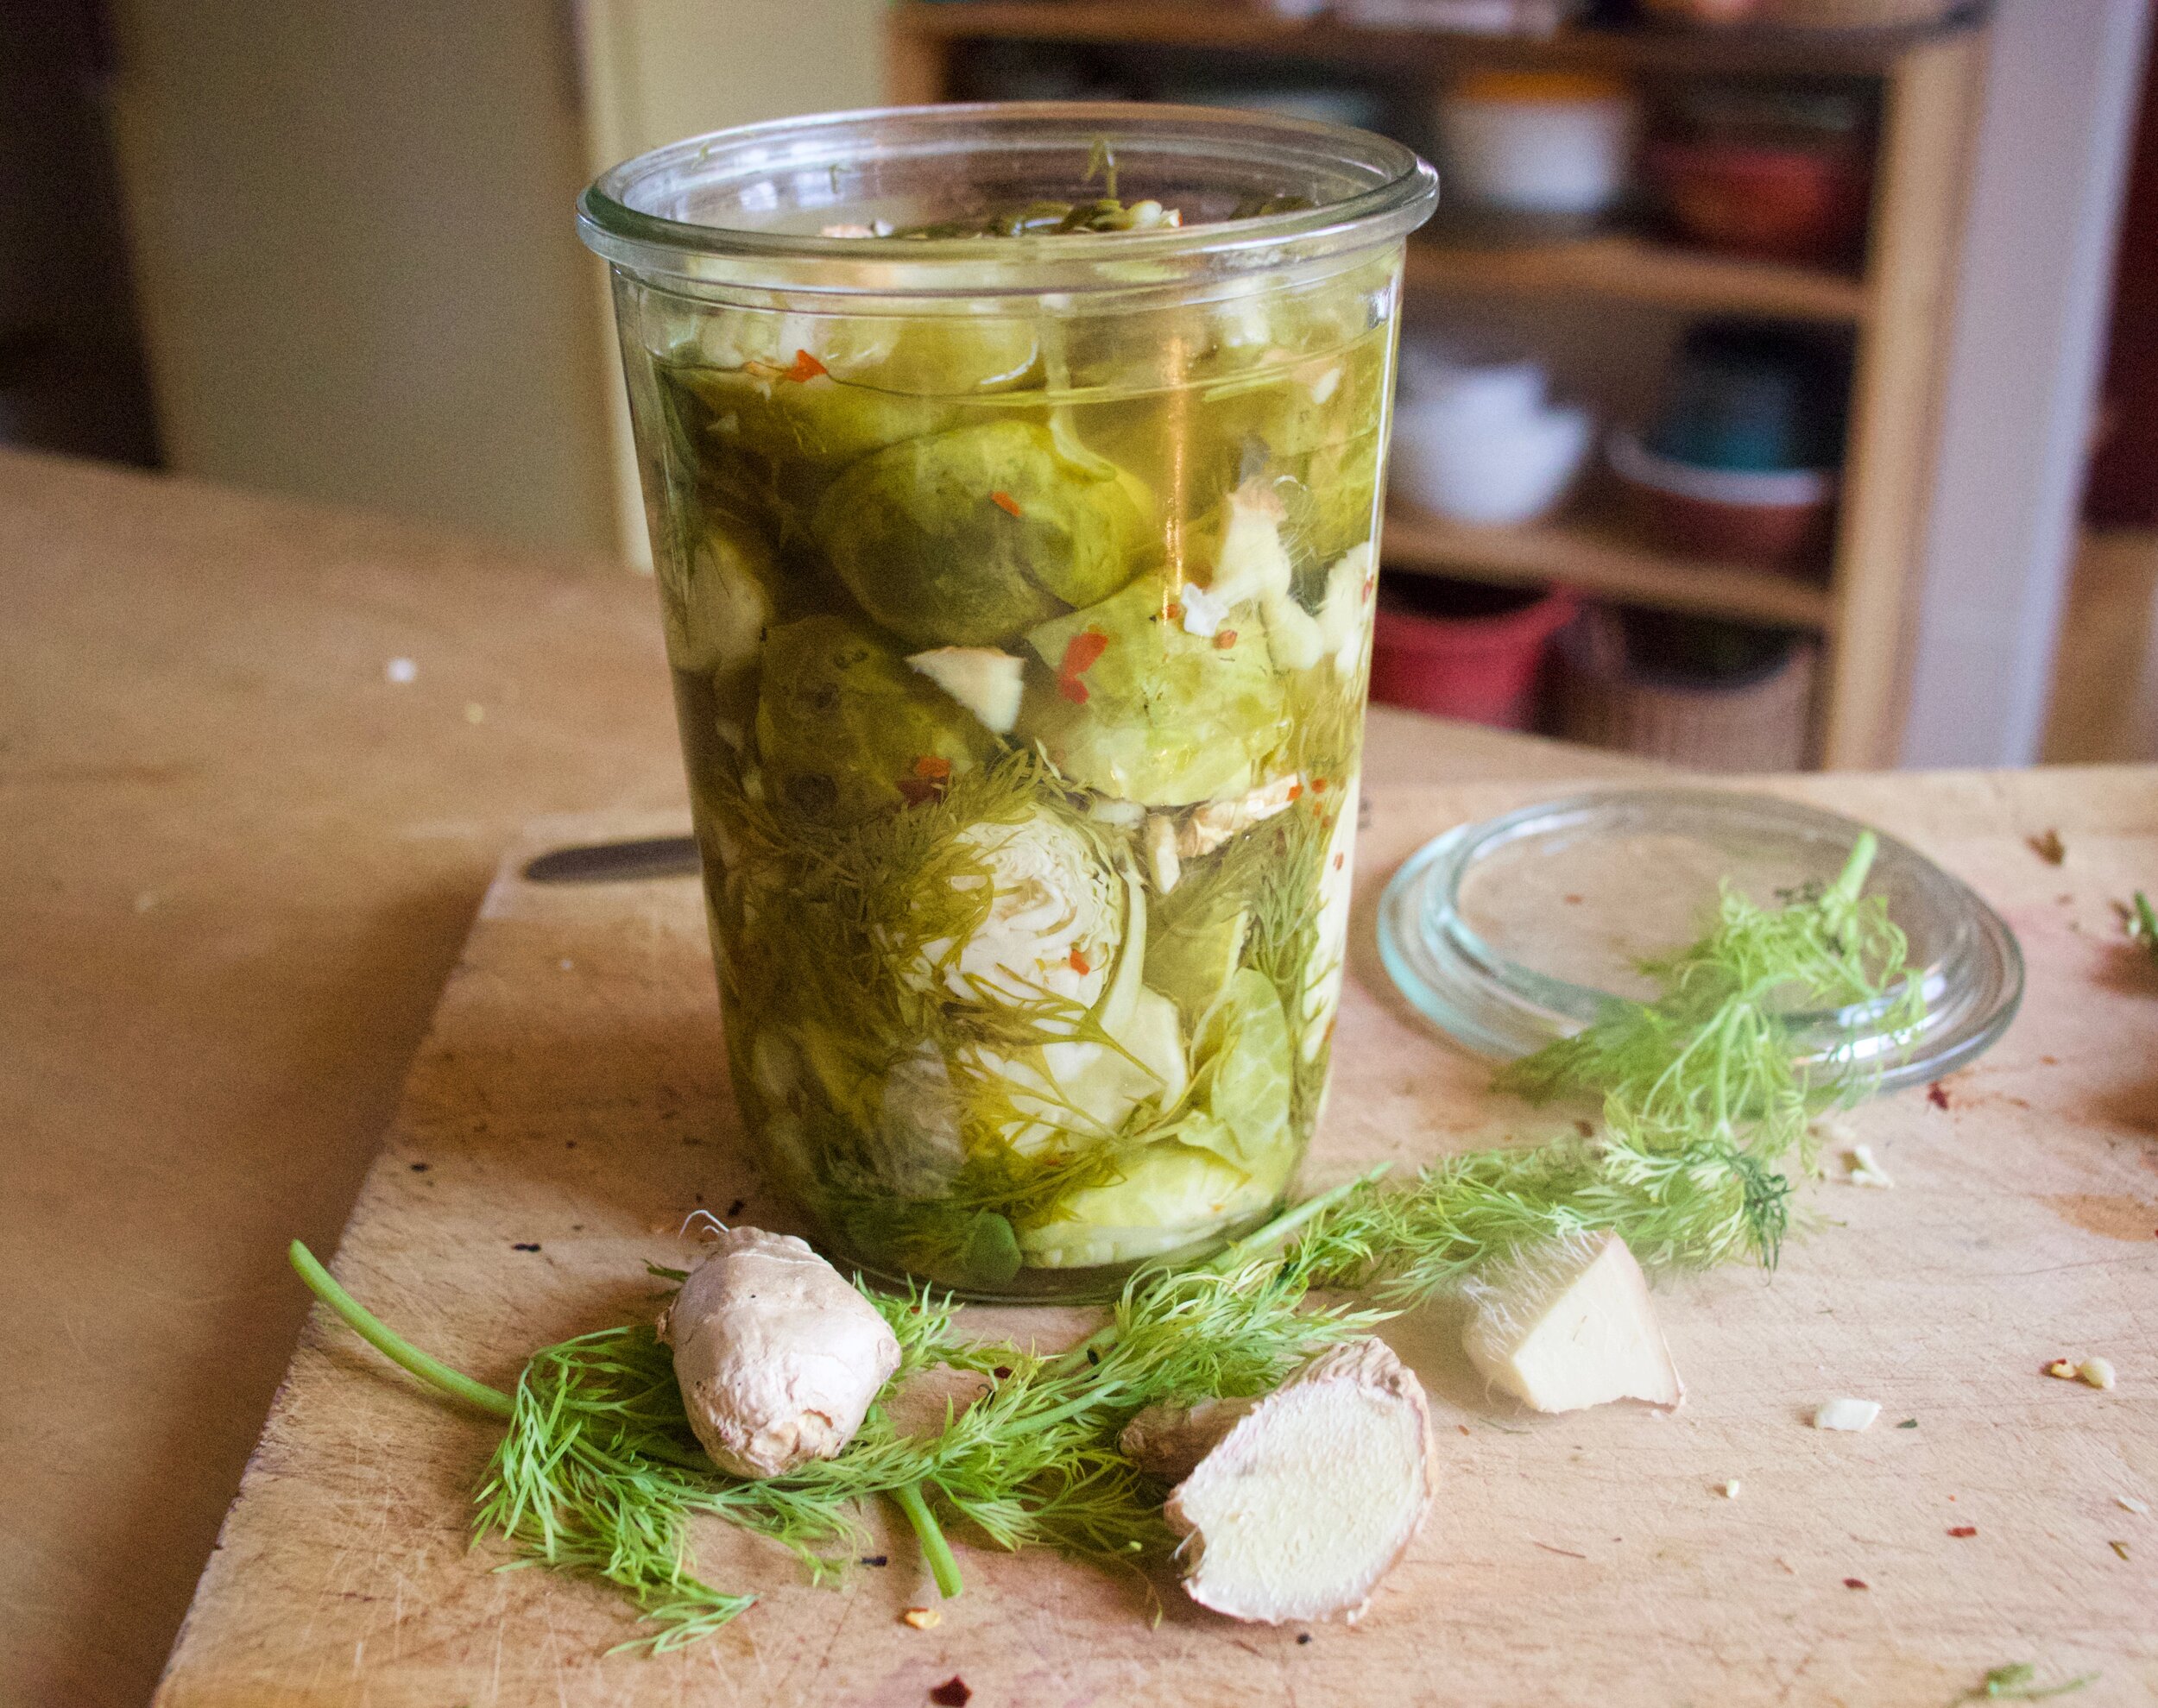
The stuff. Brussel sprouts , vinegar, fresh dill, chunks of fresh ginger, mustard seeds, peppercorn, red chili flakes, and salt.

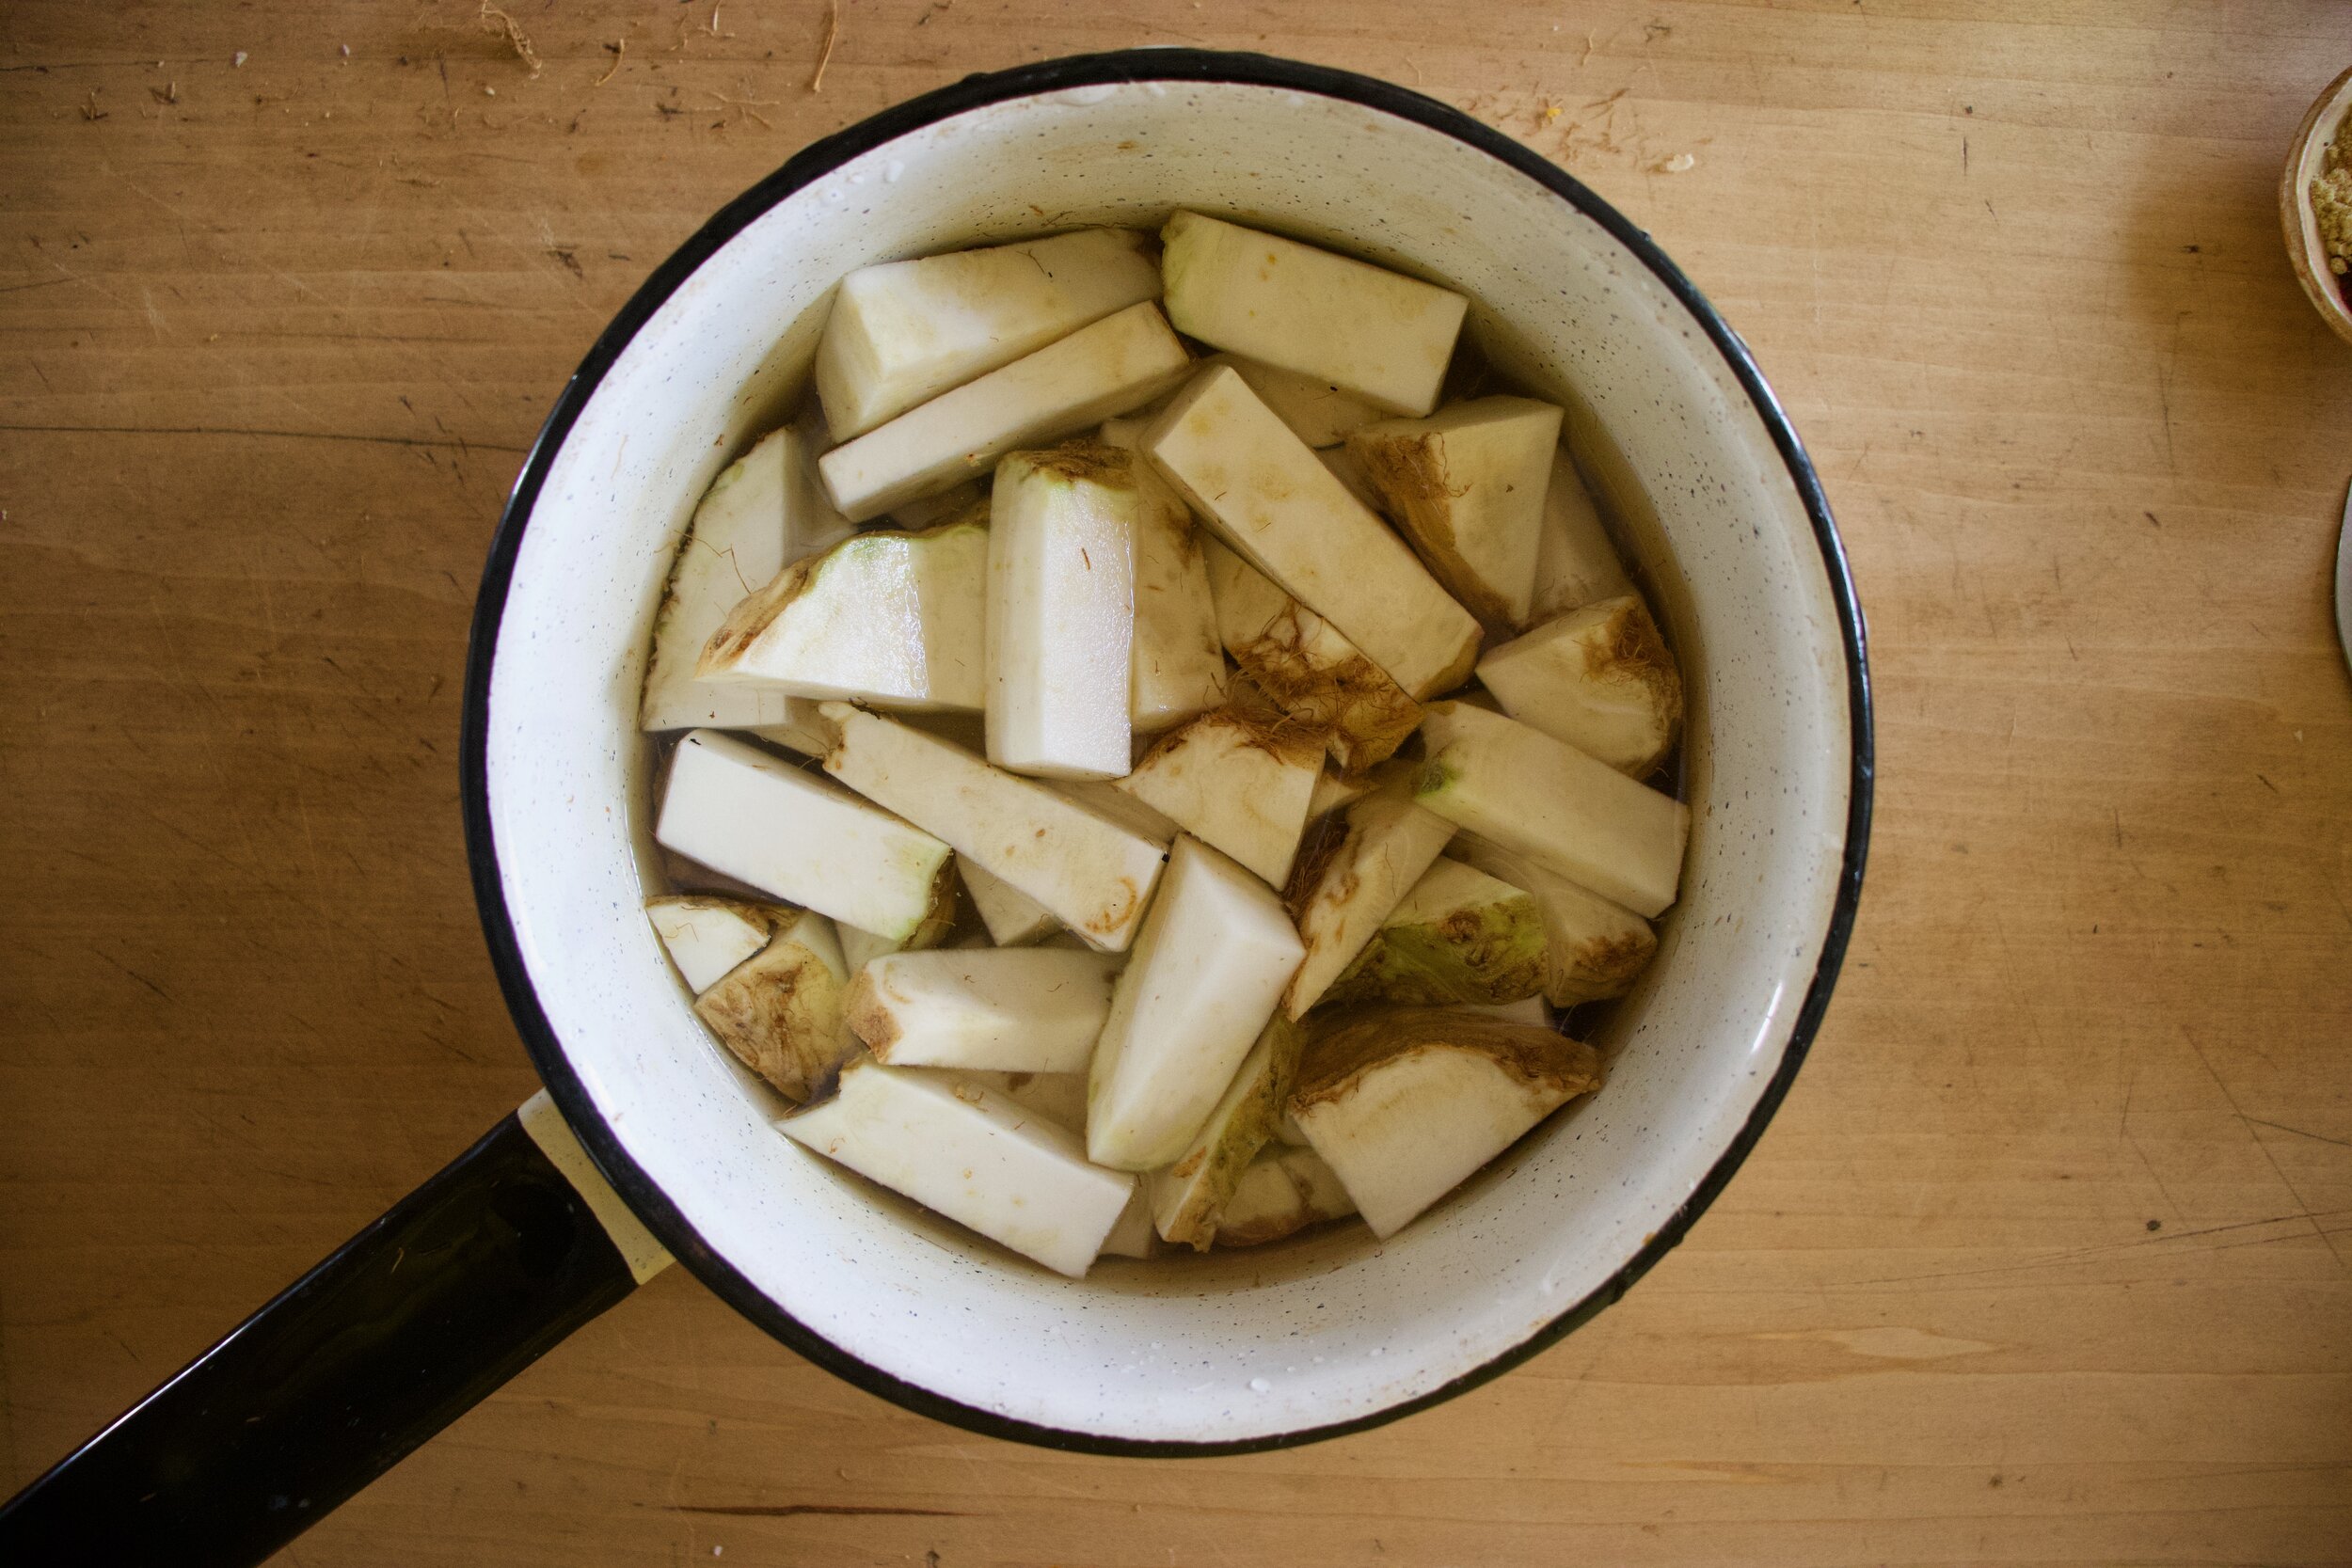
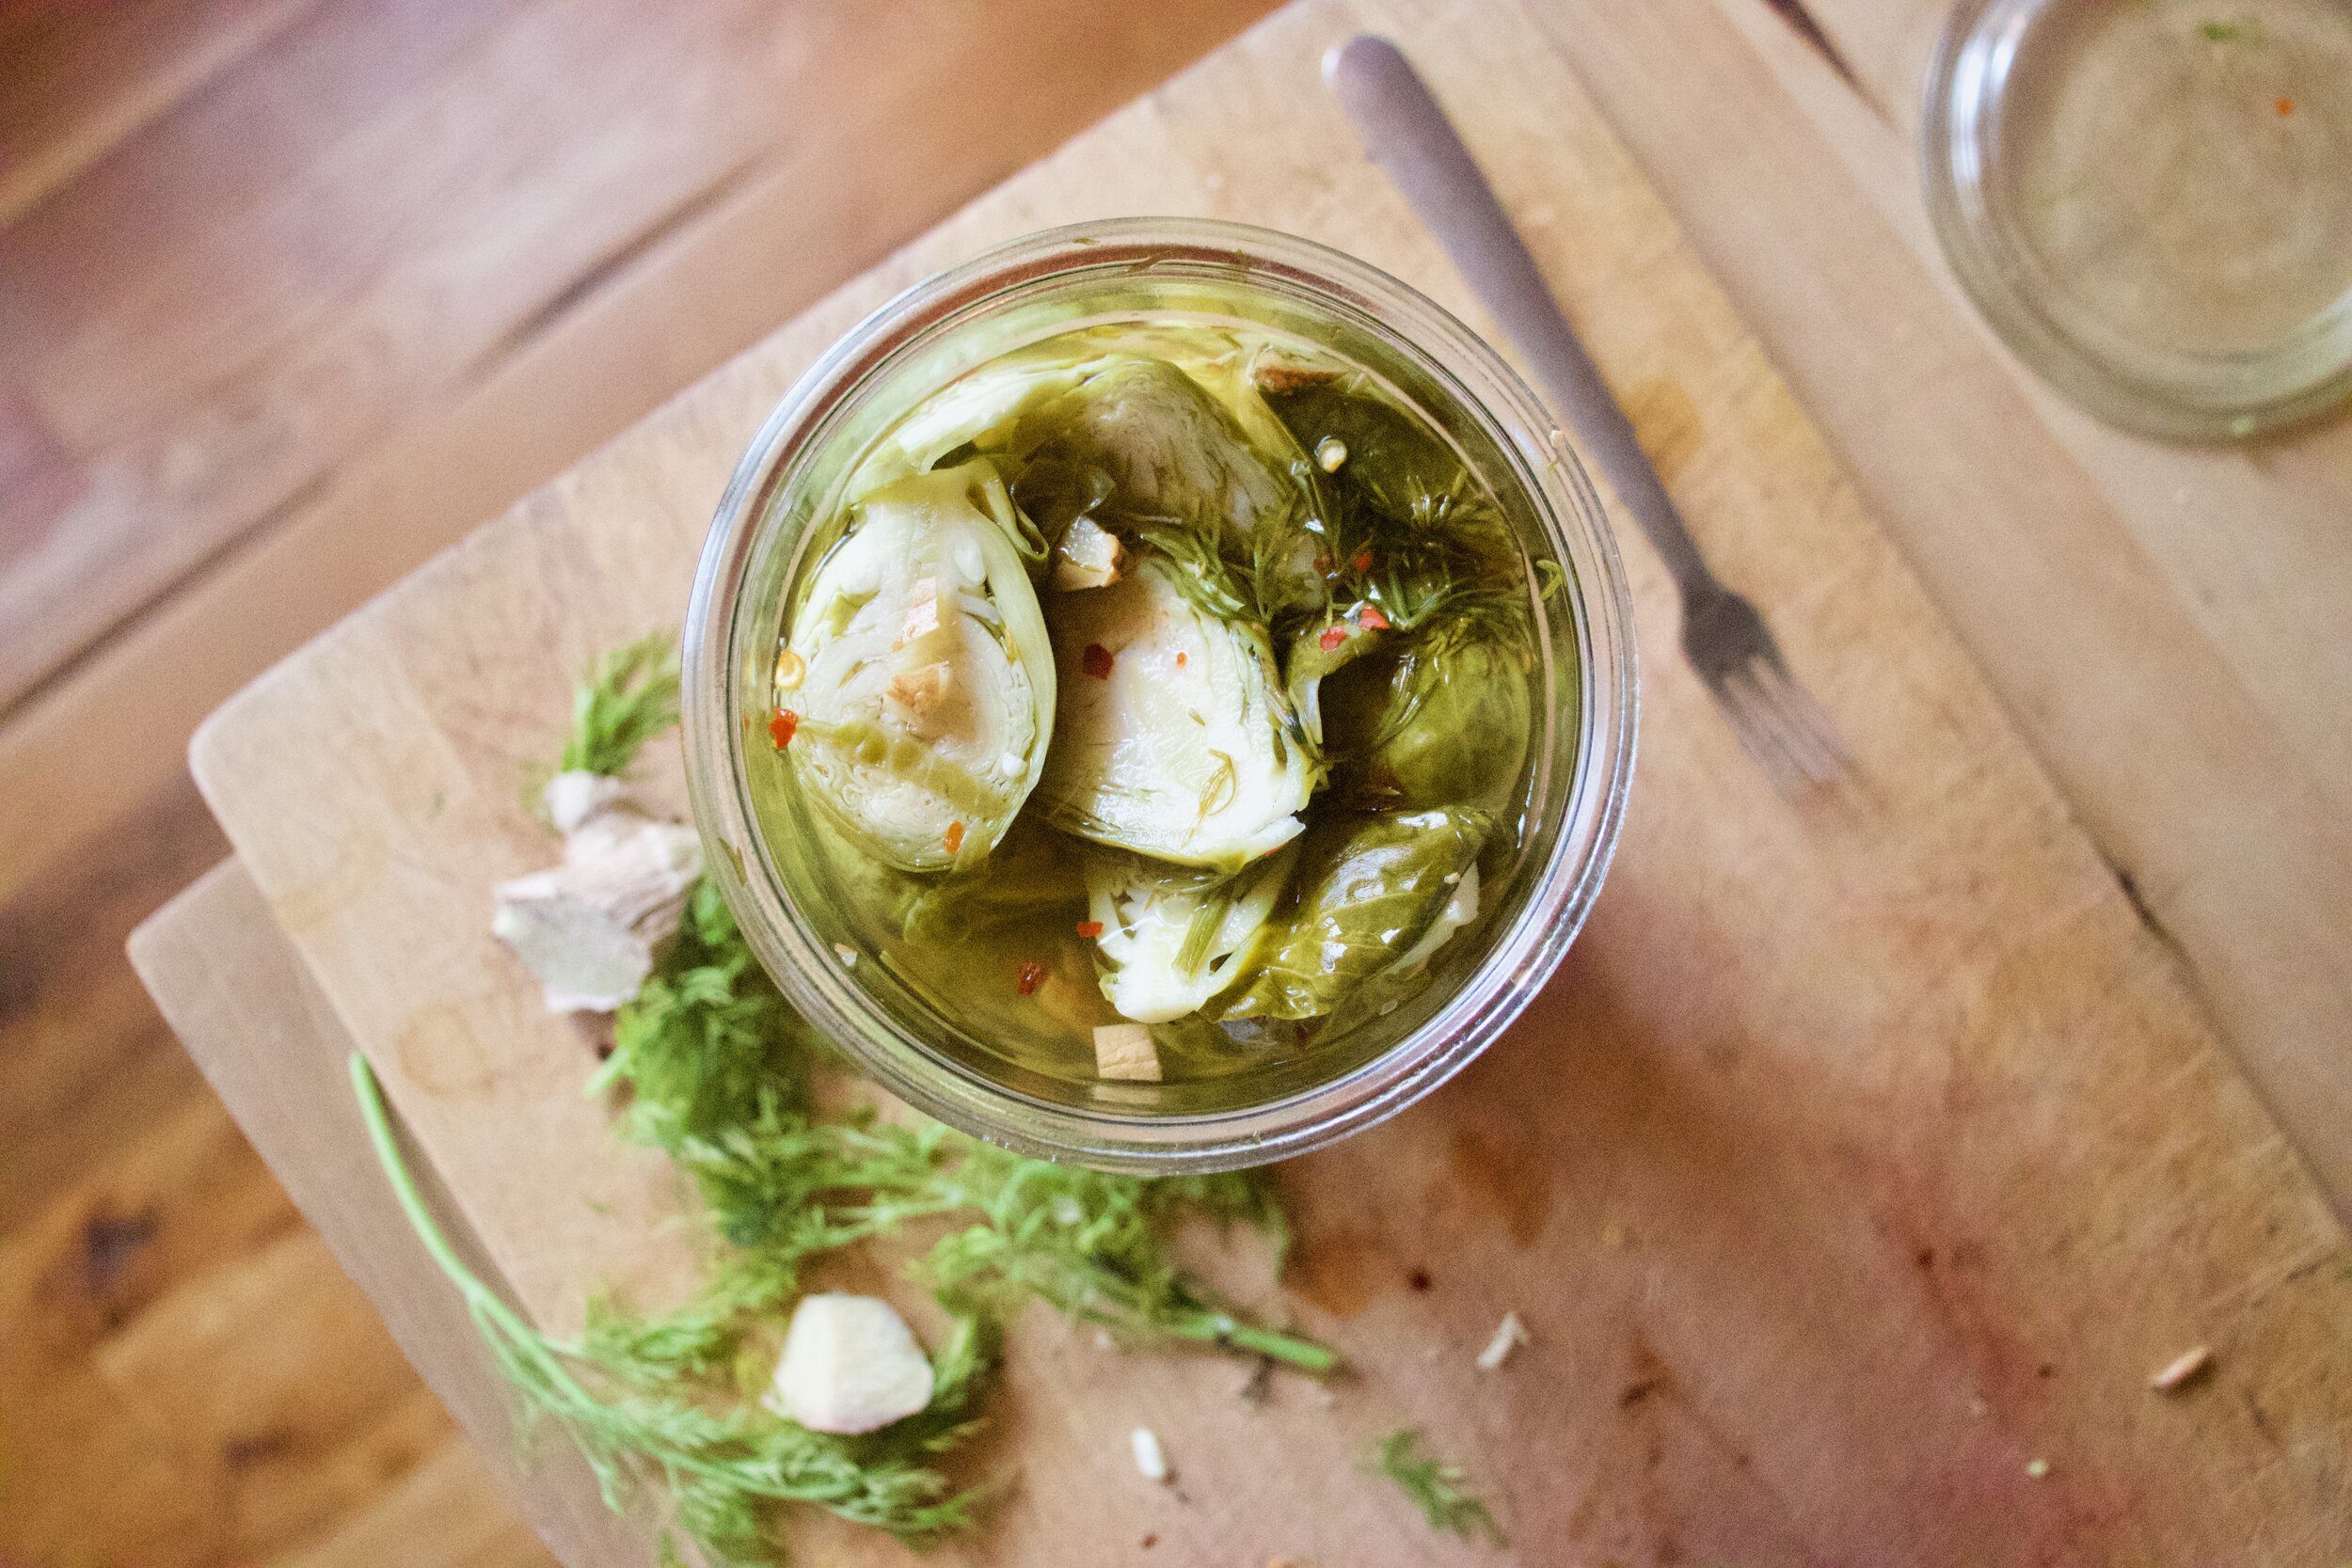
Nice and clean spouts. Cut them in half.

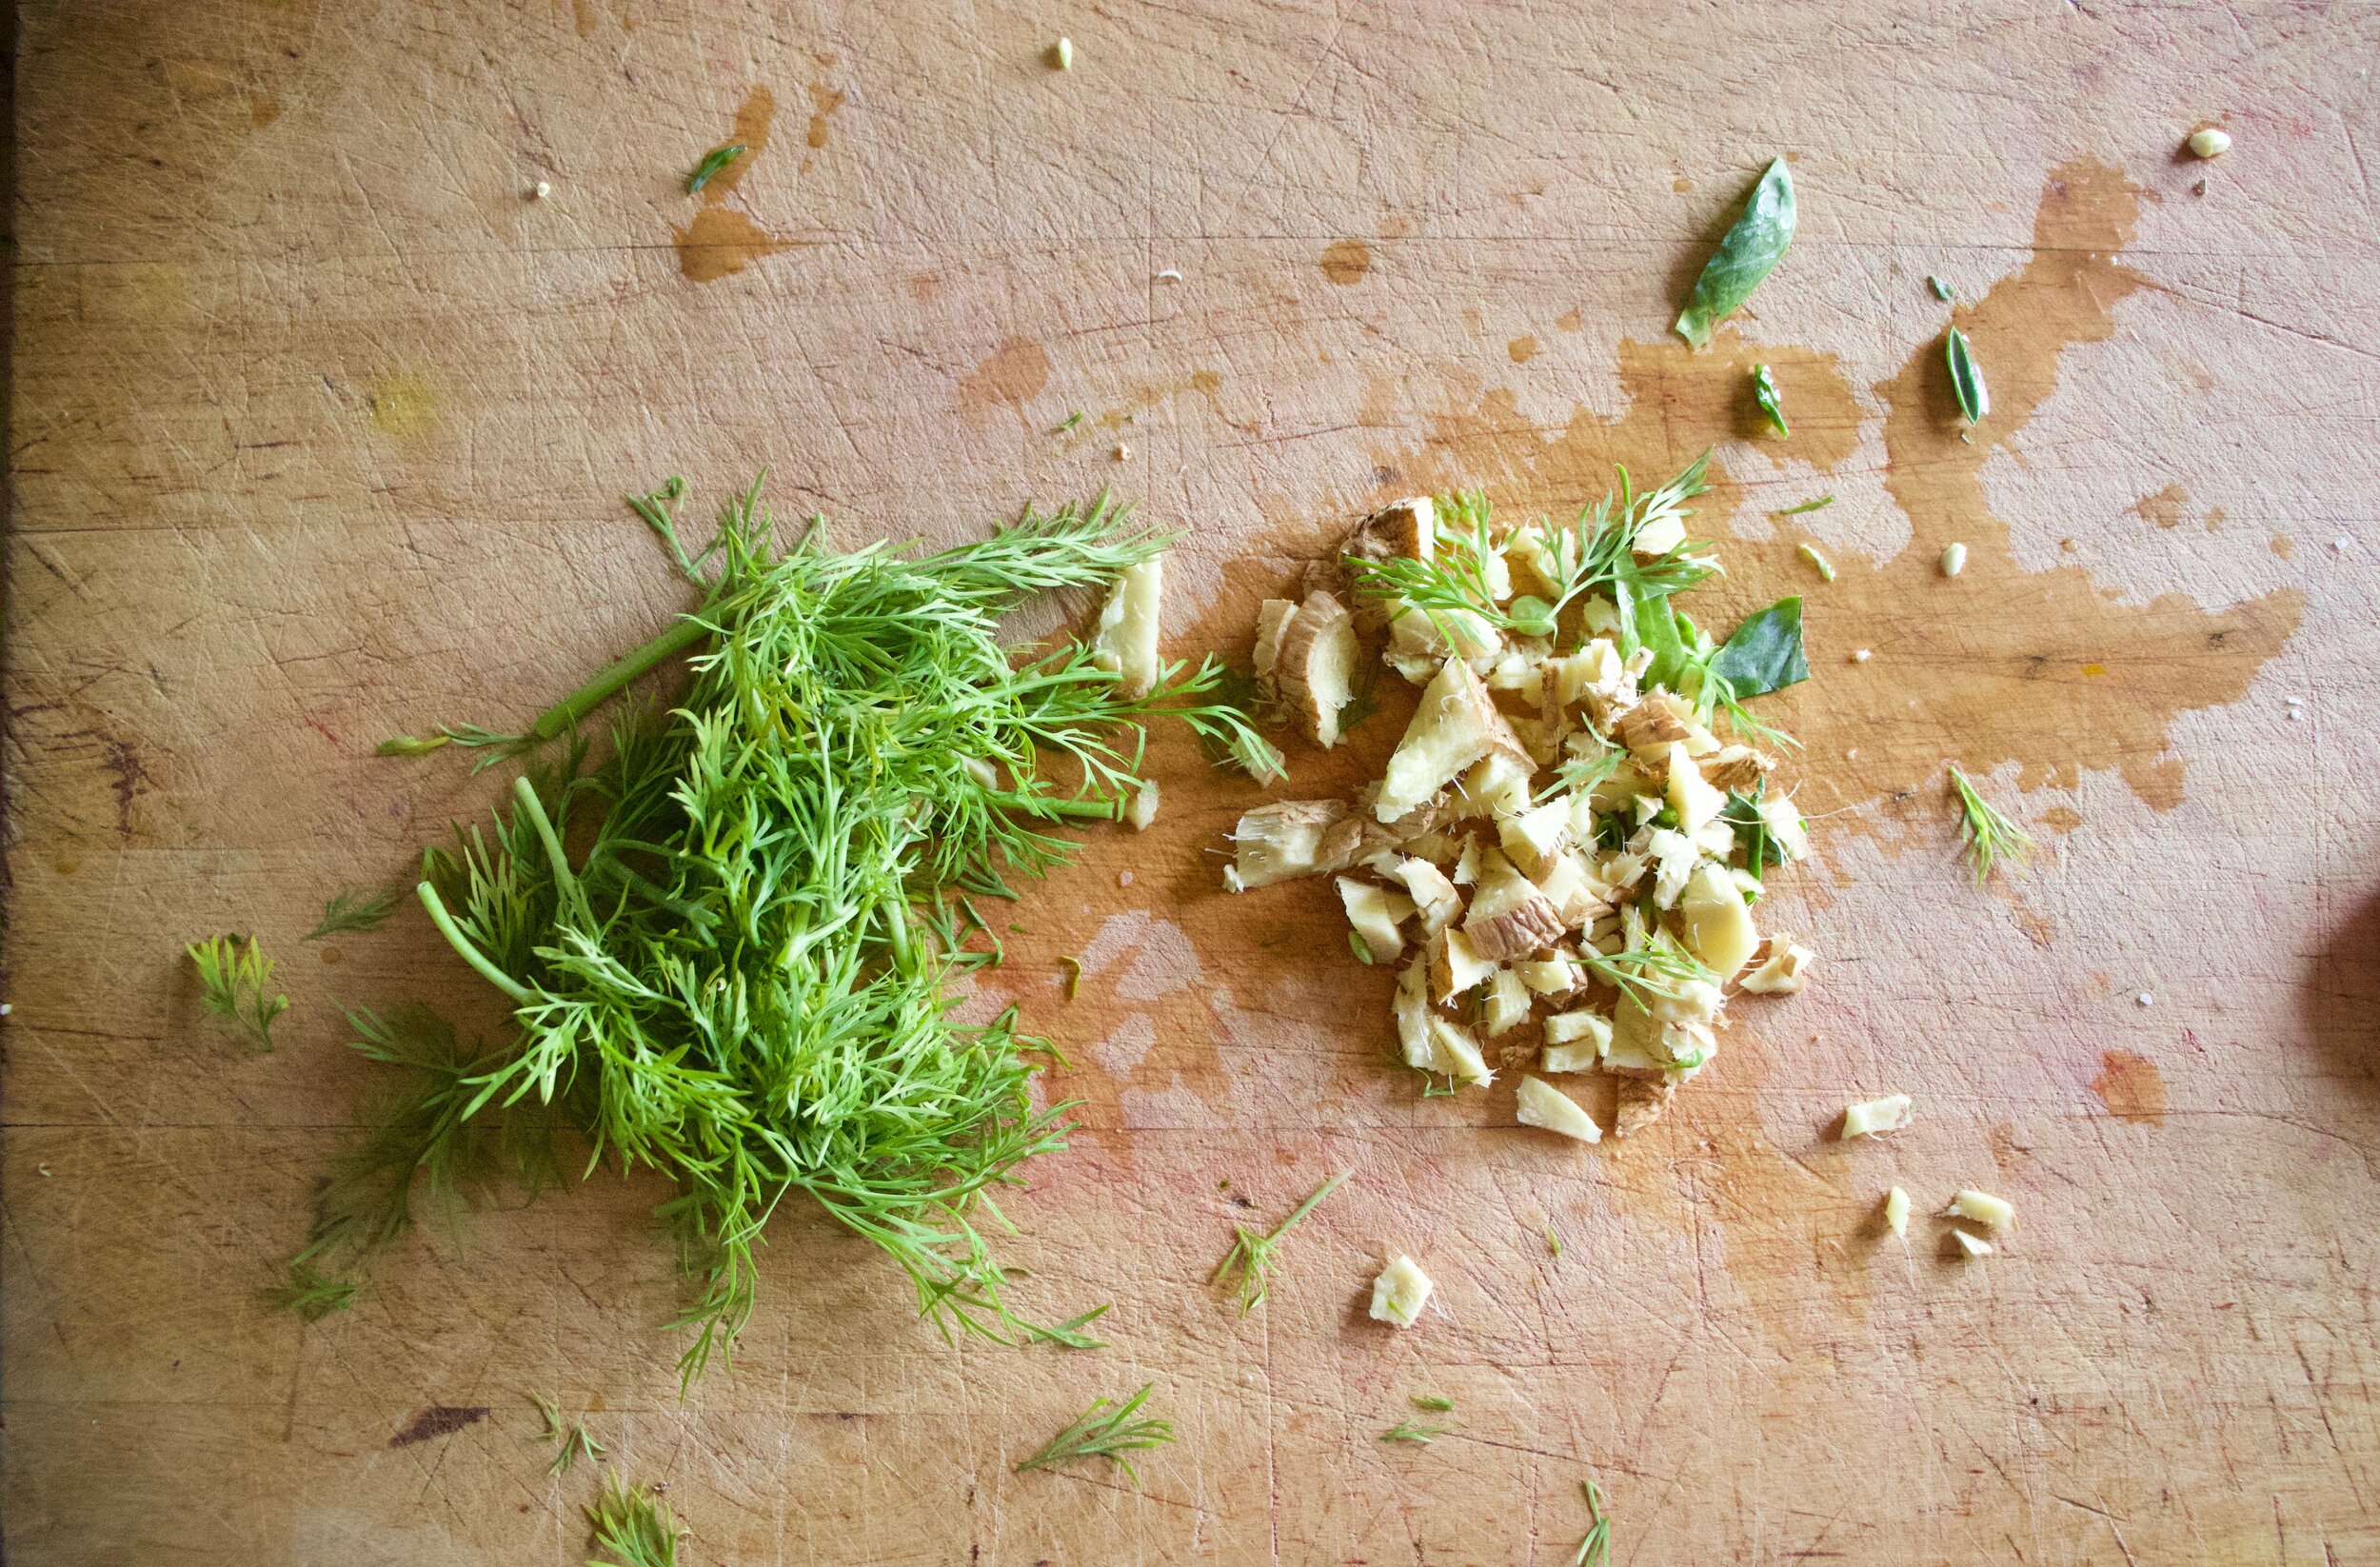
Cut up the dill into smaller pieces and as for ginger, I minced a little and cut some up into larger chunks.. I like to eat chunks of pickled ginger too.

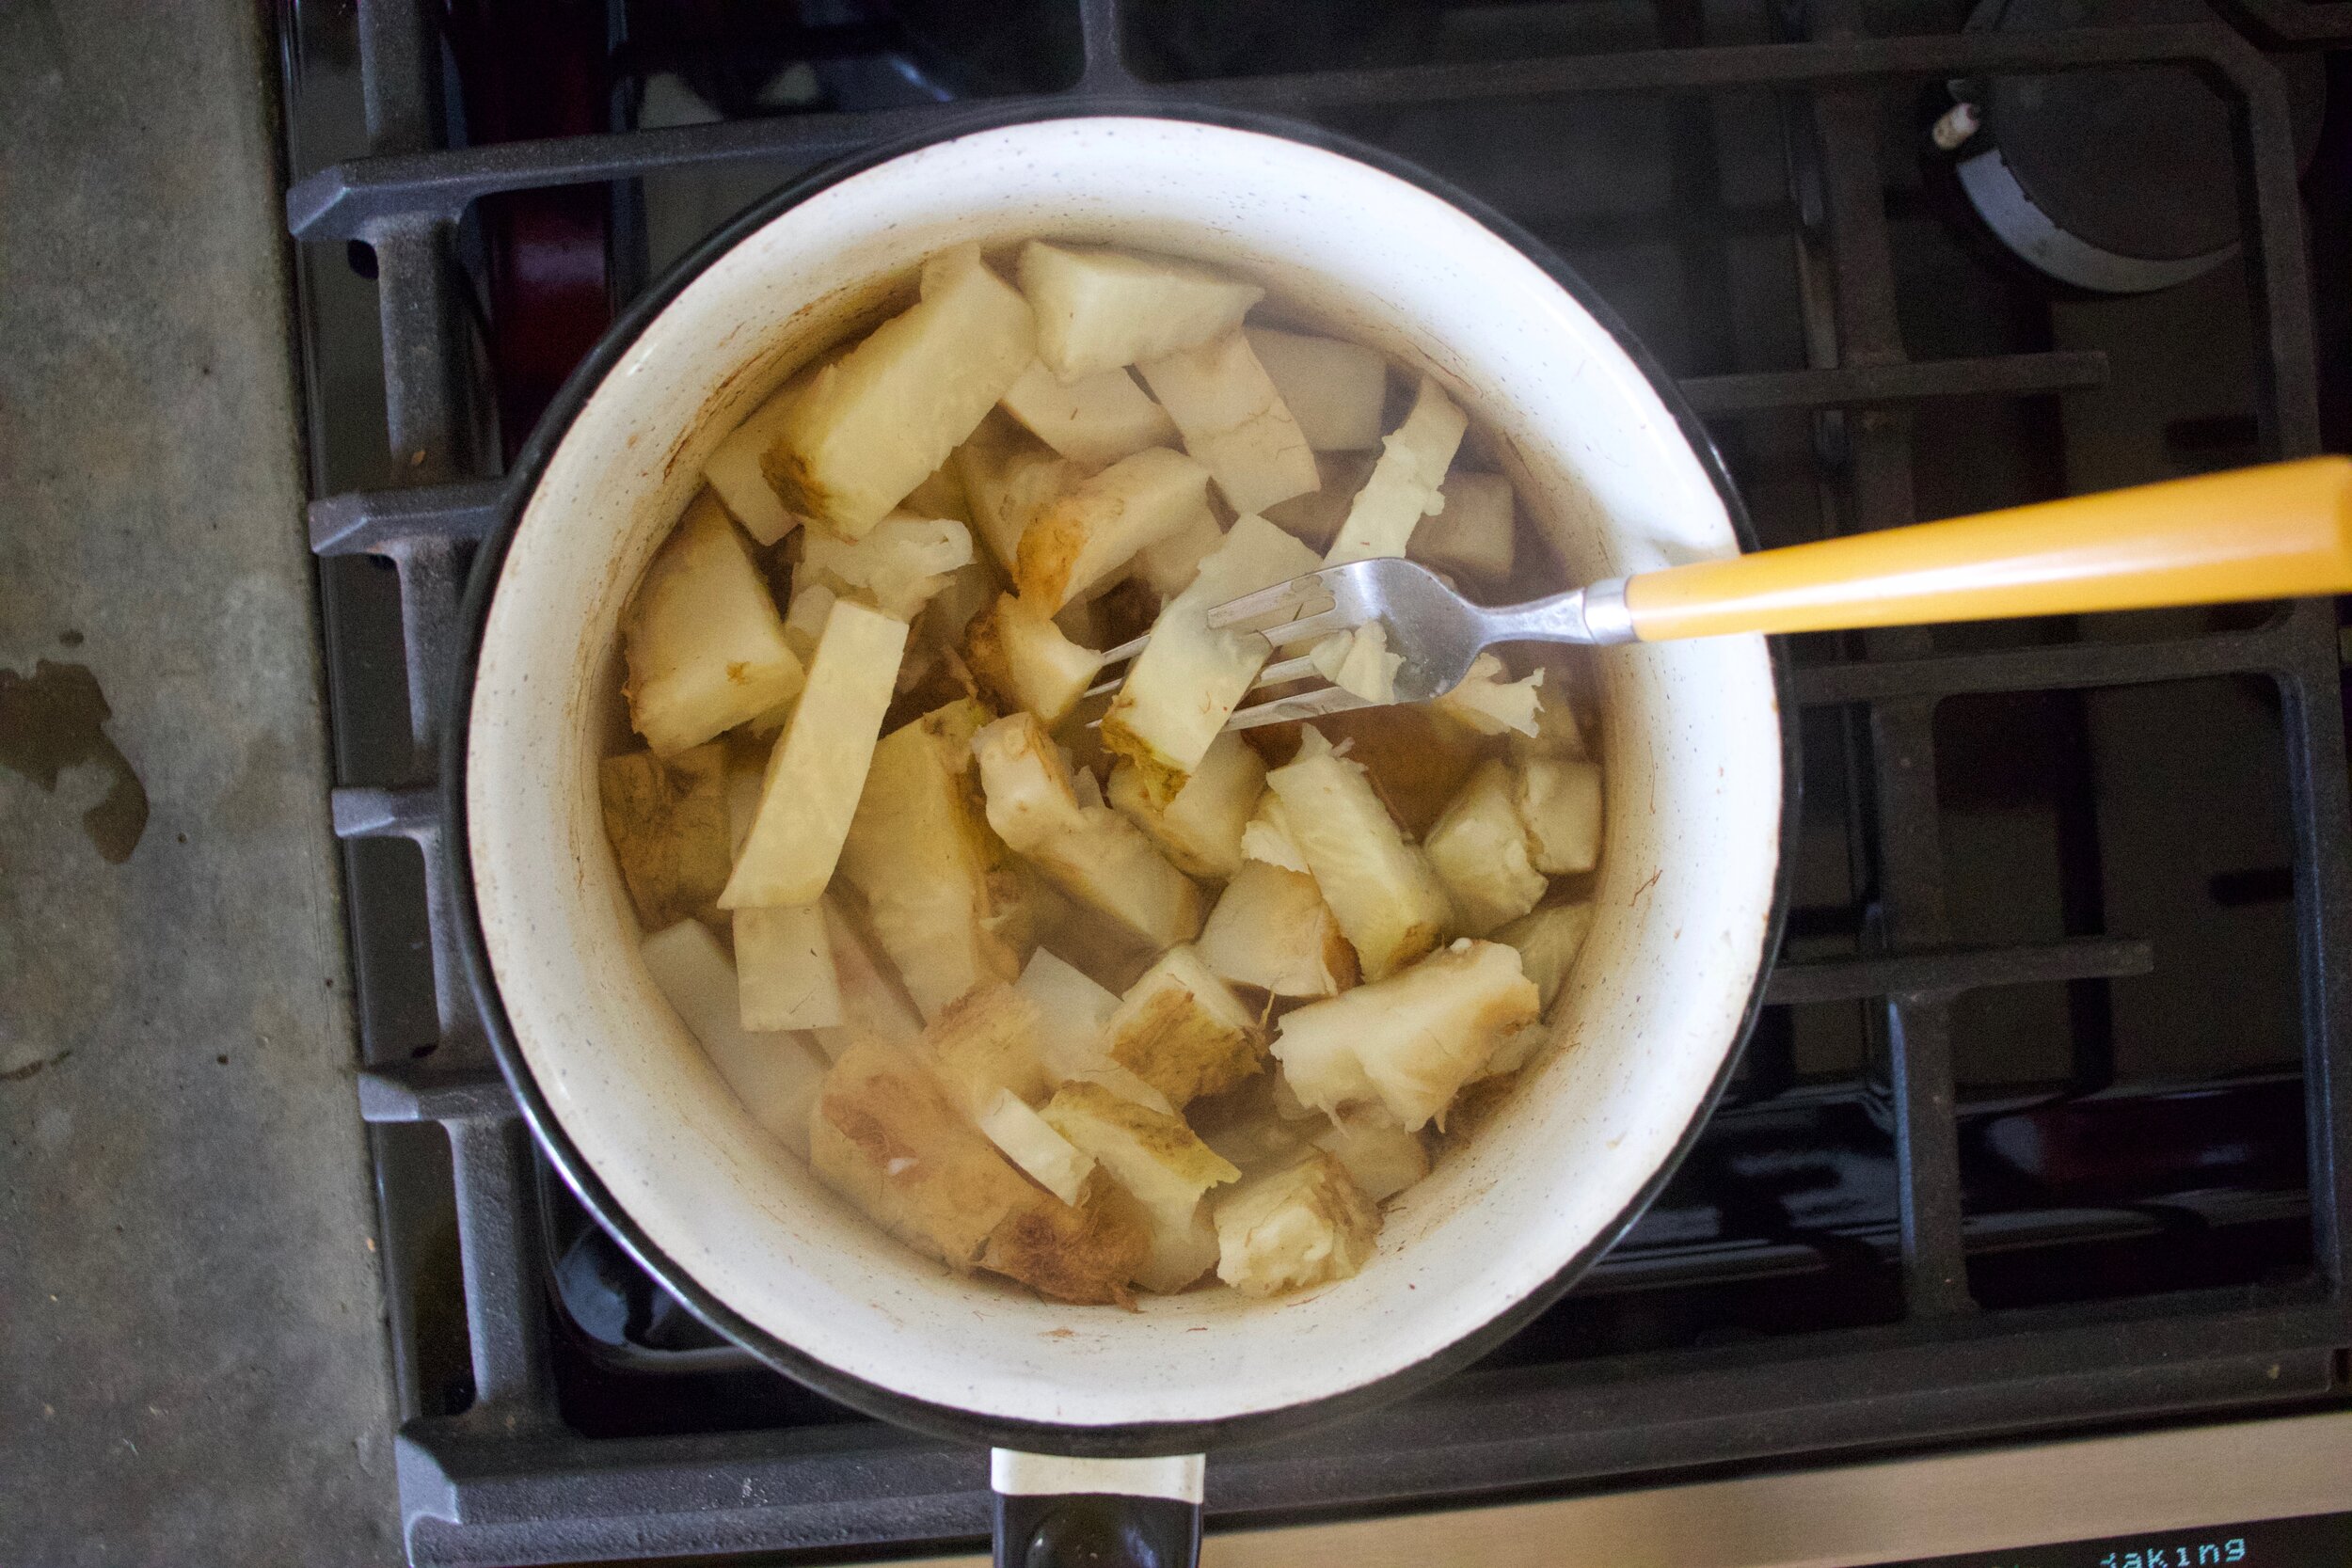
Vinegar and water go into a pot with the ginger, salt, peppercorn, pepper flakes, and mustard seed and brought to a rapid boil.

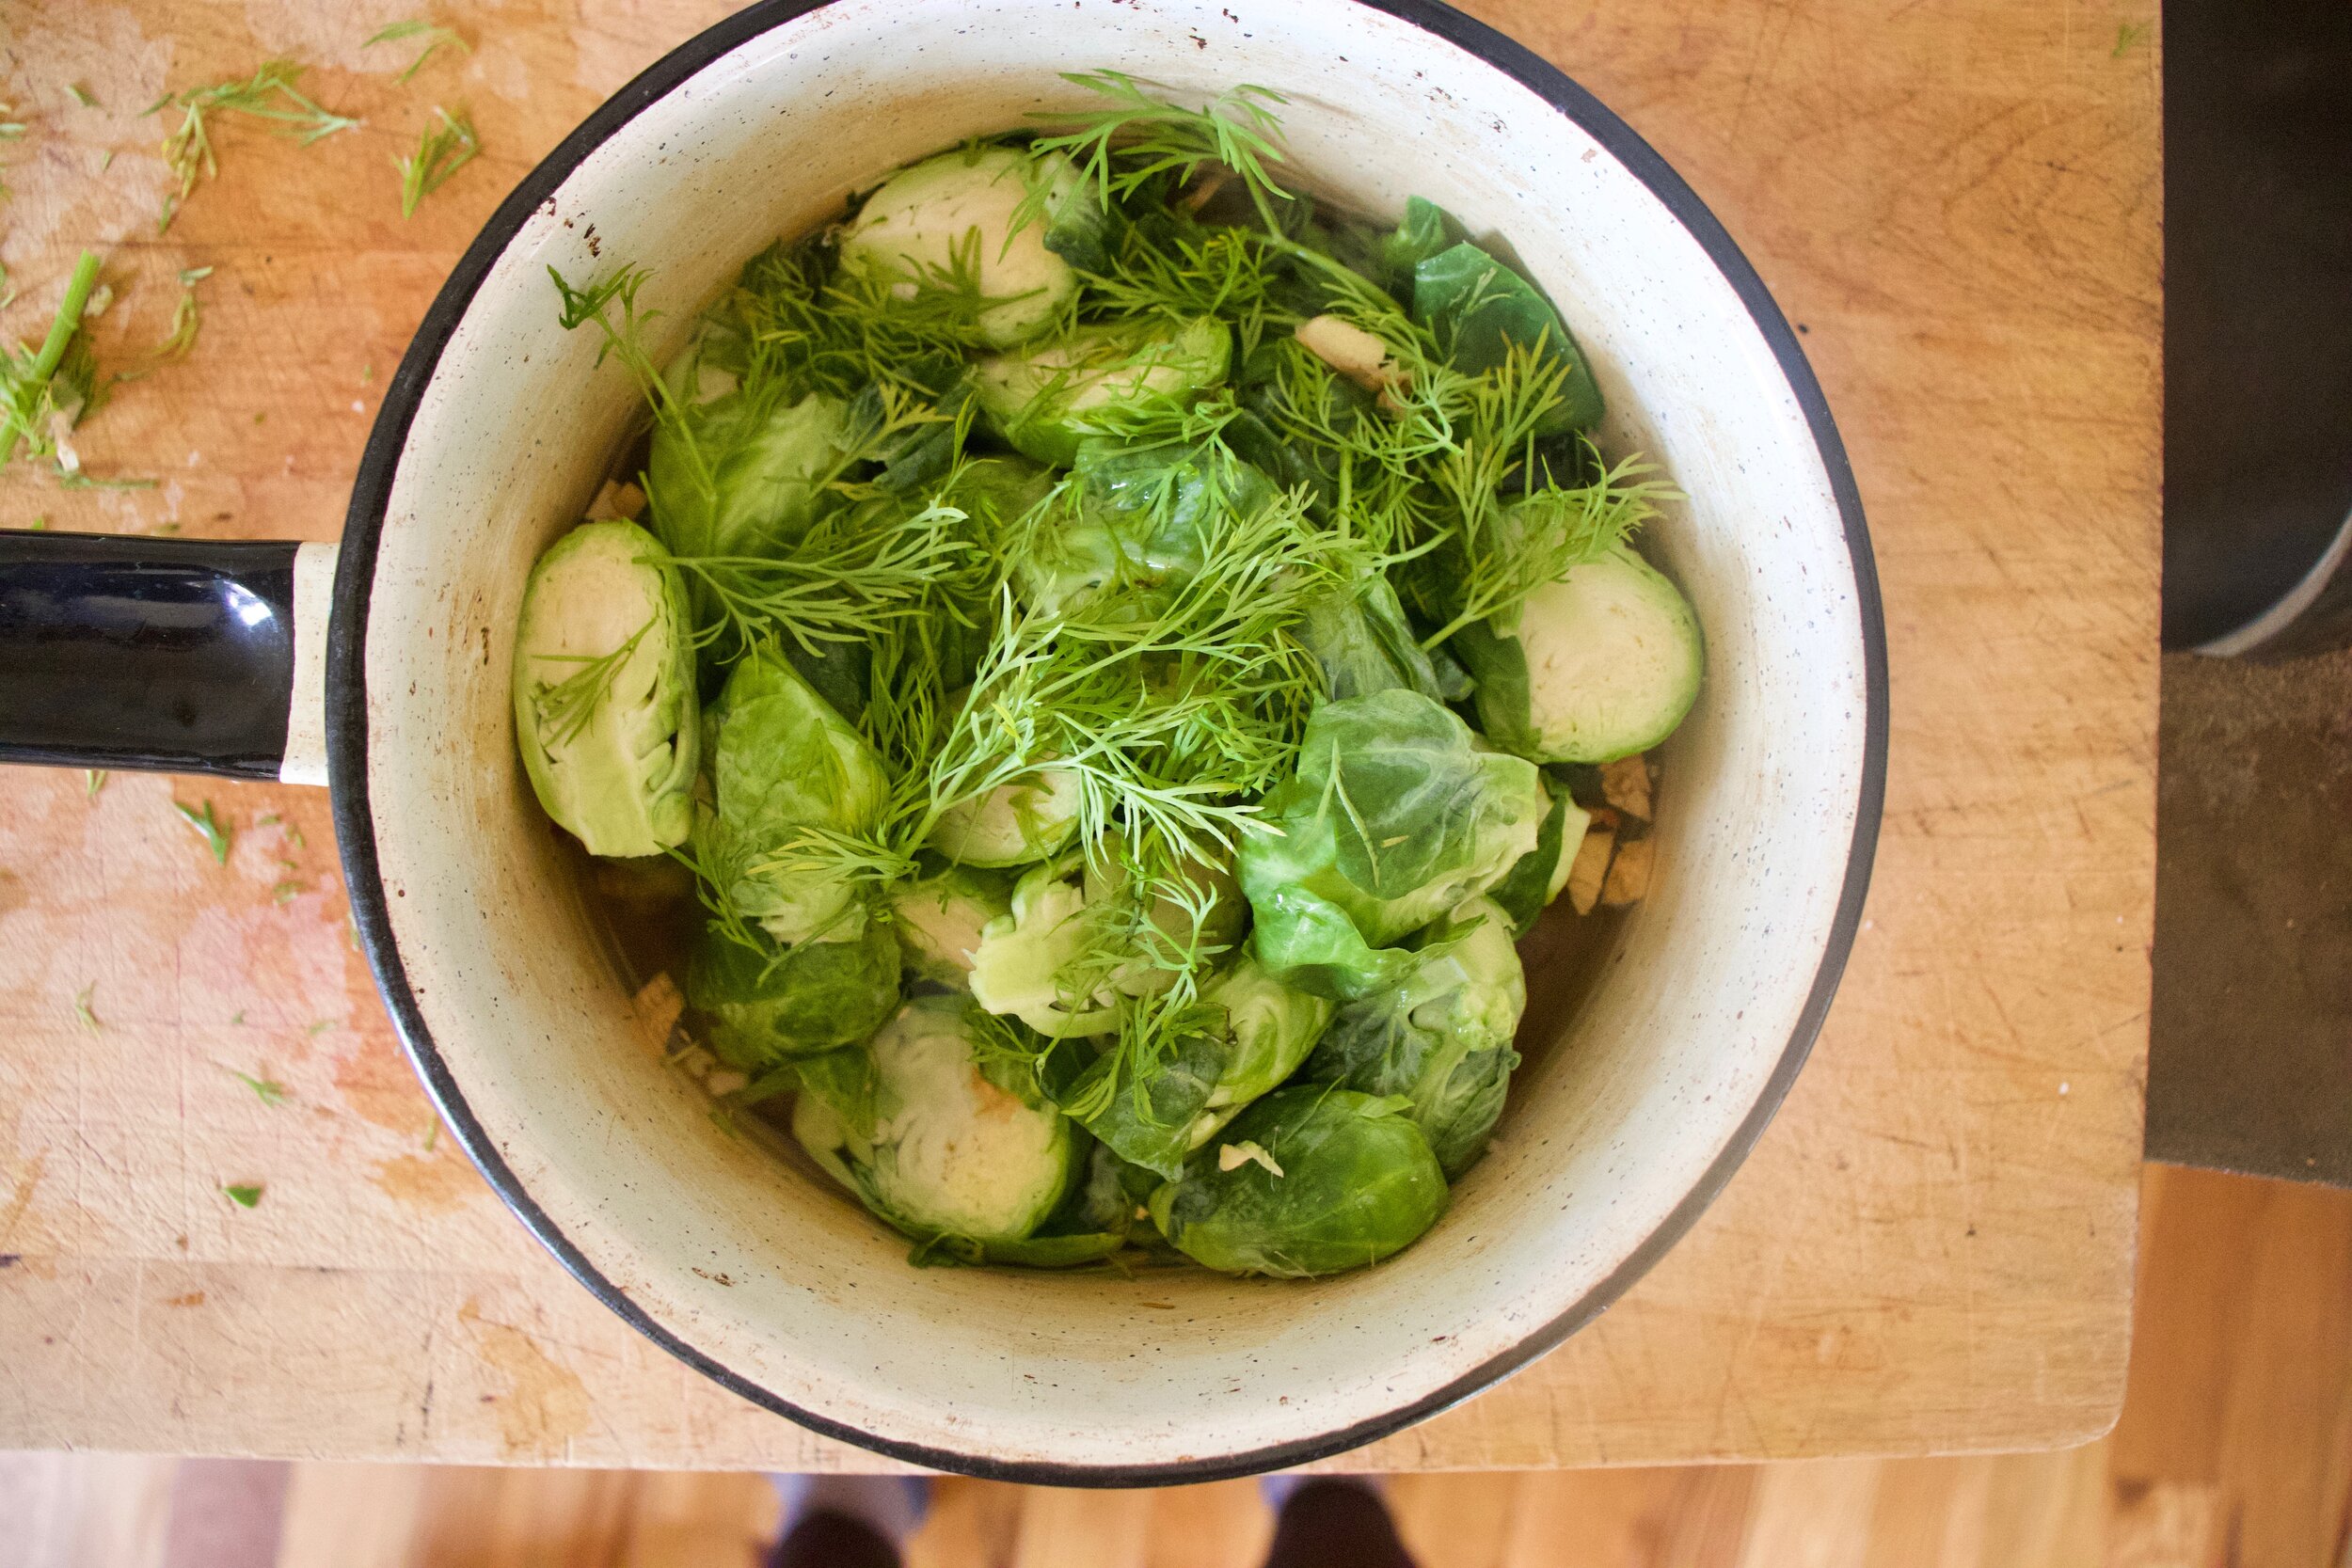
Once boiling dump in sprouts and dill and keep on heat for about 3 minute so the sprouts tenderize a little.

IMG_2247.jpg

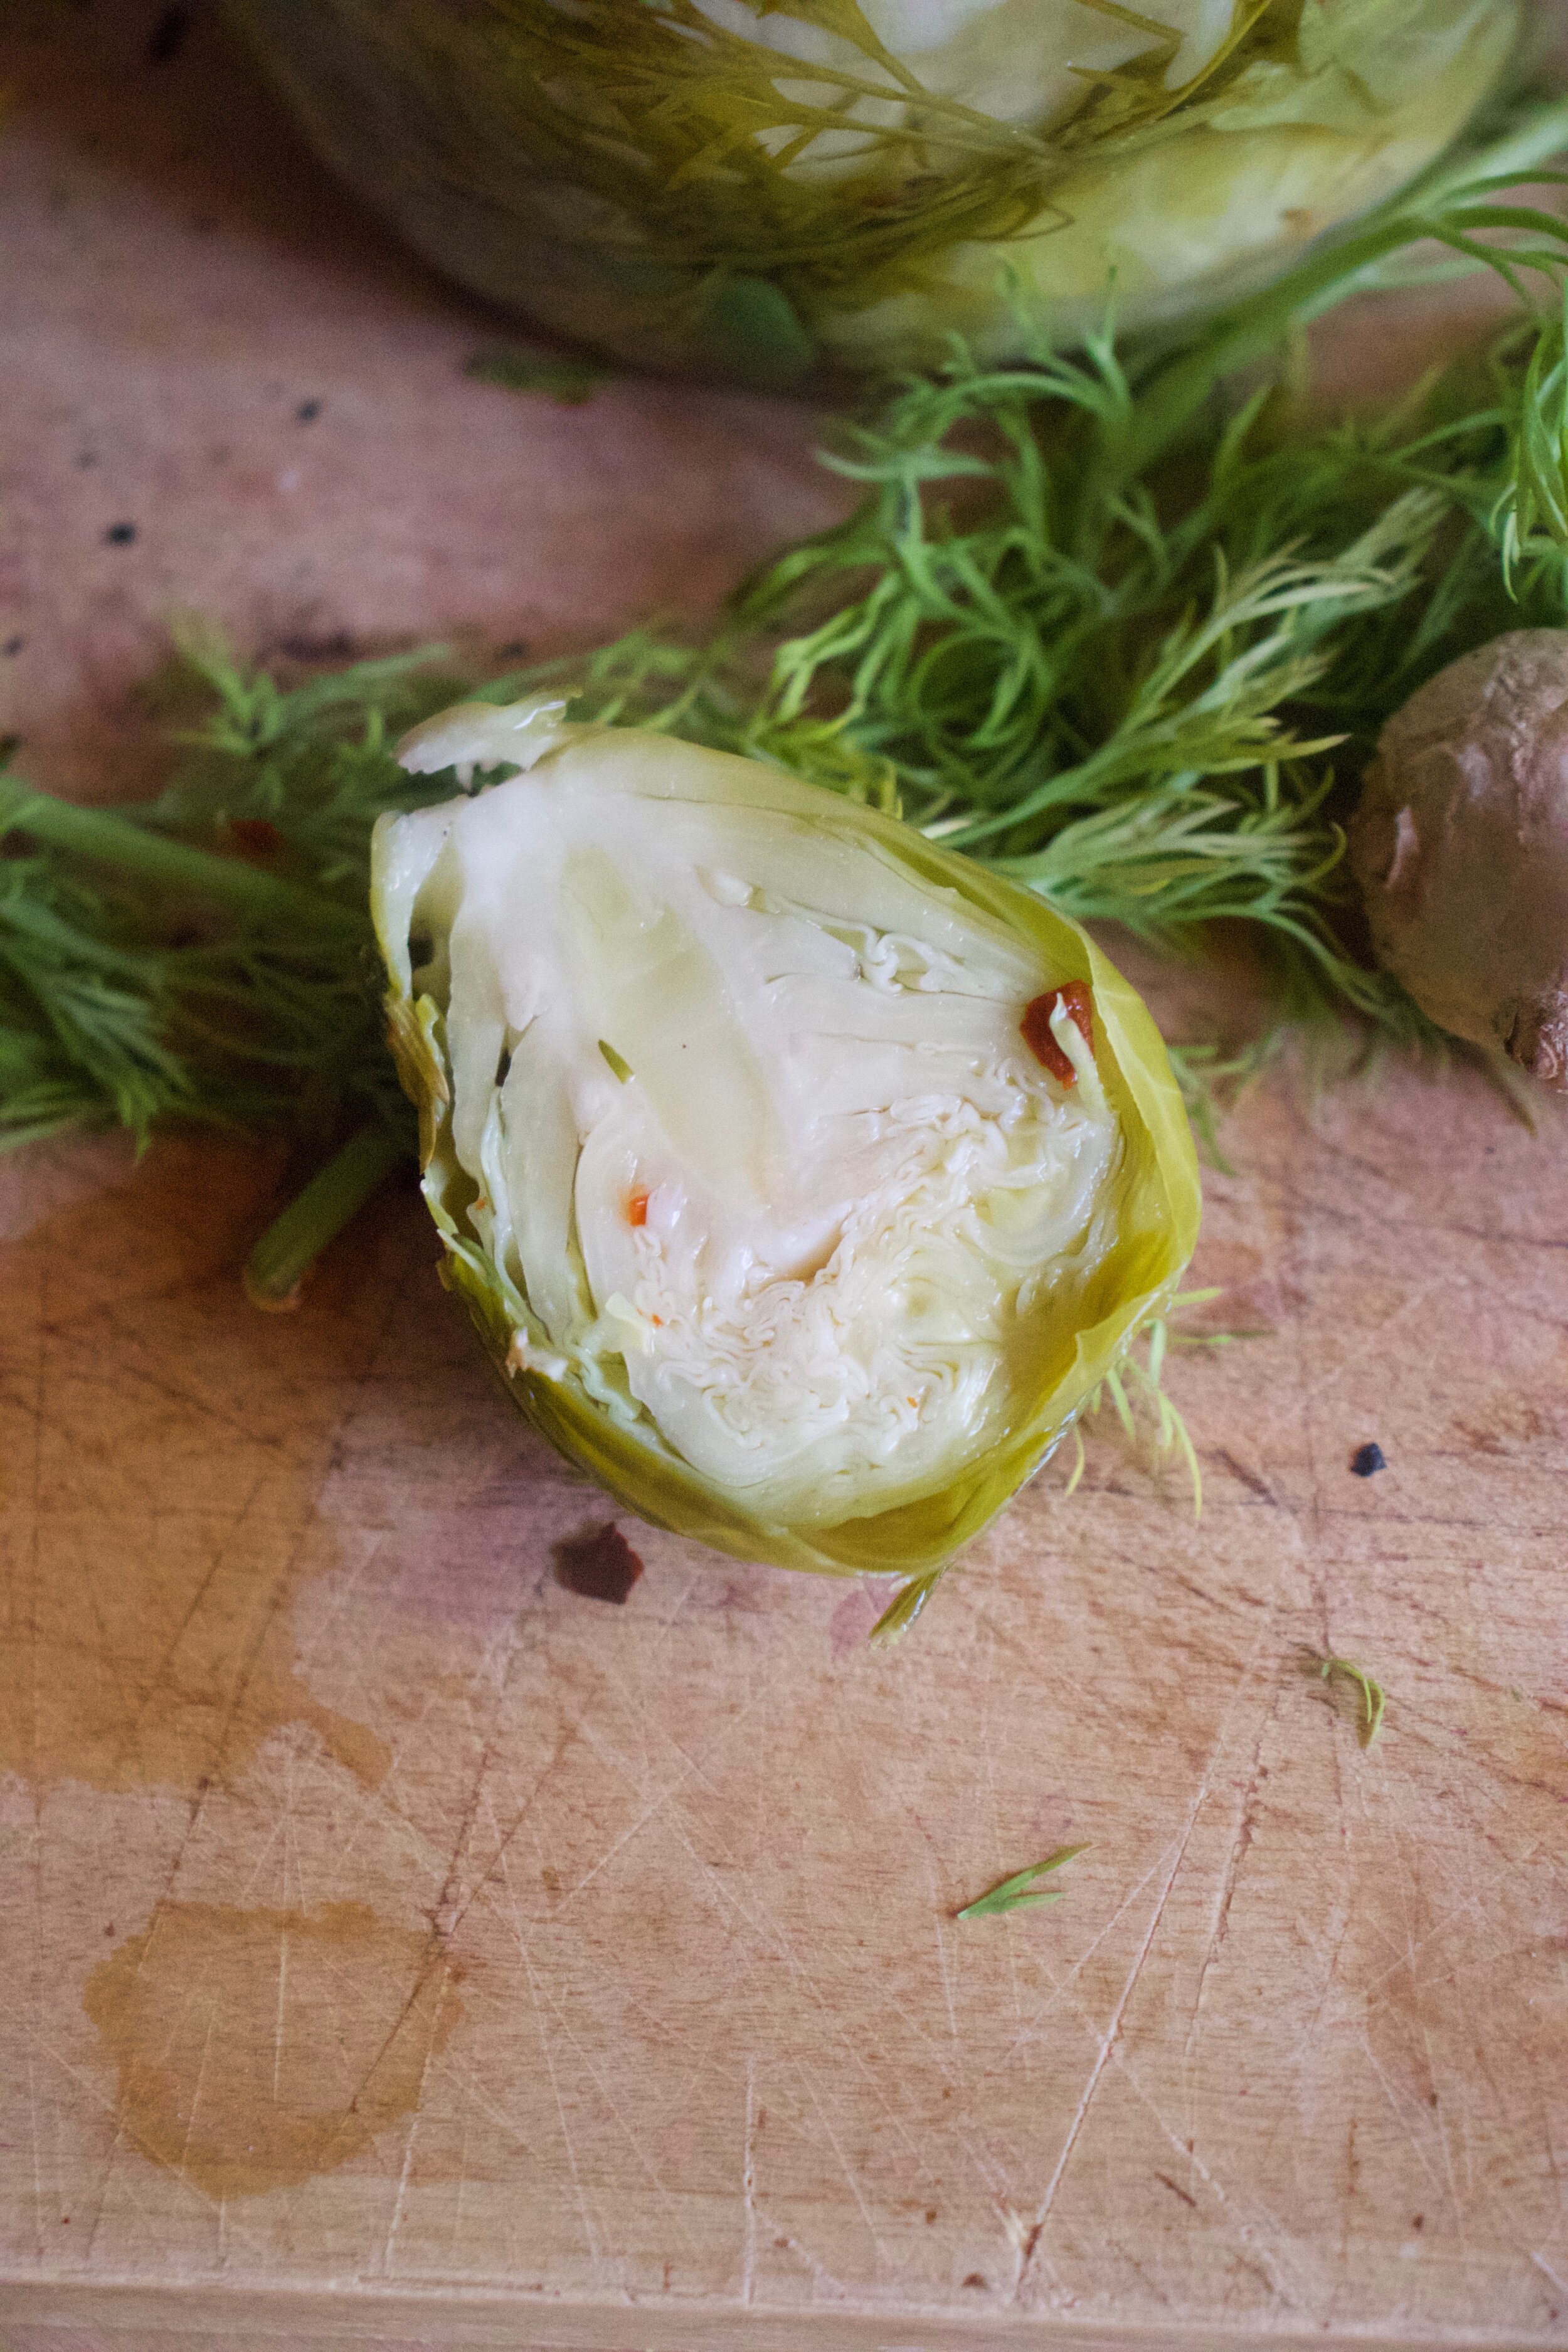
Then dump it all into a clean jar. And that is it. Yes you can eat one, but really, you should wait like a day or two. And after a week.. Perfection.

So yeah, once you got them in a jar, let them cool to room temperature, top with a lid, and place in the fridge.

If you are wise you will make multiple jars because these sprouts will not last.

-C


Pickled Ginger Dilly Sprouts

makes 1 quart sized jar

  • about 20 good sized Brussel sprouts

  • 2 cups white vinegar

  • 2 cups water

  • 3-4 sprigs fresh dill

  • inch of fresh ginger root

  • 1 teaspoon pickling or kosher salt

  • 1 teaspoon peppercorns

  • 1 teaspoon mustard seeds

  • 1/2-1 teaspoon red pepper flakes (more for spicer)

Clean and halve all the sprout. Stick them all into a clean quart sized jar to make sure they all fit then dump them out.

Grab ginger and rough chop it. Cut dil up into smaller pieces.

Dump the vinegar, water, salt, peppercorn, red pepper flakes, mustard seeds, and salt into a pot. Bring to a rapid boil. Add in the halved sprouts and ginger and toss around. Keep on heat for about 3-4 minutes just to give the sprout a little bit of time to soften just a bit. Remove pot from heat and carefully dump all the sprouts and everything in the pot into the clean jar. Pack sprouts down with a wood spoon and make sure they are completely submerged in liquid. If all the liquid doesn’t fit, just dump into a smaller jar and use for a salad or something.

Let sprouts cool to room temperature then stick a lid on jar and place in fridge. Sprouts are good eaten whenever, but are at their best after a few days in the fridge.

They will keep for a month or so but who are you kidding, there is no way they will last that long.

In Vegetables, Vegan, snack, quick and easy, Pickled, holiday Tags dilly sprouts, brussel sprouts, homemade, refrigerator pickles, ginger, dill, quick, easy, fresh, seasonaf, gift idea, vegan, vegetable, food, gluten free, healthy, plant based
Comment

Spaghetti with Roasted Green Tomato Sauce

September 12, 2020 Colleen Stem
IMG_0353.jpg
IMG_0334.jpg
IMG_0283.jpg

If you are a gardener or farmer (or know one) you know. It’s that time of year where there are so many tomatoes, and I right? And with the bounty of ripen tomatoes comes the many green tomatoes, There are always green tomatoes and they are not to be dismissed.

Sure a freshly picked gorgeous red or orange tomato, ripe and sweet, eaten within minutes of being plucked from the plant is one of life’s greatest pleasures , but don’t turn a nose at all those tomatoes that don’t make it to ripeness, that fall from the plant. or that you accidentally pick off while getting to the rip ones. Those green tomatoes might not seem like much, but given a little attention, well they can shine just as bright as all those ripe and colorful ones!

All green tomatoes need to be delicious is to be roasted. Then they are amazing, like seriously freaking delicious. Just as bright and flavorful as ripen tomatoes, maybe even more so.

Once roasted you then can make them into sauce. Sauce for pasta, for pizza, for eating straight out of the jar (That is me). It can do anything red tomato sauce can do.

So don’t just let those green tomatoes go to waste. Heck, maybe pluck a few extra green ones before they ripen just so you can enjoy the goodness of roasted green tomatoes!

To the green tomato sauce!

The stuff. Green tomatoes, a large onion, a few cloves of garlic, olive oil, salt and pepper, spaghetti, fresh basil, and a few rip cherry tomatoes.

IMG_0246.jpg
IMG_0249.jpg

Cut the onion into large chunks and slice all the green tomatoes in half (or quarters if they are large)

Place it all on a baking sheet and toss with a drizzle of olive oil and sprinkle on salt and pepper. Also place the unpeeled garlic into a corner and pop the baking sheet into a hot oven to roast.

Ah, all soft was tender and roasted.

(The garlic was removed after 15ish minutes of roasting, peeled and set aside.)

IMG_0293.jpg
IMG_0298.jpg

Dump it all into a blender and blend until smooth. Season with more salt and pepper if needed.

IMG_0299.jpg

And make spaghetti. I trust you know how to do this.

IMG_0271.jpg

Ripe up some fresh basil and chop the cherry tomatoes in half and…

IMG_0341.jpg

Place some of the cooked pasta into a bowl, pour in your desired amount of the sauce, and top with fresh basil and a few red cherry tomatoes.

It is ready. Now eat.

-C


Spaghetti with Roasted Green Tomato Sauce

Makes 5-6 cups

  • Around 20 smaller green tomatoes (or how many you can fit on a a large baking sheet)

  • a large sweet onion

  • 4-5 cloves garlic

  • 1-2 tablespoons olive oil

  • salt and pepper

  • Spagetthi (as much as you want to eat)

  • handful of fresh basil for erving of pasta resh basil

  • a few red cherry tomatoes for each serving of pasta

Preheat oven to 450

Cut tomatoes in half (or in quarters if they are large). Peel skin from onion and cut into large chunks. Place both cut tomatoes and onion onto a large baking sheet and drizzle with about a tablespoon of olive oil. Toss around and then sprinkle with salt and pepper. On the corner of the pan, place the garlic(still in skin) Place into oven.After 15ish minutes, remove the garlic and set aside. Continue baking the tomatoes and onions for another 35-45 minutes or until the tomatoes are fork tender.

Once the tomatoes are cooked, remove from oven and, being oh so careful, dump or scoop the tomatoes and onion into a blender. Add in the roasted garlic (skin removed) and blend until smooth. Taste the sauce then season with more salt and pepper and add another tablespoon of olive oil if you think it needs it.

To eat with spaghetti.

Make spaghetti as in instructed on box. Once you have cooked spaghetti, drained it, and placed it into a bowl, pour or scoop the green tomato sauce on top. Top with a handful of fresh basil and a few red cherry tomatoes.

Then eat.

Extra tomato sauce can be placed in a jar or container with a lid and refrigerated for about a week.

In sauce, Pasta, Vegan Tags Spaghetti With Roasted Green Tomato Sauce, vegan, green tomatoes, sauce, dinner, gluten free, dairy free, plant based, vegetarian, vegetable, simpl, easy, no waste, healthy, home made, fresh
1 Comment

Tomato-y Roasted Red Cabbage

February 29, 2020 Colleen Stem
IMG_6295.jpg
IMG_6329.jpg

Most people who know me and know my eating habits think that I eat more carrots the anything else. Well it might be true that yes, I eat an excessive amount of carrots but what I probably eat even more of is cabbage. Yup, me and cabbage. Not shitting you, I eat at least a head a day. Why? Because it really is one of my favorite foods ever and the possibilities of how to eat it are endless. Sure most of the time I just eat it raw, toss with other veggies and mustard, but have you ever roasted cabbage? Oh man, roasted cabbage is A-MAZ-ING!!!!

Also, if you know me, I rarely make a dish other than salad that I am not planning on sharing. The other day I was home all by my lonesome, the mr wasn’t coming home for lunch so I decided that, what the hell, I should make something fancy for myself. This is that something.

Tender and crispy roasted cabbage with onions all up in a tomato sauces that gets nice and dark and delicious. I mean, come on. Doesn’t that sound amazing? This dish is so simple and yet so freaking fantastically good. It was the best thing I ate all week. And yes, it is a whole head of cabbage and I ate it all to my face. Didn't think about sharing with anyone. 😁

To the cabbage!

IMG_6235.jpg

The stuff. A head of red cabbage, an onion, a lemon, a couple cloves or garlic, crushed tomatoes, and salt and pepper.

IMG_6239.jpg
IMG_6255 2.jpg

Mince or press the garlic (I just found a garlic press and decided to use it…. not bad) and slice the onion into thin rings .

Next cut cabbage into wedges about an inch thick. And don’t remove the core because you eat the core. It gets tender and delicious.

IMG_6243 2.jpg
IMG_6249.jpg
IMG_6257.jpg

Grab a oven safe skillet and toss in the garlic and a good splash of water and start to heat on stove. Once the water evaporates, add in half of the crushed tomatoes. Stir around and bring to a soft bubble then add in half the onions.

IMG_6259.jpg

Now layer in the cabbage wedges and sprinkle with salt and pepper.

IMG_6266.jpg

On goes the rest of the onions and the rest of the tomatoes plus about a 1/3 cup of water. Sprinkle with a little more salt and pepper and toss the skillet into the oven.

IMG_6297.jpg

An hour later, after flipping the wedges mid roast, you pull out the skillet of the most tender and crispy cabbage.

Now grab the lemon and squeeze on some of that juice!

IMG_6340.jpg

Scoop onto a plate (pile it high) and squeeze more lemon if you want.

Now get on to eating.

-C


Tomato-y Roasted Red Cabbage

serves 1(as a meal) to about 4 as a side

  • 1 small head of red cabbage

  • 1 onion

  • 3 cups crushed tomatoes (or 28 oz can)

  • 2-3 cloves garlic

  • a lemon

  • salt and pepper

Preheat oven to 400

Grab cabbage and cut into inch thick wedges. Don’t bother with removing the core, it is delicious and you should eat it. Mince or garlic press garlic and slice onion into thin rings. Place garlic into a oven oven safe skillet, add about 1/4 cup of water, and place on stove on medium heat. Once water evaporates add in half of the crushed tomatoes and a good pinch of salt and pepper and cook until nice and hot. Then add in half of the cut onion rings and nestle in all the cabbage wedges. Sprinkle with a little more salt, dump the rest of the tomatoes on top and the rest of the onion rings. Also pour about 1/3 cup of water over the whole shebang then pop it into the oven. Bake for about 30 minutes, carefully remove skillet and flip the cabbage wedges over. Place back into oven for another 30 minutes.

Once top is crispy and delicious looking remove from oven, squeeze on the juice of a lemon, and then eat it. Straight From pan if you can’t wait, or serves on a plate alone or along side something that might not be as delicious as this.

Left overs are freaking amazing cold too.

In Vegetables, Vegan, 5 ingerdients or less Tags Tomato-y Roasted Red Cabbage, red cabbage, cabbage, tomato, vegan, vegetable, side dish, snack, dinner, gluten free, dairy free, grain free, plant based, healthy, delicious, roasted
2 Comments

Celeriac Puree With Crispy Lentils

October 12, 2019 Colleen Stem
IMG_2848.jpg
IMG_2859.jpg

Every now and then I make something for me. All for me. This is one of those dishes that was not destined to be shared with anyone. That I had no one else in mind to eat besides me. No worring about what anyone else with think. Just a simple little dish that I was craving and wanting.

So I made it and man, was it so freaking satisfying. Cooking for oneself is very much a gratifying experience.

Celeriac, or also know as celery root. Have you ever had it? If not, well duder, you need to. It is in my top 3 favorite vegetables and that is saying a lot. So anyway, celeriac, has a slight celery taste, but also kind of earthy and nutty. It pairs well with anything that a potato might, but also is amazing on it’s own. Roasted, steamed, raw. Just really fantastic. And it is in season so get on it and go find yourself some.

And lentils. In my top 3 favorite foods. Made them crispy because pureed celeriac and crispy lentils just sounded right and I love me crispy things. Again, I was making this dish fo me so crispy was happening.

Together, the creamy, delicious pureed celeriac covered with a bunch of spiced, crispy lentil….Amazing. Eating it, I couldn’t have been happier. I did myself one good with this one.

I might even have to make it to share someday.

Now to the celeriac and lentils!

The stuff. A bulb of celeriac, some cooked lentils, salt and pepper, chili powder, garlic powder. mustard powder, and oil. (oil is optional)

The celeriac. Ok, so most people peel it. I actually get weird looks from people when I tell them I don't , but let me do me, you know. So anyway. Peel it if you want, or not, just cut it up into chunks.

IMG_2815.jpg
IMG_2841.jpg

Place cut up celeriac into a pot and cover with water. Place on stove on medium heat and cook until fork tender.

IMG_2816.jpg

Lentils meet spices and get mix all together. Add a pinch of salt and lots of cracked pepper too.

IMG_2820.jpg
IMG_2847.jpg

Spread now spiced lentils onto a baking sheet, pop into oven, and bake until crispy. Easy peasy.

IMG_2852.jpg

And to puree the celeriac. Strain any extra water into a cup. Season with a pinch of salt and pepper and grab the hand blender (or regular blender) and blend it, adding back in some of the strained water as needed, to get to a consistency that you like. Me, I liked it pretty smooth, but also with a little chunk. Heck, you could leave it really chunky or go all out completely smooth. Up to you. Also if you want a creamier texture, add in a teaspoon or so of the olive oil. That is a taste preference. I didn't add oil this time, but I have before. It’s good both ways.

IMG_2894.jpg

And there you have it. Add the celeriac puree to a bowl, top with crispy lentils, and garnish with something green if you want.

Then eat it.

Not going to lie. After this picture was taken, I busted out the spicy mustard and covered everything with it. And it was amazing.

-C


Celeriac Puree With Crispy Lentils

serves 1 as a meal, or a few as a side dish

  • 1 1/2 cups cooked green lentils

  • 1 large celeriac bulb (soft ball sized)

  • 1 teaspoon chili power

  • 1/2 teaspoon ground mustard powder

  • 1/2 teaspoon garlic powder

  • salt and pepper

  • olive oil (optional)

Grab celeriac and peel if you want, or just give it a really good wash. Cut into chunks and place into pot. Add enough water to just cover the celeriac and place on medium heat on the stove. Cook until fork tender.

In the mean time, mix all the spices and a good pinch of salt and lots of pepper together with the lentils. Dump them and spread them out onto a lightly oiled baking sheet. Place in oven and turn to 400 degrees (you can start cooking the lentils while the oven is preheating). Bake for about 20 minutes or until lentils are crispy.

Once the celeriac is tender, strain water into a cup and either with a hand blender or a regular blender, blend until smooth, adding in some of the poured off water as needed. You can puree as smoothly as you like or leave a few chunks.. Also, you might want to add in a teaspoon or so of olive oil for a slightly richer and creamier taste. Season to taste with salt and pepper.

Ehen the lentils are done, take them from oven. Place large amount (or all) of the celeriac puree to a bowl, cover with some (or all) of the crispy lentils and that is that. Eat away.

Serving suggestion…. Mustard. Any kind. So good.

In Dairy Free, dinner, entree, Gluten Free, grain free, pulses, quick and easy, side dish, Vegan, Vegetables Tags Celeriac Puree With Crispy Lentils, plant based, vegan, roots, vegetable, pulses, lentils, easy, gluten free, grain free, celery root, heathy, clean eating, dinner, dairy free, celeriac puree, crispy lentils
Comment

Carrot Sugar Cookies with Orange glaze

April 20, 2019 Colleen Stem
IMG_7690.jpg
IMG_7717.jpg
IMG_7740.jpg

These are definitely my favorite shaped cutout cookies I have ever made. I mean seriously, carrot shaped carrot cookies, what could possibly ever be better? Nothing, and that’s truth for you.

Not only are they carrot shaped, they are also carrot flavored. Yup, Carrot shaped, carrot flavored, awesomeness. A little cinnamon added to the cookie for little extra boost of flavor and an orange glaze because it works and orange is good and fresh and springing. All good stuff.

You might be thinking, huh, carrot puree in a cookie, well that doesn’t sound right. But it is, it is right. And you know how I know that these cookies are awesome? Well I packed them up, (2 dozen of them) and took them over to the littles house for an after school treat. When I got there, the two older ones had friends over. I asked them if they wanted a carrot which earned me that look that said “are you serious” but them showed them the cookies. Of course the wanted a carrot so I gave them each one. They ate their cookies then proceeded to beat the shit out of the mr. Then they asked for another cookies and beat the shit out of the mr some more. This when on and on for about a 1/2 hour until all the cookies were gone and the mr was crouched in the corner with a broom trying to defend himself against 4 rulely kids who where slashing at him with light sabers and spraying him in he face with kitchen cleaner. It’s because they wanted more cookies. (and yes, the littles are getting crazy). So yeah, the cookies are good. Ass kicking good.

Anyway, a cookie with some goodness mix into it, shaped into a great shape, that will make everyone smile and happy. You could make them by yourself, make them with your friends, make them with some kids, with some old people. They are the perfect cookie to leave out for the easter bunny(do you leave carrots out for the easter bunny?) or to serve up at any easter party, spring party, or any garden party you might be attending. This cookie is pretty much perfect for any and every occasion that required a cookie. Or a carrot because carrots are always welcome.

To the carrots! I mean, the cookies!

The stuff. Flour, baking soda, salt, sugar, vegan butter, carrot puree, cinnamon, an orange, some powdered sugar, and food coloring.

IMG_7554.jpg

Into a big bowl the sugar, vegan butter, and carrot puree go.

Beat for a minute or two until completely incorporated.

IMG_7574.jpg

Add in all the rest of the dry stuff and mix by hand until it turns to dough.

IMG_7590.jpg

This is the dough it turned into.

Gather the dough and wrap it or place in a plastic bag and stick it Into the fridge for a few hours or overnight. The dough NEEDS to chill.

IMG_7607.jpg

After you let the dough be, remove from fridge, liberally dust counter, and roll out dough about 1/4 inch thick.

IMG_7610.jpg
IMG_7621.jpg

And then it’s time to cut the cookies out. I unfortunately do not have a cookie cutter so I improvised and make 2 carrot cutouts from paper and hand cut each cookie. That worked but took forever so I got crafty and used a fat Christmas tree cookie cutter then just did a little trim and pinch to make it into a cookie. (I am a genius for that). Any way works, and you can also do other shapes too, the cookies don’t change taste in different shapes. (but that would be so cool if they did)

Carefully place cut out cookies onto a baking sheet, giving them a little space because they do spread a tiny bit.

And into the oven to bake they go.

Out in 10 minutes looking all carrot like.

IMG_7653.jpg

Carrots waiting to cool so they can be glazed.

The glaze. Pretty straight forward. Just zest orange into powdered sugar and juice the orange into the sugar and mix.

Divide glaze and dye one orange and one green

IMG_7678.jpg

And glaze away. I recommend doing it over a rack and baking sheet to minimize mess because they do drip a bit.

Now just you look at that, carrot shaped carrot sugar cookies .What a sight!

IMG_7754 2.jpg

And of course, carrots come in bunches. HA

Enjoy some carrots!

-C


Carrot Sugar Cookies with Orange glaze

makes about 2 and a half dozen (depending on size)

  • 2 1/4 cups all purpose flour plus more for dusting

  • 1 teaspoon baking soda

  • 1/2 teaspoon salt

  • 1 teaspoon cinnamon

  • 1/2 cup vegan butter

  • 3/4 cup granulated sugar

  • 1/2 cup carrot puree ( see note about how to make puree)

    For the glaze

  • 2 to 3 cups powdered sugar

  • on orange

  • orange and green food coloring

Note. To make carrot puree, steam a couple carrots until completely soft them blend until smooth.

Place sugar, vegan butter, and carrot puree into a big bowl. Beat with a beater until light and fluffy. Add in the flour, baking soda, salt, and cinnamon and mix by hand until completely incorporated and mixture tunes into dough. Gather dough into a disk and wrap in plastic or place in a plastic bag and refrigerate for at least 2 hours or up to overnight.

Once dough has chilled enough and you are ready to go, preheat the oven to 350.

Place dough on a flour dusted counter and roll out about 1/4 inch thick. Cut out the cookies with a cutter or by hand and place on a baking sheet. Bake cookies for 10-11 minutes or until just starting to turn slightly brown around the edges. Remove from oven and place on a wire rack to cool.

Once cookies are all baked and cooling, make the glaze. Place powered sugar into a big bowl, zest in the orange then add in the juice od half the orange. Mix completely and check consistency. You want it to be slightly running but not liquid, but also not to stiff. Add more juice or more sugar to get it right. Once it is the right consistency, separate into 2 bowls. Dye one green and one orange. Now glaze you cookies. A knife or small spatula works best and yes, the glaze drips a little so do it over a baking sheet, but after about 10 minutes the glaze hardens.

And then you have carrot cookies and all is good. Now go eat a carrot cookie!

Store uneaten cookies in an airtight container for up to 5 days. They can be frozen too.

In Vegetables, Vegan, Sweets, Spring, desserts, cookies Tags Carrot Sugar Cookies with Orange glaze, Carrot cookies, vegan, vegan sugar cookies, sugar cookies, carrot cookies, carrots, plant based, desserts, cookies, easter, spring, holiday, garden party, vegetable, roots, orange, citrus, glaze, fun, food, egg free, dairy free
Comment
← Newer Posts Older Posts →
 

https://thelovelycrazy.squarespace.com/config#/|/about/

Me. Food Maker.Food eater. Woo HOO!

STEM+NODE  SMALL BATCH AND ONE OF A KIND POTTERY

stem+node ceramics


____________________

Subscribe

GET NEW POSTS IN YO EMAIL

You are AWESOME!!!


@thelovelycrazy 2014-2021