• stem+node ceramics
  • HOME
  • Food Recipes
  • About
  • Contact
Menu

The Lovely Crazy

Street Address
City, State, Zip
Phone Number

Your Custom Text Here

The Lovely Crazy

  • stem+node ceramics
  • HOME
  • Food Recipes
  • About
  • Contact

Tomato Bundt Cake

August 20, 2016 Colleen Stem
IMG_0548.jpg
IMG_0573.jpg

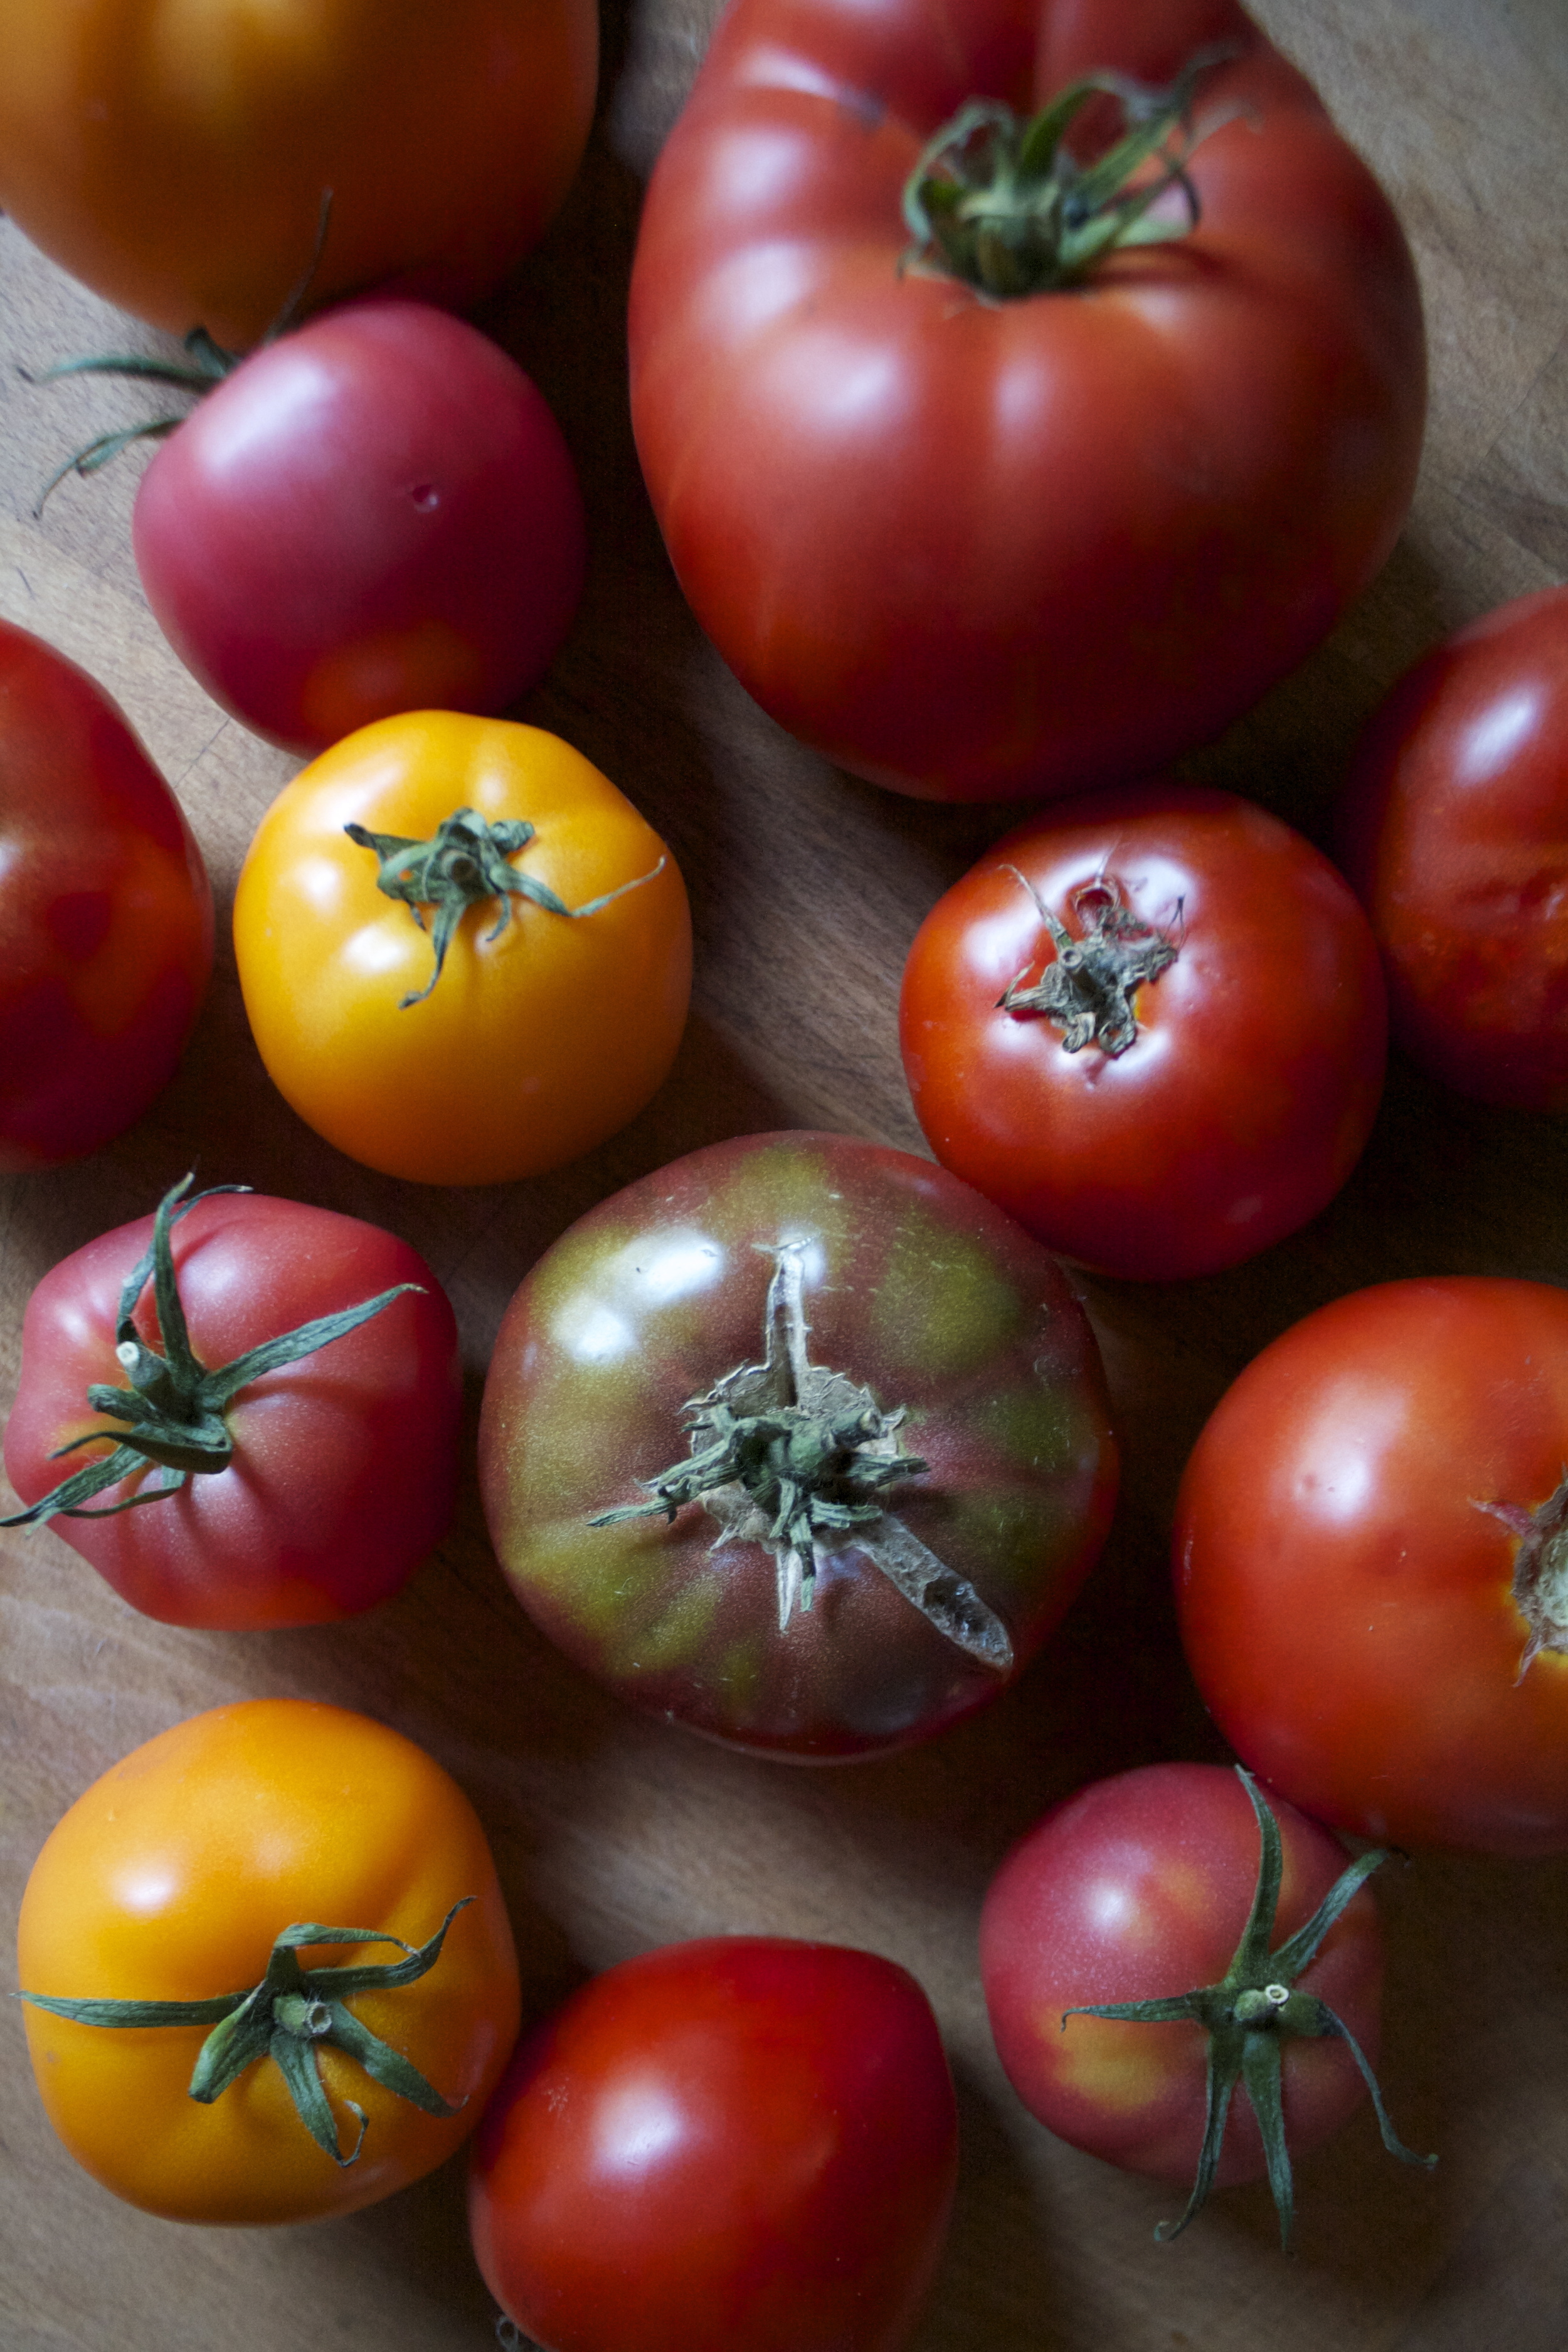
Do you have a gazillion tomatoes, like so many that they are practically coming out of your ears? Me too.... Me too. This year the tomatoes have been gang busters, a explosion of the sweetest and most delicious fruit and now I have tomatoes littered everywhere, tucked into all the corners and baskets all over the house. It's getting kinda tomato crazy over here.

 I can only eat so many tomatoes a day before all I have eaten are tomatoes and I start to feel slightly sick. Same with the mr, he has been a tomato eating champ as well but I think he was getting a little bored with all the tomato salads that I have been making. So I thought I would try something new and make a tomato cake. I figured why the heck not, tomatoes are technically a fruit and fruit and cake are great together and yeah. So tomato cake is going to be fantastic. I also wanted to make something that the mr would eat for breakfast. I have been doing this new thing in the mornings for the mr. I have coffee ready, some breakfast food (its been zucchini bread for a while), and a little vase of fresh flowers that I pick on my morning walk, all set out on the counter for when he wakes up. I know, I am so great right. Really I do it cause I want him to eat something before working all morning and plus if I am all sweet in the morning, he can't be an old man cranky pants (at least he tries not to be).  Now for the next few days the tomato cake is breakfast cake and all is good.

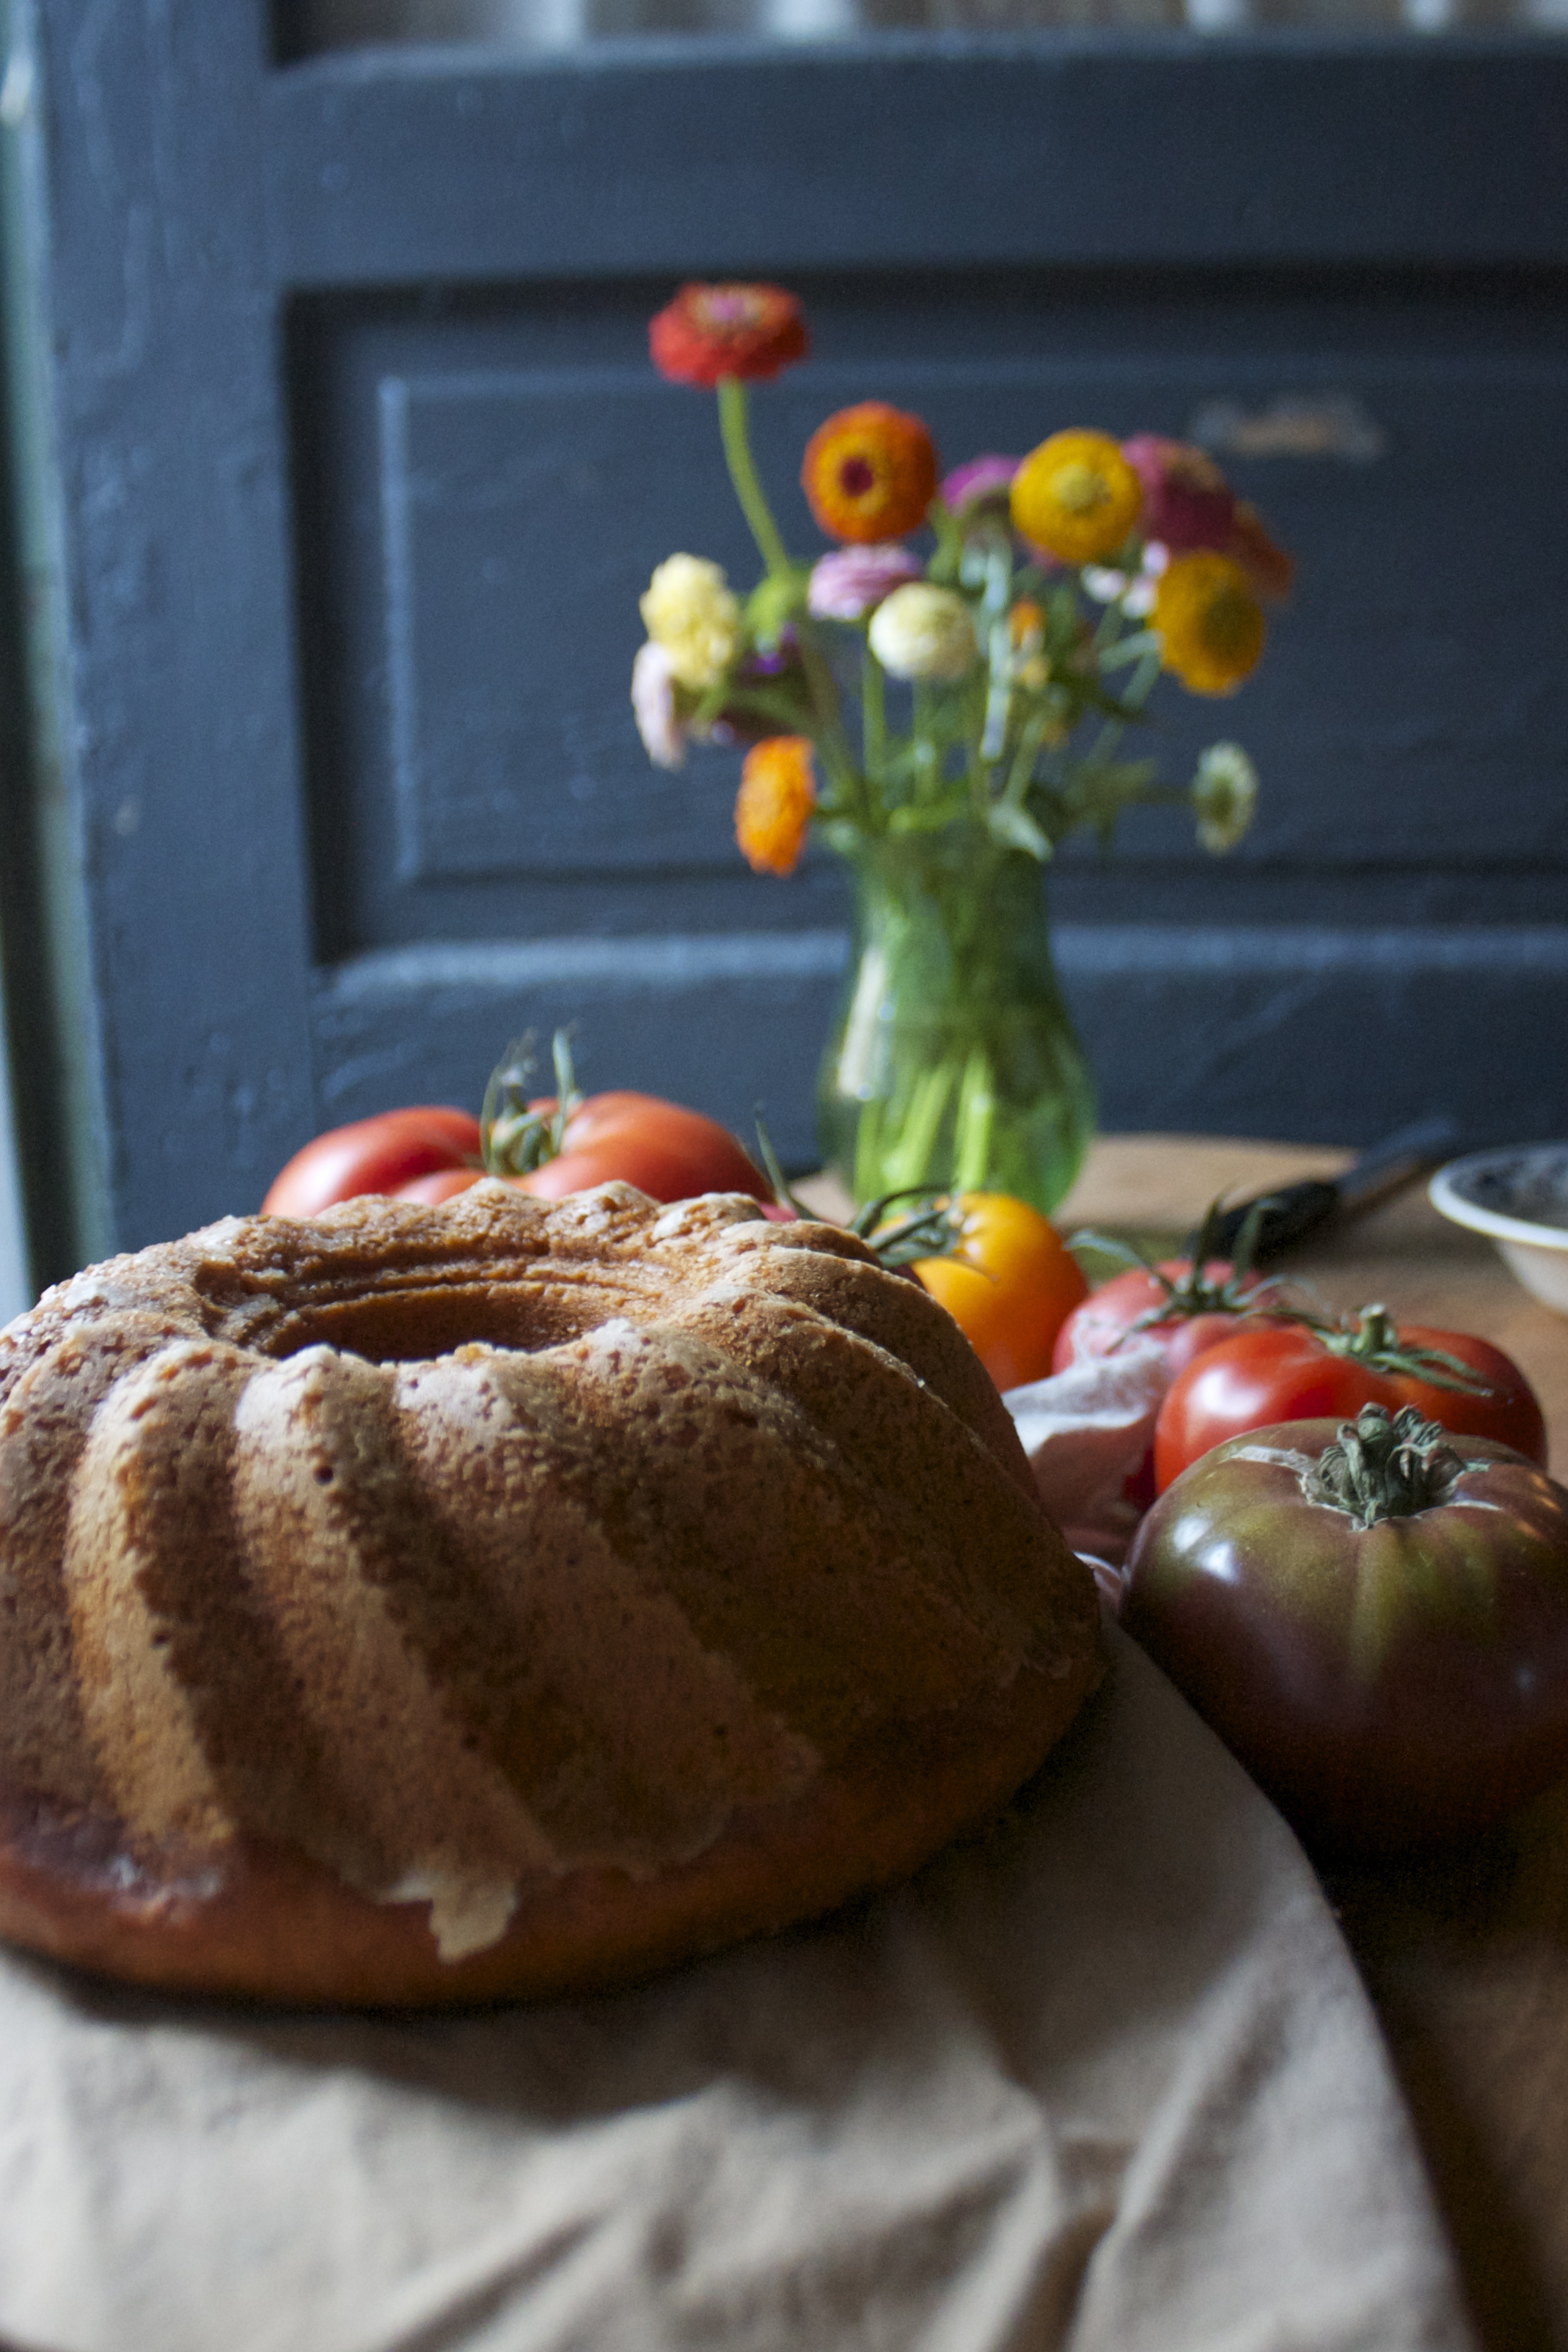
Anyway, the cake come out great. Bright reddish orange, dense but fluffy and most, and smells so good. The mr tells me it's amazingand I shared a chunk with some of my family and everyone (minus a little) where fans. I am for sure going to be making this again soon, although I have been toying with the idea of eggplant sweet bread (too far??) but I'll get to that later.

Now for the tomato cake!

The stuff. Flour, baking soda, baking powder and salt (all in the bowl). Brown sugar, oil, vanilla, apple cider vinegar and a few nice and juicy tomatoes.

First off, remove the core from tomatoes and cut into some chunks. Stick the chunks into a blender and blend.

Fresh and smooth tomato puree.

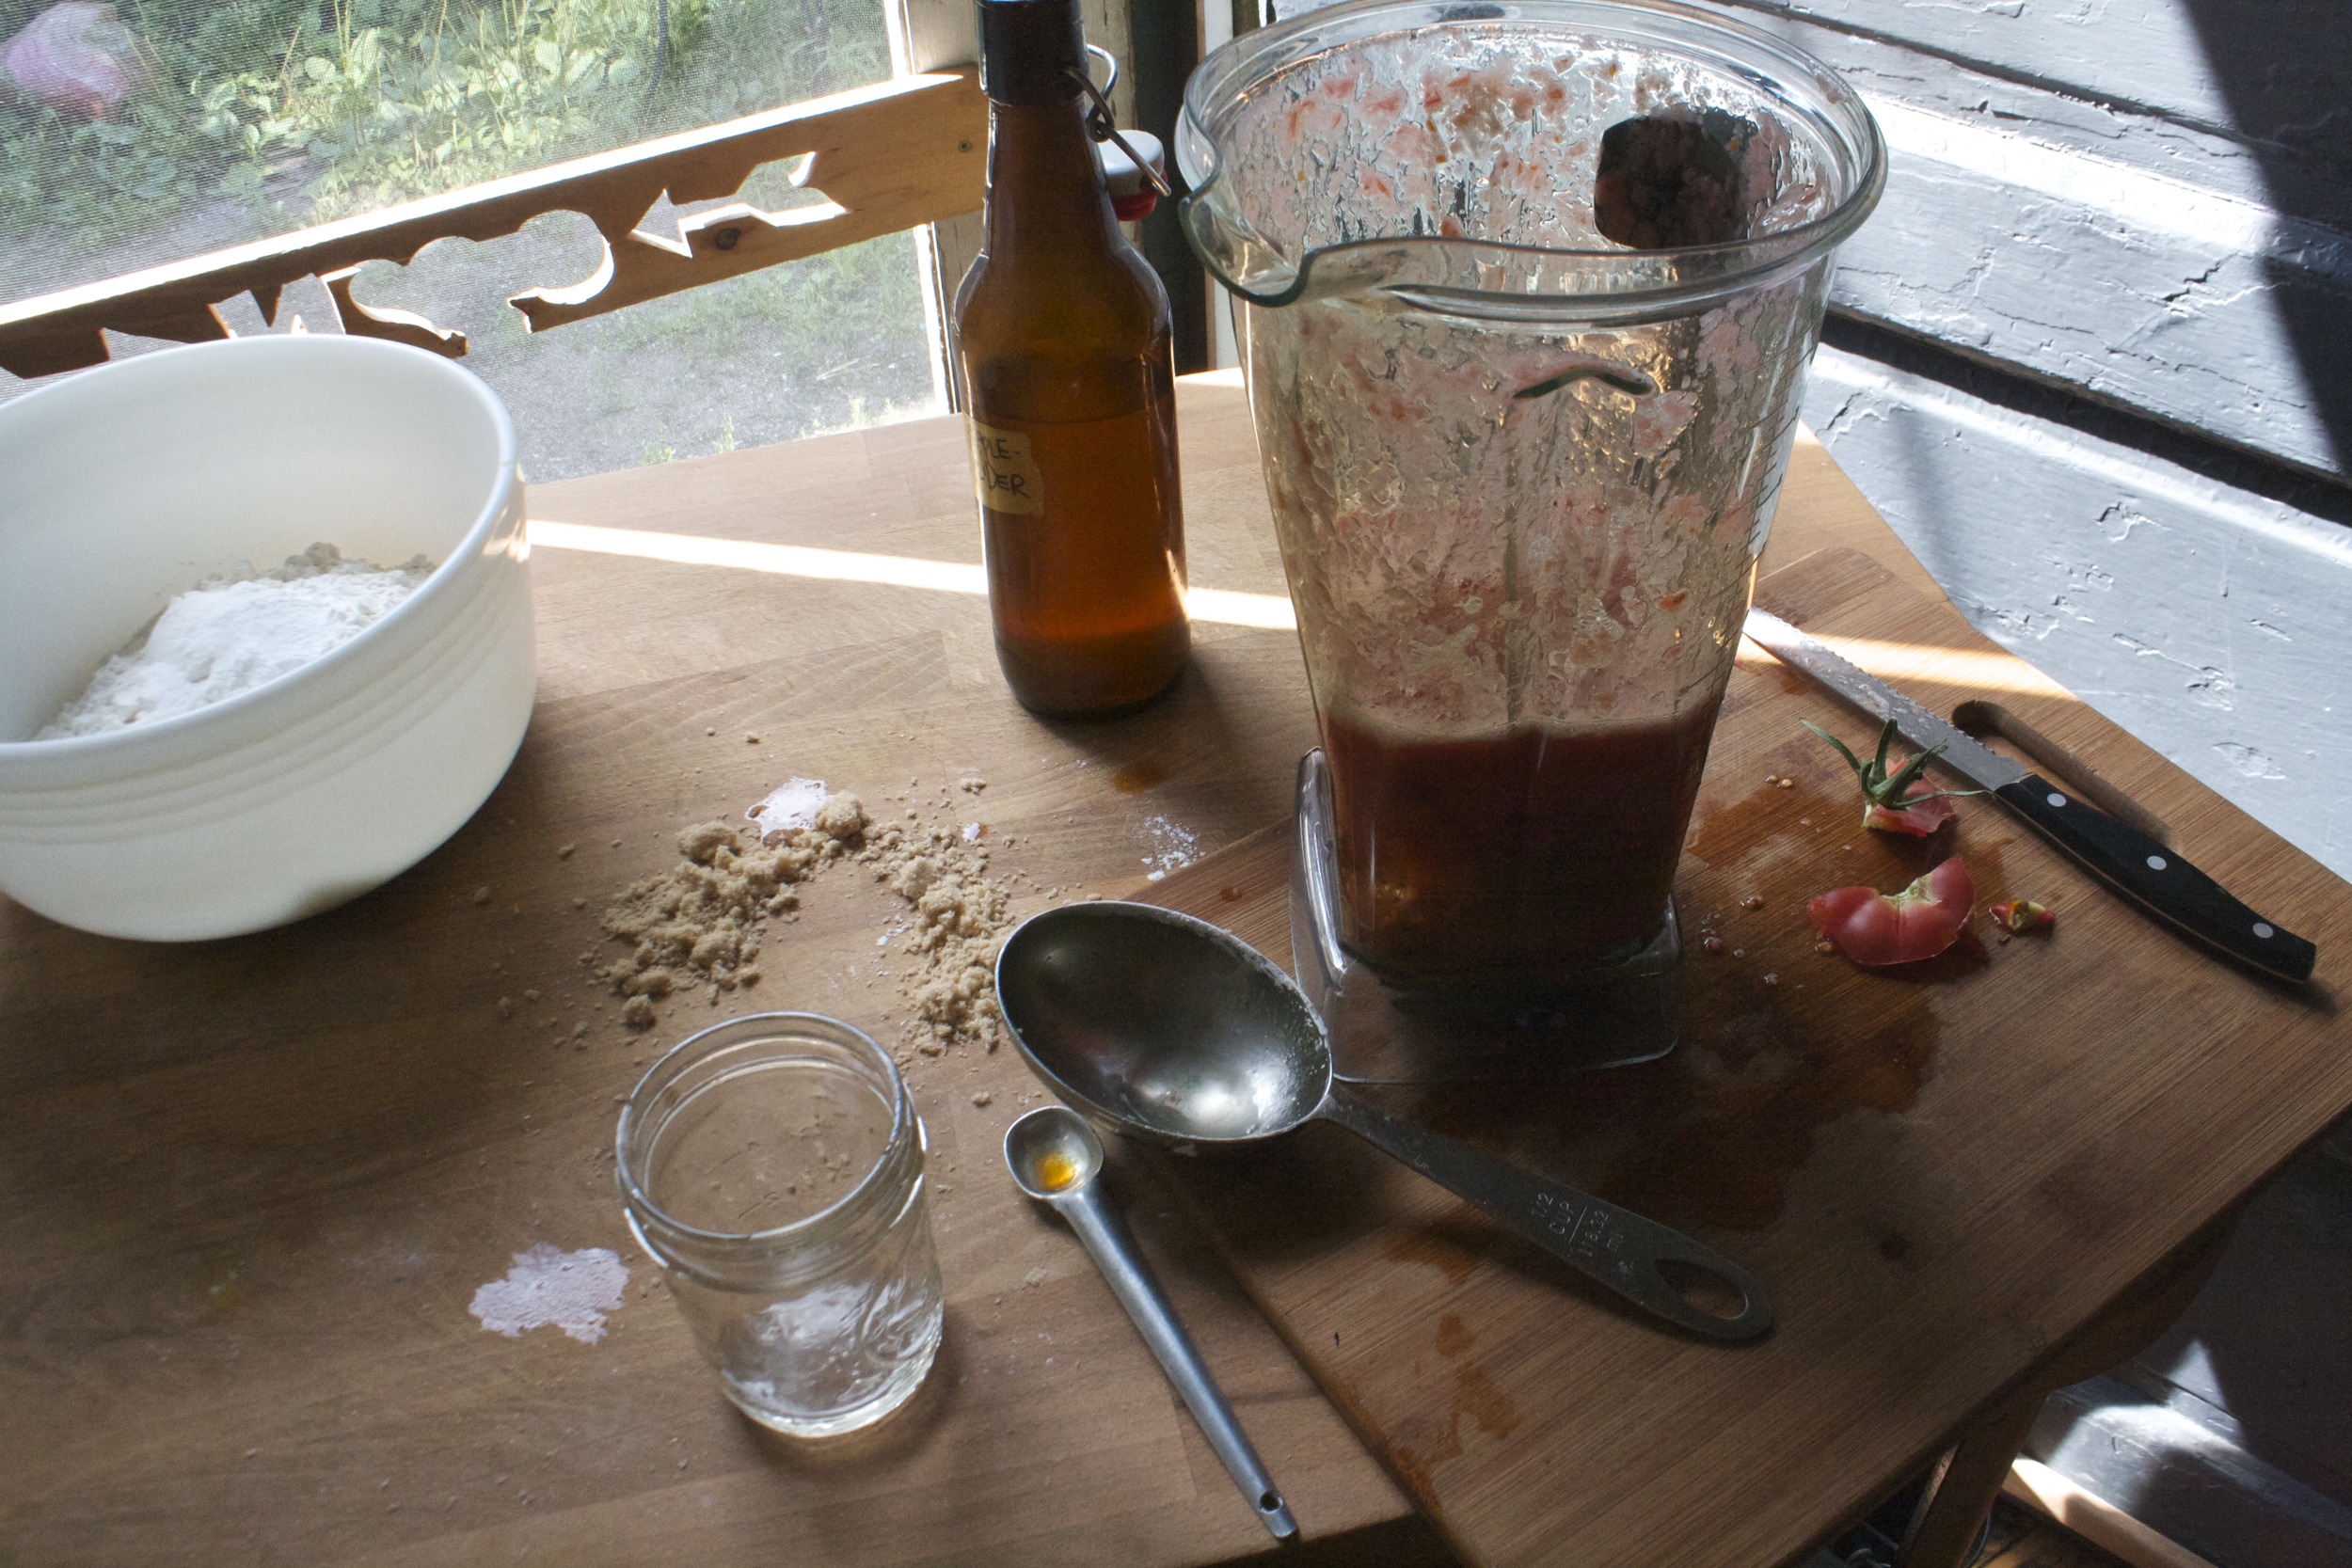
Now just dump the rest of the liquid stuff into the blender now and give it a whirl to mix it all up.

And pour the blended wet into the dry and mix until incorporated.

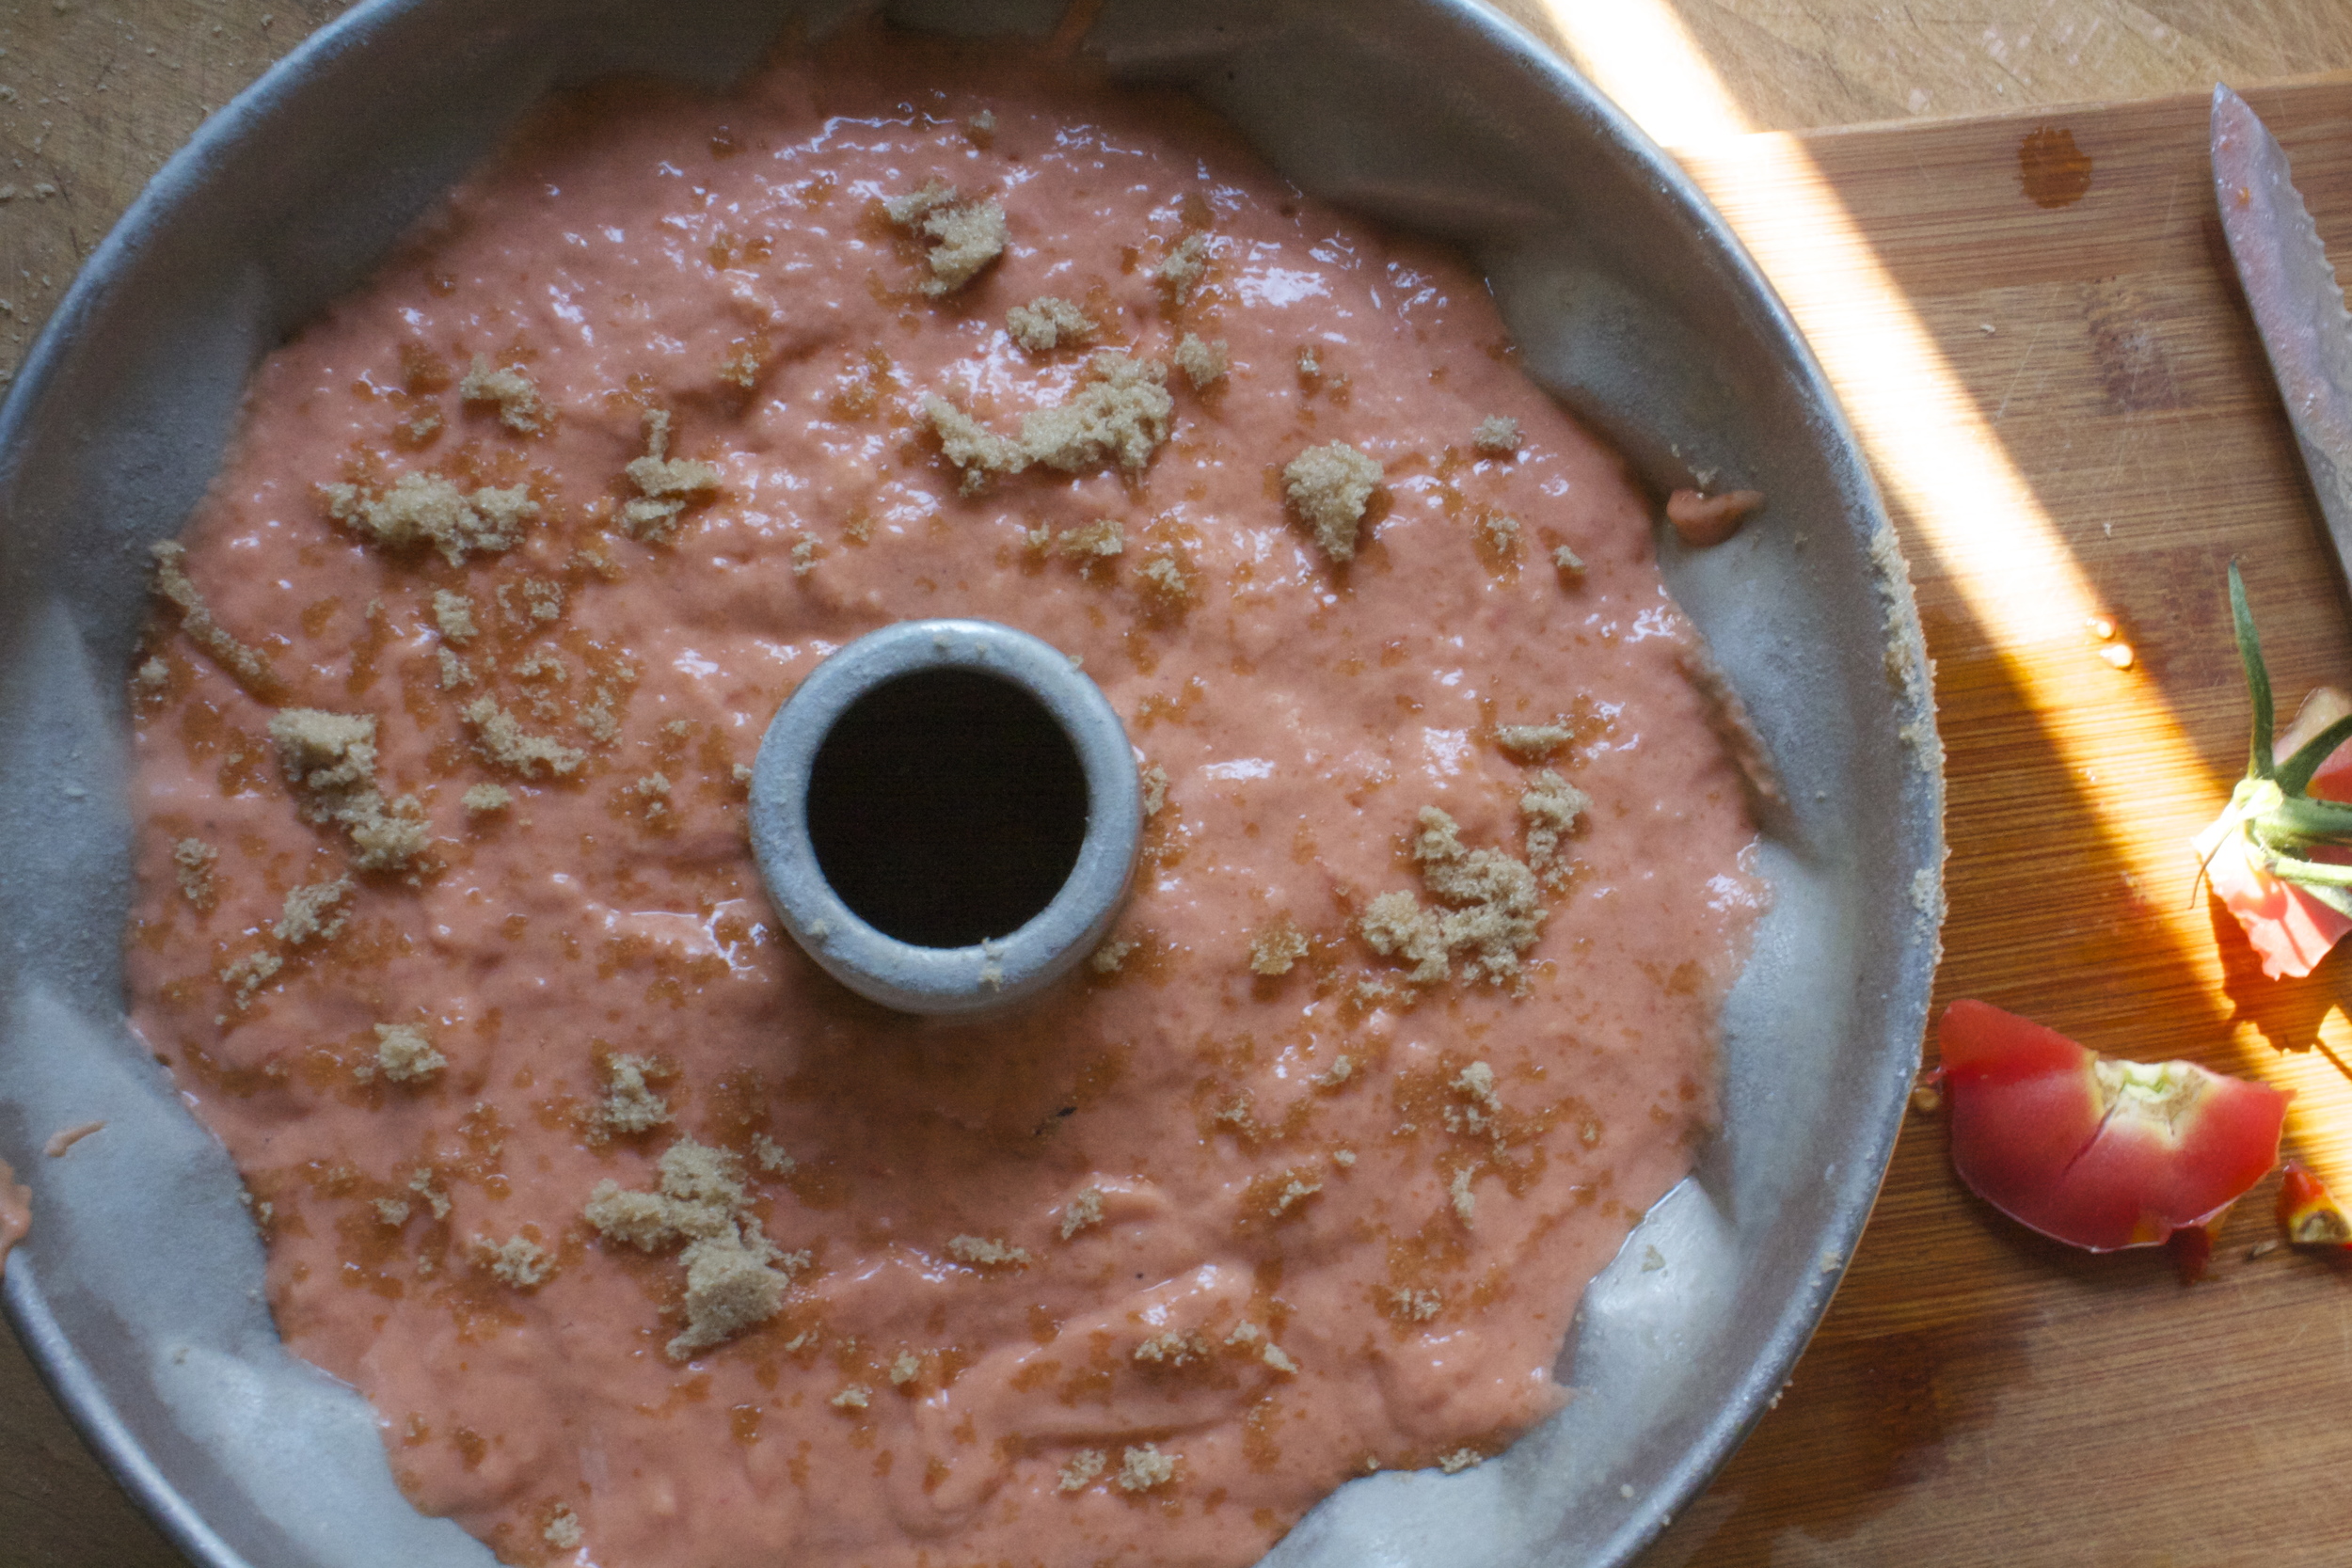
Pretty pink batter goes in a well greases bundt pan. I had got brown sugar everywhere while I was measuring it out and decided to just toss it on the cake as not to waste it...doesn't hurt.

And now the batter goes into a preheated oven to bake .

A bit of time later you have yourself a cake.

The scary part. Flip the pan and hope all that grease does it's job and the cake pops out. Lucky me this one popped out like a champ.

One de-panned, let the cake cool for a bit before cutting into it.

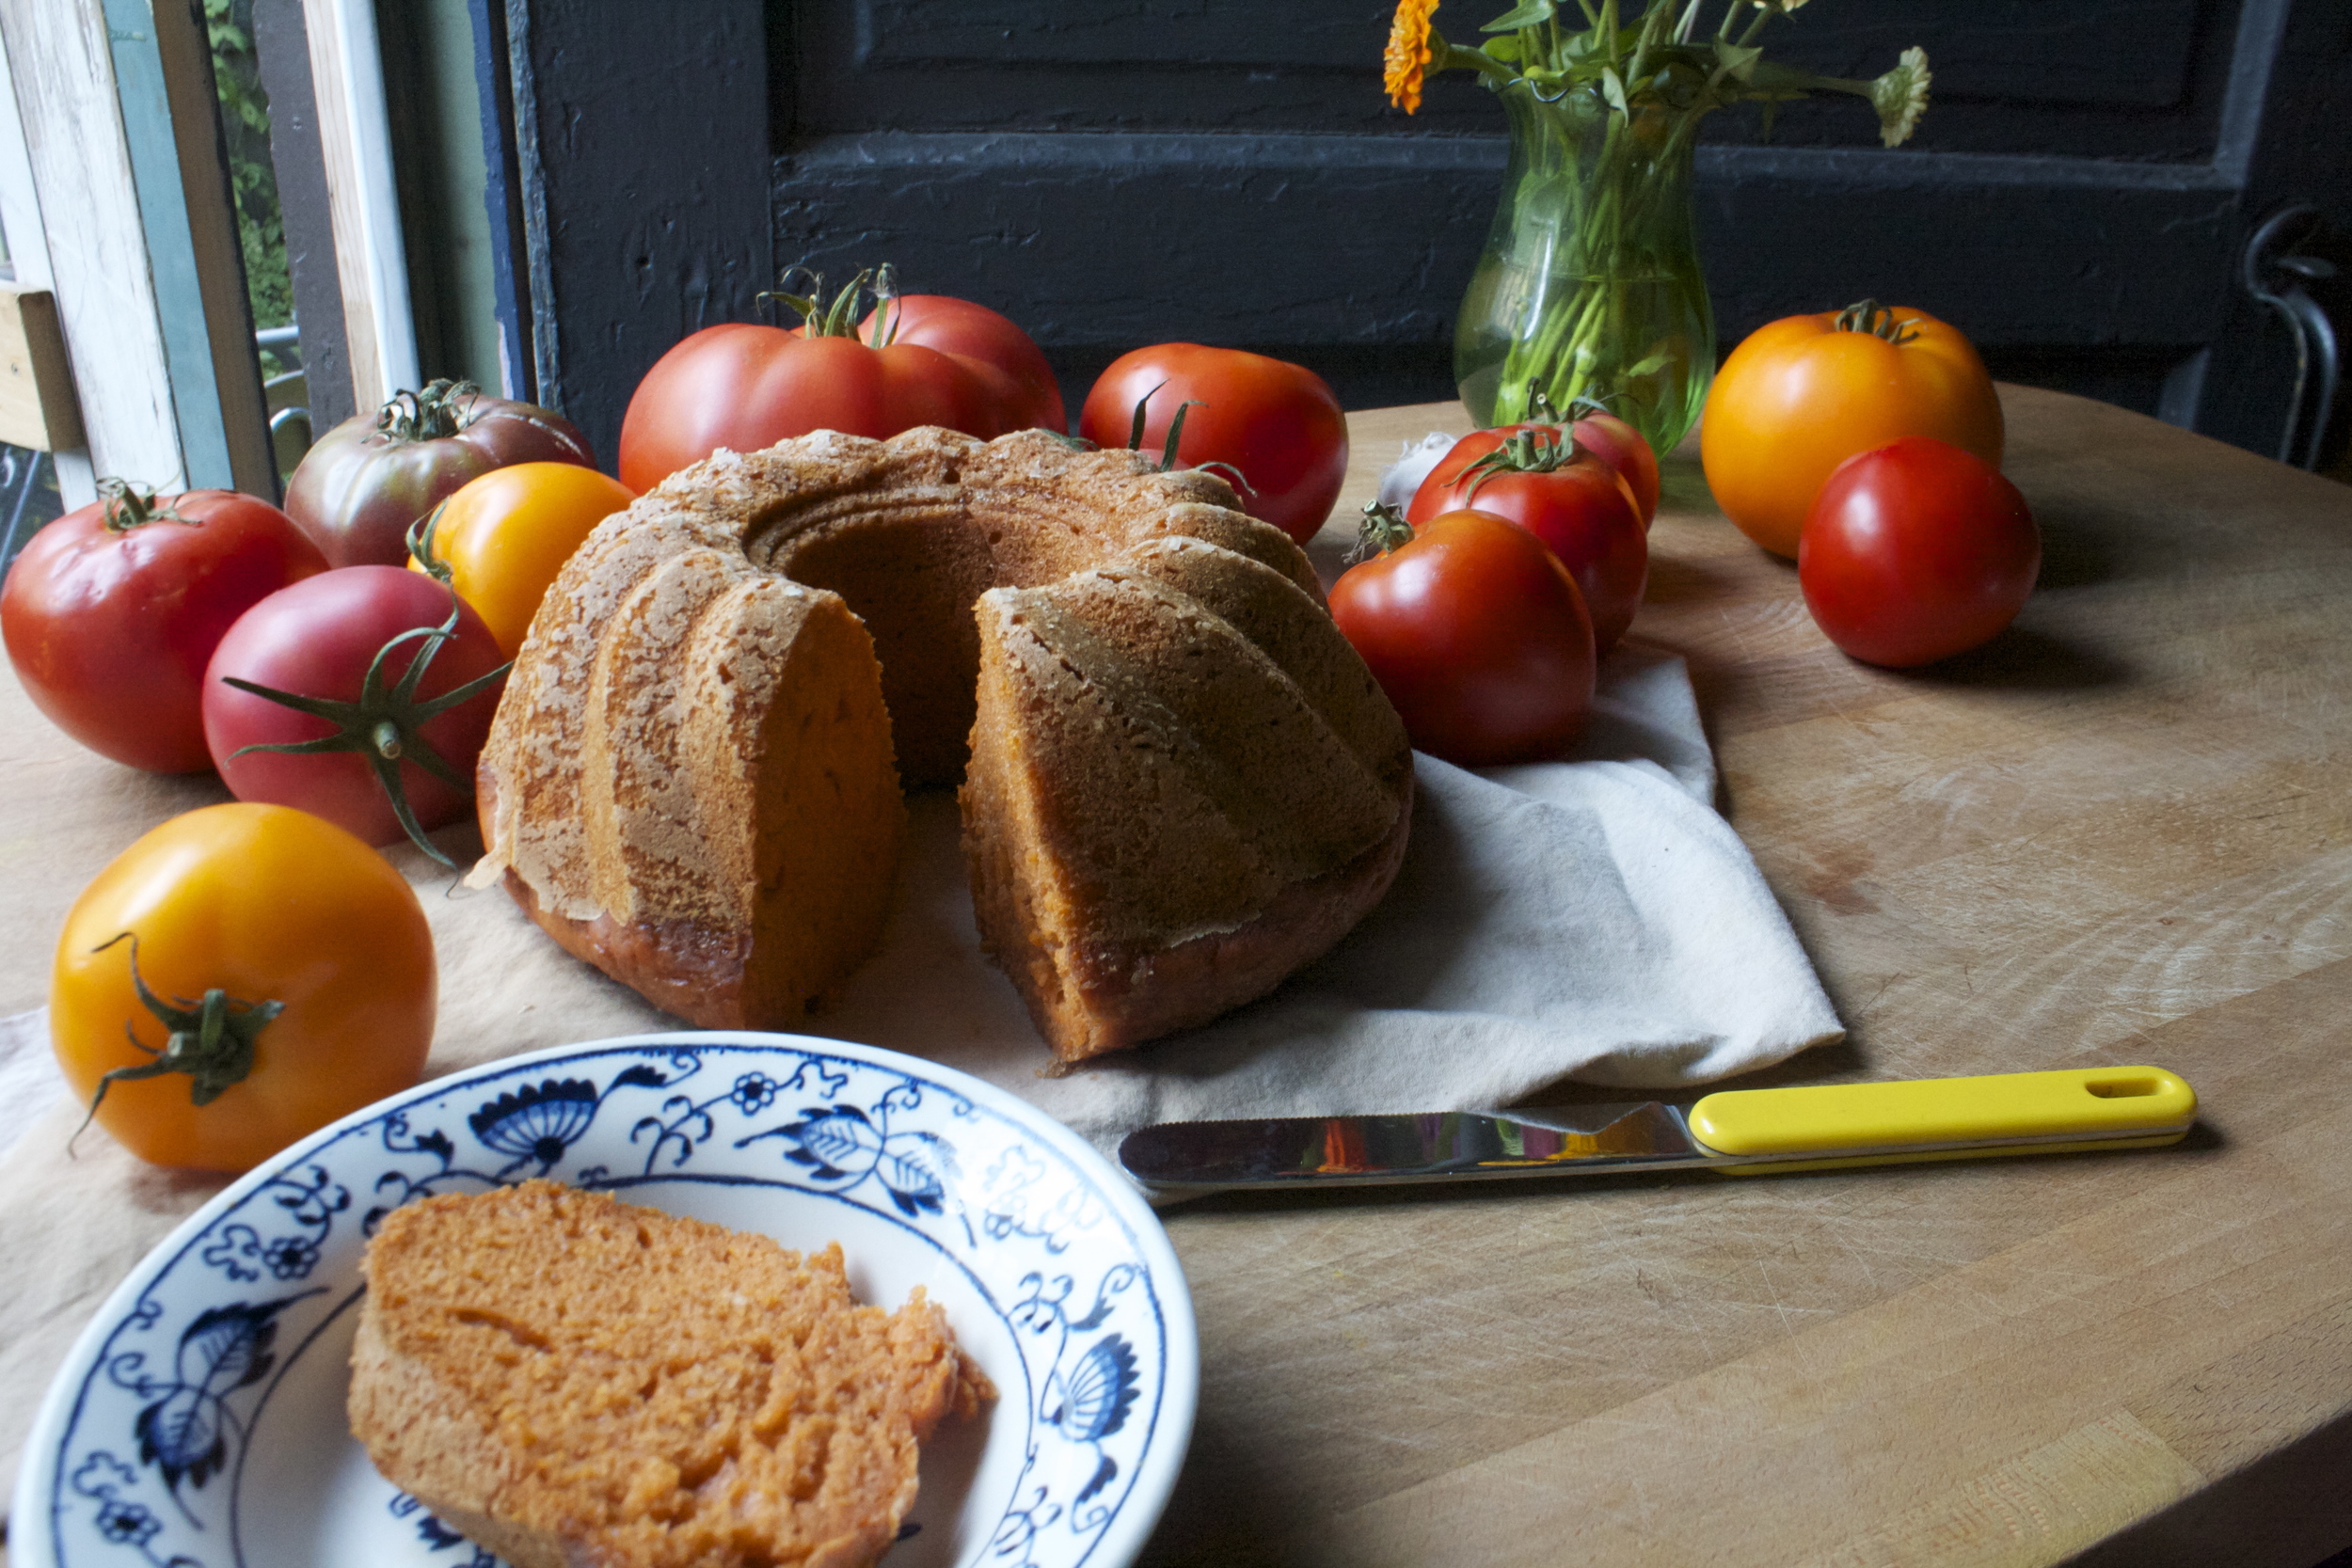
And now all you have left to do it eat it, so eat it.

Have a great weekend. Eat lots of tomatoes and make lots of cake.

-C


Tomato Bundt Cake

Makes one bundt cake

  • 2 -1/3 cup all purpose flour
  • 1 teaspoon baking soda
  • 1 -1/2 teaspoon powder
  • 1/2 teaspoon salt
  • 2-3 large tomatoes (2 -1/2 cups after blended)
  • 1/2 cup brown sugar (for a tad sweeter, add another 1/4 cup)
  • 1/2 cup of any neutral flavored oil
  • 1 teaspoon vanilla
  • 1 tablespoon apple cider vinegar

Preheat oven to 350

Start by whisking together all the dry ingredients into a big bowl. Take tomatoes, remove core, chop into chunks, and place into a blender. Blend tomatoes until a smooth and frothy puree. Now add in the sugar, oil, vanilla, and apple cider vinegar and blend until incorporated. Pour wet mixture into dry and stir until combined.

Pour the cake batter into a greased (and floured if you want. I find it helps to make sure all the nooks are greases) and stick into preheated oven. Bake for 45-50 minutes until it's a dark reddish golden brown and a tester (I use a fork) comes out clean when stabbed.

Remove from oven and let cool for a minute or two then invert cake, give the pan a few tap taps and hope that it comes out all nice and clean. (don't worry if a piece gets stuck, you can just dust the top with some powdered sugar)

Let cake cool and when ready, cut a slice and eat it up. I was told no glaze, but I was going to make a simple lemon glaze (lemon juice and powdered sugar) for the top. The mr said it was perfect, but glaze would have been pretty.  So glaze it up if you want.

In vermont, Vegetables, Vegan, Sweets, summer, snack, recipes, photography, desserts, Dairy Free, cake, brunch, breakfast, bread Tags Tomato Cake, Summertime, bundt cake, vegan, vegan cake, dessert, snack, tomato, garden, what to do with too many tomatoes, vermont, breakfast cake, brunch, fruit, veggies
Comment

Skillet Bread with Chard, Mushrooms, and Onions

July 14, 2016 Colleen Stem
IMG_6422.jpg
IMG_6424.jpg

I am running extremely low on food in my house, like there isn't a can of beans or a box of pasta left. Yeah, I have a few zucchini left, but I think that mr might be getting a bit sick of it. (He has had zucchini noodles for lunch and dinner for the past few day). And I was going to go to the grocery store before dinner, but then I didn't. Why? well because I didn't really feel like it.

Turns out that I didn't need to go to the store for dinner.I had a few mushrooms, an onion, and a few stalks of chard left in the fridge. (but pretty much nothing else) I just bought a 25 lb bag of flour so I am all stocked up on that and last minute I found a avocado that I thought was a beet in the fridge. All I needed to make a dinner, and a quick and easy, and really tasty one to boot. Plus being so mother F*ing hot, it was perfect because there was no need to turn on the oven.

Now the question is,now that dinner was made and being that the fridge is so empty, should I clean and defrost it? Answer is yes, yes I should, but am I going to? Probably not. I just don't have it in me to stand in font of the fridge, hacking ice away with a large spoon and boiling water for an hour. It's to hot. I'll do it later.

The stuff. Flour, baking powder, olive oil, salt ans water for the skillet bread. A few humngo stalks of red chard, a couple mushrooms (I would have used a few more if I had them). an onion, and a few cloves of garlic.  Missing is the pepper and the avocado and lemon that I found while rummaging the fridge.

The bread is super easy. Just whisk together the flour salt, and baking soda then add in the oil. Mix until it's crumbly then mix in the water until it turns into a soft dough. Gather into a ball and stick in bowl then into fridge for a few minutes to let the dough rest.

IMG_6410.jpg
IMG_6413.jpg

After the dough has rested, take it and cut into 4 equal pieces. Roll each piece into ball and then roll out as flat as you can. Heat up a skillet to high heat and once hot, place rolled out flat onto (dry) skillet. Cook first side for about 3-4 minutes or until browned and cook, then turn heat down a bit, flip and cook other side until browned. Remove bread, turn heat back up, and repeat with remaining flats.

For the rest. Remove the leafy part of the chard and set aside .Thinly hop up the mushrooms, onion, and the chard stalk. Mince up the garlic. Toss it all (not the garlic yet)into a lightly oiled skillet , season with salt and pepper, and cook on medium heat until starting to brown. Now toss in a few splashes of water and the minced garlic, mix around, and cover wit a lid. Cook for another 8-10 minutes until the veggies are nice and soft.

IMG_6417.jpg
IMG_6420.jpg

Cooked and ready, but wait, chop up the chard leaves and toss them into skillet. Another splash of water and a few more minutes under a lid will wilt them up real quick.

Skillet beads are made, veggies are all nice and cooked up. The avocado and lemon where found, sliced.

Not bad for a last minute-lean out the fridge of all food-dinner. Not bad at all.

Don't melt

-C


Skillet Bread with Chard, Mushrooms, and Onions

Make 4 flatbread

For the skillet bread

  • 1 cup all purpose flour
  • 1 teaspoon baking powder
  • 1 teaspoon salt
  • 2 tablespoons olive oil
  • 4-5 tablespoons cold water

For the rest

  • 2-4 white mushrooms
  • 2-3 large stalks of chard (any color)
  • 1 sweet onion
  • 2-3 cloves garlic
  • salt and pepper
  • olive oil
  • water
  • An avocado and a lemon (optional)

To make the skillet bread. Mix together the flour, salt, and baking soda in a large bowl. Pour in olive oil and mix until crumbly then add in 4 tablespoons of water (5 if it seems to dry) until a dough forms. Gather dough into a ball, stick in bowl and cover, and place in the fridge to rest for about 10 minutes. Once dough has chilled, remove and cut into 4 equal sized pieces. Roll each piece into a ball then, on a clean surface, roll out as flat as you can. Grab a skillet and place on high heat. Once skillet has heated up, place a rolled out dough on hot, un-oiled surface and let cook for about 3-4 minutes or until the bottom cooked with golden brown spots. Turn heat to medium and flip bread. Cook the other side for another 4-5 minutes or until browned. Remove flat and turn heat back up. Cook the rest of the bread like the first one.

For the rest. Remove leafy parts of the chard from the stalk and set aside. Take stalk and chop into pieces about 1/ 2 inch think. Slice onion and mushrooms up as thinly as you can. Mince garlic. Garb a skillet, stick on medium heat and drizzle with a little olive oil. Toss in chard stalk, onions, and mushrooms, sprinkle with salt and pepper and mix around until the stuff starts to brown a bit. Add in a few good splashed of water and the garlic and then place a lid on the skillet. Cook for about 10 minutes, giving the mixture a good stir every few minutes. Once the veggies are all soft and yummy, chop up the remaining chard leafs and place them into the skillet. Add another splash of water and place the lid back on. Cook until the leaves have wilted.

To assemble. Flat bread on plate. Scoop some of the sauteed veggie mixture on top. A few slices of avocado on top with a squeeze of lemon juice and a bit of cracked pepper...You are good to go.

In Vegetables, Vegan, summer, snack, Savory, salad, entree, dinner, Dairy Free, brunch, breakfast, bread Tags Skillet bread, Skillet Bread with Rainbow Chard Mushrooms and Onions, Vegan, Veggies, king arthur flour, Swiss Chard, Avocado, DInner, Quick, Easy, no oven, summertime, local, organic, farm share, icf, intervale community farm, farm food, seasonal
Comment

Strawberry Zucchini Bread

July 9, 2016 Colleen Stem
IMG_6253.jpg
IMG_6172.jpg

I am a glutton for punishment. 91 degrees, super humid, and what do I do, I turn on the oven to make bread. And this is after I drag the poor mr to the middle of a field on the hottest most humid day to pick strawberries. He didn't complain once (well, maybe on our walk back to the car, but I was bitching a little too).

At home. recuperating from the picking, I made myself a snack of shredded zucchini with chopped strawberries covered in black pepper (try it, it is so freaking good) and was like "this would make a killer bread situation". And that's when I turned on the oven and went to town making bread with the zucchini and strawberries (minus the pepper cause, well I wasn't sure if the mr would like it, but I think I'll add it to the next loaf). And I know, hot day, hot oven=no but really, I was so F*ing hot that I didn't think I could have gotten any hotter, so I figured why the hell not turn on the oven. (The mr and he pup where at the other house so I wasn't torturing them with the heat)

And when the mr came home sure the house was still hot, there was fresh loaf of the sweetest smelling strawberry zucchini bread waiting for him. And so what ifI might have been slightly delirious, I had accomplished something great and was then okay with spending the rest of the say laying in a heap on the floor.

The mr says the bread was worth it.

The stuff. A good sized zucchini and a pint or so of the loveliest strawberries . Also have a bowl with flour (all purpose and while whole wheat) baking soda and baking powder, and a little salt. Sugar, oil, cinnamon, and a little vinegar are needed and a handful of walnut if you want too.

Oil and sugar go into a bowl and get mixed together until combined.

Zucchini gets shredded and added to the bowl.

And strawberries get chopped (stems removed) and go into the bowl along with the zucchini.

Mix the wet mixture up until it starts to get all juicy then mix in the vinegar.

The dry stuff gets mix together along with the walnuts.

 Now in goes the wet mixture. Mix it all together until just combined (don't over mix)

Batter goes into a nicely greased pan and if you have it, sprinkle a little brown sugar on top.

Pop pan into preheated oven to do it's thing.

And it's thing it did. All dark brown and pretty with red and green bits all over. Quite the stunning loaf if I do say so myself. Remove from pan and let the bread cool for a little while..(you should wait until it's completely cooled, but at 15 minutes would be ok)

You have waited long enough.. time to cute the bread.

Bread all day long.

Enjoy.

-C


Strawberry Zucchini Bread

makes 1 loaf

  • 1 cup all purpose flour
  • 1 cup white whole wheat flour
  • 1 teaspoon baking soda
  • 1 1/2 teaspoon baking powder
  • 1 teaspoon salt
  • 1 teaspoon cinnamon
  • 3/4 cup brown sugar plus about a tablespoon to sprinkle on top
  • 1/2 cup canola oil
  • 1 tablespoon apple cider vinegar
  • 1 medium zucchini (2ish cups shredded)
  • 1 pint fresh strawberries (about 2 cups chopped)
  • 1/2 cup walnuts (optional)

preheat oven to 350 degrees

In a large bowl, whisk together the flours, baking powder ans soda, salt, cinnamon, Toss in the walnuts as well.

In a separate bowl mix together the sugar and oil until combined then shred zucchini and dump it it. Grab strawberries, remove the stems, and chop those up into small chunks and add to the bowl with the zucchini. Mix until everything is mixed and starts to get juicy then mix in the vinegar.

Now dump the wet mixture into the dry and mix just until everything is incorporated and pour/scrape batter into a well greased loaf pan. Sprinkle he top with a little brown sugar and stick the pan into the oven.

Let cook for about an hour or until the top is a deep brown and a tester stuck into the middle comes out clean. Once out of the oven, let cool for a a few minutes, remove from pan and let cool completely on a wire rack.

Cut cooled bread and eat it to your face.

In Vegetables, Vegan, Sweets, summer, snack, desserts, Dairy Free, cake, brunch, breakfast, bread Tags Strawberry Zucchini Bread, Zucchini bread, strawberry bread, sweet bread, vegan, vegan sweet bread, organic, local, icf, intervale community farm, dessert, breakfast, so much zucchini, walnuts
8 Comments

Upside-down Rhubarb Maple Cornbread Cake

June 7, 2016 Colleen Stem
IMG_4732.jpg
IMG_4591.jpg

My rhubarb patch has turned into a rhubarb jungle and I couldn't be happier. At the beginning of the spring I moved like 10 of the plants to the new patch location and was wondering if I would even get a small crop this year. Guess my soil is premo cause those plants be ginormous.

And now I am harvesting the stalks from that jungle and I have rhubarb coming out of my ears. (I will be eating rhubarb all summer long) It's not really a problem per say, but there is so much, so it's time to get a little crafty with the tangy sour veggie stalk.(rhubarb sword fight anyone?)  One of the first things I made with some of it was a salad that consisted of roasted and slightly charred zucchini, onions, corn and rhubarb. I made it for the mr thinking that he was going to love it because he loves rhubarb so much. Well he didn't love it because of all the corn. (Such a weird egg that boy) But me,I loved it, like ate it all and then some. Corn and rhubarb are such a good combination and if the mr wasn't being such a weirdo, he should have liked that salad too. But it gave me the inspiration for the cake . A cornbread cake ( he loves cornbread) sweetened just the right amount with maple. Not exactly a rhubarb corn salad, but you get the idea. And this cake is totally multi purpose. Made as dessert and would go extremely well with a scoop of your favorite vanilla ice cream but would work equally as well served with a bowl of baked beans. I mean, can cake for dinner get any better?

The stuff. A bowl with cornmeal, flour, baking soda, baking powder, along with a little salt. Also need some maple syrup, soy milk, earth balance and apple cider vinegar.And of course we have a few rhubarb stocks,

Start with melting the earth balance and maple syrup together on the stove and letting it thicken up a bit. While it's thickening, think about the shape of you skillet and haw you want to layer you rhubarb, like the design of it.

Then when the maple is thickened and you know how you want to layer it, chop up your rhubarb and start placing in into the bottom of the skillet. Any way you do it, just make sure that the bottom is pretty much covered in rhubarb and that its only on stalk deep.

Rhubarb so pretty

Now for the batter. Easy easy. Just whisk together the dry and combine all of the wet into a bowl.

Wet and dried mixed together.

Pour the batter gently onto the rhubarb and smooth the batter out.

And into the oven it goes.

IMG_4693.jpg
IMG_4702.jpg

Pulled from the oven when the cornbread is golden brown and a tester stuck into it comes out clean. Let it cool just as it is for about 10 minutes... (give the maple time to cool and set up so it doesn't just get sucked into the cake) then flip in. I flipped mine onto a piece of parchment and a cutting board . You could try to go directly onto a cake stand or plate, but It might get a little messy. I like to play it safe when flipping things and just use a big cutting board. Now get ready to cross your fingers.....

Ta da!. Ain't it a beaut? And don't worry if a little piece or two get stuck in the pan. Either scrape it out and place it back on the cake or consider it a little snack.

There you have it. A cake good to go for all your meal eating needs.

Go rhubarb GO!

-C


Upside-down Rhubarb Maple Cornbread Cake

  • 1 1/4 cup flour
  • 1 1/4 cup cornmeal
  • 1 teaspoon baking soda
  • 1 tablespoon baking powder
  • 1 teaspoon salt
  • 1/3 cup melted earth balance + 2 tablespoons
  • 1/3 cup maple syrup + 2-3 tablespoons
  • 1 1/2 cups soy milk (or any plant based milk)
  • 1 tablespoon apple cider vinegar
  • 2-3 stalks rhubarb (enough to cover bottom of skillet)

Note. I baked this in a 10 inch cast iron skillet. If you don't have one, a 9 inch circle or square pan will do the trick, you are just going to have to simmer the maple in a pot ans pour in into the pan you are using...and maker sure to grease it!

Preheat oven to 350.

Place the 2 tablespoons of earth balance and the 1/3 cup of maple into a 10 inch skillet and place on medium heat. Stir around until earth balance is melted and the maple starts to thicken. Remove from heat. Now grab rhubarb cut into pieces and layer it any way you see fit, making sure to cover the bottom of the skillet but not layering it in to thick.

In a large bowl mix together the flour corn meal, salt, baking soda and powder. Then In a separate bowl, mix together the apple cider vinegar, soy, melted and cooled earth balance and the remaining maple. Pour wet into dry ans mix until even;y incorporated.

Pour batter gently on top of rhubarb, leveling out if need be, then slide it on into the oven to bake for 25-30 minutes or until the cake is golden brown and a tester stuck into the middle come out clean.

Remove cake ans let cool for for about 10 minutes. This is really important,because flipping to soon and all the rhubarb maple will just absorb and soggy up the cake and if you wait to long, all that goodness willl harden up and get stuck. SO 10 minutes.

Now when your ready yo flip, think about size. I used a big cutting board that , but a plate would work to, just make sure it;s slightly bigger then the skillet. Then just do it flip and lift the skillet away. Any pieces that might have gotten stuck can be scraped off and placed back where they belong.

Now your cake is ready and waiting for you to eat. Sweet enough for dessert, not to sweet that you couldn't serve it with dinner. Multi purpose cake.. the best kind!


In bread, breakfast, brunch, cake, Dairy Free, desserts, dinner, recipes, Sweets, Vegan, Vegetables Tags Upside-down Rhubarb Maple Cornbread Cake, corn bread, vegan, cake, maple, rhubarb, plant based, clean eating, sno sugar added, upside down cake, local
Comment

Maple Banana Walnut Oat Squares

May 10, 2016 Colleen Stem
IMG_3451.jpg
IMG_3417.jpg

Every year I play this game with myself.. Is it allergies or am I sick. The past few days I have been feeling kinda crappy, waking up with itchy, gunky eyes. My throat hurts, my head is like a balloon, and I am just feeling beat.. 

I think it's that I am sick (because I don't want to have allergies) but whatever it is, it sucks, but usually goes away after a week (like every year because its really allergies). Blah.

But enough about my balloon head, lets talk these maple banana walnut oat squares. These yummy gems of the oat square world are just what you need in your life. Healthy, protein packed, nutty, and a touch sweet. No junk, just good stuff all made with little to no effort. If you like banana bread, you will be all into them. I was inspired to make these by the extremely ripe bananas that need to be eaten asap and the mr's lack of eating a healthy breakfast (I want him to eat, and I want it be oatmeal). I know him well enough that if I make a snack like thing and leave it out to eat, that he will eat it. For breakfast.

So weather or not you are looking for a good way to get in some good stuff into your tummy or just want some good tasting stuff in your mouth, this is the breakfast/dessert for you.

The stuff. A couple of ripe bananas, a bunch of rolled oats, some yummy walnuts, real maple syrup, cinnamon, baking soda and a wee bit of water.

Start with the walnuts in a food processor. Turn it on and process until....

You got this walnut butter. Do not eat it, it's for the squares (it is so good).

IMG_3355.jpg
IMG_3358.jpg

Add in the oats, cinnamon and baking soda and turn the processor back on until you get a nice unified crumbly mixture.

Now in goes the bananas and the maple syrup. And you guessed it, blend some more. While you are blending, if the mixture seems to dry, add in a splash of water, to wet, just toss in another handful of oat. The mixture should be like a muffin batter consistency.

And that's it. If you want some nut chunks, add in a handful more of walnuts (do it) and pulse just to get them mixed into batter.

Then pourthe mixture into a well greased 9x9 baking pan and spread out evenly. Toss those suckers into the oven to bake.

Oh so good bananas give off the best smell when baking. After about a 1/2hour, these bars are nice and golden brown and a fork stuck in the center comes out clean, which means, they are done.

Cut into square , eat one or two, and save the rest. Eat for breakfast, as a snack, or for dessert. And a smear of peanut butter on top is aces too!

Later dudes.

-C


Maple Banana Walnut Oat Squares


  • 3 cups old fashion rolled oats (gluten free ones to keep in GF)
  • 1 cup plus a a small handful walnuts
  • 1/2 cup maple syrup
  • 2 rip bananas
  • 1 /2 teaspoon baking soda
  • 1 teaspoon cinnamon (optional)

Place 1 cup of walnuts into a food processor and blend until it turns into walnut butter.. about 3 minutes. Add in the oats and blend together until it becomes a crumbly mixture. Add in the maple, baking soda, cinnamon and the bananas (break into chunks) and blend until incorporated. If the mixture seems lie its too dry, add in a splash of water, and if to wet, add in another handful of oats. The batter should resemble a muffin batter.  Once blended, mix in the remaining walnuts and pulse just to mix them in.

Pour mixture into a well greased 9x9 baking pan and stick into the fridge for 10ish minutes and preheat oven 350

And after the time in the fridge, remove the pan and slide them into the oven. Bake until golden brown and a tester stuck into te middle comes out clean. (about 30 minutes)

Remove and let cool. Pop out of pan, cut into square, and eat to you face.

Squares will last 3-4 days in a airtight container or freeze them and they will last until you eat them.


In breakfast, bread, Vegan, Sweets, snack, recipes, Gluten Free, desserts, Dairy Free, brunch Tags Maple Banana Walnut Oat Squares, vegan, Gluten free, oatmeal, oat squares, breakfast bars, healthy, clean eating, plant based, bananas, maple, walnut, nuts, protein
Comment
← Newer Posts Older Posts →
 

https://thelovelycrazy.squarespace.com/config#/|/about/

Me. Food Maker.Food eater. Woo HOO!

STEM+NODE  SMALL BATCH AND ONE OF A KIND POTTERY

stem+node ceramics


____________________

Subscribe

GET NEW POSTS IN YO EMAIL

You are AWESOME!!!


@thelovelycrazy 2014-2021