• stem+node ceramics
  • HOME
  • Food Recipes
  • About
  • Contact
Menu

The Lovely Crazy

Street Address
City, State, Zip
Phone Number

Your Custom Text Here

The Lovely Crazy

  • stem+node ceramics
  • HOME
  • Food Recipes
  • About
  • Contact

Waffle Iron Hash Browns

December 7, 2019 Colleen Stem
IMG_4109.jpg
IMG_4075.jpg

I don’t think I can ever eat potatoes any other way ever again.

It started with me, doing my weekly pantry cleaning, you know, when I wipe down ever surface, count all the beans and lentils in the jars to make sure I am not running low, and inspect every squash for soft spots. I was just going about my thing when I looked over at my waffle iron. Poor, sad, underused. And it hit me. When was the last time I waffled anything? I remember how excited I was when I found it a few years back at a thrift store. Such a cutie little iron. When I brought it home, I used it a bunch of times for maybe a week or two. And then it was put away and I think I have busted it out like 3 times in the past 2 years. So not cool.

I also noticed I had a shit load of potatoes left from thanksgiving.

And there I had it, a reason to use the waffle iron and a way to use up the potatoes. And now, now I am a potato on the waffle iron addict, which is weird because I am not a overly potatoy person in general. But now with this new waffled hash brown thing, well I might just be eating potatoes all day, every day. (At least until I get sick of them or I run out of potatoes.) They come out soft and fluffy inside, super crispy in ever little nook and cranny, outside. Evenly, perfectly cooked. It’s hard to explain, but they are just, ugh, so good, especially dipped in mustard for a fantastic hash brown snack. (Yes mustard, no not ketchup. Let me do me, you do you.) Or smothered in refried black beans topped with salsa and avocado (that was the dinner version). These hash browns. Just make some and you will see.

And no matter what happens with my hash brown phase, I will be damned if I ever let the waffle iron go so long without use. It deserves better then that.

To the best hash browns EVER!

IMG_4038.jpg

The stuff. Potatoes, salt and pepper, and a little oil.

Shred potatoes. Simple, easy.

IMG_4048.jpg
IMG_4054.jpg

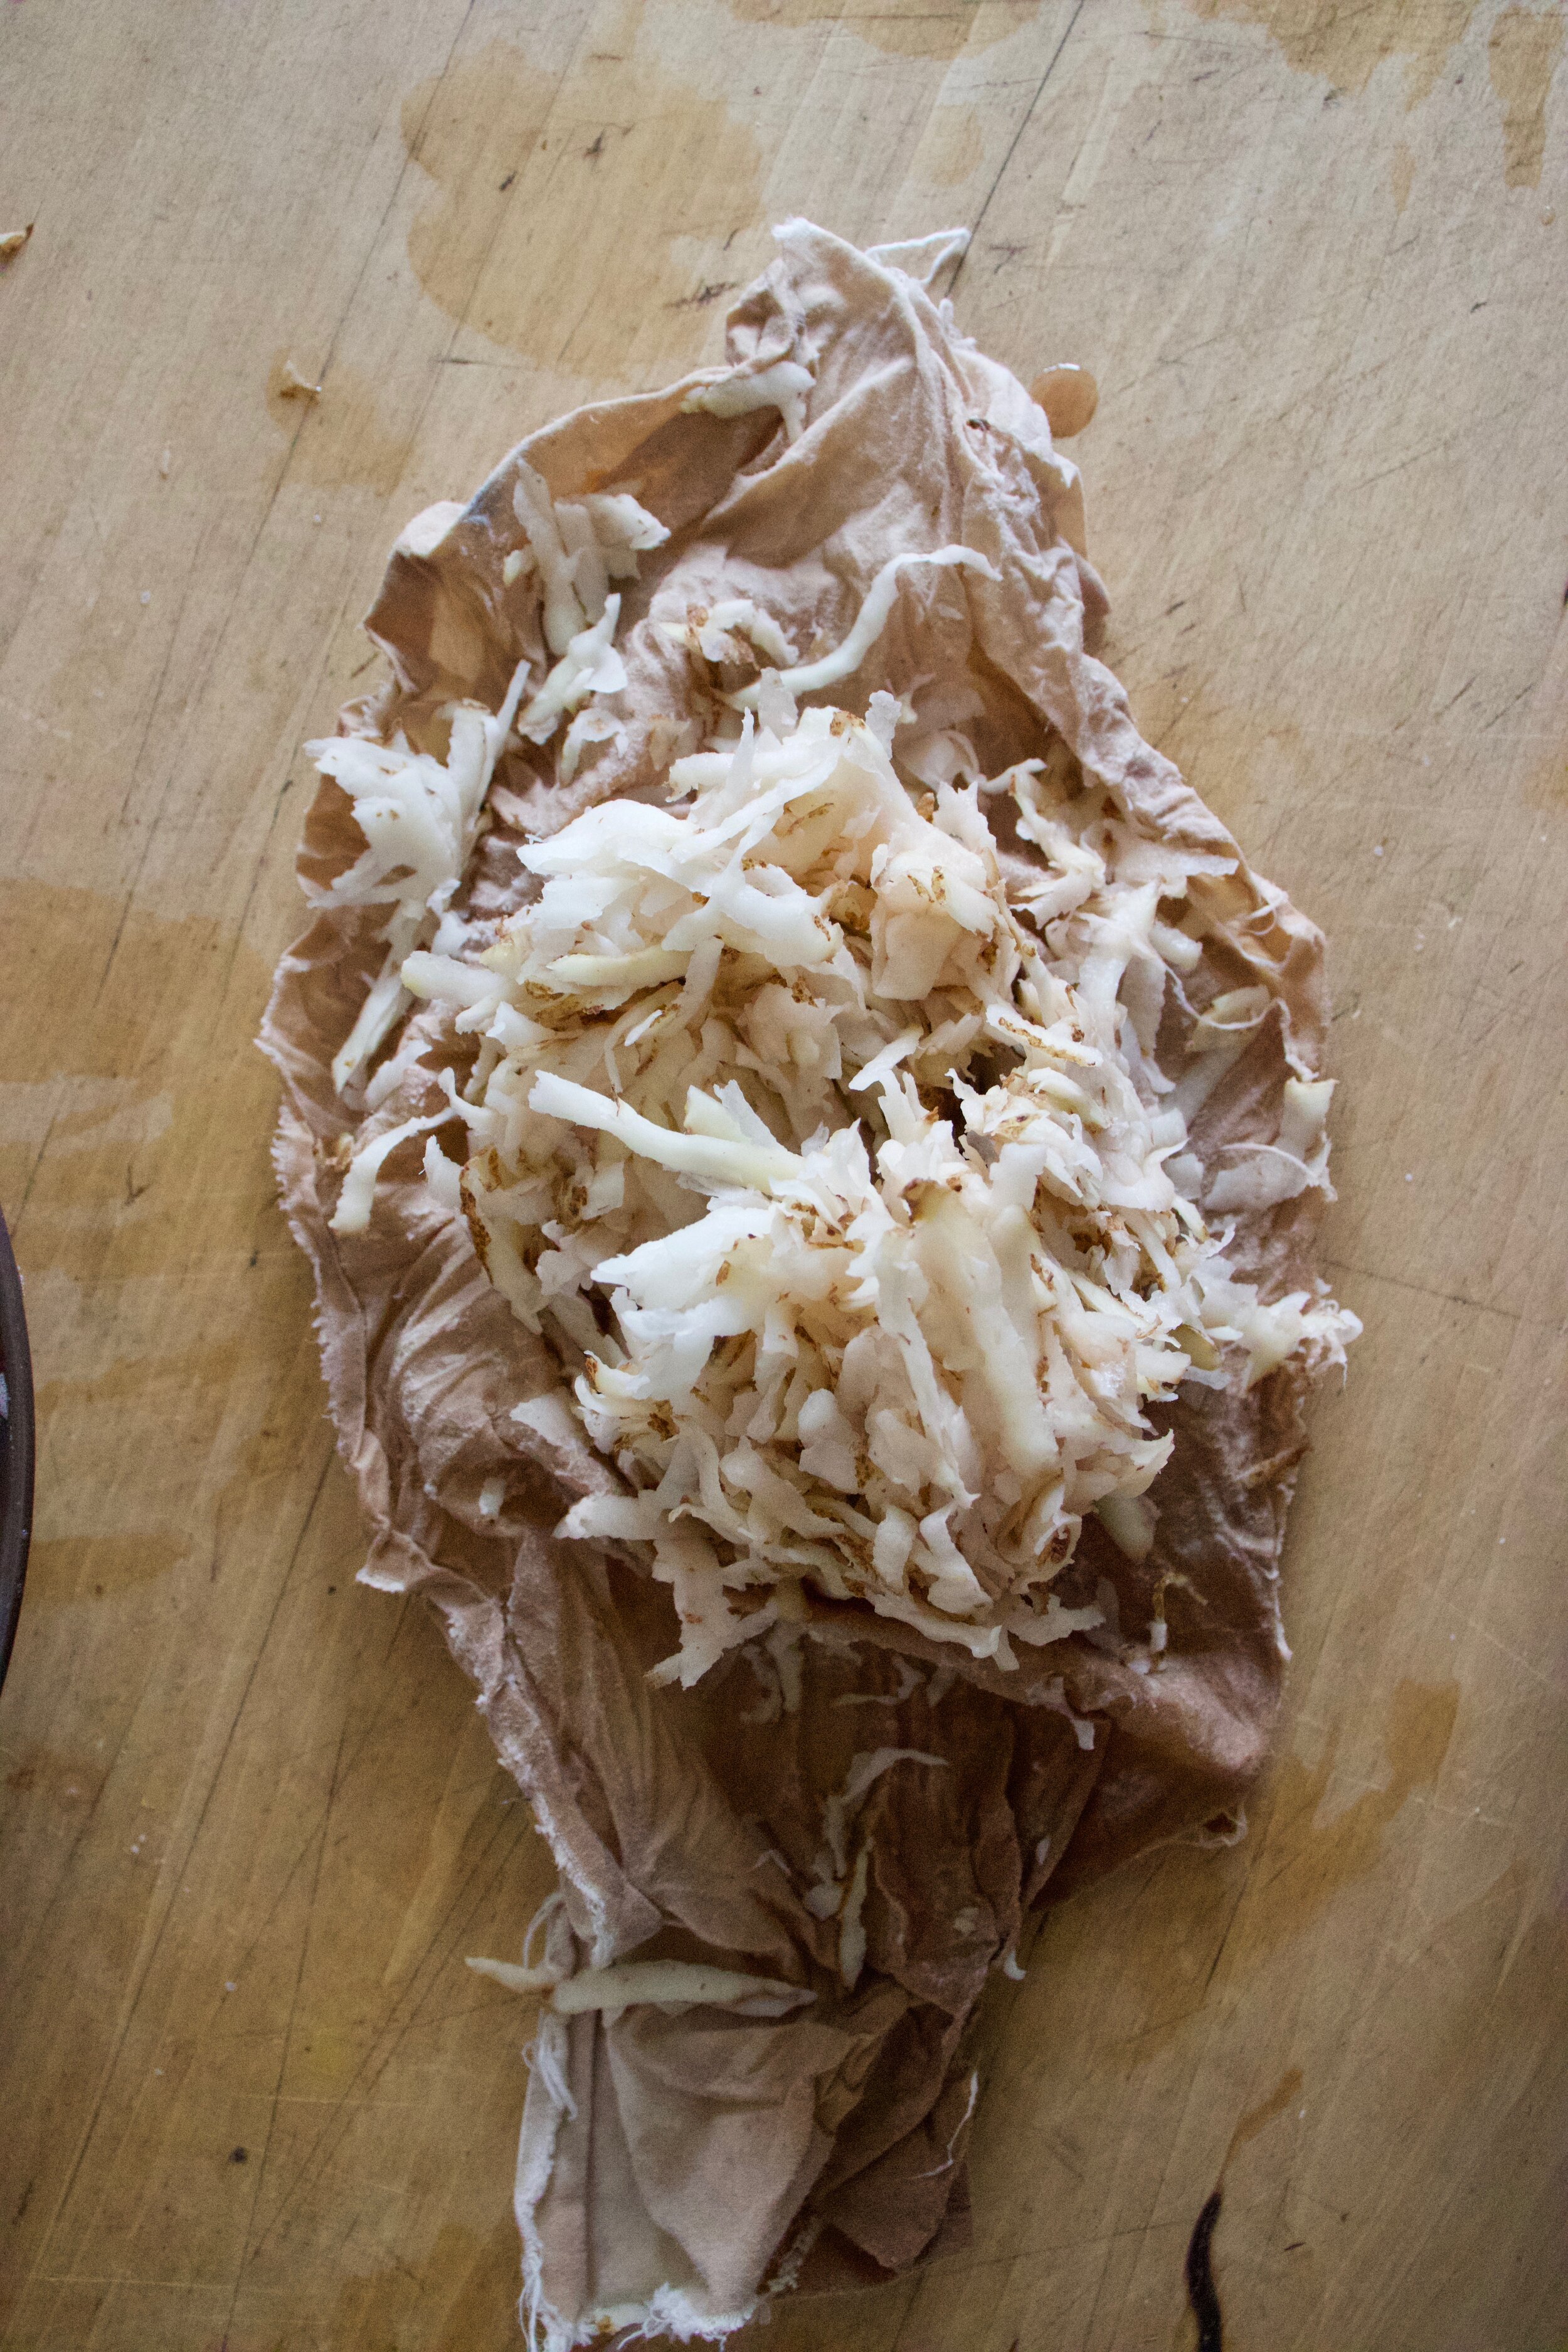
Place the shredded potatoes into a clean dish towel (avoid paper towels because paper towels are the devil) and squeeze as much of the liquid out as you can.

Dump the squeezed out shredded taters back into the bowl and sprinkle with salt and pepper and mix it around.

IMG_4064.jpg

Oil your hot iron and pile on the potatoes. Then close it and press it down. It’s a bit dependent on your iron how long they will need to cook fully, mine took about 9 minutes on high. But maybe just stand close by and check yours after 7ish minutes but expect maybe 10 or so.

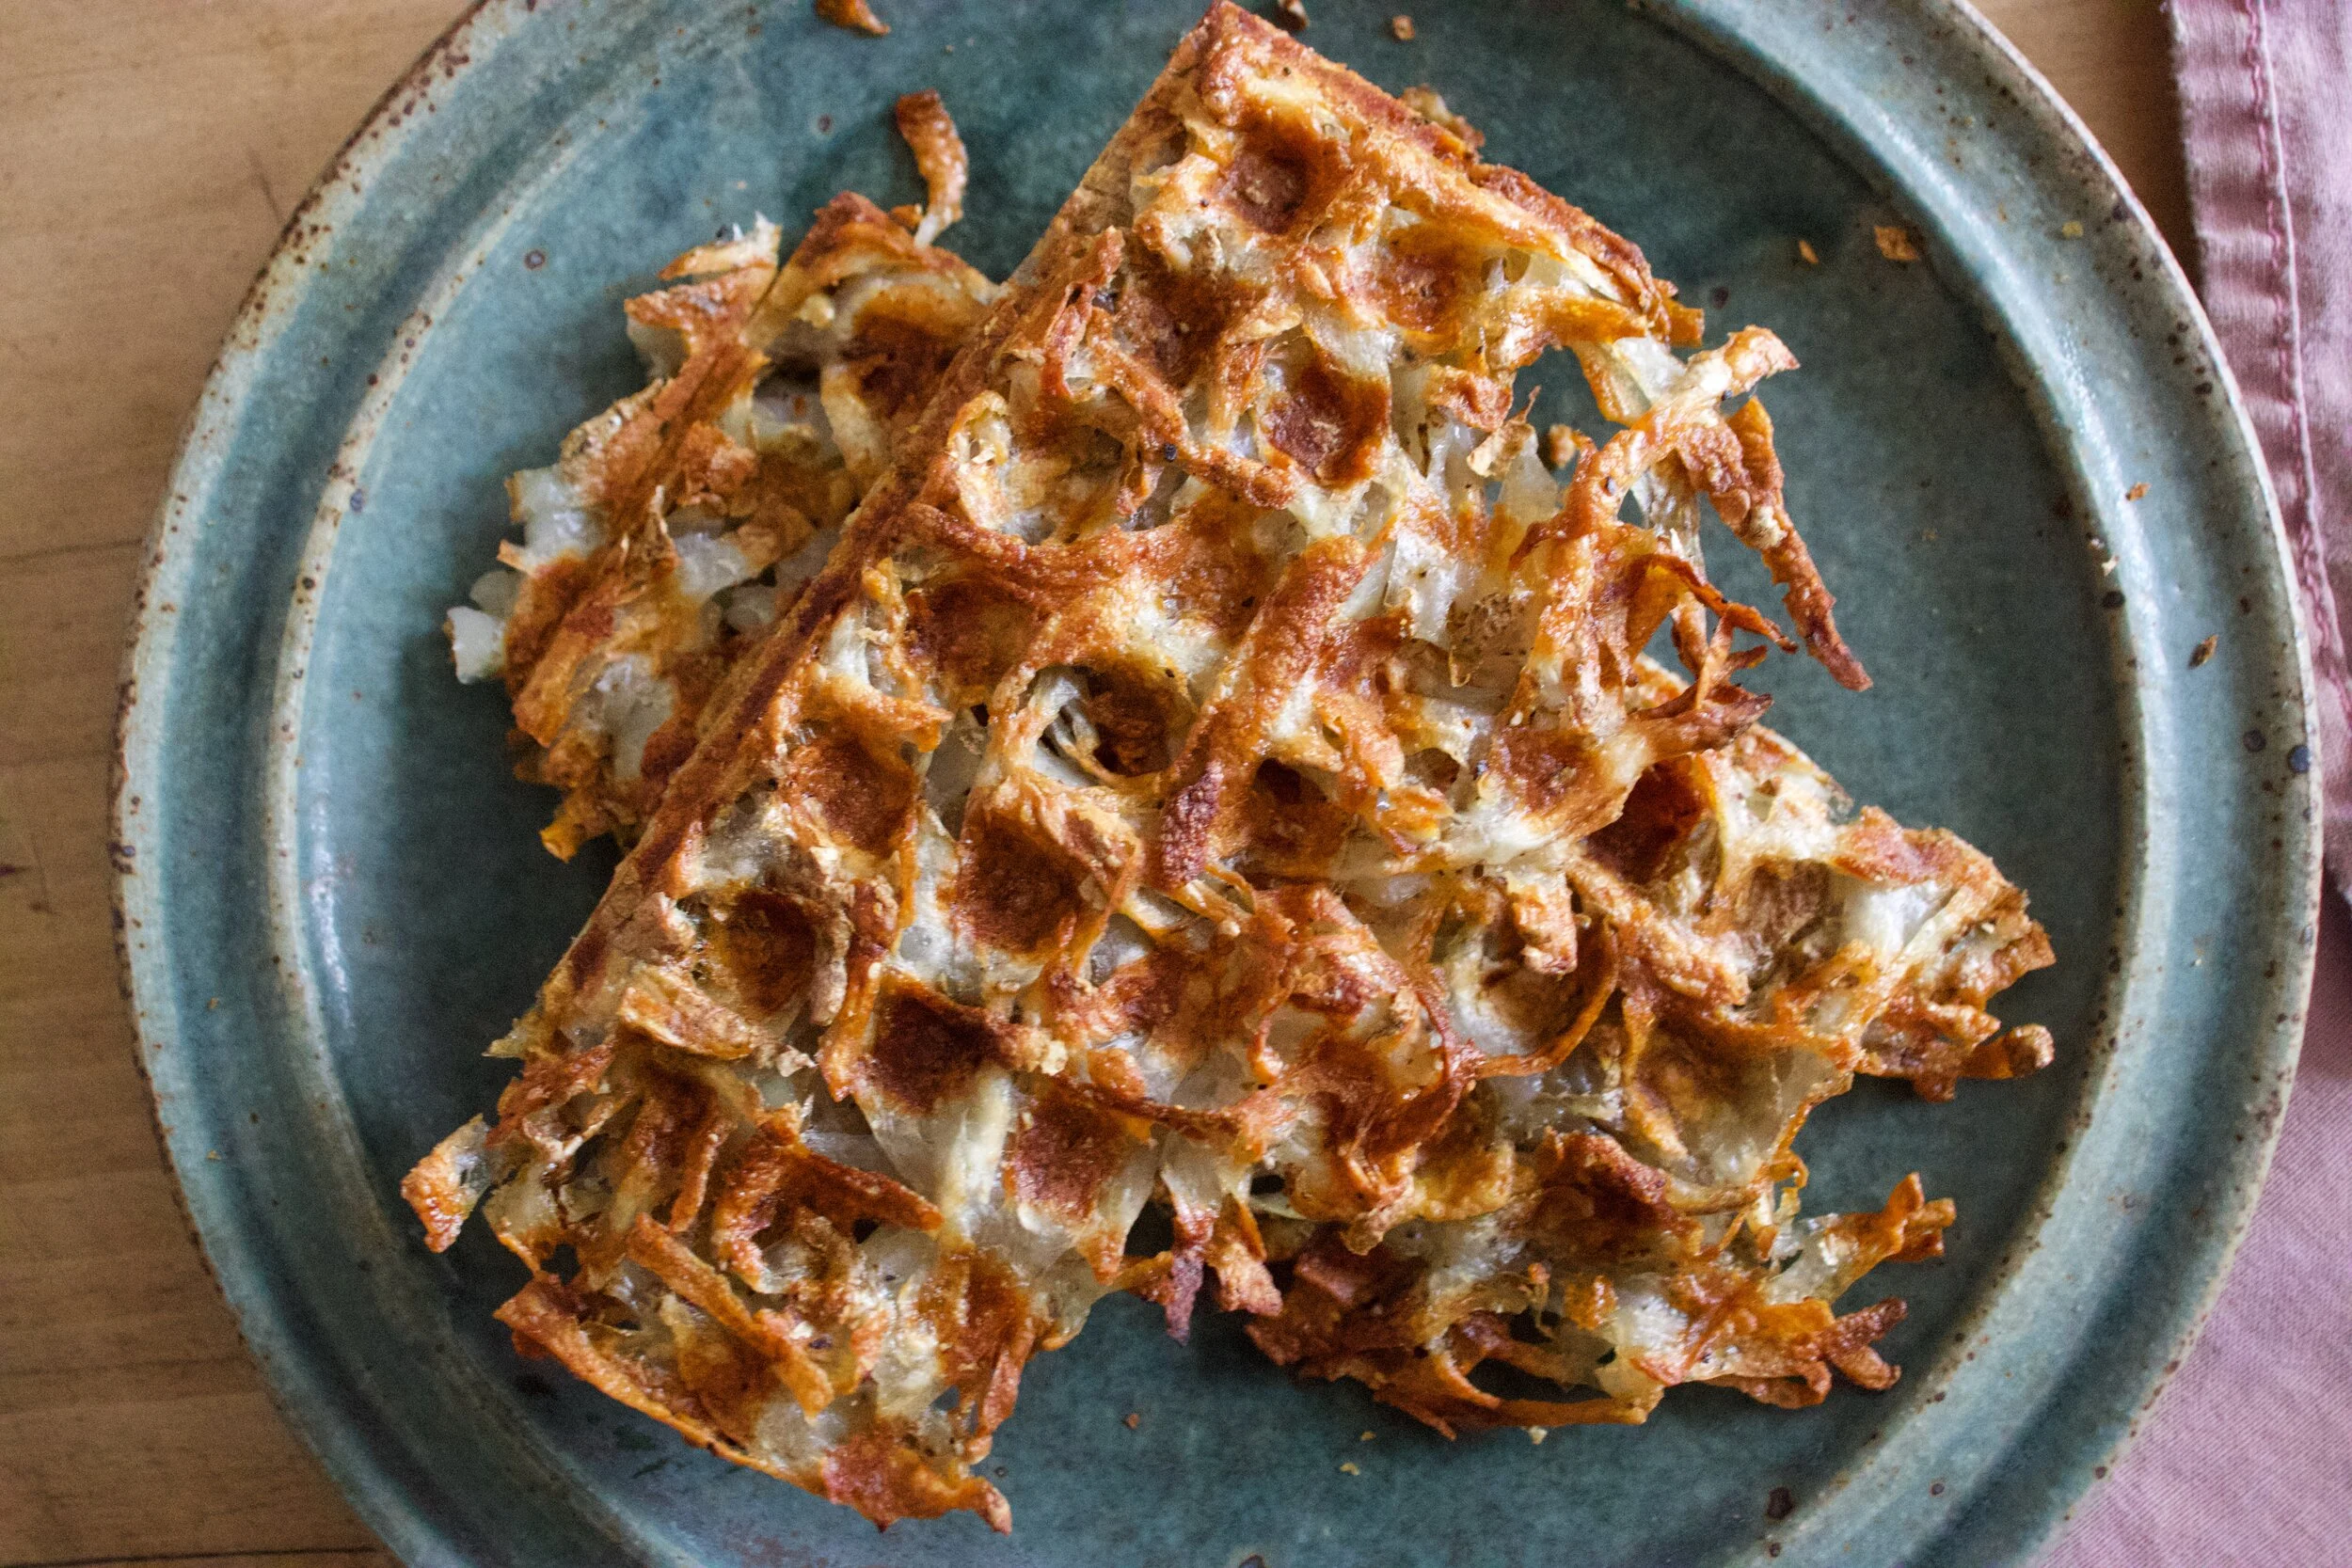
Deep golden brown and crispy all over.

IMG_4077 2.jpg

I mean, really look. Every surface browned and crispy. It is freaking perfection!

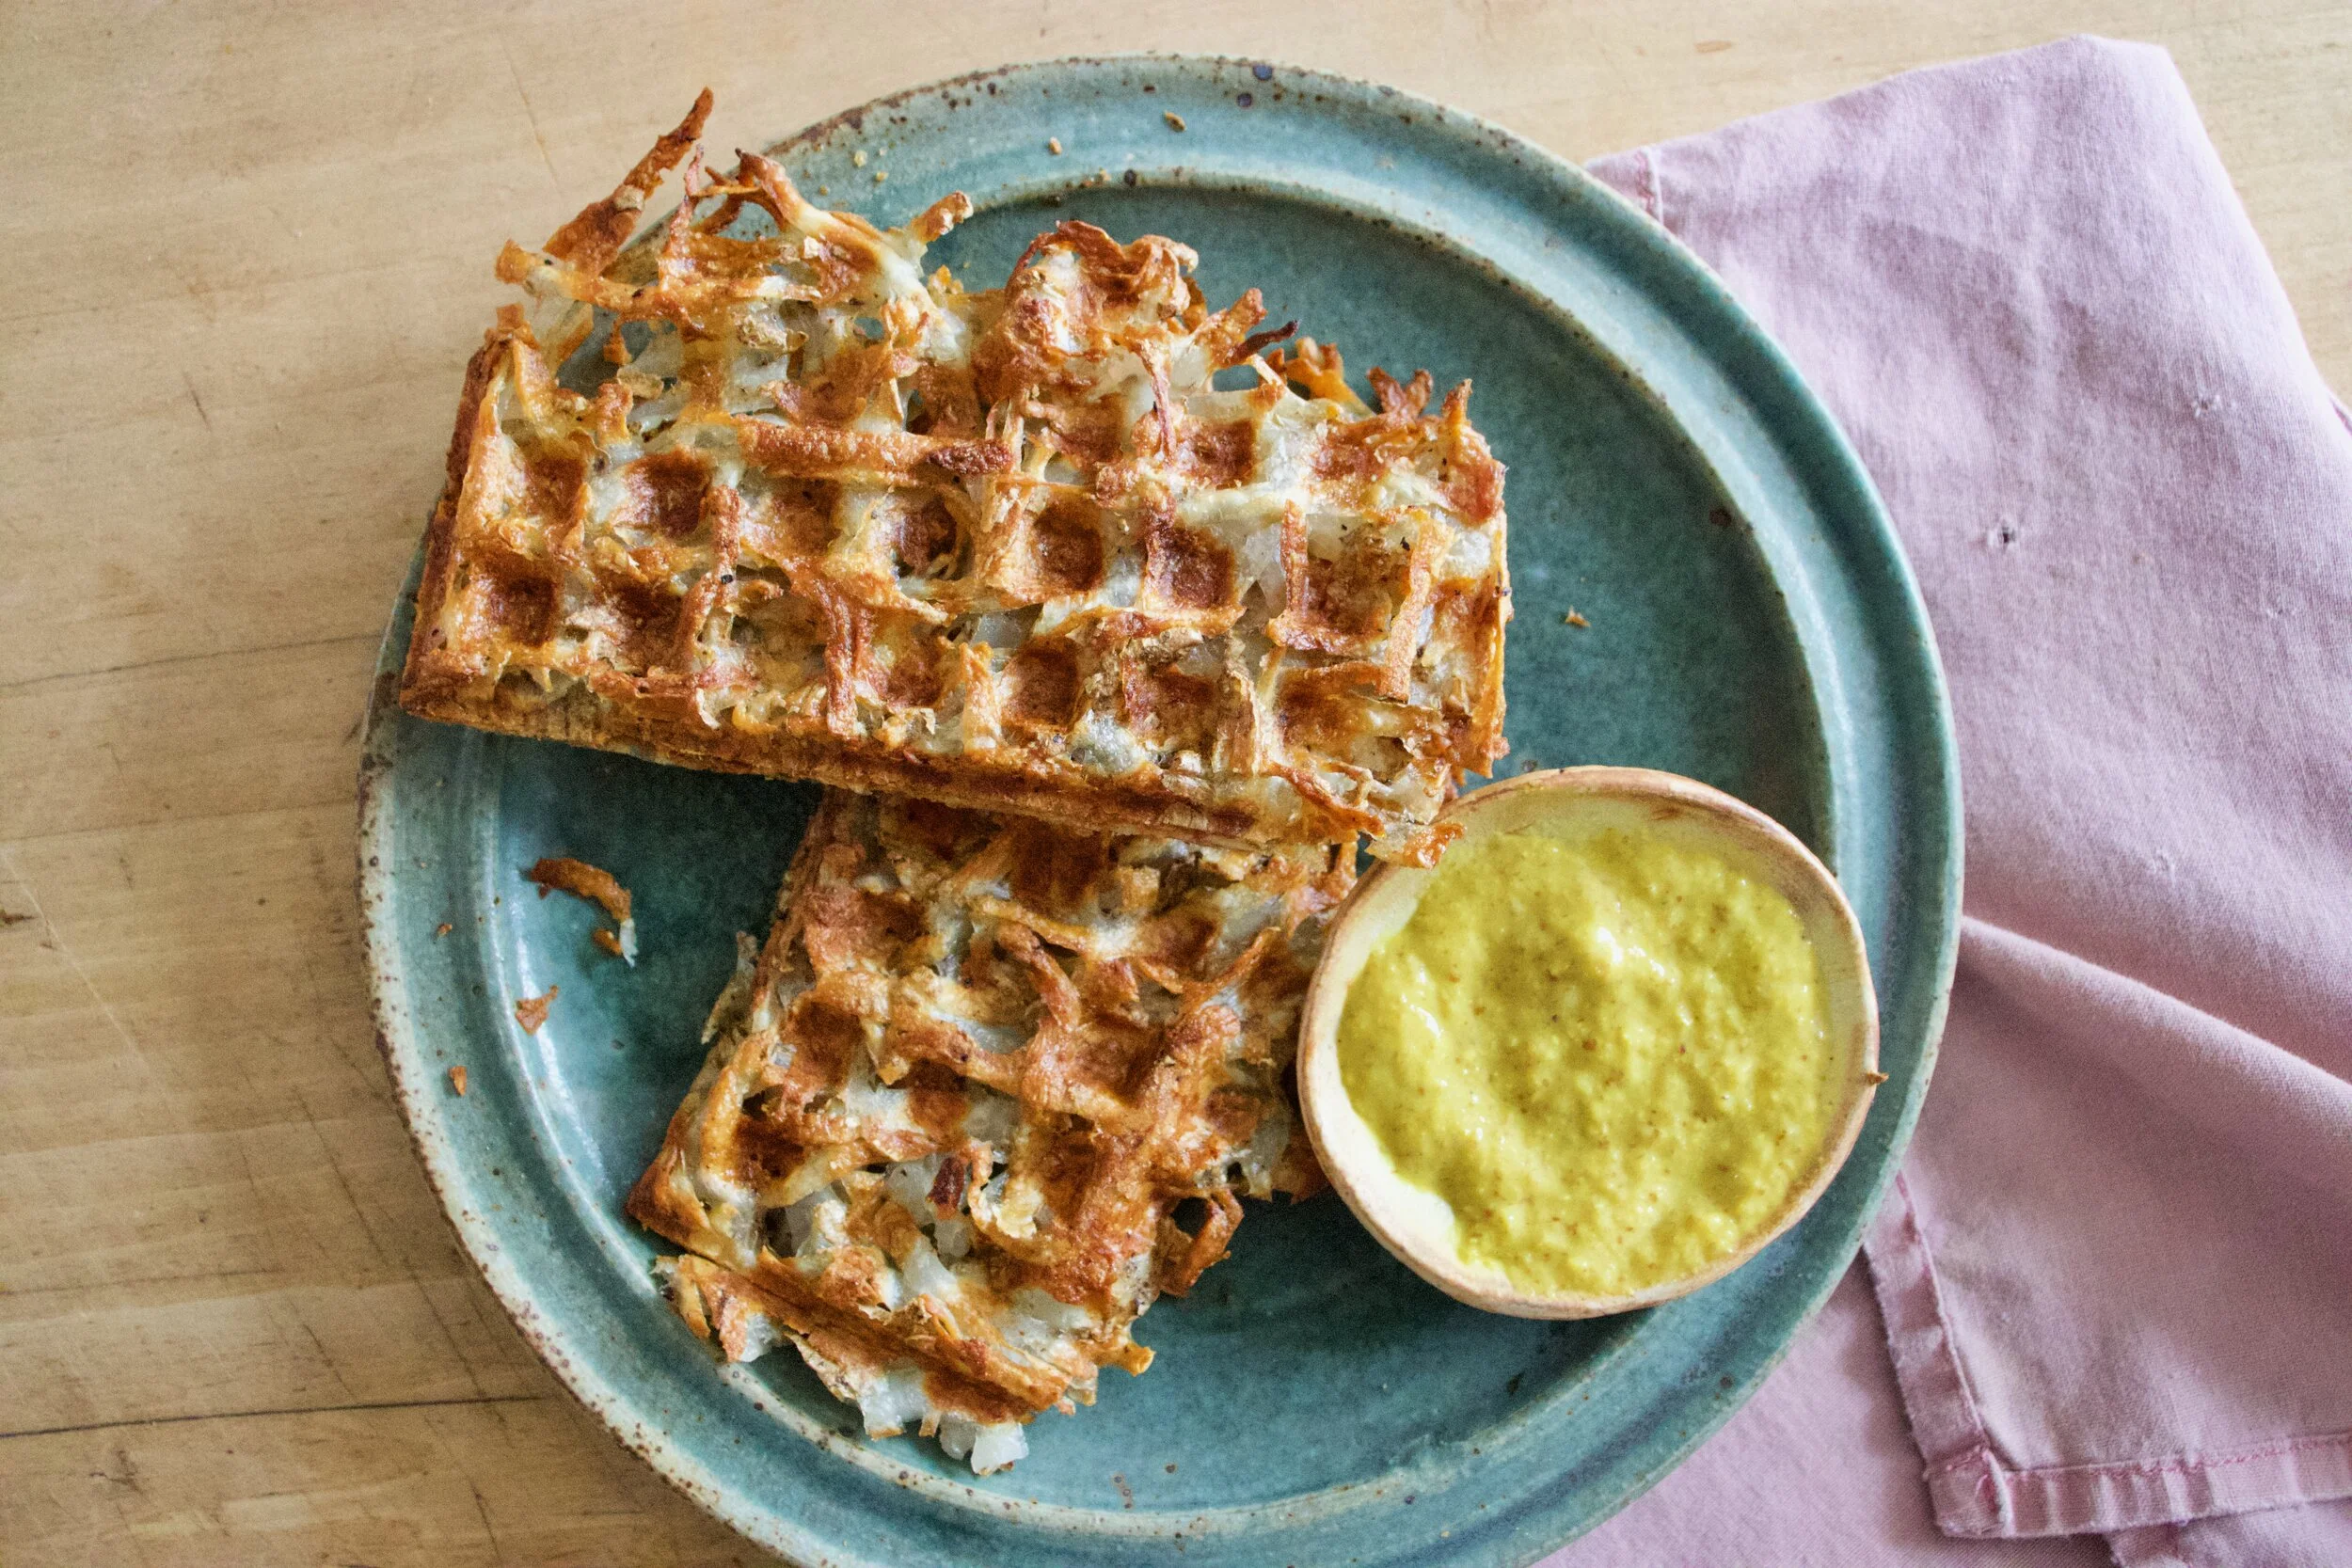
And then like any good waffled food, you plate it, and eat it. Me, with horseradish mustard and a big stupid smile.

Thank you waffle iron. You done good.

-C


Waffle Iron Hash Browns

makes 2-3 servings

  • 2-3 small to medium sized starchy potatoes (Russet or Yukon Gold)

  • couple teaspoons olive oil

  • teaspoon each of salt and pepper

Preheat your waffle iron to high

Shred potatoes on a box grater. Once shredded, gather in a clean kitchen towel and squeeze as much of the liquid as you can from the potatoes. Place potatoes back into bowl and add in about a teaspoon of each salt and pepper and mix around.

Open iron and brush with oil. Place shredded potatoes on the iron, kind of pack together, and close. If it locks, lock it shut, if it doesn’t push it down. And let cook, for about 10 minutes, checking after 7ish (you iron might have more power the mine does). Once the potatoes are a deep golden crispy brown, remove from iron.

Then eat. Any way you want. Plain, with mustard or ketchup. Next to some scramble something or another. Piled high with some black beans and salsa. Whatever. Just eat them and be happy for the waffle iron.

In 5 ingerdients or less, breakfast, dinner, Gluten Free, Potato, quick and easy, Vegan Tags Waffle Iron Hash Browns, Waffle iron, hash browns, vegan, gluten free, grain free, plant based, food, simple, easy, fast, starch, breakfast, dinner, potatoes
4 Comments

Cherry Oat Muffins

July 13, 2019 Colleen Stem
IMG_0325.jpg
IMG_0334.jpg

I recently found my old cast iron muffin pan hiding in the basement over at the loft. I totally forgot I had it and was very much happy to find it not covered in rust and still looking all nice and basically ready for use. Not even the seasoning and non stickness that I worked hard to produce on it was messed up, which is amazing because I also found another cast iron pan that I left down there and it did not fair as well. It had a little rust and was grimy. Fine by me, I didn’t even want that pan anyway.

And that is basically why I made muffins. Because I wanted to use my muffin pan again.

These muffins. First off, muffins are muffins and are not meant to be a pain in the ass to make. This muffins are not, unless you think pitting cherries is a pain. For that I am sorry, but that is a small price to pay for a tasty ass muffin situation. Secondly, these muffins are well worth the tiny effort it takes to pit cherries because you end up with cherry muffins, and that alone should be enough of a reason. And the fact that they are damn tasty. The mr, who eats everything but never says too much about whatever is going into his mouth, texted me at 630 in the morning while I was at the gym just to tell me how amazing he thought they were….

Amazing at 630 am. That’a validation.

Now go get yourself some cherries and make some muffins. And it is ok if you don’t have a super sweet cast iron muffin pan. Most don’t. But you are still cool, don’t worry.

To the muffins!

The stuff. In the bowl is flour, rolled oats, baking soda and powder, salt and cinnamon. Also have cherries, brown sugar, almond milk, canola oil, apple cider vinegar, vanilla extract, and a lemon.

Hardest part of the whole shebang… pitting the cherries. Not my favorite thing to do, but definitely not the worst.

Do it any way you see fit, but I just cut them in half and kind of wedge the pit out with my thumb.

Once all the pits are removed, chop those sherries up into small pieces.

IMG_0117.jpg
IMG_0126.jpg
IMG_0149.jpg
IMG_0165.jpg

Then make the batter. Mix the dry together with the sugar and the zest of the lemon. Just make sure there are not huge clumps of the sugar in the mixture. Then add in all the wet and gently mix until combined. And then fold in the cherries.

IMG_0174 2.jpg

So purty.

IMG_0178.jpg

Fill up well grease muffin pans with the batter then sprinkle a little brown sugar and a few oats on top.

Pop those soon to be muffins into a hot oven.

IMG_0204.jpg

Baked for your pleasure.

IMG_0231.jpg

Remove the muffins from pan and let cool on a wire rack.

IMG_0296.jpg

Cherry oat muffins. You are good.

-C


Cherry Oat Muffins

makes 11-12 muffins

  • 1 1/2 cup all purpose flour

  • 2/3 cup of old fashion rolled oats (plus 2 tablespoons to sprinkle tops with)

  • 1/2 teaspoon baking soda

  • 1 1/2 teaspoon baking powder

  • 1/2 teaspoon salt

  • 1/2 cup brown sugar (plus 2 tablespoons to sprinkle tops with)

  • 1/2 teaspoon cinnamon

  • A lemon (juice and zest)

  • 1 teaspoon vanilla

  • 1 tablespoon apple cider vinegar

  • 1 cup plant based milk

  • 1/3 cup canola oil

Preheat oven to 350

First thing first, remove steams and pits from cherries. Do it any way that you want, but I find just cutting them in half and kind of popping the pit out with my thumb works best for me. Anyway, once the pits are remove, chop cherries up into small pieces.

Place flour, oats, baking powder and soda, salt, cinnamon, brown sugar, and zest of lemon into a big bowl. Mix together until completely incorporated. Make sure there are not huge clumps of brown sugar, if there are, break them up with your fingers. Add in the milk, oil, vanilla, vinegar, and juice of half a lemon. Gently mix until just incorporated. Now fold in chopped cherries.

Evenly scoop the batter into a well greased muffin tin. (There is enough batter for12 normal sized muffins.) Sprinkle the tops with the extra brown sugar and oats then pop the pan Ito the oven. Bake for 28-32 minutes or until the tops of the muffins are a nice golden brown and a taster poked into one of the muffins comes out clean.

When fully baked, remove muffins from oven and pop them out of the pan. Let cool on a wire rack but feel free to eat one or two warm.

Store any extra in an airtight container on counter for a day or two but in the fridge for about a week. Individual muffins can be wrapped and frozen for a good long will too.

In breakfast, Vegan, sweet breads and muffins, fruit, Dairy Free Tags Cherry, Cherry oat muffins, muffins, vegan, vegan food, food, breakfast, snack, plant based, king Arthur flour
Comment

Raspberry Rhubarb Cobbler

April 27, 2019 Colleen Stem
IMG_7865.jpg
IMG_7904.jpg

I found another bag of frozen rhubarb in the chest freezer which is never a bad thing, but my rhubarb patch outside is growing strong and I will have all the fresh rhubarb I could possible eat within the next few weeks. So found rhubarb just means I need to eat it right fast before the fresh stuff comes in. (I haven’t had a problem with that. it’s almost gone already). Plus the other day while I was digging up and transplanting raspberry bushes to the back yard, my neighbor came over and gave me a gallon of frozen raspberries, harvested from said bushes that I was currently planting in my yard. Score for me! Free bushes and berries…I have such nice neighbors.

So the logical thing to do with my new found and giving bounty was of course to hurry up and bake something. Cobbler. Why cobbler? Well, why not? I figured the mr would really like it and eat it and I also didn’t want to make anything to fussy because I was just to dang busy spending all of my extra time outside doing outside things. And cobbler, it’s not fussy because it is basically biscuits and jam baked up all together. Not a lot to think about and comes out looking all homey and sweet and smelling all nice and cozy. Doesn’t that sound nice? And not a pain in the ass?

And best part. A made cobbler works as dessert or breakfasts or just a snack. Just asked the mr. He ate it for all the reasons. With a dollop of yogurt or cream of course because he is fancy like that.

And yeah the fruit I used was frozen, but fresh works just the same here too.

Now, lets get to that cobbler.

The stuff. Raspberries (frozen), rhubarb (frozen), sugar, flour, salt, baking power, cinnamon ,almond milk, apple cider vinegar, cornstarch, and oil.

IMG_7777.jpg

Raspberries, rhubarb, sugar, cinnamon, cornstarch. Its all there in the bowl. Just needs to be mixed. So mix it.

IMG_7781.jpg

Dump fruit mixture into well greased 8 inch pan and pop it into a hot oven to get a head start on baking.

IMG_7797 2.jpg
IMG_7802.jpg

While the fruits in the oven, make the biscuit dough. Mix the dry together then mix in the wet until just incorporated and a sticky dough forms.

IMG_7805.jpg

Pulled from the oven, the fruit is starting to cook down and whoa, it just smells so good!

IMG_7816.jpg

Drop on the biscuits dough on top of the fruit (careful of the hot pan). Evenly if possible, but don’t work to hard to make it look perfect. Imperfection makes it look perfect, you know?

Once biscuits are on, lightly brush the tops with a little milk and sprinkle with more sugar then pop it back into the oven for another 25-30 minutes or until the biscuits are baked.

IMG_7817 2.jpg

Pulled from the oven with a bubbly filling and a golden brown biscuity top. Things are looking good here.

IMG_7929.jpg

And now it’s time.

Dig on in my friend. Sever with something creamy like whipped coconut cream or some type of yogurt or ice cream situation of your choice. And again, this can be your breakfast.

Happy spring people!

-C


Raspberry Rhubarb Cobbler

make a a 8 inch round which serves 5-6

For the Filling

  • 2 cups raspberries (fresh or frozen)

  • 2 cups rhubarb chopped into 1/2 inch to inch long pieces (fresh or frozen)

  • 1 1/2 tablespoons corn starch

  • 3/4 -1 cup sugar (lesser amount if you like a little more tartness. I used lesser amount)

  • 1 teaspoon cinnamon

For the dough

  • 1 cups all purpose flour

  • 1 1/2 teaspoon baking powder

  • 1/2 teaspoon salt

  • 3 tablespoons sugar

  • 3 tablespoons neutral flavored oil

  • 1/2 cup plant based milk

  • 1 teaspoon apple cider vinegar

Preheat oven to 350.

In a large bowl mix together the rhubarb and raspberries with the corn starch, sugar, and cinnamon. Grease a 8 inch round pan the is at least 2 inches deep (can use a slightly large pan or a square) and dump in fruit mixture. Place into oven to bake for about 15 minutes or the fruit starts to break down.

While fruit is baking, mix up biscuit dough. Flour, salt, 2 tablespoons sugar, and baking powder go in a large bowl and mixed until combined. Add in the oil, the milk, and the vinegar. Mix until just incorporated and a dough has formed.

Remove the fruit cooking from the oven. Turn heat up to 375.

Carefully drop spoonfuls of biscuit batter on top of fruit. Brush the top of the biscuits with a little milk and sprinkle with remaining tablespoon sugar. Place the pan back into the oven and bake for another 25-30 minutes or until the biscuits are all nice and golden brown on top.

Remove from oven and let cool for a few minutes before serving. Serve warm with a scoop or dollop of soothing creamy (coconut cream, yogurt, ice cream…..whatever floats your boat.)

Left overs can be stored in pan, just cover it with something and place in fridge. Can be eaten cold to or reheated in microwave or oven.

In Vegan, Spring, fruit, desserts, brunch, breakfast, biscuits and such, cobblers and crumbles Tags Raspberry Rhubarb Cobbler, Cobbler, dessert, raspberries, rhubarb, spring, fruit, plant based, vegan, vegan dessert, biscuits, easy, dairy free, breakfast, brunch
1 Comment

Banana Oat Smoothie

April 6, 2019 Colleen Stem
IMG_7190 2.jpg
IMG_7170 3.jpg
IMG_7159.jpg

It’s a smoothie. And no, we have never really been smoothie people in this house, but what can I say, sometimes smoothies happen, especially when you have about 20 ripe bananas in the fruit bowl with no room in the freezer and no need for 7 loafs of banana bread.

So I smoothied. And I like it (a lot).

This is a smoothie of simplicity. Nothing fancy. Simplest of simple. Straight to the point. And all sorts of good.

You might think, does this simple smoothie you speak of taste very good? Yes, yes indeed it does. It is all sorts of fantastic. Basically if you like creamy, nutty, oaty, bananery things, you will like this. And it’s a perfect breakfast, snack, dessert, or just wanting a little treat like thing that is not garbage food. A smoothie of all smoothies with the most basic ingredients. And takes about 15 seconds to whip up. Can’t complain about that.

To the smoothie goodness!

IMG_7097.jpg

The stuff. A ripe banana, some old fashion rolled oats, a pinch of salt, water, and a smidge of maple syrup if you want it.

IMG_7114.jpg

Everything goes into blender.

And blended until smooth. Hence the word smoothie.

Pour it into a cup (or if you are feeling primal, drink it straight from the blender… it’s totally cool)

And done.

A banana oat smoothie.

Let the good time roll!

-C


Banana Oatmeal Smoothie

makes 1 smoothie

  • 1 very ripe banana

  • 1/3 cup raw old fashion oats

  • 1 1/2 cups water

  • pinch of salt

  • a tablespoon or two of any sweetener you like (optional)

  • a pinch of cinnamon (optional)

Place everything into a blender and blend until smooth. Pour into a cup, sprinkle with cinnamon if you wish, and drink right away.

In 5 ingerdients or less, breakfast, Dairy Free, drinks, fruit, Gluten Free, quick and easy, Raw, snack, Vegan Tags Oats, old fashion oats, oat milk, banana, banana oat smoothie, Oatmeal, smoothie, simple, done in seconds, fresh, vegan, gluten free, dairy free, plant based, snack, breakfast, drink, dessert, healthy, protein, fruit, raw
Comment

Maple Rhubarb Baked Oatmeal

March 23, 2019 Colleen Stem
IMG_6768.jpg
IMG_6708.jpg

I am sadly at my last few bags of frozen garden foods from last season. As of now I have a bag of tomatoes, a couple bags of shredded zucchini, and a bag of rhubarb. Well, had a bag of rhubarb. I think I have eaten almost all of it already. My rhubarb patch better get up and producing stalks soon. And as for the rest of the veggies that I will require. Guess I am going to be surviving mostly on roots from farm share (we are getting a lot more greens though!!!!) and probably doing a bit more grocery shopping then I care too. A few more months. I can do it.

Anyway, enough about my freezer and lack of fresh produce problems.

Here in Vermont maple season is well on it’s way making it a perfect time for anything maple. And rhubarb. Yeah I am using my frozen rhubarb from last year, but any time now (after the snow melts) there will be plenty of stalks for the taking. There will be so much maple and so much fresh rhubarb which are the perfect taste combination. Exciting times! And when added to oatmeal, things just get more gooder. (I know gooder is not a word but I think it should be) Oatmeal, especially baked, is the stuff where all gooder things start.

Have you had baked oatmeal yet? It truly is fantastic. Not at all gummy and gloopy like stove topped cooked oatmeal (but I like it like that too). It still has a good bite to it while still being soft and creamy and boy oh boy is it just the bees knees. With the addition of some crunchy almond friends, well even better. Trust me. If you are a oatmeal eater, you must try it baked. Best part is that it can be eaten as breakfast but also I have been serving it to the mr for dessert with a healthy drizzle of more maple. It’s that good friends. From breakfast to dessert. Everyone is happy.

To the baked oatmeal.

IMG_6643.jpg

The stuff. Old fashion oats, cinnamon, salt, baking powder, rhubarb (fresh or frozen), REAL maple syrup, some plant milk, a few flax eggs, a bit of tahini, and some almonds.

To start. Oats, cinnamon. salt, baking powder and almonds get a quick toss together in a big bowl.

IMG_6648.jpg
IMG_6661.jpg

If you rhubarb is not already chopped up into inch long pieces, do that. I already did before freezing it so yea me. Once its chopped, layer almost all of it (reserve a few small needful to toss on top) into a lightly greased 9x9 inch baking dish then cover evenly with the oat mixture.

In now empty bowl mix together the milk, the flax eggs, the tahini, and the maple until evenly incorporated.

Pour the wet mixture all over the oats and let it absorb.

Once the liquid is all absorbed , top with any left over almonds and the left over rhubarb. For good looks.

Pop into a hot oven to bake.

Golden brown with crispy edges. Rhubarb and maple baked oatmeal for all your maple, oaty and rhubarbie needs.

Fresh from the oven scooped warm into bowls. Top with extra maple if thats what you should want do.

Enjoy and happy maple season!

-C


Maple Rhubarb Baked Oatmeal

Make a 9x9 pan of oatmeal

  • 2 1/2 cups old fashion oats (make sure gluten free if need be)

  • 1 teaspoon baking powder

  • 1/2 teaspoon salt

  • 2 teaspoon cinnamon

  • 1/3 cup maple syrup plus more for serving

  • 1 tablespoon tahini or any other nut butter

  • 2 flax eggs (2 tablespoons ground flax seed with 6 tablespoons warm water)

  • 2 1/2 cups fresh or frozen rhubarb chopped into inch long pieces

  • 1 1/2 cup plant milk (water works but it won’t be as creamy)

  • 1/2 cup chopped almonds (optional)

Preheat oven to 375

Lightly grease a 9x9 inch baking pan (I used metal because it makes for crisper edges but glass works too) and dump 2 cups of the rhubarb in and evenly distribute on the bottom. In a large bowl mis the oats, the baking powder, salt, and cinnamon together. Mix in chopped nuts if you are using. Evenly cover rhubarb with oat mixture. In now empty bowl mix together the milk, flax eggs, maple syrup, and tahini until evenly incorporated. Pour mixture over oats. Let the mixture sit for a few minutes until the oats have abosbed all the liquid. Toss the rest of the diced rhubarb and a few more chop nuts to the top and pop into the oven to bake.

Bake for 30-40 minutes (shorter time for a wetter oatmeal, longer for a denser crispier oatmeal)

Once baked to your likeness, remove from oven and let cool for a few minutes just so it is not super hot. Scoop into bowls and serve warm with extra maple and milk or whatever you might want to serve with it.

Left overs last great in fridge for 3-4 days or individual portions can be frozen for a month or two. Just pop into microwave for a couple minutes to warm up.

In Vegetables, Vegan, Spring, Nuts, Gluten Free, fruit, grains, desserts, Dairy Free, brunch, breakfast Tags Maple, Real Maple syrup, vegan, baked oatmeal, gluten free, plant based, oats, almonds, rhubarb, eating in season, breakfast, dessert, healthy, energy
Comment
← Newer Posts Older Posts →
 

https://thelovelycrazy.squarespace.com/config#/|/about/

Me. Food Maker.Food eater. Woo HOO!

STEM+NODE  SMALL BATCH AND ONE OF A KIND POTTERY

stem+node ceramics


____________________

Subscribe

GET NEW POSTS IN YO EMAIL

You are AWESOME!!!


@thelovelycrazy 2014-2021