• stem+node ceramics
  • HOME
  • Food Recipes
  • About
  • Contact
Menu

The Lovely Crazy

Street Address
City, State, Zip
Phone Number

Your Custom Text Here

The Lovely Crazy

  • stem+node ceramics
  • HOME
  • Food Recipes
  • About
  • Contact

Fenugreek Ginger Tea

January 25, 2020 Colleen Stem
IMG_5238.jpg
IMG_5266.jpg
IMG_5233 2.jpg

Besides begin a coffee addict, I am also a super big tea drinker. At least 1, if not like 3 cups a day. And when I say cups, I mean a 32oz ball jar of steaming hot water with a tea bag of some sort in it. And sure, I will use the same bag twice or leave in an old bag and add a new bag. Or with loose leaf, I’ll end up just eventually swallowing it all. What can I tell ya. That’s my truth. 🤷🏻‍♀️

Anyway, tea. I have a shit ton. Bags and loose leaf, but sometimes what I would call "conventional tea flavors” do not sing my fancy. That is when I will dig around in my spice jars and pull stuff out to make or add to a tea.

Fenugreek. A seed. A great tasting seed. I usually use it in my chilis and curry dishes, but lately, I have also been brewing it up with (and without) fresh ginger to drink because it is fantastic. Ginger of course is spicy and earthy, but fenugreek, while also being really earthy, also has a sweetness to it and tastes kind of like real maple syrup. Now doesn’t that sound great? That’s because it is great.

So if you are feeling a little something different and tasty and maybe just so happened to have some fenugreek in the old spice cabinet, give this tea a try. A perfect for and cosy drink for cold winter afternoon.

To the tea!

IMG_5168.jpg

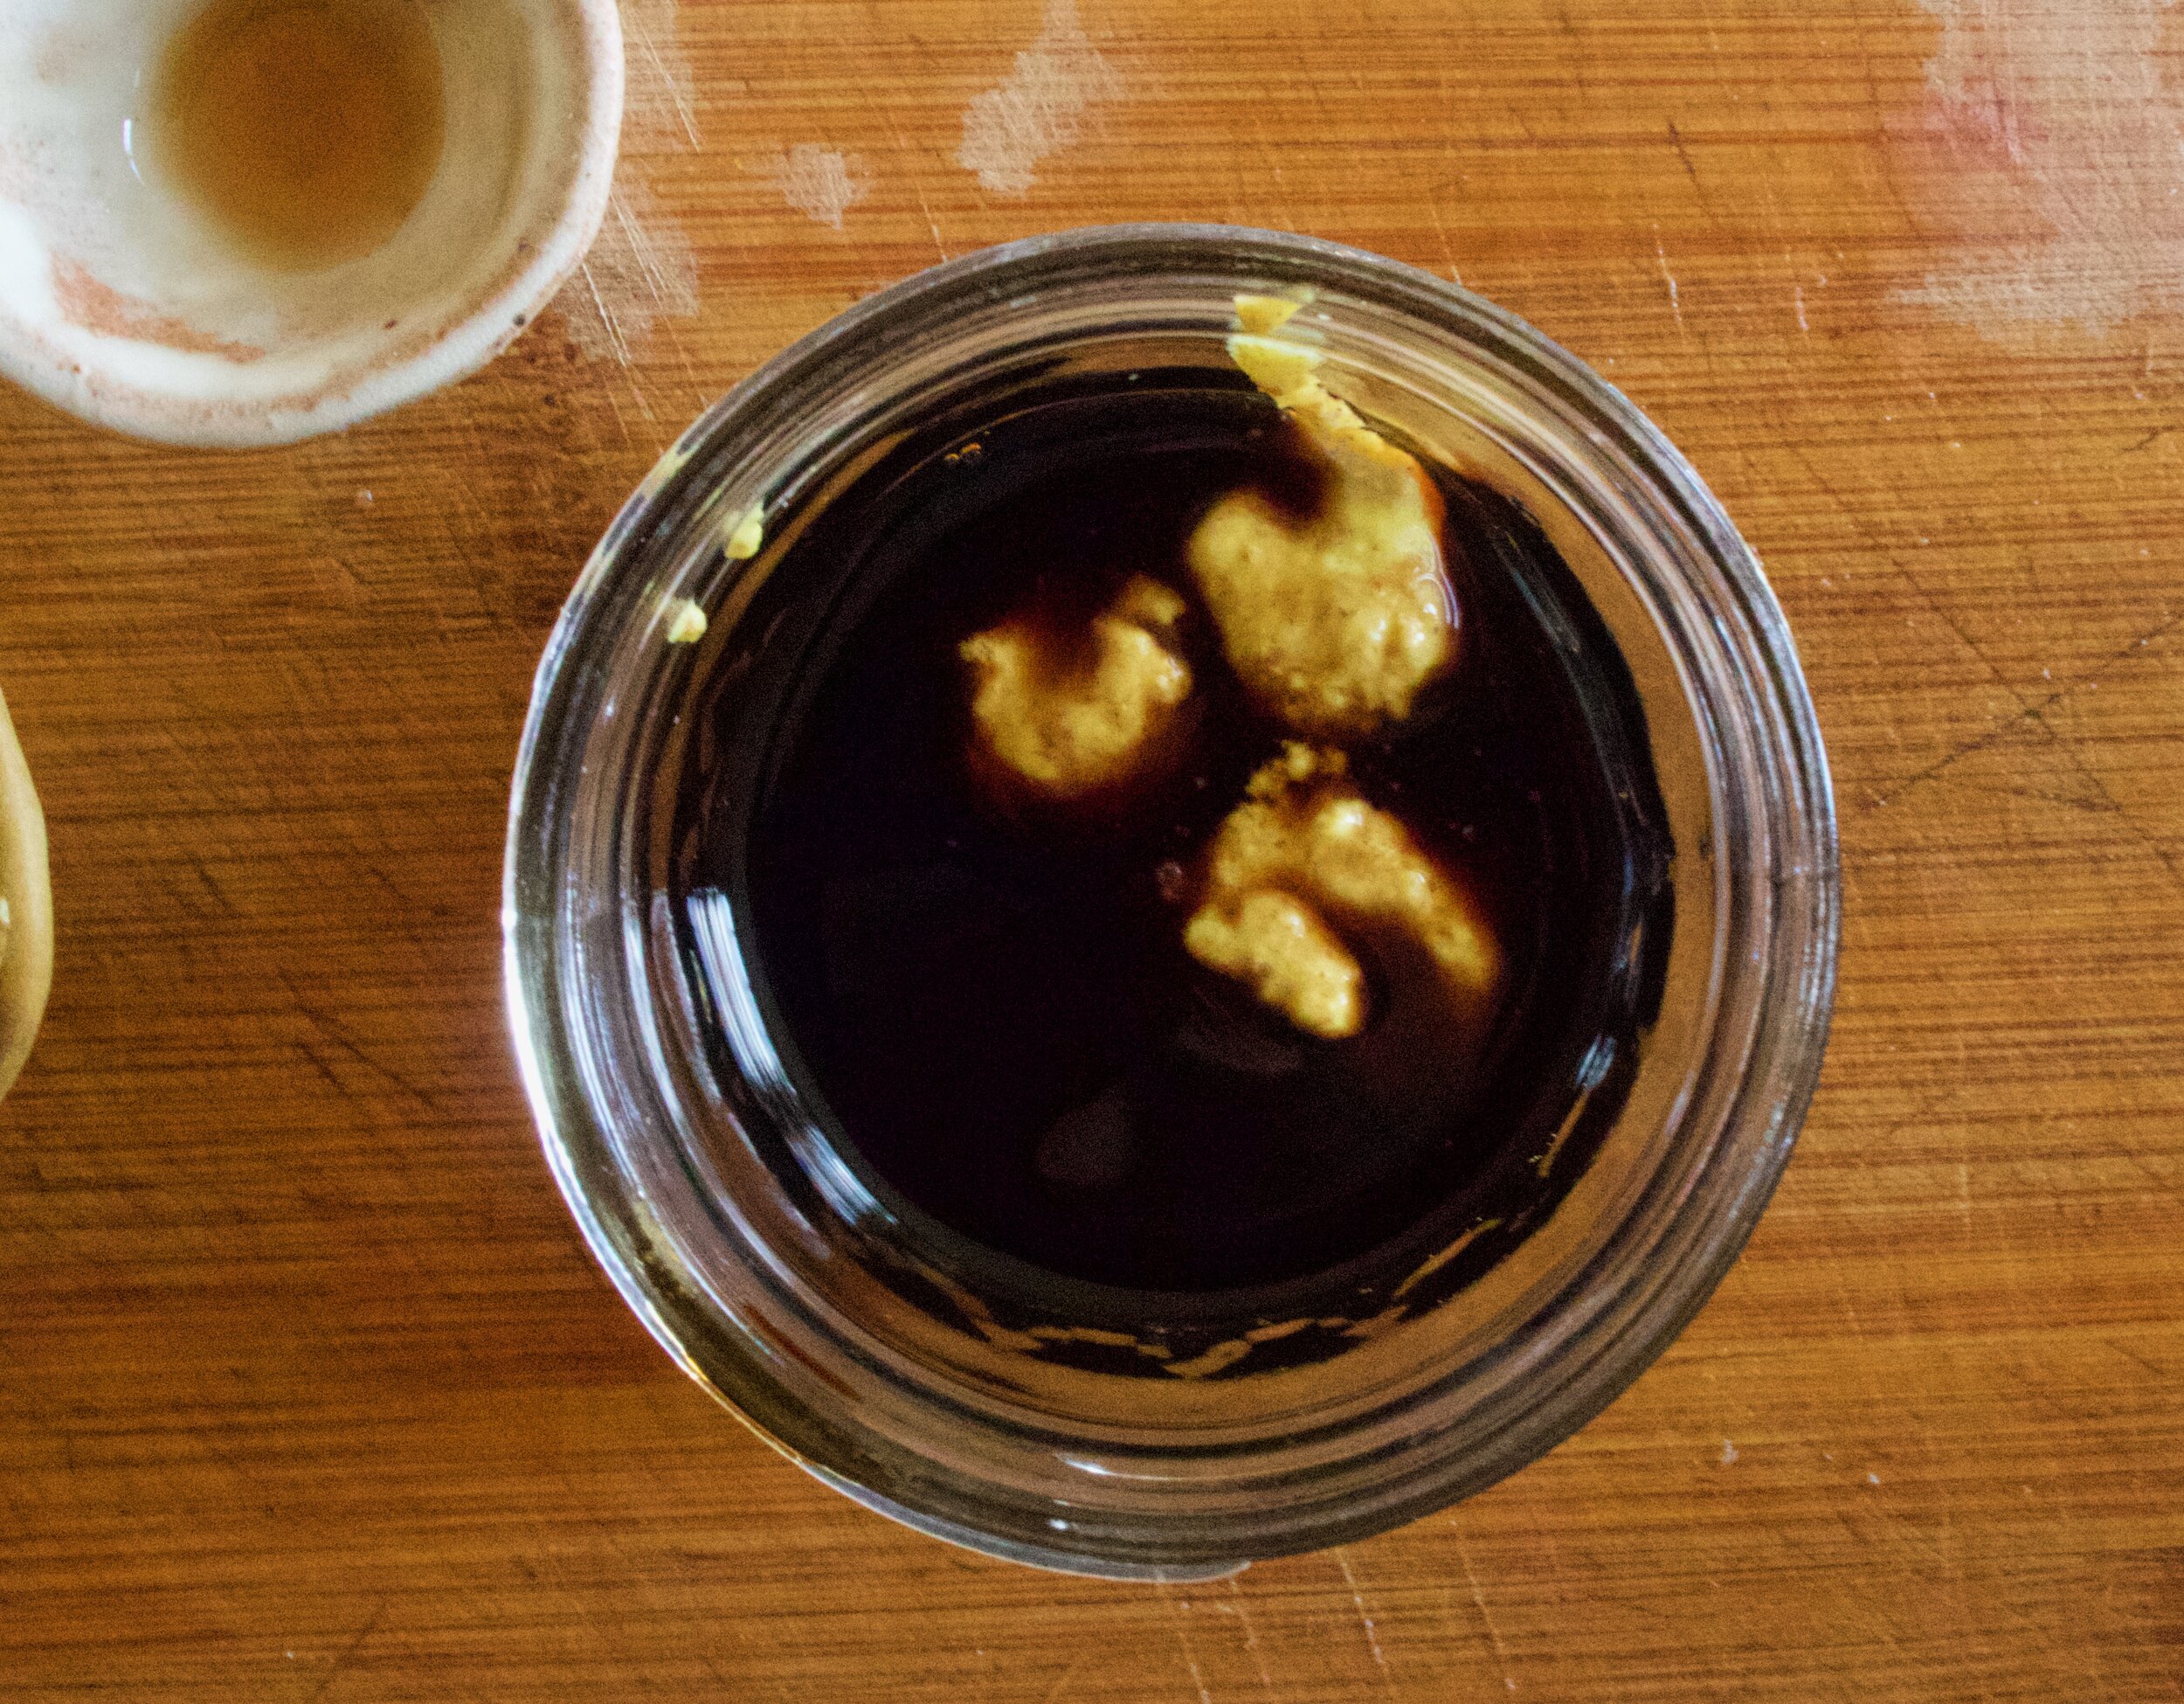
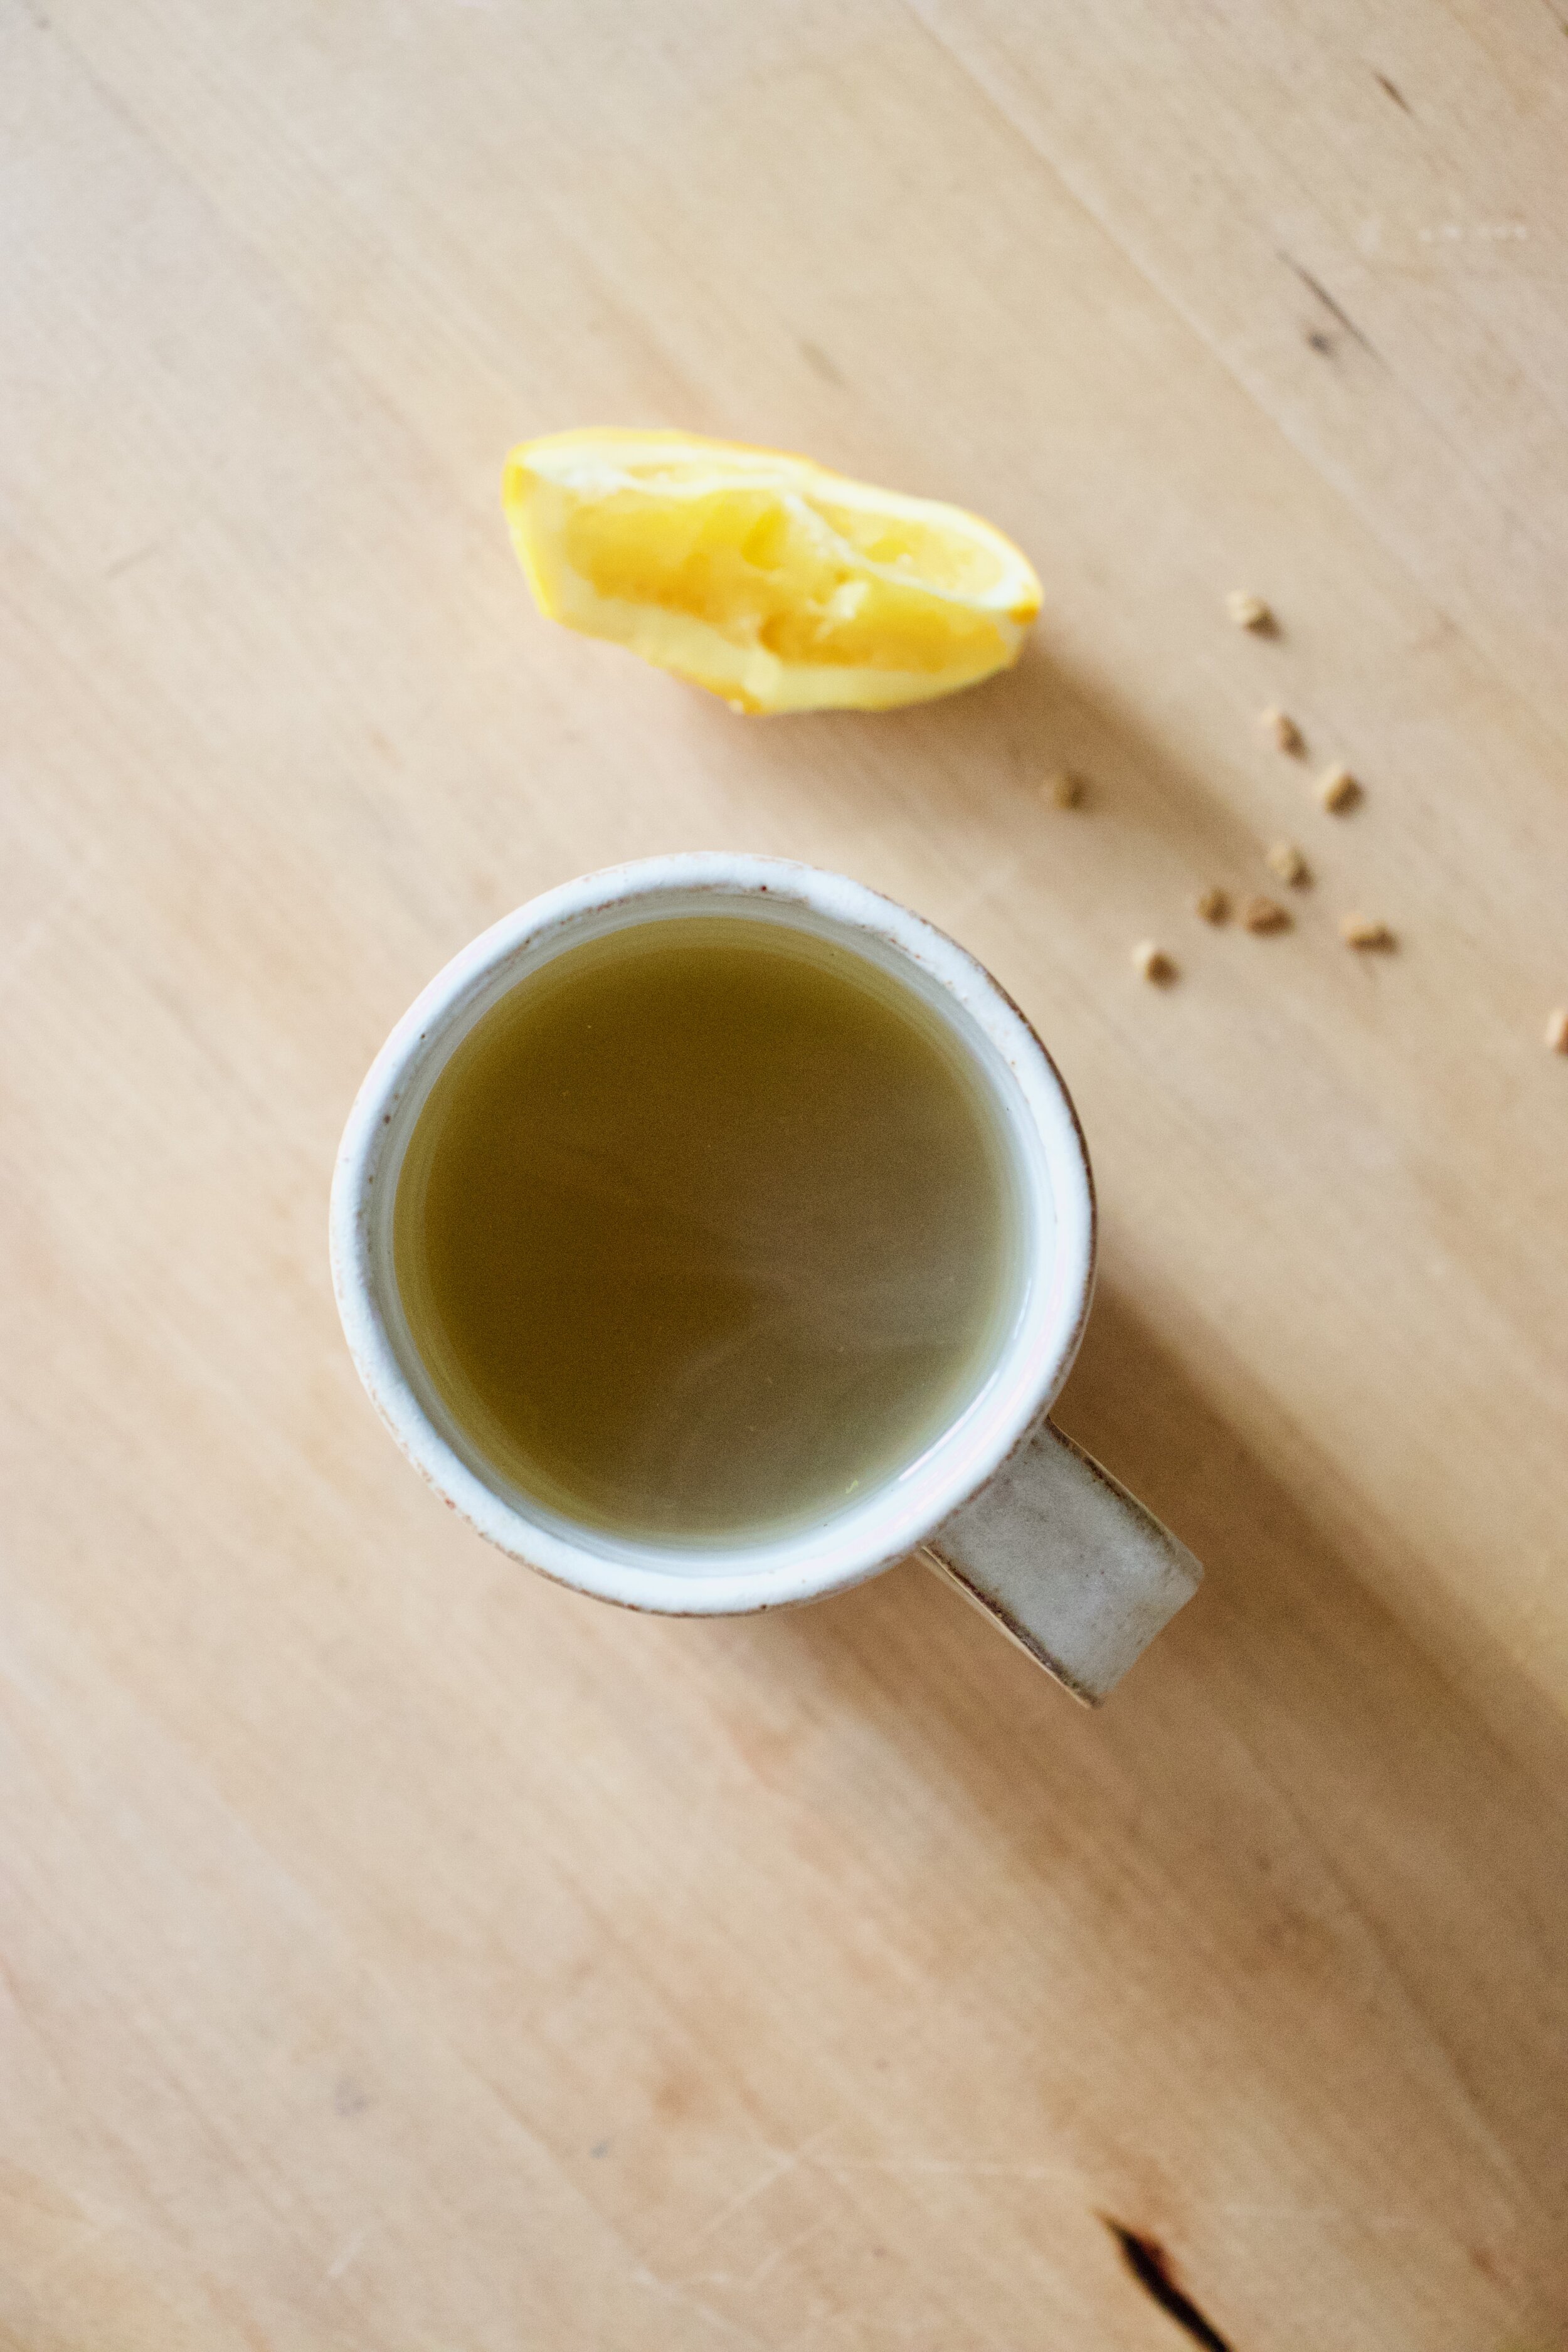
The stuff. Water, fenugreek, fresh ginger, and an orange.

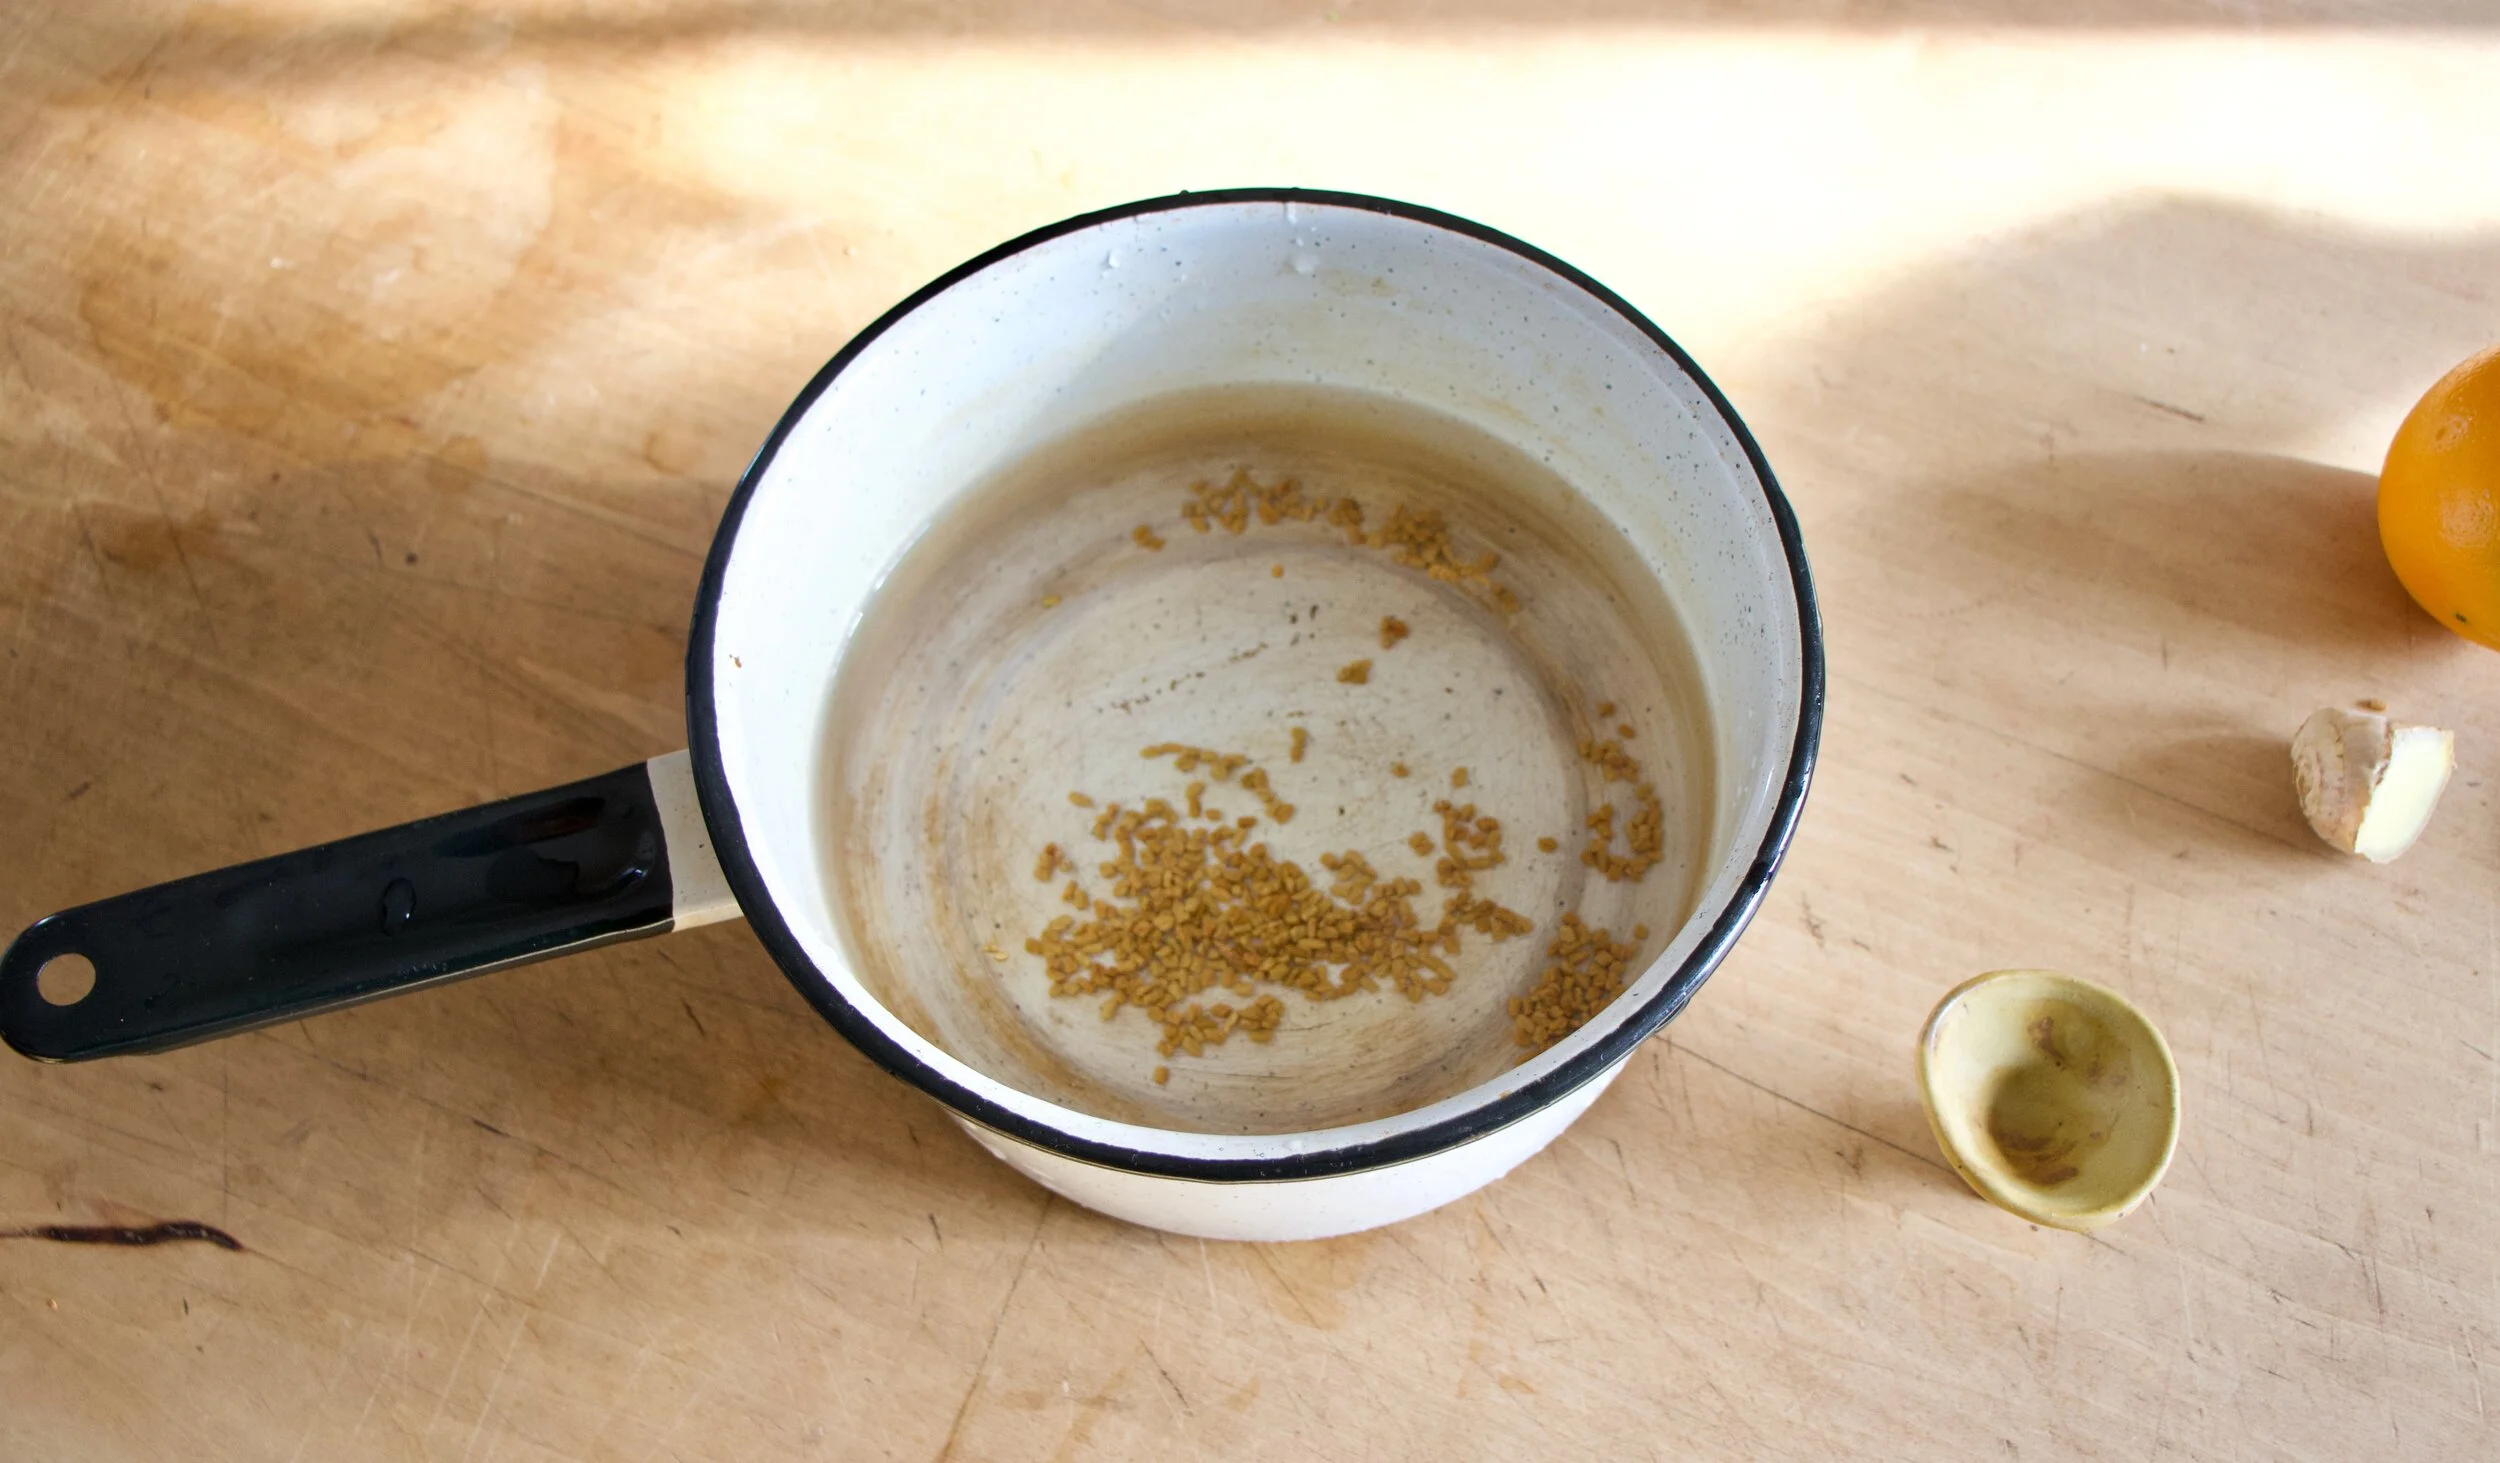
Dump water into a pot and add in fenugreek seeds. Place on the stove and bring to a boil, then turn the heat to low and simmer.

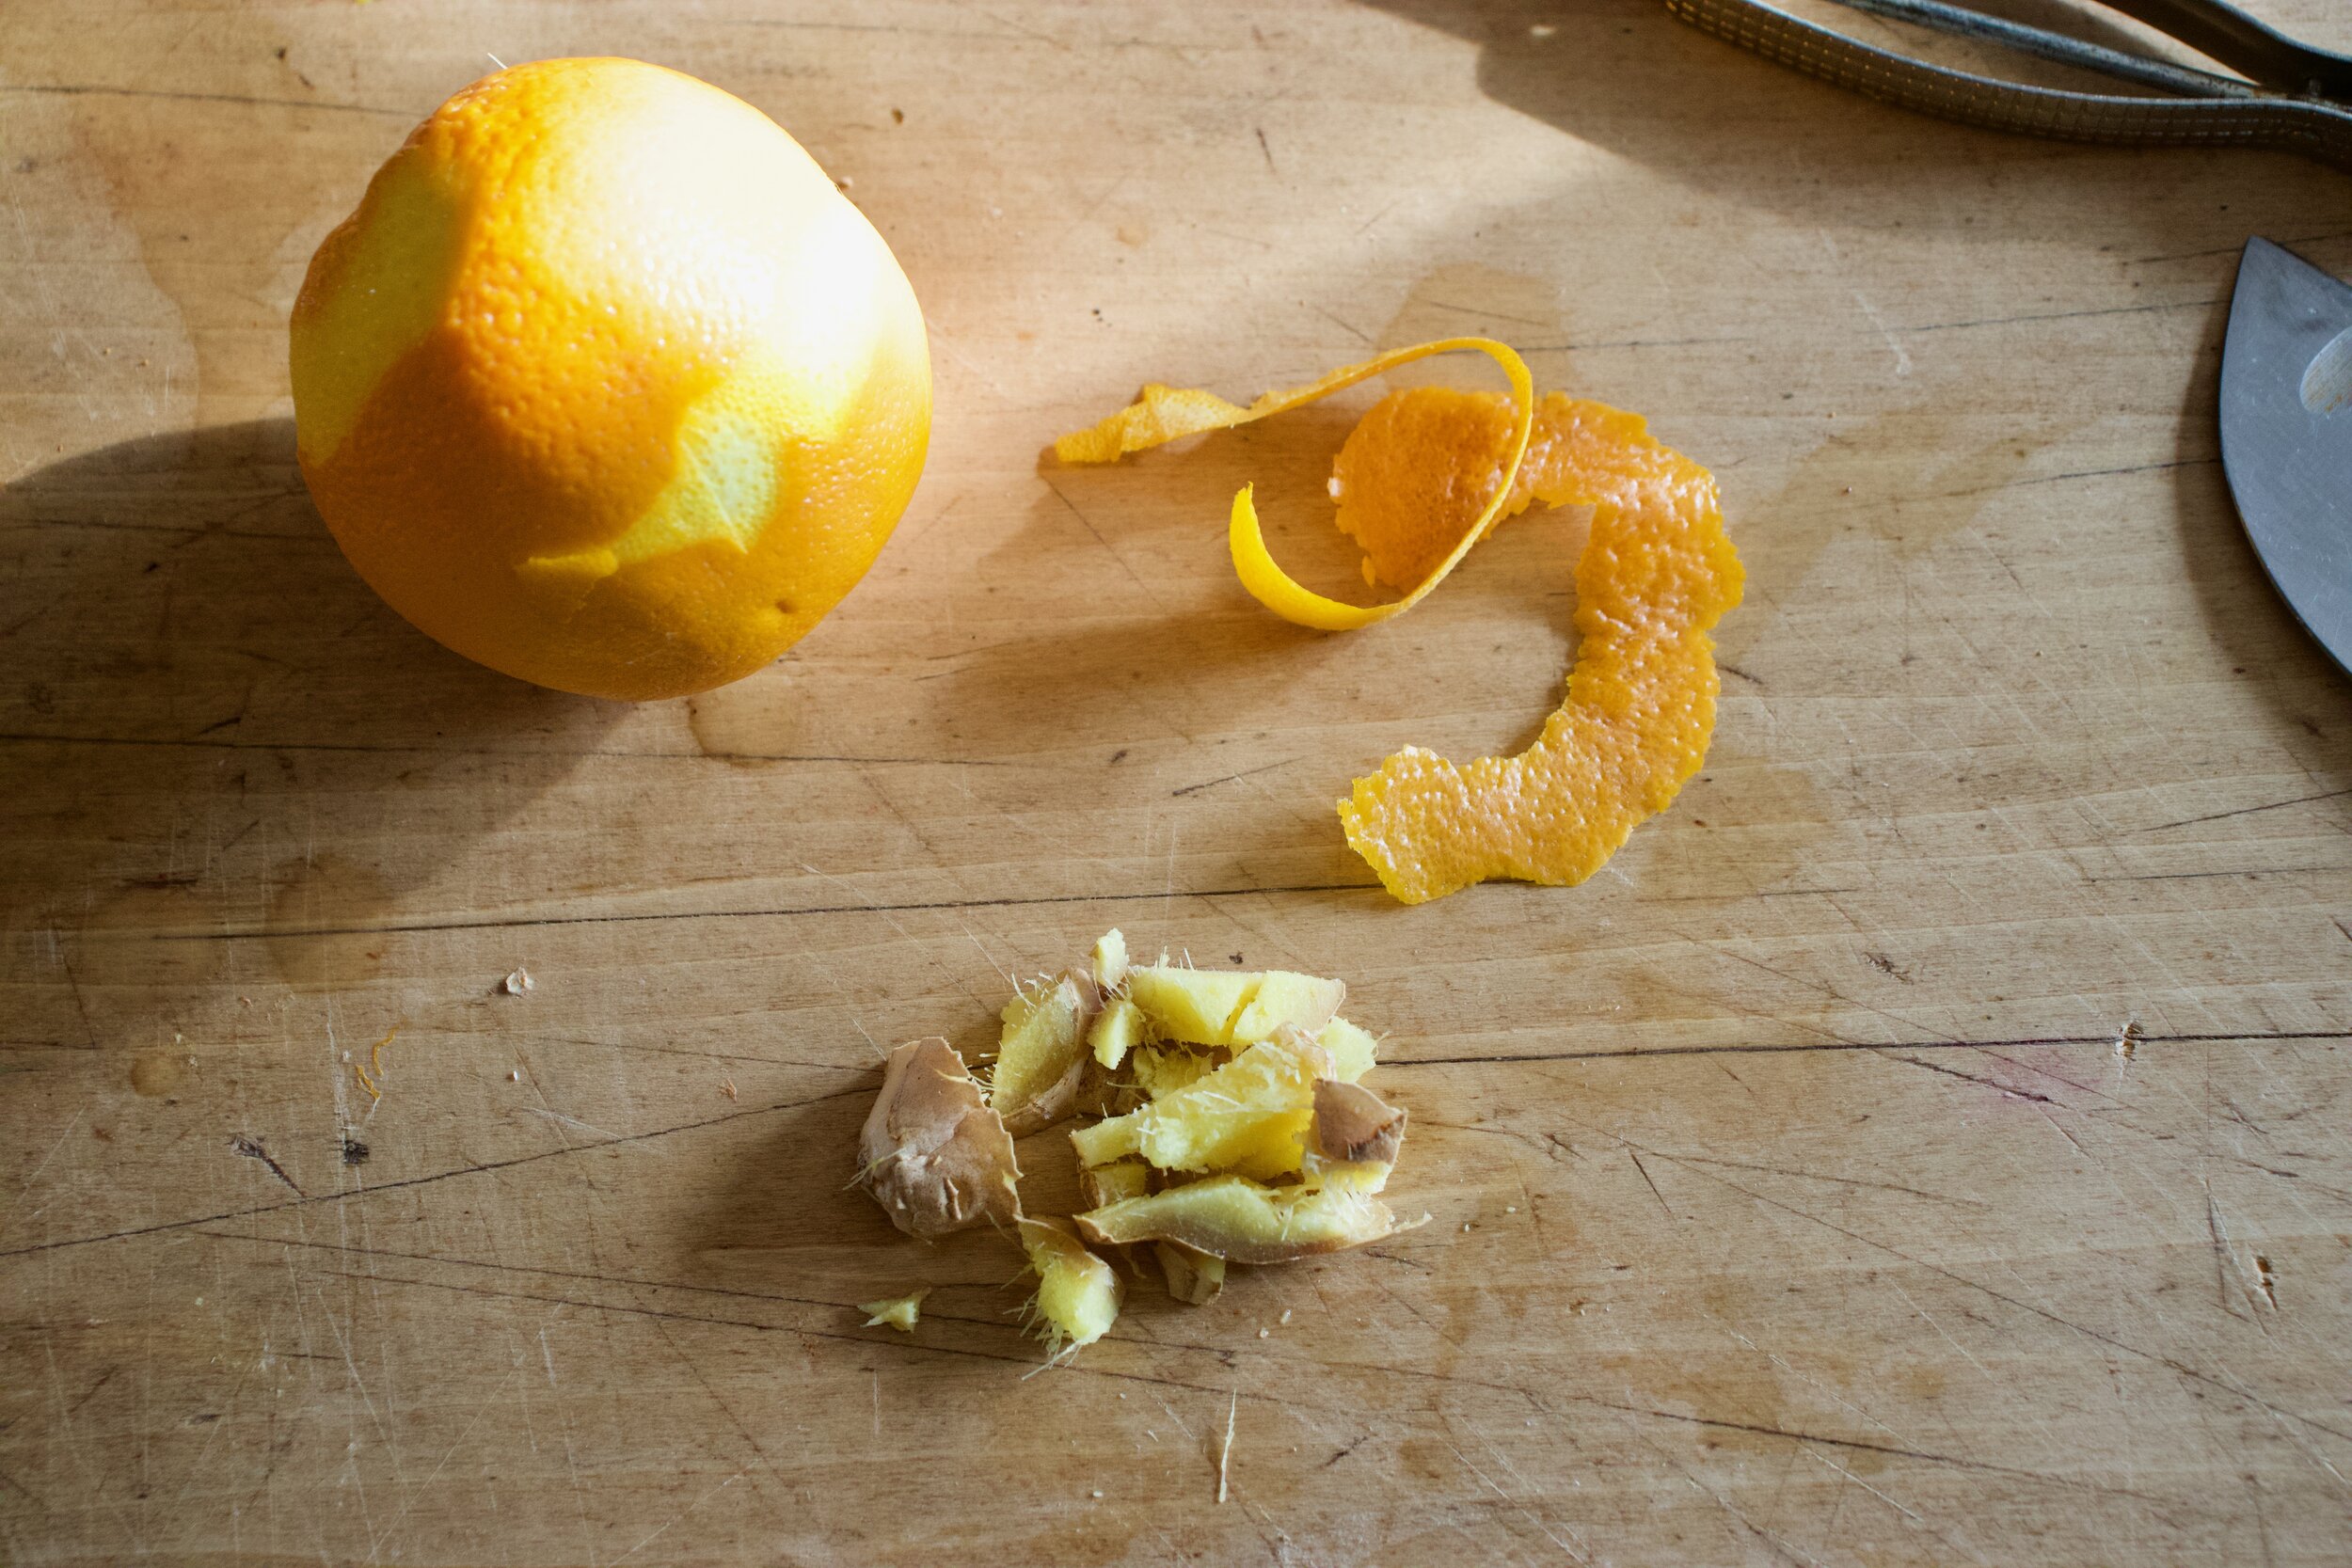
Cut up the fresh ginger into small chunks and take a few ribbons of peel from the orange.

After the fenugreek has had a 5 minute head start in the water, add in the ginger and orange and keep simmering for another 5 to 10 minutes. (longer time for stronger tea)
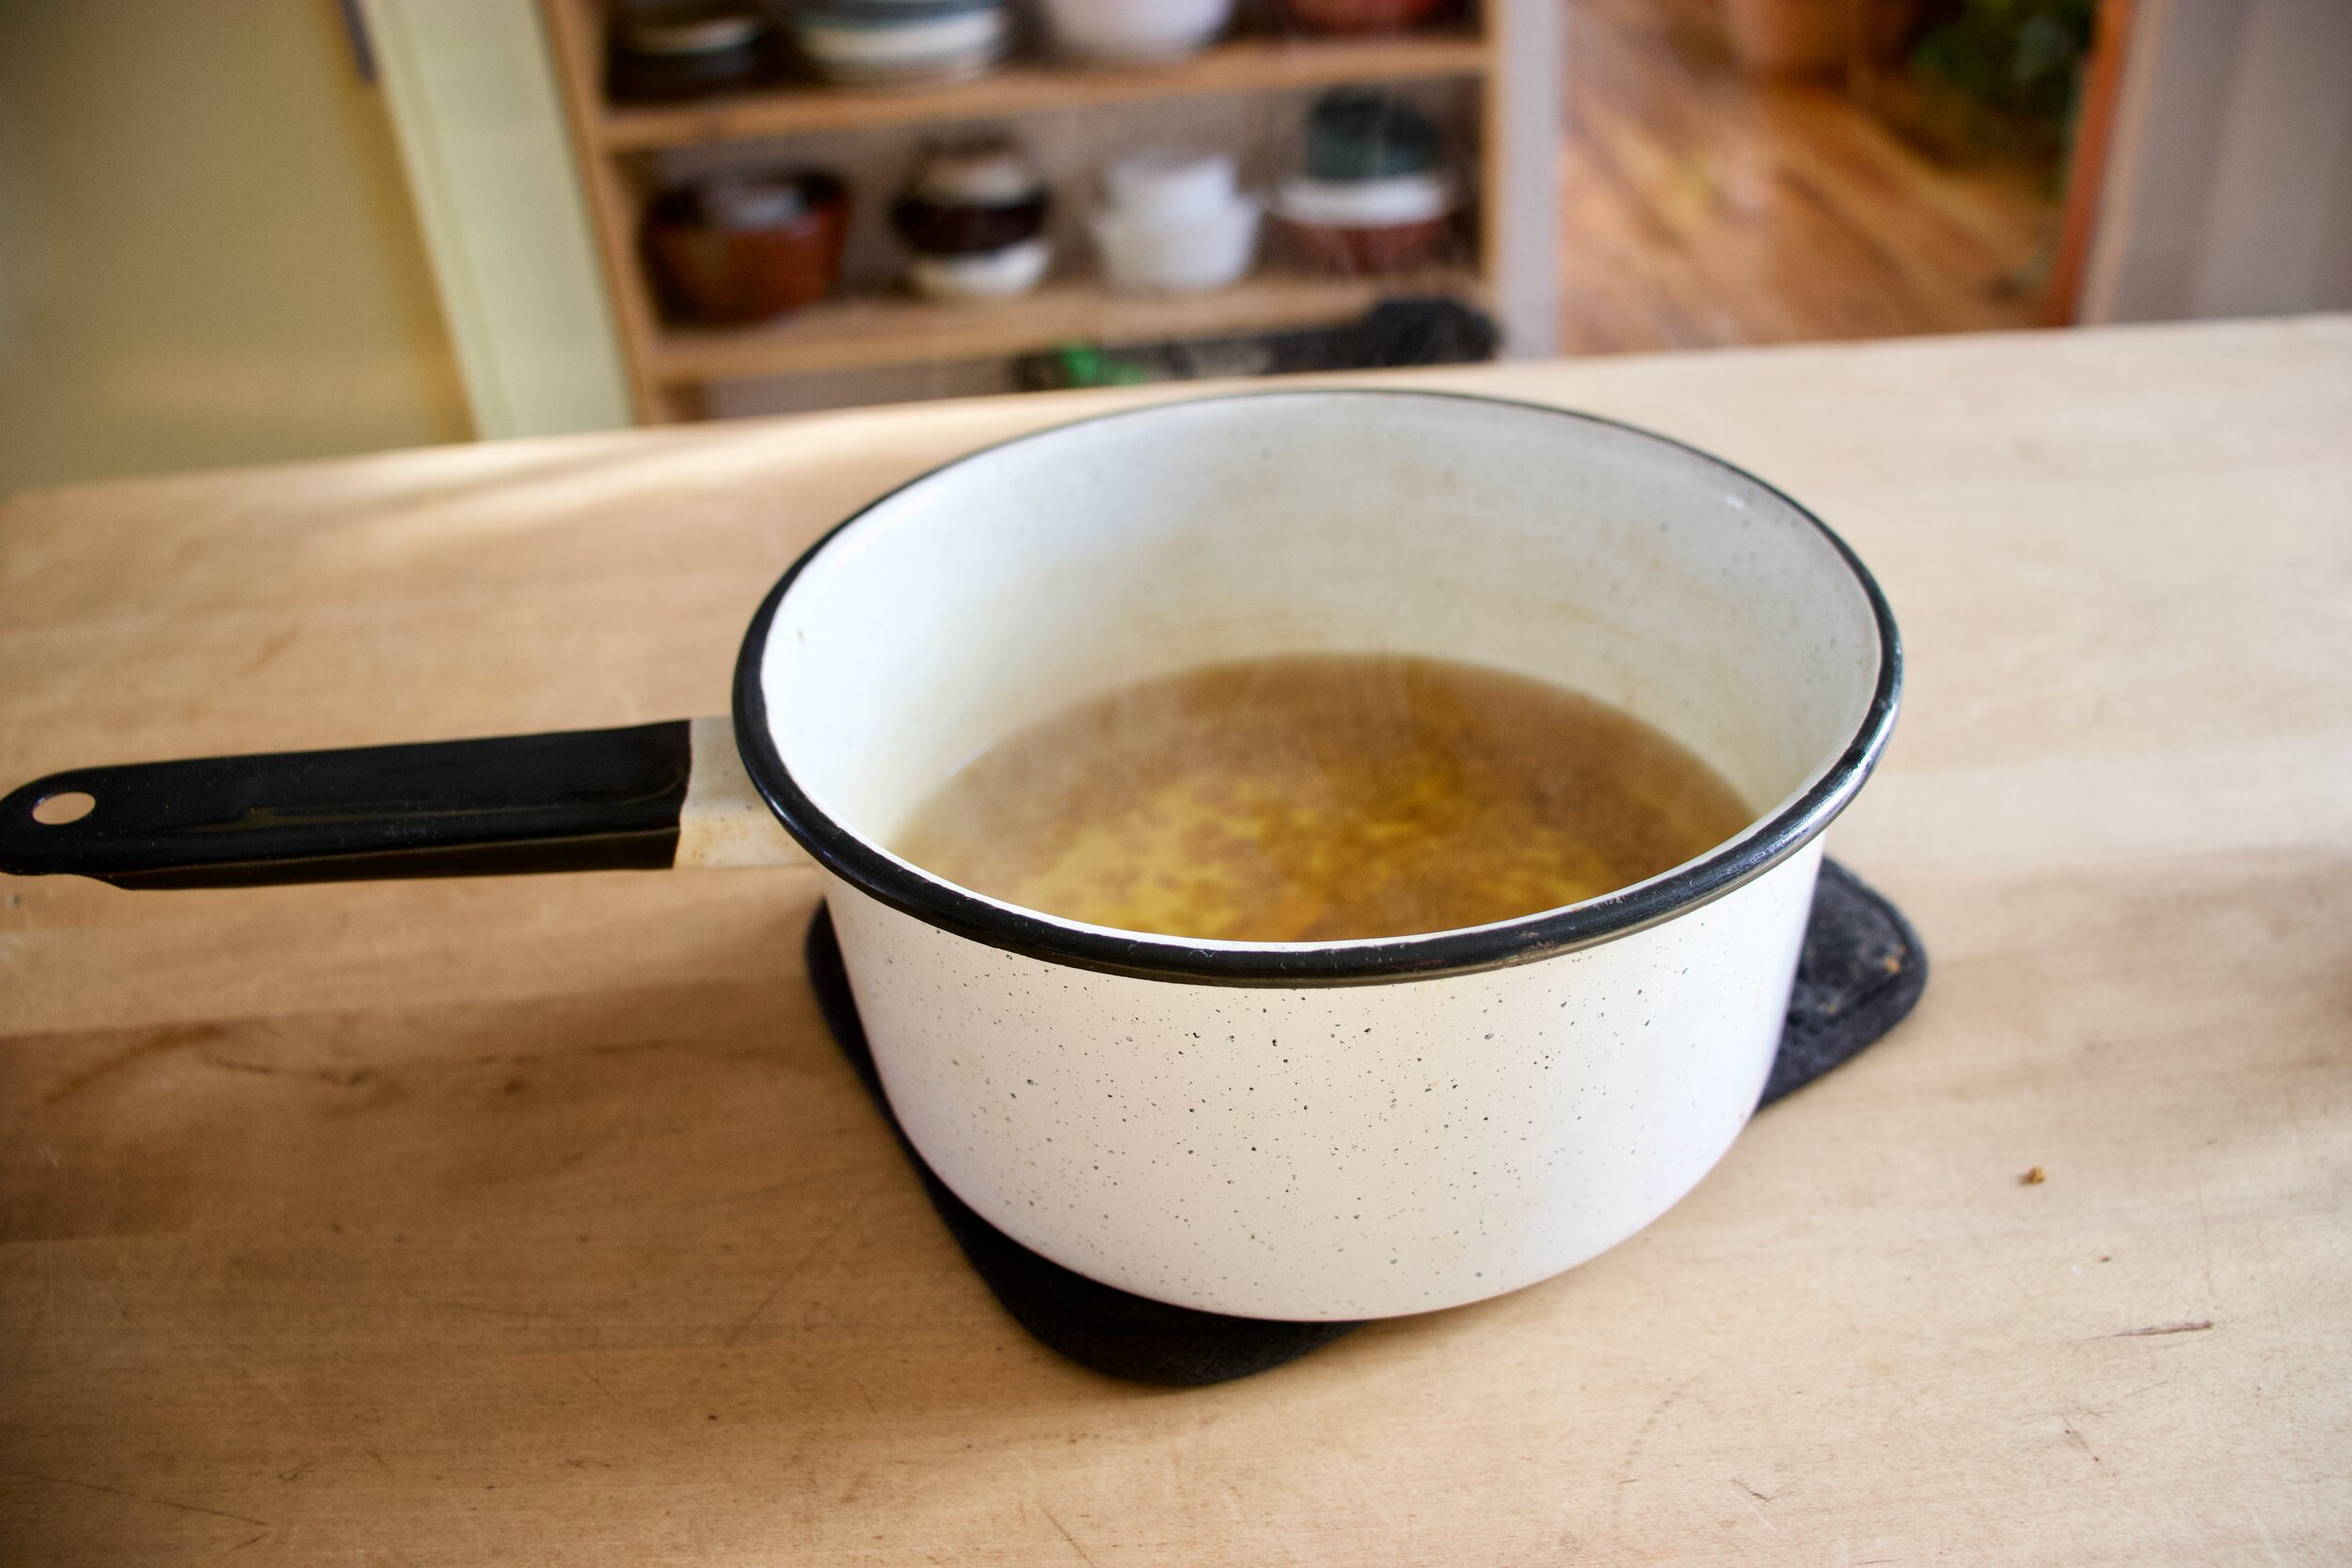
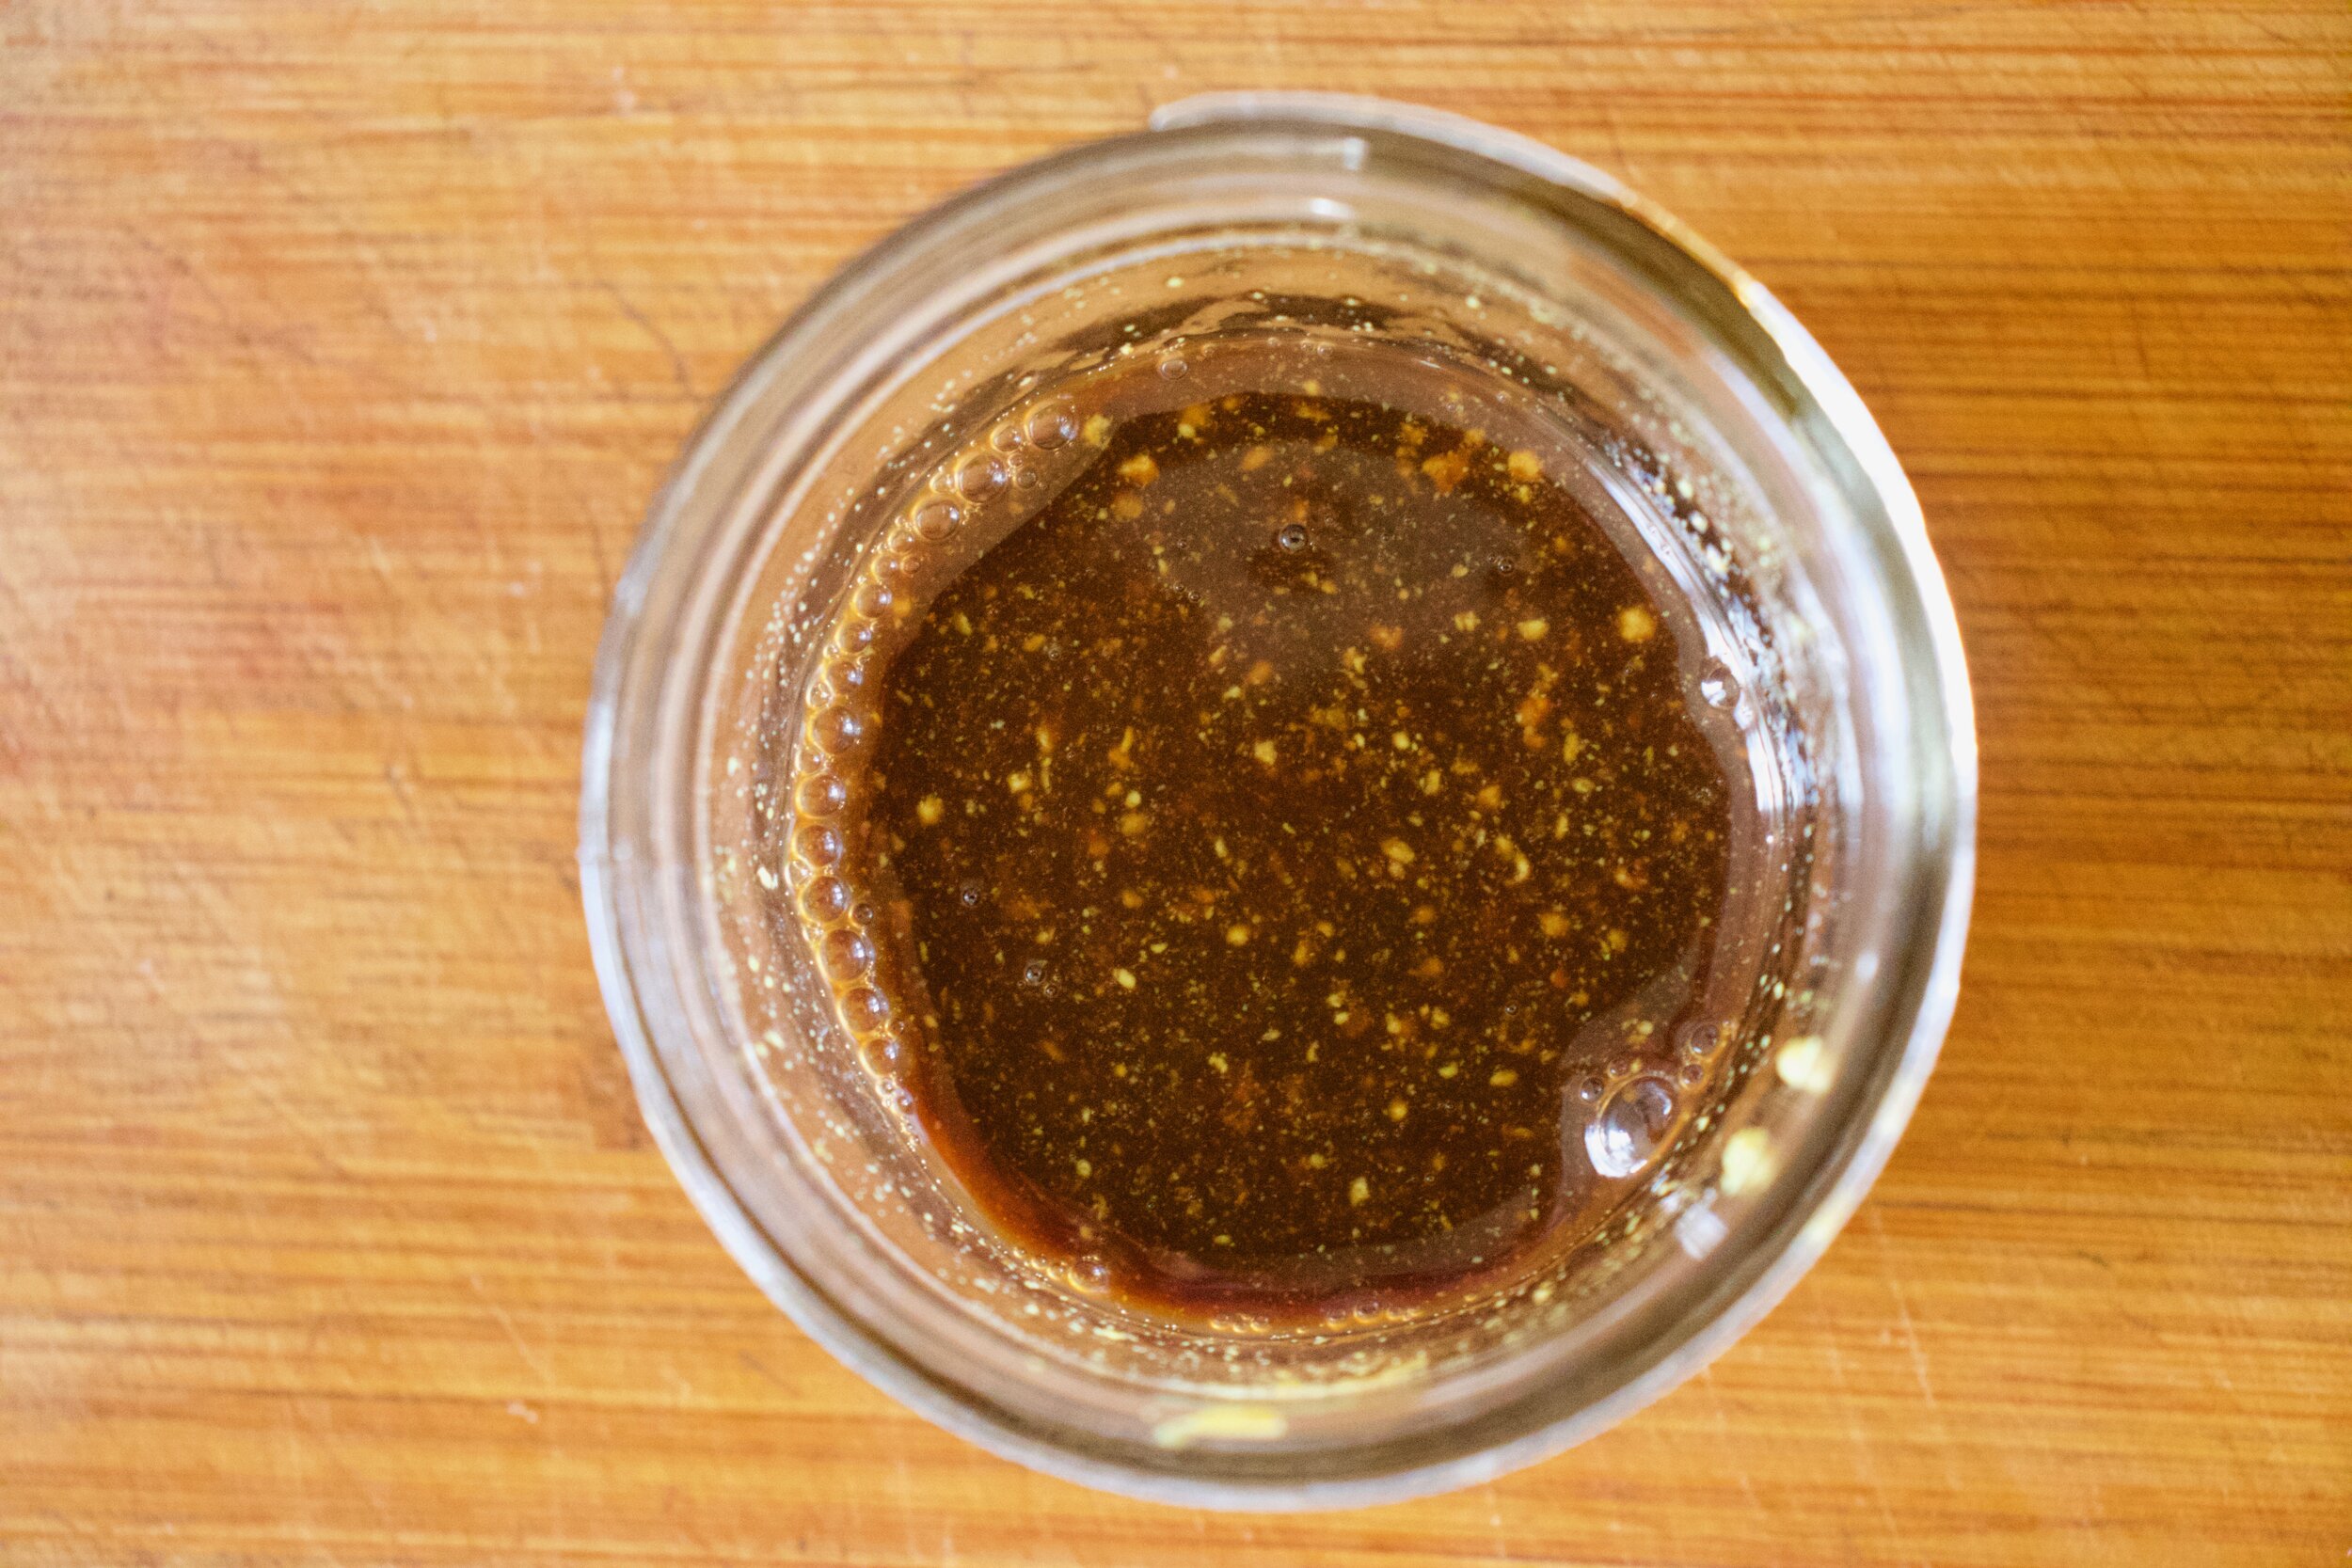
A tea decoction.

IMG_5211.jpg

Strain the tea into cups, squeeze in a little fresh orange juice, and go curl up o the couch.

It’s tea time.

-C


Fenugreek Ginger Tea

makes 2 cups of tea

  • 2 teaspoons fenugreek seeds

  • 1 inch chunk of fresh ginger

  • an orange (optional)

  • 4 cups water

Place water and fenugreek seeds in a pot and place on stove. Bring to a boil then turn heat down to simmer for about 5 minutes. Cut up ginger into small chunks and peel a few ribbons of orange zest and place into pot. Continue to simmer for another 5-10 minutes (longer for stronger tea). When you are ready to drink, strain into cups, squeeze in a little fresh orange juice, and drink.

In drinks Tags fenugreek, tea, ginger, maple, vegan, drink, decoction, medicinal, fresh, spices, winter
1 Comment

Poppy seed Crusted Apricot Jam Muffins

January 11, 2020 Colleen Stem
IMG_4908.jpg
IMG_4949.jpg
IMG_4917.jpg

Mid week, I was doing a little pantry cleaning/ inventorying of what I had and needed when I came upon not one, not two, or even three. No, six. SIX, jars of jam. And there are 2 that are already opened in the fridge. I don’t know why, but knowing that there was that much jam in the house made me a little uneasy. Six unopened jars is about 3 jars past my comfort zone. Sure there are so many things you can do with a jar of jam (jelly, preserves, and marmalade included) and now that I am thinking about it, is one of the reasons why I bought a few jars a while back. Then there was Christmas and I think we got at least two jars as gifts so it’s not all my fault, but still, that is just too many jars of jam. Right there I needed to get rid of at least one jar. So muffins. Jam muffins, with poppyseed crust because it’s pretty and nobody ever complains about poppy seeds, or at least they don’t until after they eat them and have poppy seeds stuck in their teeth all day. But that is just our mouths way of saving a little for later, am I right? HA

Anyway, a quick and simple muffin recipe for all of you people out there that might have a jar or two too many of jam in the fridge or pantry (I used apricot but any flavor(s) would work) and could use yourself a tasty little muffin situation. I mean who doesn’t want a tasty muffin?

To the muffins.

IMG_4798.jpg

The stuff. In the bowl is white and white whole wheat flour, baking powder and soda, and salt. Also have apricot jam, oil, almond milk, apple cider vinegar, and orange, and some poppy seeds.

Grab a zester and zest the orange into the bowl with all the dry stuff. Whisk to combine.

IMG_4805 2.jpg

Jam, oil, milk, and vinegar. All on top of dry. Whisk that up until just combined. No over mixing. You will get tough (not in a good way) muffins.

IMG_4812 2.jpg

Apricot muffin batter.

IMG_4816.jpg
IMG_4822.jpg

Scoop into well greased muffins tins then cover the tops with poppy seeds.

Ready for that hot oven.

IMG_4854.jpg

And out of the oven, looking all pretty like.

IMG_4894.jpg

Pop those muffins out of the tins and cool on a wire rack for a bit. And by all means, don’t wait until they are completely cool.

Now eat you a warm muffin and if they are mini, grab a few. You can’t just eat one mini muffin, that is just crazy.

-C


Poppy seed Crusted Apricot Jam Muffins

Make 12 normal size muffins or 24 mini muffins

  • 1 cup all purpose flour

  • 1 1/4 cups white whole wheat flour

  • 2 teaspoon baking powder

  • 1/2 teaspoon baking soda

  • 1/2 teaspoon salt

  • 1 cup plant milk

  • 1/3 cup neutral oil

  • 1 tablespoon apple cider vinegar

  • zest of an orange

  • 1 heaping cup apricot jam or preserves (can sub in any flavor you like)

  • 1/3 cup poppy seeds

Preheat oven to 350

In a large bowl whisk together the flours, salt, baking powder and soda, and the zest of the orange. Add in the oil, milk, jam, and vinegar and whisk until just incorporated. Scoop batter into well grease muffin pans (12 regular or 24 mini) then cover the tops with poppy seeds. Pop into hot oven and bake until risen and a tester comes out clean when one is poked. For mini muffins, check after 13 minutes, for normal muffins, after 16 minutes.

Once baked, remove from oven and pop out of pans when cool enough to handle. Place on a wire rack to cool completely or just start eating them warm.

Store left over muffins in an airtight container for 3-4 days at room temperature. They also freeze well.

In breakfast, Vegan, sweet breads and muffins, quick and easy, Dairy Free Tags Poppy seed Crusted Apricot Jam Muffins, Vegan, Vegan muffins, poppyseeds, jam, breakfast, fast, easy, no fuss, plant based, dairy free, home made, fresh, baker, recipe, delicious, king Arthur flour
2 Comments

Hummus Bowl with Roasted Veggies

November 30, 2019 Colleen Stem
IMG_4035 3.jpg

I eat so much hummus. Everyday, all day. Homemade, store bought. If there is hummus, I will be consuming it. But the thing is, I usually don’t eat more then a little at a time. (A little being like 1/2 a cup). And sure, sometimes that is just fine and enough, but other times, what I really want to do is garb a spoon and a bag of carrots and eat it all. And then I do.

But there is that little voice in the back of my head telling me that if someone where to catch me eating mounds of hummus, they would liken my eating behavior to that of someone eating a jar of mustard (Not going to lie, it happens sometimes) or of a bottle of ketchup (but I don’t eat ketchup) and that have a problem and shouldn’t being eating it like that. Because hummus, for some reason, has been put into the condiment category. It’s treated like a dip or a spread and that is fine and dandy to eat it as such, but hummus is so much more. It can, and should be treated more like a main component to a dish. So let us step outside of that box and eat it how we really want to eat it.

Hummus by the bowlful. I know right! It just makes so much sense to me. And now to you too. We need to stop stopping ourselves from just a scoop or two because really, that is just not enough. Nope, this is for real. A bowl, full of hummus, topped with roasted veggies because that is just more deliciousness. And we get to eat it all.

Life can be pretty great sometime, you know. HA

Now to the bowl of hummus!

IMG_3887.jpg

The stuff. We got chickpeas, tahini, a lemon, red wine vinegar, garlic, salt and pepper. And Veggies. Brussel Sprouts, broccoli, onion, Swiss chard, and kale.

IMG_3892.jpg
IMG_3931.jpg

Chop up the broccoli, the onion and half or quarter the Brussel sprouts. And separately, chop up the kale and chard.

Toss the chopped Brussels, broccoli and onion into a baking sheet or oven safe skillet and season with salt and pepper. IF you want to toss in a little oil, go for it. Then pop the veggies into a hot oven to roast away.

IMG_3939 2.jpg

Once the veggies are just about done to your liking, grab the chopped kale and chard and off to the veggies. Toss and roast for a few more minutes.

Done.

IMG_3904.jpg
IMG_3913.jpg

Hummus. Chickpeas with liquid, garlic, tahini, juice of lemon, and blend. Creamy smooth and delicious.

Dump that hummus into bowls.

And top with roasted veggies.

Would you look at that. Now all you need to to is dig in. Serve with extra lemon and black pepper. Grab your utensil of choice and eat.

-C


Hummus Bowl with Roasted Veggies

makes 2 servings if eating as a meal

  • 3 cups cooked chickpeas in liquid

  • A lemon

  • 1 tablespoon red wine vinegar

  • 2-3 cloves garlic

  • 1/4 cup tahini

  • salt and pepper

  • 10 or so Brussel sprouts

  • A small head of broccoli

  • A small onion

  • 5-6 kale and or Swiss chard leaves

Note. Use whatever veggies you want. Fresh or already prepared. All and any leftovers would be great.

Preheat oven to 450.

Cut Brussel sprouts in half, chop the onion into small pieces, and cut up the broccoli and toss onto a baking sheet or an oven safe skillet. Sprinkle with a little salt and pepper and stick into the oven to roast for about 20 ish minutes or until nice and roasted. Feel free to toss the veggies in a little oil if you want. Chop up the kale and chard into smaller pieces. Once veggies are just a few minutes from being cooked to you liking, remove from oven, and toss in the greens. Cook for another 5 or so minutes until those are nice and wilted. Remove veggies from oven.

While veggies are roasting, make hummus. Place chick peas with liquid, the juice of the lemon, vinegar, garlic, and tahini into a food processor. Blend until smooth and creamy. Taste and season with salt and pepper to your liking. Dump into a bowls.

And when you have hummus make and veggies roasted, its time to compile. Dump the hummus into 2 bowls. Dump half of the roasted veggies into each bowl.. Squeeze more lemon juice onto both then grab a fork.

Eat. And yes, lick bowl clean. No shame.

In beans, dinner, Gluten Free, grain free, pulses, quick and easy, Vegan, Vegetables Tags Hummus Bowl With Roasted Veggies, Hummus, roasted veggies, clean eating, plant based, grain free, gluten free, dairy free, vegan, vegetables, vegetarian, simple, easy, fast, pulses, beans, fresh, farm, protein, dinner, main dish, left overs
Comment

Warm Balsamic Delicata, onion, and Kale Salad

November 9, 2019 Colleen Stem

Let us talk about how winter squash is like one of the best foods ever. Seriously. Hardy, creamy, rich, and full of the nutty, sweet flavors of all the good things. How anyone says they don’t like winter squash is beyond me. I sometimes even feel like I put myself in danger of exploding when I am around enough cooked squash. I can eat and eat it until it’s gone, which is fine if it’s a serving or two, but when you roast up a 10 pound butternut, well, that is when the danger is real. I am getting better at holding back, but man, sometimes I just can't (or don’t want to?) help myself. ( You might also wonder why I cook 10 pounds of squash at a time. It’s because I will eat it all in a few days and I might as well cook a bunch at once, for efficiency sake.)

Now the delicata squah. If you haven’t had it before, stop what you are doing and go get one. You need to try it because it is amazing. Sweet, nutty, creamy. So good! And another good thing is that they are not giant, so you can buy one and eat the whole thing and not worry about overeating until you can’t move, unless that is the goal. In that case, just buy a bunch. HA.

Anyway, it’s getting to that time of year where salad is still great, it is just great warm. And with winter squash. Don’t you agree? So we cook up the squash, grab the kale and make one heck of a salad to eat all to your face. Because that is what will happen. You will make it , taste it, and not want to share it. It is too good to share. (Yes salads can be too good to share, so if you are planning on feeding others, plan accordingly)

To the salad!

The stuff. Kale, a delicata squash, red onion, some balsamic vinegar, a touch of maple, spicy brown mustard, a handful of toasted seeds, and salt and pepper.

Start with the squash. Cut it in half and scoop seeds from booth sides (these seeds are great roasted). After deseeded, cut both pieces into 1/4-1/2 inch thick rounds. And NO!!!!, do not peel the skin.

Grab the onion and cut into 1/4 inch rounds too.

Place the squash on a very lightly oiled baking sheet so the pieces are not overlapping each other. Then toss on the onion which is fine if it overlaps. Sprinkle with a pinch of salt and lots of cracked pepper and pop into a hot oven.

IMG_3494 2.jpg
IMG_3501.jpg

In the meantime, mix the dressing situation together. Mustard, maple, and balsamic in a jar, mix and done.

Chop the kale too. Into mouth sized pieces.

IMG_3515.jpg
IMG_3516 2.jpg

Once squash is cooked all nice and tender, remove pan from oven. Take all the kale and toss on top then take the dressing and drizzle it all over the kale. Pop the pan back into the oven for a minutes or two, just until the kale starts to ever so slightly wilt.

IMG_3536.jpg

Pull the pan back out and give it a good toss.

IMG_3546.jpg

Dump it all into a big bowl, toss in the toasted seeds, and call it. Now grab a fork and start eating.

-C


Warm Balsamic Delicata, Onion, and Kale Salad

Can be a main dish for 1 or a side for a few

  • 1 delicata squash

  • 1 bunch of kale (around 3/4 pound)

  • 1 smallish red onion

  • 3 tablespoons balsamic vinegar

  • 1 -2 teaspoons maple syrup (more for a slightly sweeter, maple-y flavor)

  • 2 tablespoons brown or dijon mustard

  • 1/4 cup toasted seeds of choice (I used pumpkin and sunflower)

Preheat oven to 400

Cut delicata squash in half and scoop out all the seeds (you can save seeds to toast up later if you want), then slice the squash into 1/4 - 1/2 inch thick rounds. Grab onion and cut into thin slices. Take onion and squash and place them onto a very lightly oiled baking sheet and sprinkle with salt and pepper. Don’t let the squash overlap, but it is fine for the onion to overlap the squash and itself. Pop the pan into the oven and bake until the squash starts to brown and is fork tender, which should take about 10-15 minutes.

In the meantime, chop kale into small mouth sized pieces and set aside. And mix the balsamic, mustard, and maple together to create the dressing.

Once the squash and onions are cooked, toss the kale onto the pan and drizzle the whole thing with the balsamic mixture. Toss it all around and pop pan back into oven for another minute or two, just to let kale get a touch wilted.

Remove pan from oven, dump everything from pan onto a plate, and toss in the toasted seeds.

Grab a fork. Eat.

In dinner, Dressing, salad, seeds, side dish, Vegan, Vegetables, winter, winter squash Tags Warm Balsamic Delicata, onion, and Kale Salad, Winter Squash, Delicata Squash, salad, seeds, vegan, gluten free, grain free, plant based, healthy, dinner, thanksgiving, holiday, winter salad, warm salad, fresh, esay, dairy free, oil free
1 Comment

Yeasted Appley Applesauce Bread

September 28, 2019 Colleen Stem
IMG_2584.jpg
IMG_2535.jpg

It is exactly that time of year. Apples galore, cool days in need of a little extra warm, meaning a warm oven is welcome, if not needed. It’s the best time of year, or at least one of them.

And so I bake bread. Sometimes just a roll, and sometime a loaf, almost everyday. I love bread baking because, well just because. Plus it’s what people want to eat and will always eat because I guess bread=love. Makes sense to me.

This bread was made from a small dip in the 2 gallons of applesauce I made the night before. (We had sooooo many apples). The mr isn’t the biggest fan of applesauce, says he would rather eat a fresh apple. I kind of get it, but dude, warm, chunky, slightly cinnamon-y applesauce… I mean, that is happiness right there. Right? Anyway, I am trying not to eat all the applesauce to my face by myself at once (it has been a challenge) and plus I needed to make the mr some bread, so I figured what the hell. I’ll just use applesauce as my liquid in the bread. And so I did and that is that and now that mr really like applesacue (when it is baked into bread)

This bread is a basic sandwich type bread. The apple taste is there but not overwhelming so it can be used for sandwiches of all kinds, toast, just eating with a smear od something, or not. Just a overall good loaf of bread with a little extra from the apple. And braided because I was feeling classy. It’s amazing what at little braiding of bread dough can do for your self esteem. Made me feel like I was the coolest person in the world. Haha!

Now to the bread.

IMG_2420.jpg

The stuff. A few apples, regular all purpose and white whole wheat flour, salt, applesauce, maple syrup, yeast, and warm water.

First, shred some apple.

IMG_2437.jpg
IMG_2444.jpg
IMG_2448.jpg
IMG_2449.jpg

Applesauce, shredded apple, maple, yeast, and a little water get mix up and let to sit for a few minutes to activate yeast. Then the salt gets mixed in, along with all the flour. Stir until dough forms. Dough should be slightly sticky, ut not wet. IF wet, add a handful more flour. To dry, add more water.

Dump the dough onto a floured surface, cover your hands in flour, and knead dough for about 5 or so minutes, adding more flour as needed to keep dough from sticking, until the dough is a nice and cohesive texture.

Nice looking dough. Now roll dough into a ball.

IMG_2467.jpg
IMG_2470.jpg

Place dough in a clean wet or oiled bowl and cover with a damp cloth for one to one and a half hours or until dough doubles in size.

Dump dough onto floured surface.

Cut dough into 3 equal pieces and roll out into long longs.

IMG_2483.jpg

Braid logs together. You can stop here bake it this way or…

After placing it on a parchment lined baking sheet, tuck the ends of the braids underneath each other and make it like this. Either way. And once you have the dough on the baking sheet, brush a little water or plant milk on top and let dough rest for 15 minutes of so while the oven preheats.

IMG_2497.jpg
IMG_2506.jpg

Before oven and after oven. Classy, right?

Then for shin and soft crust, rub warm loaf with some plant butter.

And for the hard part. Let it cool before slicing it. Ok sure, a little warm is fine, but wait at least 20 minutes (an hour would be best) and then eat you some bread.

Eat you some bread. That’s a t-shirt right there.

Happy Fall friends!

-C


Yeasted Appley Applesauce Bread

makes pretty one loaf

  • 2 cups all purpose flour

  • 1 1/2 cups white whole wheat flour plus more for kneading

  • 1 cup unsweetened room temperature applesauce

  • 1 large or 2 small apples ( about 2/3 cup shredded apple)

  • 1/4- 1/2 cup warm water

  • 1 tablespoon maple syrup or honey

  • 2 teaspoons active yeast

  • 1 teaspoon salt

  • 1 tablespoon or so plant milk or water

  • 1 tablespoon plant based butter (optional for rubbing on finished bread)

Grab the apples and shred them until you have 2/3 cup shredded apple. In a large bowl, mix together the applesauce, shredded apples, yeast, 1/4 cup warm water, and sweetener.and let yeast activate for a few minutes. Add in salt, the all purpose flour and the 1 1/2 cups white wheat flour. Stir together until dough forms. The dough should be a little bit sticky so if the dough seems to dry, add in 1/4 cup more warm water. If it seems really wet, add in a handful more flour.

Dump dough out onto a well floured surface and knead for about 5 minutes adding a little bit of flour to the counter as needed to prevent it from sticking. Once dough is cohesive in texture, roll into a ball and place into a clean wet or oiled bowl. Cover with a damp towel and allow the dough to double in size. Should take between an hour and an hour and a half.

Once dough doubles in size preheat oven to 400

Dump risen dough back onto a well flour counter. Cut the dough into 3 equal sizes and roll each piece into long logs about 20 inches or so long. Place each roll next to each other and braid. Grab a baking sheet and line with a piece of parchment paper. Sprinkle with a bit of flour and place braided dough onto sheet, either as a braid or if you want, like I did, wrap the braid around itself into a rounded braid situation. Tuck ends into each other and under the loaf. Brush the top gently with a little plant milk or water and let rest for about another 15 minutes or so.

After the rest, place dough into preheated oven. Bake for 35-45 minutes (Less if left long braid, more if wrapped braid) or until the top is a deep golden brown and when tapped on the bottom, it sounds hollow. Also can use an insta read thermometer and check temperature. You want it to reach 190 degrees.

Once bread is baked, remove from oven. If you want the top to stay a little crispy, don’t do anything but let it cool. For a softer, shinny crust, rub the top while it is still warm with some plant based butter.

Let bread cool completely before cutting.

Then eat it like you would eat bread. Any and every way.

Store cooled loaf in a airtight bag on counter for 2-3 days but if not eating that fast, slice and place into freezer. That way you can pull out individual pieces and toast as you want.

In bread, Dairy Free, fall, fruit, Vegan Tags Yeasted Appley Applesauce Bread, Yeasted Bread, sandwich bread, bread, whole wheat bread, King Arthur flour, yeasted, plant based, vegan, apple, applesauce, fresh, baked, fall, simple, easy
Comment
← Newer Posts Older Posts →
 

https://thelovelycrazy.squarespace.com/config#/|/about/

Me. Food Maker.Food eater. Woo HOO!

STEM+NODE  SMALL BATCH AND ONE OF A KIND POTTERY

stem+node ceramics


____________________

Subscribe

GET NEW POSTS IN YO EMAIL

You are AWESOME!!!


@thelovelycrazy 2014-2021